
Likes
Comments
Share


@DogDoctorOfficial
Follow
so waiting for the final streach so that i can mass defoliate hehehe
i think around day 23/24 F i will do it lets see hehehehe
Appart from that they are streaching and growing as they should 😜😍😁
Day 23 F defoliation day done 😝 let’s see how they react 🙏
The smells are amazing in all of them, SG is finally waiking up for life 🤦🤨😈
Day 24 F and they seems Happy with yesterday’s haircut 😄
Loving this LED Tec 😍
Girls:
1-BlueBerry
2-Alaskan Purple
3-Poyote Gorilla
4-Hindu Kush
5-Whitw Mango
6-Super Glue
7-Badazz Cookies
8-S.A.D.
tent -8x8 / 2.4x2.4 but i'm only using 1/2 so 4x4 / 1.2x1.2
Led - Lumatek 465w Compact Pro at 100%
All i Grow is medicine for myself,
Stay safe, stay tuned and B Happy
Peace out
D


Processing
Likes
10
Share


@CanadianFillmore
Follow
Start of week 2, day 8 of flowering. The plants are sagging a bit in these photos, as I took them just before feeding, except for the pics in the grow room, they are just after feeding. So far, they all look good and healthy, a few leaves are showing some small deficiency signs, hopefully that will go away as additional nutrients are added over the grow cycle.


Likes
508
Share


@Legendaryseedthumb
Follow
Day 23: had to remove some leaves! The stems had some insane growth yesterday so the leaves was growing in the tent😁
Just a picture at the final product of sugarpunch, one phenotype out of 5x!
Smells amazing and taste so sweet just like sugar. very strong head high.
Mars hydro TS-1000
Increase Yield & Crop Quality in Led Grow
Newest SMD Led technology provides the highest Par/Lumen output, makes you get 30% higher yield compare old led lights, can get up to 2.5g/watt yield.
Only 150 watts true output so you don't have to check your bill every month. 342 pcs LEDs, more scientifically and energy-efficient! Perfect for 3'x3' (100x100cm) veg stage and 2'x2' (60x60cm) bloom stage
https://www.instagram.com/marshydro_aliexpress2/
Likes
3
Share


@Growrnotashowr
Follow
Harvested two of the plants for fresh frozen bubble hash. Total for the hash wash is 900 grams of starting material so I should get about 30 grams of high quality rosin. The third and biggest plant has yet to be weighed but will update once the dry?cure is finished


Processing
Likes
7
Share


@thephalanx420
Follow
Both are doing great! Finally got the temperature and humidity corrected enough that the plants are stressing less, and i also increased the lights back to 200W after 5 days. I think they're large enough now to handle more light - going to increase the light slowly over the next few weeks as well.
No other issues - haven't had to add much nutrient solution or anything really... ph is super stable in both reservoirs as well.
All that being said, I know the reality is that i'm going to run into a bunch of issues now that i've said i haven't yet.

Likes
56
Share


@Ganjagrandaddy
Follow
Day 35: Good say growmies.
I hope we are all well in these odd times.
The ladies have been very busy this week with plenty of action on the L.S.T training and constant resetting of the stakes to hold them down. Rhe only girl that won't be trained is the sweet cheese. I am curious to see how she does on her own as she has lots of growth tips poking out all over main. She is still low to the pots surface and only about 10 inches at the moment. Most of that has come about from this last week. She is still only displaying her sex pistils ( no not the band!) , at present but is approx 1 week behind the other plants.
Gorilla Girl #3 is doing well and not showing any issues. I did snap her main at the 4th node while doing the video but am hoping she can offer some repair time to the clean snap with my quick repair job..( ooops). Thankfully it is where she would have been topped anyway so the two nodes have now got a chance to flourish more.
Gorilla Girl #2 is still the biggest of the group and has been pushing all her stakes out with her strength. She is in flower now without doubt but only by a few days. I am hoping the stretch period will boost her height now too. she has a lot of growth tips to become buds too.
Gorilla Girl #1 is chasing the #2 for top dog and looks good. she has also just about started to show flowers properly now too. I expect she will put a lot more growth on before she settles into her mid flowering so I have high hopes for this lady.
Gorilla Girl #4 Still the smallest of the bunch but I have given her a nice bend to help get her lower limbs active and wanting..
The whole group had a full watering to runoff a few days ago and so far , are more than happy to be left alone a few more days.
Be safe and well


Likes
40
Share


@Dingle
Follow
Really happy with the amount of growth this week both girls seem happy with the setup so far.
I have had a few signs of nutrient burn on both plants but thankfully I don’t think it’s too bad. I am not sure if I have maybe feed them too quickly or too much this week.🤔 I tested the run off for the first time and got a reading of 400ppm so I need to figure that out for the next feed 😐
Not much else to report this week.
✌️🙃

Likes
12
Share


@CANNASIM
Follow
Hello, long time, no grow. I’m trilled to start on a new grow project, i’m away from growing a long time, but my love for ot was always present, i miss it a lot so i have got a few strains from Fastbuds to test and come back with a minimal setup.
I have got the Fastberry, Bluedream, and the 1:20 cbd, they have sent in the Banana Purple punch
Ok, so what is a minimal setup? For this grow i have choose to grow in my balcony, it is fairly big and i gave good sunlight, we are in summer now, so temps are high, swinging a lot. It is raining often as well so I did not need to water much.
For the nutrients i will go organic i think, in my substrate i have about 30% warm castings, so i’m good for till mid grow length +-, i might add a bit of nutrients in 30 days mark.
The objective of this experiment is to use as little as possible, 360 degrees.
For the germination process i have used a mixed process method, that i have learned from Fastbuds and i have loved it, 24h in a glass of filtered water, paper towel for about 24h -48h and then the Floraflex gremination pellets, i have tested on the jiffy and worked fine as well. Cool about this method, if you are more on the anxious side or like to control more the process this is the way, you can follow the hole process and see the development in parts. I will add images later on, for this breakdown.
Well that is it, lets hope for a cool, safe journey for this girls.

Likes
13
Share


@PatriciaGant
Follow
next week of flowering she is so huge no ideaa how this is going to end. thx for watching by have a nice day and an even better grow. see ya around.
Likes
8
Share
@Growverse420
Follow
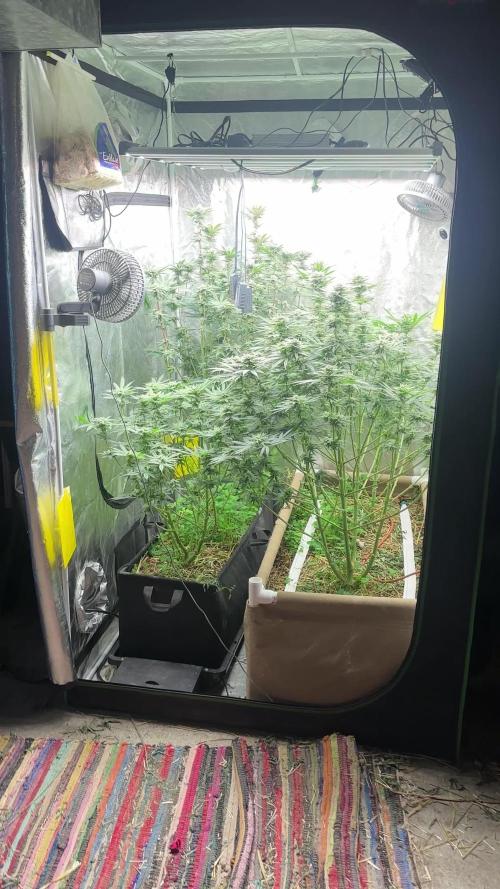
Week 6 of flower is done and the 4x4 is progressing nicely! The buds are all starting to fatten up, I'm especially loving Hella Jelly #1, especially the candy terps she's giving off. The Vanilla Frosting is the other big player in the tent, with the second Hella Jelly a bit smaller than the other two. The Jelly Donutz will be the last to be harvested, as she is developing her flowers more slowly. This tent will be a staggered harvest when it comes to it. These plants have been so easy to grow this run. The Autopot Tray2Grow living soil bed bed has been solid throughout the run, and this past week I installed Blumat Blusoak tape for the 2x4 Grassroots bed, which, up until this point, I have been hand watering. It always amazes me how automatic watering eliminates like 90% of the tent work. It is such a game changer, and the plants love it even more than hand watering because they drink how much they want when they want it!
Hella Jelly is supposed to be a fast finisher (45 days sometimes!), so after this next week I will begin checking trichomes. My guess is another 2-3 weeks at least. The trichomes will guide me! Happy growing, growmies! 😎

Likes
13
Share


@Felix_DeSouza
Follow
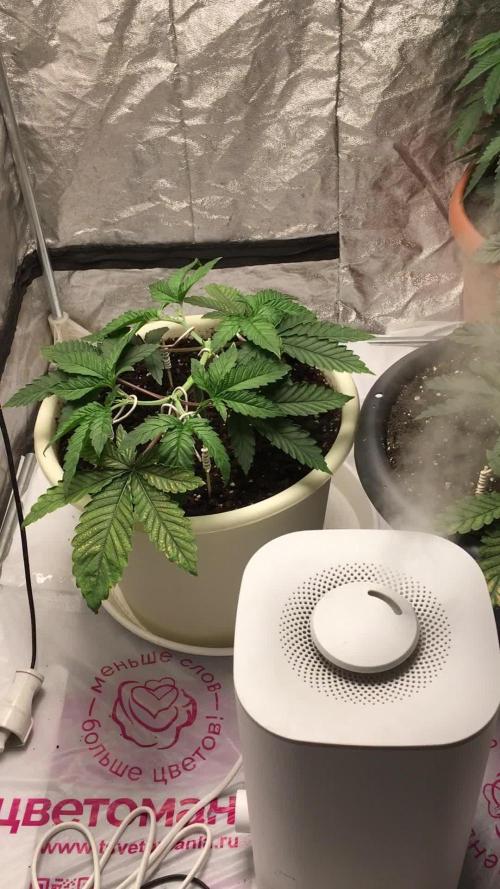
Подверг серьезному стрессу, LST+defoliation, надо же опыта набираться 😉
На листьях коричневые пятна, полил чистой водой с pH 6.3

Likes
5
Share


@BudBeat
Follow
Ab geht’s in die Blütephase! Die Kabul erweist sich meines Erachtens bisher pflegeleicht. Außer das ich sie am Anfang zur Seite gebogen habe, entwickelt sie sich kräftig. Die Seitentriebe haben sich ihren Platz ergattert und wachsen kräftig mit. Zur besseren Belüftung habe ich im unteren Bereich ein wenig Blätter und kleine Triebe entfernt. Nix spannendes… Ich beobachte jetzt ihren Stretch und werde dann nochmal in ca. zwei Wochen etwas radikaler dran gehen. 😎

Likes
6
Share

@Rare_Terps_5280
Follow
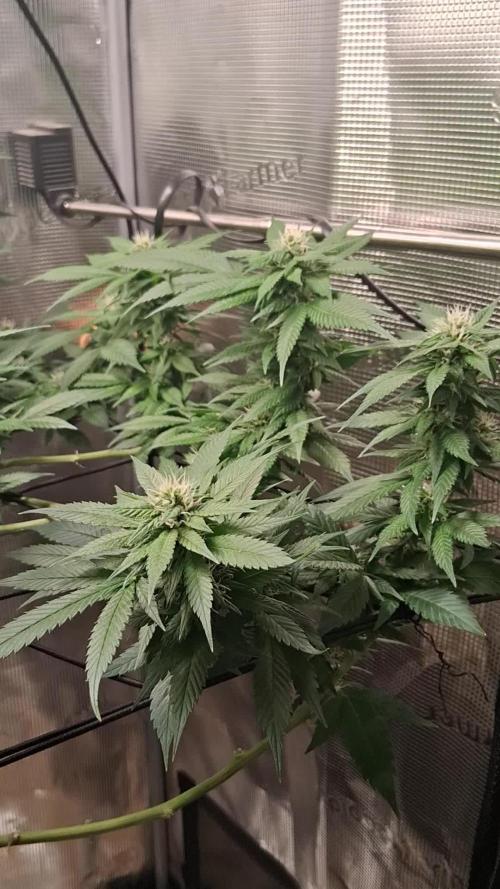
She's really packing on the weight now, lots of tricomes developing, and getting that great earthy aroma goin, got her on bud candy and overdrive, let's she how fat she can get!

Likes
26
Share


@Brujha77
Follow
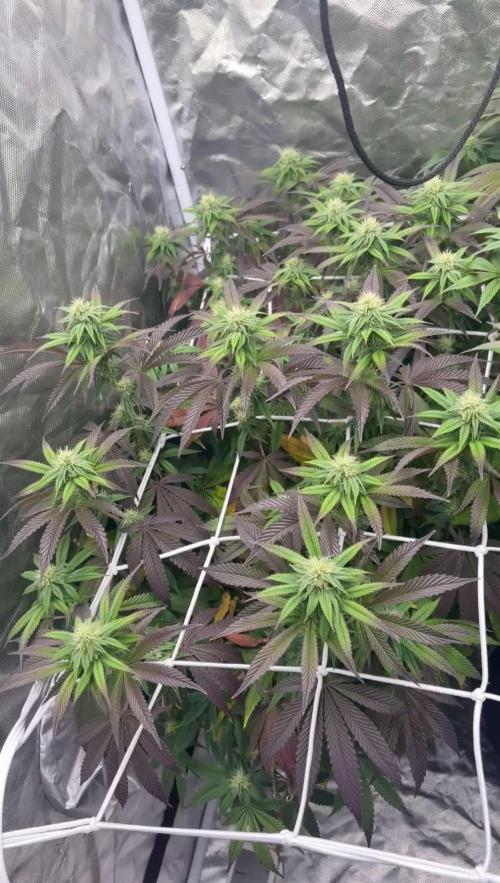
Start in to week 7
As usual, she lost again some Fanleaf's 😏
She's getting really sticky and she's developing a stronger fruity smell in the last 2 days👍
Trying out a CO2 Bag....
And she gets another watering with 2l with 1g/l BioEnhancer Day 78.
Day83
Trichome's are most milky and some few Ember at the Top's. Still few clear
I think she get another Week and she will be finish👍


