


Processing
Likes
Comments
Share


Likes
283
Share


@love_2_grow
Follow
FD29 - Lmao. Similar to last week I (almost) forgot to snap some pics. When I finally remembered it, the lights were in sunset mode and almost turned off. Hence the weird color in the terrible pics. I will upload better pics tomorrow.
FD30 - Pics!
FD35 - We're at the end of yet another week. It's been uneventful, as it mostly is in flower. I prefer veg, while flower can be a bit ZzzZzzzt at times, where it's mostly a waiting game.
However, in my lazy approach, I missed that the second girl stretched lately and got close to the light.
I noticed that her leaves were taco-ing in, and I measured 1300 PPFD in the center. Holy smokes, Batman!
I raised the light to around 1000, and I will observe her in the next few days.

Likes
17
Share


@DETOX
Follow
12ª semana día 82 - 8ª semana de floración día 58.
Llegamos a su fin, ahora a secar y curar.
Es todo, nos vemos en la próxima.
Felices humos.

Likes
15
Share


@Springbokke
Follow
Добрый вечер
Сегодня ровно 2 недели как я перевел режим света 12/12 и 75 день жизни. Рост очень мощный, думаю он продолжится еще недели 2-3. Все вроде идет по плану, никаких замечаний не вижу. На 8 день она показала свой пол, а сегодня уже можно сказать что она цветет. Я всегда первые две недели считаю предцвет, и только начиная с третей недели начинаю считать цвет и в этот раз не будет исключений. На 12 день заменил лампу 5000К на две 200вт лампы со спектром светимости 3000К и 3500К. Сейчас в сумме у меня выходит 600вт, по бокам стоят со спектром 3500К и посередине 3000К. Все три лампы стоят на мощности в 75%.
Полил ( 872ppm )-3л Bud Ignitor - 2мл/л;
Влажность 44% - 54%; температура 21c - 24c
8-й день предцвета
Полил ( 698ppm )-3л
Влажность 40% - 52%; температура 21c - 25c
9-й день предцвета
Полил ( 944ppm )-3л Cal-mag Xtra - 0,5мл/л; Bud Candy - 2мл/л;
Влажность 43% - 51%; температура 21c - 25c
10-й день предцвета
Полил ( 958ppm )-3л
Влажность 43% - 52%; температура 21c - 24c
11-й день предцвета
Полил ( 802ppm )-3л Bud Ignitor - 2мл/л;
Влажность 40% - 51%; температура 20c - 24c
12-й день предцвета
Полил ( 732ppm )-3л Piranha - 2мл/л; VooDoo Juice - 2мл/л; Tarantula - 2мл/л
Влажность 38% - 51%; температура 20c - 26c
13-й день предцвета
Полил 3л
Влажность 36% - 49%; температура 21c - 27c
14-й день предцвета

Likes
116
Share


@AsNoriu
Follow
Day 65 since seed touched soil. Big disaster in garden !!! I added epsom salt and didnt phed , was in a rush to overtime, they dranked in 3 days , that was unexpected ....
Twins got all those nice new roots dead now. See no big damage in canopy, but notice discoloration, leaves went to darker blue green shade , were way more healthy bright green. Beeing so close to light it could be only feeding factor influence ...
Running out of space. Mars Hydro TSL2000 is doing great job, two plants are like 5 cm away , still no signs of burn.
Try to keep humidity in 65-70 % range, temps around 22, nights 20. All works.
Will top up this week with next watering, want to give one plain.
Wrong Ph led to slow uptake, twins are in limbo, behind couple days by weight, if troubles are bigger than i see now - maybe even 3-4. So sad .... One time wrong ph and you can damage garden heavily ...
Close up bud photos were taken under max light, so colours are false.
Day 66. Damage done, i see many pistils shrinked. Some roots recovering, see new whites again. Leaf colour fades into patches, far from best ... At least drinking ... Watered yesterday, 5 liters in. Hope to do top up and watering on Friday.
Day 68. They drink fast, 3 days were needed only. Loaded 5 liters again. Made top up. See bleaching, raised lights , have 10 cm left.
Top up was dosed, mixed well and laid on top, then i rough and mix top lair of soil with top up and only then i water.
All pots are 30 litres ( grams and ml , have in mind ) :
Plant Success - Great White - 5 ml / pot
Ecothrive - Biosys - 5 ml / pot
Ecotrive - Charge - 120 ml / pot
Ecothrive - Life Cycle - 60 g. / pot
Ecothrive - Bio Blend - 200 ml / pot.
Happy Growing !!!


Likes
25
Share


@pifflestikkz
Follow
Day 99
09/10/24 Wednesday
De-chlorinated tap water pH 6 with Plagron PK13-14 today to give her the extra boost they need. I will continue flush at end of week and next week.
Day 101
11/10/24 Friday
De-chlorinated tap water pH 6 only today.
Day 103
13/10/24 Sunday
De-chlorinated tap water pH 6 only today again.
Day 104
14/10/24 Monday
Picture update 😎💚
Day 105
15/10/24 Tuesday (End of week)
Gave them all another 0.5L of de-chlorinated tap water with Plagron PK13-14 PhD to 6.3.
Update on strains:
DS- Auto Kabul is a robust, hardy little plant. Not many lateral sides bud it has bid sites climbing throughout main colar and it has a heavy top 🙌💚
Light green in colour and smelling like a zesty gas.
DG/GF- Auto XXL Ammo -
She is such a tall, stretchy plant, with alot of leaf to bud ratio! I won't do this one again as she requires alot of height space I don't have. She has a garlic, ammonia pungent smell to her.
DG/GF- Auto lemon zkittles 🍋-
This is A typical Christmas 🎄 tree shape plant, beautiful strong structure, resilient to pest. And has nice lateral sides with a bit of LST it would Unlock her true potential. She has a heavy main colar. Light green in colour dripping in trichomes, and smells like candy/ Z terps.


Likes
18
Share


@Brothersfromweed420
Follow
Bueno por ahora las genéticas van estupendas, espero que disfruten tanto del seguimiento como yo

Likes
3
Share


Likes
50
Share


@DogDoctorOfficial
Follow
Eternity Grow Cup - Week 9 Veg Update
We are stepping into Week 9 of vegetation, and things are getting exciting! The plants are thriving—compact, bushy, and growing beautifully. This week, we introduced a SCROG (Screen of Green) net, an essential tool for maximizing yield and optimizing plant structure. Let’s dive deep into the why and how of scrogging:
Why Install a SCROG Net Now?
Maximizes Light Exposure: The net allows even light distribution across all branches, ensuring every bud site gets the optimal amount of light.
Controls Plant Height: By guiding the branches through the net, we keep the canopy even and prevent excessive vertical growth.
Enhances Airflow & Reduces Mold Risks: Spreading the plant out increases air circulation, reducing humidity pockets and minimizing risks of mold and pests.
Increases Yield: More bud sites exposed to light mean higher-quality flowers and greater overall production.
For now, we’re still not using the under-canopy lights, though they will come into play soon. The ICL 300 is positioned strategically, and we will likely move them around as needed later. For now, the focus is on structuring the plants and ensuring they fill out the available space properly.
Optimizing Airflow - The Vortex Effect
Air circulation is crucial for plant health, and this week, we’ve optimized airflow by positioning the fans to create a vortex effect:
Fan Positioning: Each fan is placed at the tent corners, pointing in different directions, ensuring dynamic airflow instead of direct wind hitting the plants.
Benefits of a Vortex System:
Reduces hot spots and evenly distributes CO₂.
Strengthens stems by creating a natural resistance.
Prevents stagnant air, reducing mold and pest risks.
The extraction system is powered by an AeroFan, connected to the AeroFan Smart Remote FRC1, currently running at 60% speed. This setup efficiently manages humidity and temperature while maintaining optimal air exchange.
Current Environmental Conditions & Feeding
For now, we’re maintaining the same water schedule and nutrient regimen. The environmental conditions remain stable:
Temperature: Holding steady at ideal growth levels.
Relative Humidity: Balanced to encourage healthy transpiration.
PPFD (Photosynthetic Photon Flux Density): Kept at optimal levels to support vigorous vegetative growth.
CO₂ Levels: Elevated but within safe limits, promoting faster growth.
The plants are filling the space beautifully, but we know that the flip to flower is approaching soon! The next phase will depend on how fast they continue to spread, and adjustments will be made accordingly.
Closing Thoughts & What’s Next?
This week was all about structural optimization—ensuring proper airflow, training the plants with the SCROG net, and keeping everything in balance before the transition to flower. The upcoming weeks will be crucial, as we fine-tune the environment, possibly introduce the under-canopy lighting, and prepare for the flowering stage.
A huge thank you to our sponsors Aptus Holland, TrolMaster, CannaKan, Grove Bags, Ziggi Papers, and of course, Zamnesia, Plagron, and Grow Diaries for making the Eternity Cup possible. And to our incredible community—followers, supporters, and even the critics—we appreciate every single one of you!
Stay tuned for next week’s update, and don’t forget to follow along on YouTube and Instagram for exclusive content and behind-the-scenes looks! See you soon, and happy growing!
Let’s keep pushing forward, and best of luck to all the competitors—we’re all growing something incredible together. Until next time!
Genetics - Runtz https://www.zamnesia.com/6000-zamnesia-seeds-runtz-feminized.html
Nutrients - Plagron https://plagron.com/en/hobby
- Aptus Holland https://aptus-holland.com/
Controls - Trol Master https://www.trolmaster.eu/
LED - https://www.futureofgrow.com/en
LED - https://www.thinkgrowled.com
Soil - https://www.promixgardening.com/en
Germination - Cannakan https://cannakan.com/?srsltid=AfmBOopXr-inLXajXu3QFgKXCXXos4F1oEvScjMKIB5MR5dk8-GJ-F49
DOGDOCTOR 15% off
Smoking Papers - https://ziggioriginal.com/
Terpene saver - https://grovebags.com/
As always thank you all for stopping by, for the love and for it all , this journey of mine wold just not be the same without you guys, the love and support is very much appreciloved and i fell honored with you all in my life
With true love comes happiness Always believe in your self and always do things expecting nothing and with an open heart , be a giver and the universe will give back to you in ways you could not even imagine so
As always, this is shared for educational purposes, aiming to spread understanding and appreciation for this plant. The journey with nature is one of discovery, creativity, and respect. Let’s celebrate it responsibly and continue to learn and grow together!
Growers Love To you All 💚
#EternityGrowCup #RuntzHunt #GrowersLove #CannabisCommunity #AptusHolland #ProMixSoil #TrolMaster #Zamnesia #Plagron #ZiggiPapers #Grovebags

Likes
3
Share


@Andres2pistilos
Follow
Todo sigue en orden, en algunas flores ya se ve como se formas los tricomas, muy rápido todo, calculo que estarán listas al completar la 9na semana de floración.
Estoy usando provisoriamente pk13/14 de canna porque no he conseguido booster de green house feeding.
Ajuste el agua de riego, baje la cantidad de hybrids y agregue pk 13/14, llegando a 2.5 de EC, subí a 5.9-6.0 de pH.
He sacado hojas de la parte inferior de las plantas y algunas ramas débiles que no mostraron flor.
Esperaré hasta la 5ta semana para eliminar todas aquellas ramas que no han formado una flor consistente para dejar fuerza a las ramas principales
Sin duda cultivar con fibra de coco e iluminación LED de alta potencia es una carrera de aceleración, con un medidor de pH y EC se torna muy manejable.
Lo recomiendo.

Likes
6
Share

@deseed_uy
Follow
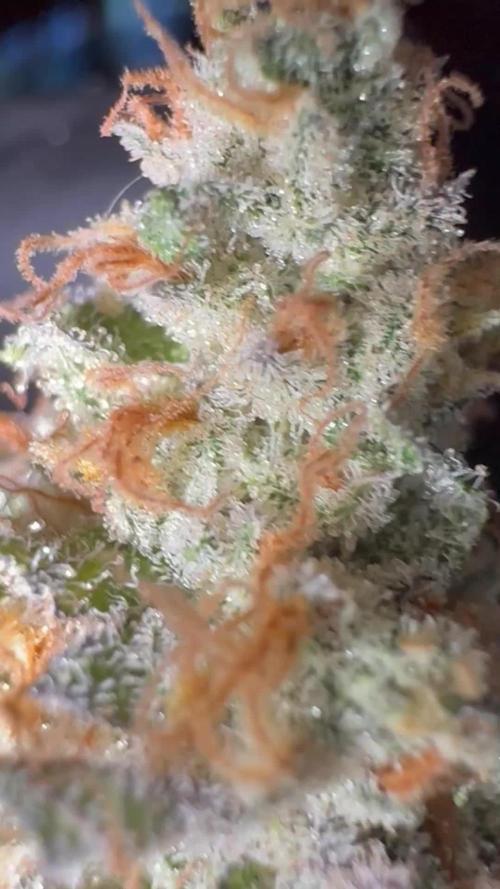
Una locura los resultados de esta genetica, mucha resina, muy densos realmente son una roca.


Likes
105
Share


@StarLorr
Follow
Welcome to my autø Møøn Røck 2 Diary.
In this Diary:
Seeds: Sponsored by Ðivine Seeðs
Media: Pro~Mix HP *•ns
Nutrients: Remo Supercharged Kit *•ns
*•not sponsored
___________________________
Feeding:
Wed 16Oct: 2L Remo/Recharge pH'd 6.5
Sat 19Oct: 2L Remo/Recharge pH'd 6.5
___________________________
Did some minor defoliation on Saturday.
Mostly skinny lower branches"cut cut goodbye"👋🏻😄
___________________________
Thanks for stopping by, likes and comments are appreciated!👊🏻😎
Keep on growin!
Keep on tokin!!!
😙💨💨💨💨💨
Likes
12
Share


@Tckfui
Follow
Going to try to squeeze a tester meph plant into my inhouse genetics run. Things will be tight!
Super excited, this strain sounds delicious!
1/4/22 at 4:20 put bean into paper towel.
Checked it 20 hours later and it had cracked with a small tap root.
Left it to grow a larger tap root for an additional 24 hours and not much had changed.
So I transplanted to its final 2 gallon home. Praying she pokes through in the next day or so!
Likes
21
Share


@Excalibur
Follow
09 October 2018 -
Day 106
Crystal was trimmed and nugs left for a week to fill out.
10 October 2018 -
Day 107
pH good
11 October - 2018 -
Day 108
Kolas are dense and thick
12 October 2018 -
Day 109
Removed from Tent and hung.
13 October 2018 -
Day 110
Drying nicely , Humidifier added .
14 October 2018 -
Day 111
Further trimmed and added to discs for overall ventilation
15 October 2018
Day 112
Rotating Tiers to make sure we dry evenly

Likes
24
Share


@Indoor55
Follow
They are starting to flower. I am doing LST to 3 of this girls and i topped the other one because i want to see the difference. The topped plant is starting to show some pistils and i'm afraid maybe she won't have enough time to recover from the stress, but the other three are looking good so far.


Likes
20
Share


@BigBudWolf
Follow
STRAWBERRY PIE AUTOFLOWER (FASTBUDS)
WEEK 9
Buds did not get very large on this solo cup girl, but they certainly are frosty and smell tasty. Trichomes are mostly cloudy, going to give her a few days for more ambers to come up.
Likes
20
Share


@Dunk_Junk
Follow
18cm vertical growth this week. She's growing well. Not much else to report.
Likes
17
Share


@Mr_Pgrow
Follow
What can i say, a fantastic plant, responding well to this organic grow with no hiccup so far.
This week i tied down the lower branches using LST method and also tucked in (not removed) some leaves that where blocking good bud sites
Thinking i might apply a Scrog in the next week or two for added support.
Again watering when needed, 2L every second day or so.