


Likes
Comments
Share


@Naturalist
Follow
Uped lights to 30000 lux today added some mosquito bits as a few fungus gnats have been flying around, should be topping Gelato #1 soon its been really shooting ahead.


Likes
57
Share


@Salokin
Follow
Hello Growmies,
We're now at week 11 with our Epic Buzz, and the flowering stage is hitting its stride. The buds are making their presence known, stretching around the colas in a spectacular display, and I'm starting to see the early stages of trichome production. This glittering onset is a clear indicator that our plant is entering a peak phase of resin production.
In response to this, I've increased the resin-specific nutrients to support and enhance this natural process. Epic Buzz is proving to be quite the thirsty one, almost depleting her 2-liter daily water ration, which has led to a few challenging moments. The small reservoir size has resulted in occasional nutrient lockouts due to the rapid water consumption. However, I've adapted quickly, now refilling the reservoir every two to three days to keep ahead of these issues.
These adjustments in our watering schedule are critical, as they prevent the water level from falling too low, which could stress the plant and impede her progress. It's a delicate dance of vigilance and response, ensuring that Epic Buzz receives the consistent care she needs to flourish.
As we move deeper into the flowering phase, the anticipation grows each day. Watching the buds develop and the trichomes proliferate is a daily joy, a reminder of why we cultivate these wonderful plants. With each challenge overcome and every new development, the bond between grower and plant strengthens.
I'm looking forward to what the next weeks will bring us. The final stages of flowering are always the most exciting, as we watch the fruits of our labor come to full maturity. I'll be here, keeping a close eye on our Epic Buzz, ready to share all the updates with you.
Stay Lifted,
Salokin.

Likes
8
Share


@Bluedreaming
Follow
Yum, yum !!! Took some cuts of all three this week and think the gorilla girl is going to be a great candidate for half the garden next grow. Just love the size and smell of the flowers!!

Likes
7
Share


@Daniel_Tri95
Follow
i’d say another two weeks on these girls and they are about done one of the other phenos of this finished up quite quickly and it’s already drying Can’t wait to give you the full results and numbers 🔥 and remember
It’s 420 somewhere

Likes
3
Share


@Autocrops
Follow
Still very happy with this grow. I have started checking the trichomes for any colour change but all seem to look totally clear
Likes
92
Share


@DogDoctorOfficial
Follow
Week 5 Veg Report: SCROG Netting, Massive Leafs & Precise Data Mastery!
🌱 Girls Growing Stronger Than Ever! 🌱
This week has been truly epic in the grow room—so much so that it’s time to bring in the SCROG net! With the canopy expanding and the younger ones still working to catch up, the SCROG net will help me achieve that perfect, even canopy. A well-placed SCROG not only ensures better light penetration but also gives the smaller plants a chance to spread out and thrive alongside their bigger sisters.
Now, let’s dive deep into the SCROG method.
The Screen of Green (SCROG) technique is a grower’s secret weapon for maximizing space, light efficiency, and yields. The concept is simple but powerful—train the plants to grow horizontally along the net, forcing them to expose multiple budding sites instead of just a single cola. This way, the canopy spreads evenly, improving light distribution and air circulation throughout the tent. As the plants grow, I’ll gently weave their branches through the screen, ensuring they fill every square inch of space. The end goal? A sea of buds all basking in equal light!
💪 Huge Leafs Everywhere! 🌿
One thing that’s really catching my eye this week is the size of the leaves—they’re HUGE! Honestly, they’re so big I couldn’t resist a little fun, so I made myself some fashion accessories: leaf earrings and a cap from the Super Sativa Seed Club Green Papaya! 😂 And, of course, I captured the moment. But seriously, large leaves at this stage are a great sign of healthy, robust plants. These “solar panels” are hard at work soaking up all the light, driving photosynthesis, and fueling growth.
So, what does it mean when your plants are showing off big, luscious leaves? It’s a clear indication that they’re happy, healthy, and thriving in their environment—big leaves mean lots of energy being produced and stored for future bud growth. Exactly what we want!
💧 Precision Feeding with Aptus Nutrients 💧
This week, I took a deep dive into my Aptus nutrient lineup and shared a video explaining how each product affects the water’s pH and TDS. Using the AMP-3 Precision Meter, I’m getting real-time water readings and keeping everything dialed in perfectly. Let’s break it down:
• pH: 5.83
• TDS in solution: 445 ppm
• Water temperature: 25.2°C
The Aptus products are incredible for balancing nutrients without throwing off the pH or TDS too much. I’m fine-tuning my feedings based on these readings to make sure the girls are getting exactly what they need. The precision I’m able to achieve with the AMP-3 is mind-blowing—I get immediate feedback on pH, temperature, and EC, allowing me to make real-time adjustments and ensure the perfect environment for nutrient uptake.
📊 Environmental Mastery Thanks to TrolMaster 📊
Speaking of control—let’s talk about the TrolMaster system! Between the DSH-2U Humidity Station and all the other sensors, I’ve created the perfect environment for my plants. Here’s where we’re at this week:
• Temperature: 26.2°C
• RH: 70.6%
• CO2 levels: 775 ppm
• VPD: 1.0 kPa
• PPFD: 423
Thanks to TrolMaster, I can monitor and adjust these metrics in real time, and the best part? I can do it all through the TM+ Pro app, even while I’m lounging in my green papaya leaf hat! 😆 Whether I’m checking the CO2 levels, adjusting the lights, or fine-tuning the humidity, it’s all in my hands with just a tap of my phone. Talk about convenience!
🌱 P.S. – Inline Sensors: Heavy-Duty Precision 🌱
Now, let’s talk about the heavy-duty players in this game—the (PCT-2) Heavy Duty Inline EC/Temp Sensor and the (PPH-2) Heavy Duty Inline pH Sensor. These bad boys are connected directly to the AMP-3 Precision Meter, and they’ve been absolutely crucial in giving me the most accurate readings on my water and nutrient solution.
The PCT-2 keeps me informed about the electrical conductivity and temperature of my solution, which is key for monitoring how well my plants are absorbing nutrients. Too high or too low, and we’re asking for trouble, but this sensor ensures I’m always in that perfect range.
The PPH-2, on the other hand, is all about maintaining the perfect pH balance. A fluctuating pH can mean nutrient lockout or deficiencies, but thanks to this sensor, I get a constant read on my pH levels, so the plants are always in their sweet spot for optimal nutrient absorption.
Together, these inline sensors allow me to run a super-tight ship—every drop of water and nutrient is dialed in to perfection, keeping the plants happy and healthy!
Shout Outs!
As always, huge thanks to TrolMaster and ThinkGrow LED for the amazing gear, to Aptus Holland for their top-notch nutrients and Pro-Mix for the best soil i have used so far. Big love to the seed banks, the amazing Grow Diaries community, and all my followers—you guys make this journey so much more exciting. Don’t forget to catch up on my social media, Instagram, and YouTube for real-time updates and exclusive content!
Stay tuned for more—next week is going to be epic!
DogDoctorOfficial Discount Codes so you can save big on your next check out 💚💚💚
Kannabia - DOGDOCTOR 30% off
SeedsmanSeeds - DOGDOCTOR 10% off
CannaKan- DOGDOCTOR 15% off
terpyz.eu - DOCTOR 15% off
The Neutralizer - PORKIT5-DOG 15% off
Growers Love to you all 💚💚💚


Likes
9
Share


@Jakobyzone420
Follow
Soddisfatto del mio lavoro? SI ASSOLUTAMENTE SI . Questa è la mia prima esperienza nel campo della coltivazione della cannabis e sono veramente contento del risultato, ma non devo cantare vittoria troppo presto adesso manca la seccatura e la concia speriamo bene ahahah 🤣

Likes
6
Share


@Sobreruedas
Follow
This week I topped each main cola at the 3rd node as usual and performed a selective defoliation to improve light penetration and airflow.
From now on, I won’t be doing any more apical cuts. In a few days, I plan to introduce a scrog net to start guiding the branches and prepare for an even canopy 🌿💪

Likes
Comments
Share

@Swanberg
Follow
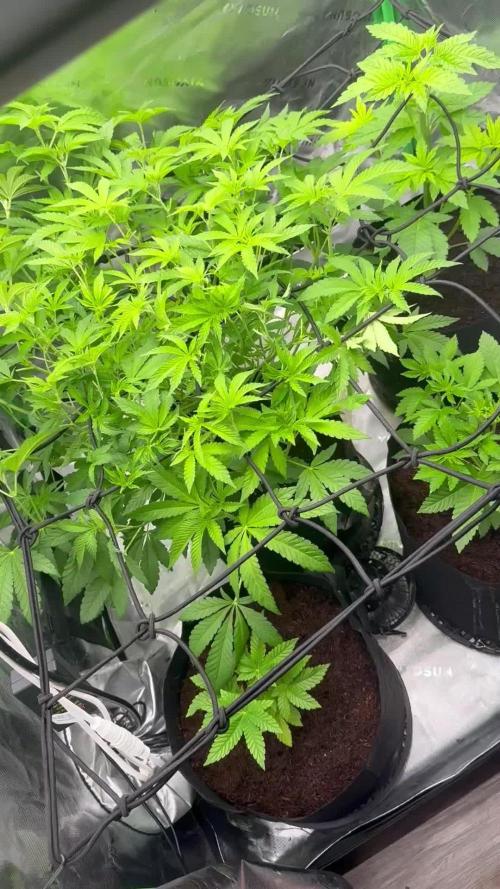
👍 update:11/26 wtf never seen a pheno have this much tight nodes and develop side branches to colas. It a monster taking over the whole tent.

Likes
13
Share

@MrGrowDiarie
Follow
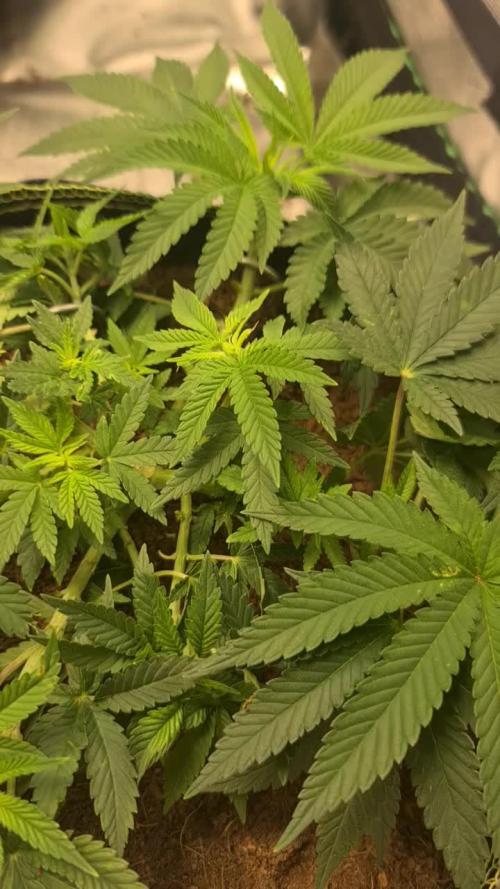
Day 42
This girl is looking fantastic! The canopy is nice and full, with multiple strong tops forming evenly across the plant. The internodal spacing is tight, creating a bushy and compact structure that’s perfect for future bud development. Leaves are a rich, healthy green with no signs of stress, and side branches are stretching out nicely after training. Overall, she’s thriving and building a strong base for the flowering stage!
Likes
11
Share


@Skull
Follow
Any suggestions with the Poppin Cherrys or is it just because it's two weeks younger


Likes
70
Share


@Insaniac_0
Follow
All feeds with nutes use either a whole ratio or combination of "Veg Mix" and "Bloom Mix"concentrates DILUTED in water until a total ppm of add in is reached using a (Total Dissolved Solids)TDS Meter measured in PPM (parts per million). The "Veg Mix" concentrate will eventually be added in smaller ratios and "Bloom Mix" concentrate what will eventually replace the "Veg Mix" concentrate entirely with the ppm and ratios listed when I feed. Veg mix recipe is on week 3. Bloom Mix recipe is on week 5.
Day 56
Took some glamor pics with black background - not really for vanity (although there's a little) but for contrast. I see more of the lockout issue better in the pics this way. - on that note, the ph seems to be working as it's been two days since defoliation and knitting needle ph correction, and the progression is way slower than it was on the last leaves at 3rd day of identifying.
So with that, room VPD of 1.07kpa seems stable enough with temps about 76F/65%RH/33%ILV
I released the binds today to let her grow without them until they crowd each other too much and I need to restrain - so in a couple of days at max.
Day 62
Transfer day. Although at first I didnt think I would be able to until Saturday, I got pots and plant saucers today, so I ended up going ahead and doing it.
Started by calibrating/testing both meters. Double checked the soil mix from yesterday as the last time I used wood ash the ph rose the day after... however this time it was fully mixed to I wanted to know if there would be a higher ph - it was the same as yesterady - 5 reading avg of about 6.35 - the slurry of 1:1 soil and 7.7 ph water was tested at 6.3 also.
Made about .75 gallon of 75/25 veg/bloom juice water at 500ppm feed water. Tried to ph read the soil in the pot and seen it go from 6.6 down to 6.35 (took video) in the dry soil, so I decided to use the 6.35 new soil reading and ph balanced the feed to that.
Used the needles since it was 7 days since the last feed and I am using such a small amount. Poured over needles in 8 places and pulled each out to let water down. the vacuum pulls the water down when I lift the needles.
Then I mixed 5tsp of Dynomyco to the 5 gallons of new soil and mixed really good. I placed a layer of perlite on the bottom of the 10 gallon pot and then layered in some soil.
Then with the help of my wife we pulled the plant out of the pot and placed it in the 10 gallon. I place back in the tent and added about a quart of plain de-chlorinated water evenly over the new and older soil to help bind them.
I reduced lights by 100ppfd to have about 505 and 500 at center colas and 430 lowest on outer ring with most at 450 and 470 highest. Soil to light is 35 inches and the plant is about 14 inches so about 21 inches from leaves to lights.
I left the ring off today and will rebind as needed tomorrow after she rests. Today the leaves look wilted and limp.
Also reduced humidity to 60% so 58 to 65% should be the range and the temps are 73F with the lights lower.
PPFD was higher with the new growth - unbound and tucked in for better cola/light position, it reads 570 to 580 on outer colas and 590 at both center branches
Day 57
Getting 1 more day out of free range growth before I tie her back against a ring. So in that time I decided to take a few vanity pics.
Overall the ph block seems to have slowed or stopped and she's back to growing again. Will be thinking about flip at the end of this week or so.
VPD same stats 76F/65%RH/33%ILV - ppfd right at max so I'll likely tie her off tomorrow. 605 600 in center and 580 to 590 at the outer ring.
Day 58
VPD stats mostly steady again today - 76F/65%RH/33%ILV - ppfd was checked after LST, measured 600 at each center cola and the outer ring measured between 550 and 590 most at 580
So as I said, I did LST today to bind her more out while the 4 center 4 colas fill the middle. I had to bind to the pot base instead of the ring as the colas are still a little short to reach for binds at the ring just yet. There's a lot of space to fill and a few (about half) of the out colas are sideways for now.
Had a break at the center cola when I tried to pull it back for bind. I knew to hold the branch at the node but forgot to do it here and heard a "snap" ... taped the crack and moved on - will monitor obviously
Day 59
Did more light LST to ensure the branches are growing where I want. PPFD was mostly the same as yesterday only now there are more colas around 560 than 580 on the outer ring with the center colas at 610 and 590 (front cola was tied down to spread more away from the ring and fill center better.
vpd same as past week or so 76F/65%RH/33%ILV
Last feed was on day 54 and the soil still seems damp so I will check again tomorrow for the next day. (Day 61)
The broken branch doesnt seem to have affected either side of the split as both sides seem to have grown a little with little to no wilt or drooping leaves. Im hoping it heals okay and doesnt delay flip to recover more; still monitoring.
Day 60
Did some light LST today by releasing the lower binds to the pot and attached as couple to the outer ring now. So far I only have to bind a few as most are already holding where i want them to.
Took the tape off the split and seen I didnt seel the gap closed when I taped it so now Im considering a drop of super glue to bind the branch back in hopes it grows onto the other side again. If not at least it would be more secure than it is now. And since it's a main split for 4 colas, I dont want too restrict it by binding at the split and potentially cutting off the nutrient pathways.
ppfd after LST was 610 and 600 after more LST and the outer ring is still ranging 550 to 580 with more at 560 now.
VPD same as I havent messing with any of the variables. 76F/65%RH/33%ILV
Soil is a bit dry and it's been 5 days since the last feed flush, so I have about 3 gallons of tap burning of chlorine now for a feed tomorrow morning.
Might still update again later if I find superglue...
found some superglue - tried to take pictures but I cant hold, squeeze the applicator, and film with just two hands. So the idea gets through, I did both sides.
On a side note I discovered a root popping out of the soil from the top. Covered it up but wasn't sure if I should be concerned.
Day 61
VPD same as it's been for most of the last week - 74F/65%RH/33%ILV
PPFD was recorded after I turn the plant a quarter turn for the smaller colas struggling to get over he ring's edge to have more light. Most colas at 580 with a couple at 600 and a couple more at 550 - center colas are hitting 615 and 620, but I have plancs to reduce in the next couple of days now
On that note, the root growing out of the top tells me that she's hungry and needs more root space, even if that means growing through the top of the soil. So I plan to transplant to a 10 gallon and flip after the recovery. After reviewing more of NugBucket's journal I realized this is why he moves them when growing 16 colas.
New pots should be here Friday so I should be able do it on Saturday.
So I prepped soil (using more Happy frog with mycorrhizal fungi already growing in it for a few weeks) with de-chlorinated tap water
Started by ph testing the soil and the water (4 readings on soil at 5.03 avg) - added about 1/2 cup total of wood ash to bring up the ph , mixed and tested again - added water at (about 7.7 ph) and tested again... last 5 readings in soil was 6.24,6.3,6.35,6.37,6.38 avg of 6.328 - covered and let rest until needed.
Since I plan to transplant in a few days I felt it would be best to 'lightly' feed tomorrow, again on transplant day, and again 2 to 3 days later.
Since my wife was taking pics at this time, I could only find this one to show the roots growing into the perlite then we planted it in the bigger pot.
--------
(Day 62 root base picture from above)
I have a hypothesis that says these are so short because I intentionally tried not to move the plant without the base stand to keep it from grinding these up and allowed them to grow in the last 2 weeks. This is that test picture/results.
I like the idea of better/more drainage, but thinking I am doing more harm each time I hear those gravel pieces crunch as it cuts those and forces the plant to look somewhere else for root space. Notice how the small root lines have no finer pieces or laterals grow out from these - I believe that is because they are so new in growth and that the perlite chewed up the smaller laterals even with little to no movement over the last two weeks
I would like to see a root ball experiment that exposed the roots throughout the grow but for now I can see these roots do grow into the base perlite and need to be handled carefully if you want them to grow more freely or with a standard pot size. As you can see Im not root bound but my plant thinks it is and is growing roots out the top.
Likes
10
Share


@GrowingGrannie
Follow
Good week... she's grown a lot, is looking VERY strong - #1's stem is already pretty thick for such a young plant.... so I think I'm going to let her get a couple more nodes on her and then top and clone her... #2 is a little weaker so I think I might top her this week. I've put them both on an aggressive veg feed and they're both responding very nicely to it... such a difference from autoflowers! I find it fascinating..... so much so that I tend to rather ignore them... for example, I think I MAY have given them a drink of something only 4 or 5 times in their lives (they've just celebrated their 4th week from seed)... never any complaints, never saying "hey, fool - pay attention to me!" .... I glance at them once a day and move on.... Still trying to decide where in my yard they're going to be planted - but I've got at least 4 more weeks before I'll feel comfortable enough with the weather to go dig a hole for them... SHOULD also start some LST, I suppose.... going to be relying on LST a lot outdoors so I can hopefully avoid the bud rot that plagued me last year...
Great fun!
May 4 - I've decided I'm going to top #1 today and stick the top in Clonex, into a RootRiot and plunk it into a DWC bucket ... so while I'll have these two plants out in the yard waiting for an October harvest, I can flip the clone indoors for an earlier harvest to see if I like the strain at all.... Hmmm... maybe I'll do that to both of them and keep one in veg while I flip one of them... This is kind of cool - I'm learning about all the possibilities growing photoperiods gives you... just amazing! I'm like a kid in a candy store! LOL! I'll put up a video when I top and clone... but don't take it as gospel because this will be my first time and I don't REALLY know what the hell I'm doing... just having fun and experimenting!
May 5 - Happy Cinco de Mayo! Didn't get around to topping and starting a clone yesterday... but I've just now posted up two videos - the first where I'm determining where to top - and the second, longer one, where I place the top I've just cut off into DWC to clone... or ATTEMPT to clone! LOL! God knows if this is going to work... if you've got any comments on what I've done, hints for a better way of doing things PLEASE comment below! I could use all the help I can get! Should I, for example, chop off the lower fan leaves of the top? Or are they needed for the top to survive? I can't help but think they're a pretty big drain on the poor thing...
#1, which is the one I topped, is really showing me she needs to get outside in the yard... her roots are starting to peek through the drainage hole at the bottom of the pot.... I THOUGHT a 2-gallon would be big enough to last at least a month and a half but..... I'm going to have to get serious about where to put these ladies!
Likes
6
Share


@Ninjabuds
Follow
My 2 permanent marker plants they are loving the light being turned up they are praying constantly there internodes are so close together they have not stretched out very far yet. I'm thinking they are going to be on the short end but who knows some plants do complete opposite when they hit the flower strech. I still have not gotten the nutrients down for the one plant I'm thinking when I flip to flower it will it will turn around nicely I love the shaoe and look of it's leaves.
The day has come and it's time to flip these ladies to flower. I was planning on letting them go untill Friday and let the smaller ones grow just a bit more but they will be fine. I have the eternity cup contest in mind and I'm thinking timing so I need to get these lady done and out my tent lol. This past week I turned the light up alot getting them ready to flower they have grown a bunch inhavendone lst maybe 5 it 6 times on the branchs and they arw nit bendy anymore that will help durring flower.

Likes
2
Share

@420DeepGrow
Follow
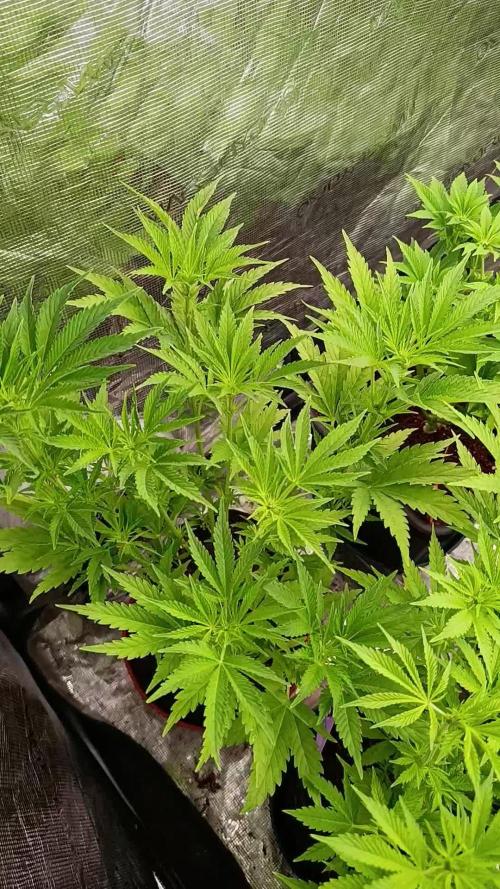
📆 Semana 3
El estiramiento se va frenando y los puntos florales ya se agrupan con mayor definición en cada punta. Los pistilos se multiplican y la planta comienza a concentrar la energía en la construcción de flores.
La estructura se mantiene abierta y equilibrada, con hojas sanas y turgentes, señal de buena asimilación. Sticky Finger gana presencia acompañando la formación floral sin sobrecargar, mientras la planta entra en dinámica productiva.
Semana de consolidación floral.
Seguimos creciendo fuerte 💪!


Likes
6
Share


@captaincondor
Follow
chopped her after two months of flowering hopefully she will dry mold free fingers crossed
