


Likes
25
Share


@pifflestikkz
Follow
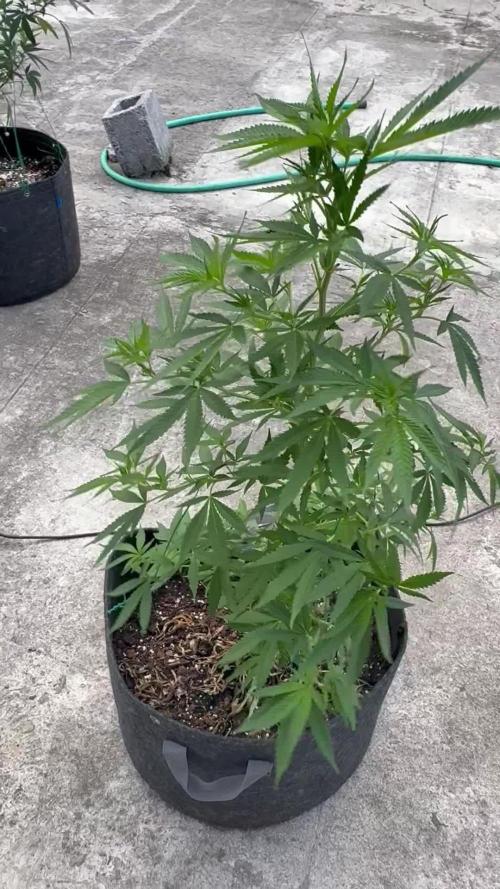
Day 29
01/08/24 Thursday
Another feed today using de-chlorinated tap water pH 6, there now taking 300ml every evening.
Day 32
04/08/24 Sunday
300ml De-chlorinated tap water pH 6 today again with Plagron PK13-14 and power buds.
All plants doing really well!
Had an infestation of leaf minors this week, no idea how, but they are treated and I'll check every 48 hrs on progress of pets.
All of them have shot up this week 💚
Day 34
06/08/24 Tuesday
De-chlorinated tap water pH 6 today with calmag only.
Pre flower stretch initiated, pre flower female sex pistils forming 😍
All happy and healthy!


Likes
4
Share


@Barcelona_Farmers710
Follow
Explosión de resina!!! Una genética que no me deja de sorprender un olor brutal a cítricos y su olor a Haze un gustazo pra la vista y el paladar sin duda esperamos impacientemente el dia de degustar este manjar!! Espero que os guste Salut y força al canut Farmers!🍁
Likes
14
Share


@Fat_Olsh_Farms
Follow
Not a huge producer but looking pretty. Starting flush.
Beautiful blue tones. Very pretty buds on both of my twisted trees plants. Can't wait to see how my Twisted cookies turns out.


Likes
5
Share


@LeedsCityFarmz
Follow
This week all the plants started to take off in flower. Buds swelling up by the day. Stopped feeding flower burst and added Pk9-18 and advanced meta boost to aid with flowering. Smell has started to increase but not to potent as of yet. EC also increased to 1.6 for increased demand in flower. Also stopped spraying IPM this week as it don't want it to effect the bud smell or taste come harvest.
Processing
Likes
15
Share


@Siriuz
Follow
This week we are helping this lady to grow even more using plenty of techniques to boost its power and to redirect its energy to the main colas we are working on...
We gonna wait a little bit until it gets packed again to start defoliation once more, in the meantime we continue to add nutes and water frequently as schedule in our program so we can get the best of her
Hopefully, she will get real good
Alright guys did you see what we did on the 21 st?
We want this girl to grow and give us its best yield :) let's see if we can achieve it

Likes
13
Share


@The_Holy_Herb
Follow
Hello y'all! Today marks the last day of the third week of flowering.
At the start of this week I watered the plant with 1 liter of plain water, no excess draining. I also applied some extra LST, I really wanted to expose as much as possible the buds. My light is not that powerful, it produce real 70/75 watts... so I do my best to take advantage of it with some LST and a major defoliation. I took out 13 leaves, some of them were a bit crushed or damaged so they had to go to create more space for the light and overall for the health of the Titan. Some of them they were just making too much shade on the buds so they also had to go ahhahaha
Couple of days ago I watered with 3 liters of water with nutrients. The excess was 1.5 liter.
I found the limit of the pot, around 2.5/3 liters of water per week. That's the sweet spot.
I was concerned that the plant didn't drink enough but then if I take in consideration that the pot is only 7 liters and I did fill it with around 6 liters of soil...then I think is more than fine as it it. We will see.
So in conclusion this week the baby got roughly 4 liters of water adjusted to pH 6.3.
The water that drained off the pot was around pH 6.7/6.8. I think is a little too much and I am considering to water next time with pH around 6.0 o 6.1 maybe I will be able to drop the pH of the excess water to 6.6 or 6.5. We will see.
The temperature is constantly around 21 to 23 degrees celsius and the humidity at the moment is constantly under 50%. At least I don't have to worry about mold. I hope.
The smell is strong with some mango scents, amazing plant! I hope it smokes also as good as it smells!
I wanted to point out something that I've noticed and it popped in my mind.
My pot was for 7 liters but in the pot I have roughly 6 liters of soil. So there is some extra empty space for soil on the very top of the pot.
The problem is that I noticed that on the very bottom of the main stem the plant tried to sprout some extra roots but because there was no soil around it they didn't spread and died straight away.
I've noticed that the plant could be much stronger or bigger if I let her root also a bit higher on the main stem... but because there was no soil around the stem the roots didn't come out from there. You can see it in the last picture. I circled in red the spots.
I believe I could do much better if the roots were starting a lil higher on the stem and not just where is the soil.
If you don't get me or im unable to explain myself cus im stoned then please give a look at the last picture of this week. You will understand what I meant, if not peace and love the same hahahaha
Overall I believe everything is going in the right direction, in 2 weeks +- I should harvest. I hope I can get 30 g dry of this plant.
Anyway
The trichomes are far away from ready, or white or even a lil cloudy. Look at the last video, 80/85% of the trichomes still transparent and lucid. If you see some whiteish is probably the camera going nuts not a ready trichome.
See you next week guys for the updates of the 4th week of flowering! The smell is delicious af
Likes
4
Share


Likes
9
Share


@FrostyCloudzz
Follow
Flush flush
Bigger buds buds
Let’s prepare harvest :)
Did the full cycle from the advanced nutrients feeding chart , know I flush and prepare the harvest , planing a late harvest for more cbn and relaxing high - and little bit other terps
Today 16.02.2025 - blooming starts at 20.12.2024 - D59

Likes
7
Share


@Scoota710
Follow
I gave her her first feed with the Emerald Harvest nutes. Still yellowing out on me anyone know what could be wrong?
Likes
36
Share


@Freddd
Follow
harvested first 1/3 at end of week 13 rest at end of week 14 after seeing no change in the trichomes, of which a lot stayed clear but that OK. It might be a strain where they don't all go cloudy. After chopping 1/3 down it seemed like more stuff just kept coming up, it's the plant that keeps on giving. In the end I was smoking this for about 3 weeks before I got to finally get a dry weight yesterday which was 7.5 tip not including what I smoked over the past three weeks which I estimate at a minimum of 1.5 ozs. So the total yield was 9 oz. This really did knock my socks off. I thought I'd get 7 in my dreams. There was likely a bit more than 9 but I just got too stoned to keep track properly.
Buds are covered in crystal and the quality extended all the way down the branch, they are hard and dense and fluff out well.
Unfortunately if I'd had known this was going to be such a big yield I'd have kept better records of what I used, when I say 9 oz that's because there was 7.5 a couple of days ago curing, and I'm estimating 1.5 oz smoked over the past three weeks, I'm allowing 1/2 oz per week for the past three weeks but in reality I've smoked more than that. per week so 9 oz is an absolute minimum the actual figure is more like 10 oz.
The stone is exceedingly stoned but mellow, you forget how stoned you are. Does not cause too much munchie problem or dry mouth. Lots of flavour when used with the FireFly 2 and the flavours are still changing, but I'd call it herbal.
The defoliating scrog and hydro set up made it easy to deal with but I can see this plant causing some difficulties for those not experienced in dealing with a bushy plant prone to mould.
The Viparspectra did a pretty sweet job, using an average of about 270W at the wall.000

Processing
Likes
142
Share


@MadeInGermany
Follow
Hi everyone :-)
This week the buds developed super ;-) All are beautiful 😍.
Super genetics 👍.
Blue Cheese pheno 1 is slowly coming to an end :-)
This week I will start to use up the remaining nutrients and harvest in 10-14 days ;-)
Everyone else needs something else :-) have fun with the videos, stay healthy 🙏🏻 and let it grow 🌱


Likes
4
Share


@LittleBigTrees
Follow
This week I've been pulling the top fan leaves to stop the plant growing taller and to allow the side branches to catch up. I also started feeding them.
I will probably repot and switch to flower next week now they've all outgrown their mutations.
Likes
34
Share


@Aleks555
Follow
Chimera Cut - Anesia Seeds
124 days of growth and 76 days into flowering, and we’ve finally reached the moment we’ve been waiting for—harvest time! This beauty has exceeded all our expectations with massive buds covered in resin, emitting an intense aroma and showing off an incredible blue hue, exactly like the photo on the seed pack. We couldn’t be happier with the results!
We decided not to weigh the wet buds; we’ll wait until they’re dried to get the final dry weight, but we’re confident it’s going to be impressive.
A massive thank you to Xpert Nutrients for their outstanding support, top-notch service, and, most importantly, their amazing fertilizers that have allowed us to grow such powerful plants year after year. Without a doubt, your products are the key to our success.
An equally huge thanks to Anesia Seeds for providing such incredible genetics. We are beyond satisfied with the results, and we can’t wait to grow more from your amazing seed collection in the near future.
Oh, and we’ve already sampled the smoke—this strain is exceptionally strong and flavorful. From the very first hit, it’s clear you’re smoking something premium, top-shelf quality. Truly a connoisseur’s delight!
Thank you again to Xpert Nutrients and Anesia Seeds for making this journey so rewarding!🏆


Likes
61
Share


@UnorthadoxDude
Follow
Hello and welcome to week 8, the second week of 12/12 for Her Royal Highness Queen Citronella. As you can see she is chafing at the lack of space. She wants to keep growing. I am looking for a 3x3 to solve this.
Day 50: Fertigated 6l.
Day 53: Height 33cm Width 70cm Depth 70cm - clear signs of flowering today. Fertigated 4l.
Day 54: It's getting difficult to get her in and out safely as she is now bigger than the tent door.
Day 55: Stretching fast now. 38cm x 60cm x 60cm the latter two being severely limited by the tent size.
Day 56: End of week 2 since flipping. Preflower period ending and flowering proper begins. Approximately ten weeks to go. Citronella is really impressive and smells very citrus. All of her foliage smells if you touch it. I do not know if this little tent can contain her. I have some major concerns about this grow due to some real life complications.

Likes
3
Share

@Chubbs
Follow
This week's been exciting, they've grown upward a few inches and started to bush out. I did do a mild defoliation taking off a few lower leaves and tucked some of the top bigger fan leaves. I started adding co2 this week and they seem to really be enjoying the added amount.
All in all Happy Growing