Likes
2
Share
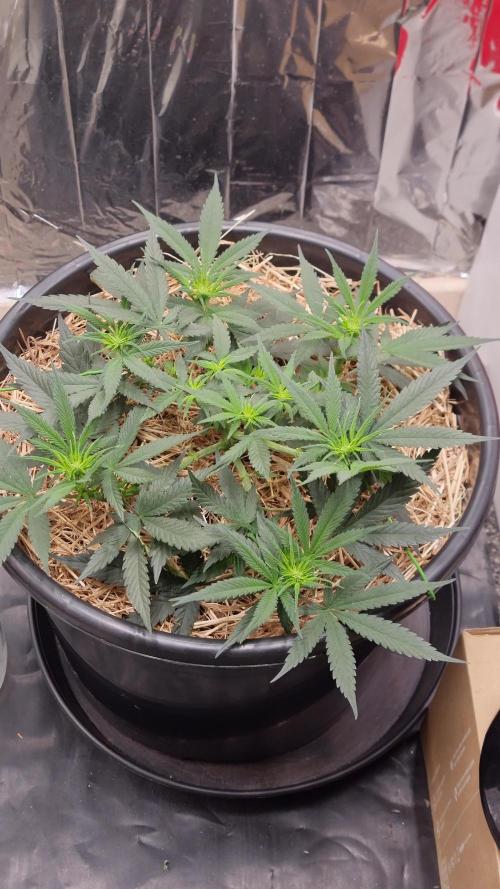
Nach einer Woche Nährstoff Lockout durch zu viel Wasser haben sich die Ladys wieder erholt und trotzdem ca 5 cm zugelegt. Ich habe jetzt 6 Tage nicht gegossen und morgen gibt es nur 1,5 Liter und am Montag nochmal 1 Liter. Dann dürfen sie wieder 4 Tage davon zehren. Danach sollten die Wurzeln stark genug und angewachsen sein, um mit den geplanten 2,5 Liter Wasser weiter zu gießen. Dann ca alle 3 Tage bis Woche 5 und dann gießen nach Plan auf biologischer Erde - ca 1/3 des Topfvolumens pro Gießgang. Man kann an manchen Stellen den Mg/Ca Lockout gut erkennen. Bin gespannt wie es weiter geht. 🤞 Stofftöpfe ist eine neue Erfahrung für mich 🌱🌿💚 Keep on growing 💚
Likes
6
Share
@Kendoda
Follow
Wk 4 flower is almost done. I’ve made a slight change to the feed schedule this week. I’d been giving around two litres twice per week but it was looking slightly over watered afterwards , so now adjusted to 1.5 L 3 times a week. The plant has reacted well and will hopefully cope with a higher dosage of feed over the next 3 weeks.
Likes
9
Share
Training This week was the start of the LST and, with that, a continuous gentle defoliation to ensure that the new shoots are getting a lot of direct light. Leaves (especially sun sails) growing over new shoots are either pressed down or, if necessary, removed. When LSTing, I always focus on gently bending the branches in the desired direction every day, without disregarding the natural structure of the plant. Once they reach a length of about 5 cm, I start to secure them with training stakes(*1). This way, the risk of damage (as well as overall stress for the plant) is kept to a minimum. Setup The lamp is now at max. intensity and min. distance (35 cm) at around 650 - 700 PPFD. (*1) I built the training stakes myself to match my needs (enough length, natural material, no sharp edges, slightly downward facing angle). Pests + Living Soil + Environment The combination of nematodes and sand seemed to work immediately, because the number of Sciaridae quickly dropped to about 2 - 3 adult flies per day. Still, on day 40 (8 days after adding the sand) I removed it again, because: - it was rather intended to support the nematodes (fewer new larvae), - the Sciaridae had fallen to a level that seemed acceptable, - it would keep the soil too anaerobic and moist in the long term. The decision also had a positive effect on the RH(*2) (approx. 10% increase). (*2) Relative humidity fluctuated slightly from day to day, but generally remained around 50%. Although removing the sand (at the end) of this week increased the RH, I only evaluated this ‘new average' RH from the following week onwards. Environment + Plants The stabilization of the environmental conditions and the increase in light, have allowed the plants to grow intensively this week. In the beginning, the relative humidity was still a little lower than I would like, but acceptable since the plants were still quite small and didn't need to be watered as often (large amount of substrate with corresponding buffering effect to keep the plants healthy. Plants During the seedling phase, I observed slight deficiency symptoms that at first glance looked like a nutrient problem (potassium, calcium, ...?). Since I cannot control the nutrient content as precisely as I could with a hydroponic system e.g., and the damage was manageable and occurred during a phase in which I also stressed the plants by allowing them to become too dry, I simply ignored it... with success. Since the system has been back in balance, there have been no further incidents of this kind. *Gorilla Z Auto was 20 cm tall, Mimosa Cake Auto 12 cm. (Pre-)Flower I have also been able to observe pre-flowering, which is consistent with my other observations. [Autoflowering genetics in particular do most of their growing during this phase, which lasts just under two weeks, roughly starting from week 3 - 5.]
Likes
63
Share
@Chubbs
Follow
420Fastbuds StrawberryGorillaAuto Week 9 What up grow fam. Weekly update for these lovely girls. They're getting really close to being done. The flowers are swelling up great with sweet smells coming off them. Trichs are starting to turn cloudy so I'll keep an eye and check them out later in the week. All in all very Happy Growing
Likes
2
Share
Suuuper sweet and tropical smell, beautiful fragrance of the buds man! By far the sweetest nuggets I have in my garden currently even more than my bslck cherry punch plants, awesome strain, such a beautiful surprise, I'll grow her more times now that I know her, she's fading out perfectly showing purple on the leafs because of the cold weather, and I'm seeing a lot of yellow leafs,let's see what happens at the end! ✌️👨‍🌾🌱💚
Likes
31
Share
La planta de la tierra viene creciendo bastante bien, los trips han disminuido bastante asi que por eso seguiremos combatiendolos con aceite de neem.
Likes
2
Share
One Bud was moldy where the other plants had no issues. This strain might me a little susceptible to mold. The Terps on this are very nice. Dark Grape with hints of lemon. Very Sticky and not very hard Trichome shells. maybe good for flower rosin or under cold contidions even for Hash Rosin.
Likes
3
Share
2 of dem from the 2nd set don't seem to catch dem self yet🤷🏾‍♂️ but the rest are taking off....those from the 1st set still ain't transplanted and they are pushing hard ties ain't holding dem back. 2 that where transplanted previously jus tryin to get dem a good size n send dem on a breeding project for the beginning of the Most of new cutting have visible root
Likes
76
Share
@Canna96
Follow
Hey now, this week went pretty good, the buds are about done bulking up, and just waiting on the trichomes, I was really hoping she would be about ready, but I think she needs another week to week and a half total. The buds are rock hard, and super sticky. I have no clue what she will yield because the colas are not that thick, but there are definitely alot of them. I plan to squeeze her into rosin, and hopefully I can break the 25% mark for the first time with her, but we will see. Thanks for stopping by, I hope you enjoy the videos, Happy Memorial Day Family, Stay Safe and Blaze On!!!
Likes
19
Share
14/05: EC: 1,23 PH: 5,22 Removed all LST hooks 15/05: EC: 1,15 PH: 5,92 16/05: Added Nuts EC: 1,3 PH: 6,08 17/05: EC: 1,3 PH: 6,1 👍👍👍👍👍👍👍👍👍👍👍👍👍👍👍👍👍👍 Lesson Learned: AS SOON AS THE MAIN BUDS RAISE UP MOVE THE LAMP ON THE CEILING TO AVOID BURNS 👍👍👍👍👍👍👍👍👍👍👍👍👍👍👍👍👍👍 18/05: Changed Grow Box SetUp . I had burning lights problem and I moved the lamps on the grow box ceiling EC: 1,42 PH: 5,99 19/05: EC: 1,25 PH: 5,46 20/05: EC: 1,25 PH: 6,03
Likes
13
Share
@Lfuego22
Follow
Day 59-66 transition from veg to flower
Likes
26
Share
@yan402
Follow
14.11.2025 Was going to close the diary today but as it doesn't smell anymore I decided to close the diary this coming Tuesday, smell shifted from chemical fish ammonia to cooked fish with the additional Citric acid I sprayed in, rest in video 📸 🐟💀 FERMAKOR: The Dorade Incident – Spontaneous Batch Log (Because the fish came with guts, and I don’t waste potential) --- 🍽️ How It Started I ordered two big Dorades for dinner. Didn’t bother ticking the “cleaned” box. They arrived whole — full organs, eyes staring, one of them with a stomach packed with broken seashells (free CaCO₃ bonus). So instead of complaining, I just said: “Alright, fine. Dinner first. Hydrolysis later.” --- ⚗️ Phase 1 — The Gut Start (Day 1) Material: 160 g of fresh guts straight from the fish. KOH: 20 g (yep, strong ratio, I know). Water: ~250 mL warm. Dissolved KOH → poured over → stirred → left to liquefy. Within minutes it warmed up and foamed; by evening it was already turning into that deep brown, oil-slick mix I like. --- Phase 2 — The Rest Goes In (Day 2) After dinner, all the remaining parts go into the same container: Heads, bones, fins, skin — roughly 500–600 g. Add another 30–35 g KOH and ~0.5 L water. Stir and let it digest for a week or two or three, until smooth. The seashells stay in — they buffer the pH and slowly release Ca and trace minerals. --- ⚖️ Phase 3 — Neutralization Once the mix settles, I’ll neutralize down to pH 6.2–6.4 using phosphoric acid. Target ~40 mL of 59 % H₃PO₄ for the whole thing. Then strain through cheesecloth / pillowcase (no coffee filter — that’s only for exports 😎). --- Storage Bottled in brown flip-top German beer bottles. Label: “FERMAKOR FISH BASE – DORADE INCIDENT – 2025-11-06” Shake before use, store dark. --- 🌿 Application 10 mL per 30 L barrel mid-flower as amino + micro boost. Clean N-P-Ca + enzymes, zero smell, instant uptake.
Likes
5
Share
Likes
23
Share
@Kakui
Follow
Primera ves cultivando una cepa de esta calidad, algo ansioso por obtener los mejores resultados posibles con estás genéticas. Básicamente elegí la Grandpa's Stach R2 y la Grandpa's Cookies #6 S1 solo por sus tiempos de floración, espero que sean buenas tanto de sabor y resina, cómo también de producción. G1, brotaron las semillas, solo 1 semilla brotó chueca, por lo que tuve que ayudarla con un alambre y va un poco atrasada en comparación del resto. G3, primer riego con pH 6.1 y EC 0.6, y micorrizas Great White. G5, creciendo bien. G11, riegos cada 2 o 3 días, a punto de pasar a etapa vegetativa.
Likes
31
Share
@Regenwurm
Follow
Trotz der Hohen Außentemperatur konnten die angestrebten 26 C° mit einer Luftfeuchte von 50-60% gehalten werden. Die Entwicklung der Blüten sind sehr gut und es geht langsam dem Ende zu. Ich denke in 2 Wochen sind Sie bereit zur Fällung. Tage der Keimung = 4 Tage. Tage in Wachstum = 28 Tage Tage Blüte = 28 Tage Wachstum h Woche 8 = 3 cm 2 mal in dieser Woche mit Purolyt Mischung 1:25 besprüht Lichtstärke: 85 % PPFD: ca. 700 umol Lichtabstand: 35 cm Std Tag/Nacht: 18/6 Temperatur Tag: ca. 26,0 Grad RLF Tag: 50-60% Temperatur Nacht: 22 Grad RLF Nacht: ca. 55 % VPD Wert: ca. 0,9-1,0 PH Wert Wasser/Düngelösung: 6,3 EC Wert: 1,0 Ventilator Oszillation: Stufe 2 Befeuchter: an Entfeuchter: aus Zusätzlicher Entfeuchter: 0 Stk. außerhalb vom Zelt im Raum Bewässerung: 2* bewässert mit Dünger mit den o.g. Mengen, Purolyt Besprühung: 2 mal Fast Plant Spray: 0 mal Controlling: Grow Control Dünger: Greenbuzz Nutrients Licht: Pro Emit Vollspektrum Abluft: EC Carbon Active 750 m3 gesteuert Danke an James von Royal Queen Seeds für die F1 Seeds. https://www.royalqueenseeds.de/56-f1-hybrid-cannabissamen Danke an Greenbuzz https://greenbuzznutrients.com/de/ Ihr bekommt 25 % Rabatt bei der Nutzung des Codes auf der GB Homepage https://greenbuzzliquids.com/de/shop/ Code: GD42025 (Mindestbestellwert 75€)
Likes
14
Share
@GRow_M8s
Follow
⚠️ We keep pushing the plants with 24/24h light schedule + increase nuts gradually. ℹ️ Crystal meths (3p) and fast berries (3p) are the tallests plants in the tent, we decide to experiment with the Crystals so we will make, #1 topping (tallest plant), #2 supercroping and #3 nothing. ℹ️ Girls scout cookies (2p) are the only plants in the tent that haven't trichomes yet (bloom) 😪. - 38 till 🔚 -
Likes
5
Share
Aquí dejo imágenes de la segunda semana! He estado un poco liado y se me ha pasado! Mañana actualizaré también la 3ª semana que ya mañana arrancamos la 4ª y no van nada mal!! La bolsa de CO2 THE EXHALE está cumpliendo y en si todos los parámetros del cultivo hasta el momento se están cumpliendo, ya os iré contando!!
Likes
21
Share
Before starting this harvest chapter, I want to apologize once again for not uploading everything directly into the official harvest and smoke review tabs. GrowDiaries has been struggling a little with very large uploads lately, and with the amount of photos, videos and information involved in this Ghost Train Haze harvest, I decided to split everything into multiple parts to make sure nothing gets lost or broken during upload. And honestly… this plant deserves the full story. So welcome to Part 1 of the Ghost Train Haze harvest. 🌱✨ Before talking about harvest itself, let’s do a quick recap of how we even arrived here. This was another 12/12-from-seed run. No traditional vegging. Very little manipulation. Minimal training. Mostly just letting the plants naturally express themselves while guiding environment, airflow, watering and light intensity carefully around them. Instead of forcing the plants into a shape, the goal here was to let them grow naturally into the PPFD and into the environment themselves. And wow… Ghost Train Haze really showed personality during this run. Most of the attention naturally went toward the massive main plant everybody keeps seeing in the photos — the giant colorful spear covered in fading reds, dark purples and swollen flowers — but there were multiple plants in this room, and in this harvest report we’ll finally start talking about all of them and the different directions they took after harvest. By Week 14, the room looked absolutely incredible. The fading on these plants became something special. Deep reds. Dark purples. Almost black tones in some areas. Golden fading leaves. Heavy trichome coverage. Color spreading through the sugar leaves and surrounding flower tissue. One of those harvests where the plants almost stop looking real. And underneath all those colors: extremely heavy flowers. Dense. Massive. Sharp aromas. Long spears everywhere. The branches became so heavy during late flower that support was absolutely necessary. Yo-yos were holding branches constantly, helping prevent collapse under the weight of the flowers. And the moment the supports came out during harvest… everything opened and leaned downward immediately under its own weight. That alone says a lot about the size and density of these flowers. There are photos in this report where I’m holding entire plants, and honestly, seeing them outside the tent really puts scale into perspective. It’s one of those plants that instantly makes you imagine how unbelievably huge she could become outdoors in native soil with unrestricted root space. Harvest day finally arrived, and from there the project split into two different paths. Some plants were harvested whole and hung for traditional drying. Others were fully broken down, every single flower removed from the branches, vacuum sealed into bags and immediately frozen for ice-water extraction work. And this is where things start becoming really interesting. Because this report is not only about harvesting flower. It’s also about exploring different post-harvest directions and understanding why growers process material differently depending on their goals. The flowers selected for traditional drying will continue their journey in Part 2, where we’ll focus much more deeply on drying conditions, moisture management, branch snapping, trimming and curing. But for now… let’s talk about the frozen material and ice-water extraction. ❄️ After harvesting, the flowers destined for washing were separated carefully and placed into vacuum bags before going into the freezer. Freezing fresh material helps preserve volatile compounds, terpene expression and trichome integrity while preparing the flowers for ice-water extraction. And no — this is not simply “throwing weed into ice.” There’s actual science and technique behind this process. Before washing, the frozen material is combined with ice and extremely cold water, ideally close to 0°C. The goal is to make the trichome heads brittle enough to detach cleanly while keeping unwanted plant contamination as low as possible. At the same time, the flowers need time to fully soak and rehydrate slightly before agitation starts. This helps reduce excessive breakage of plant material during washing. And then comes the wash itself. The bubble washer machine agitates the mixture gently, allowing trichome heads to separate naturally from the plant material and suspend inside the cold water. From there, the water passes through a series of filtration bags with different micron sizes. 25 micron. 45 micron. 73 micron. 90 micron. 120 micron. 160 micron. 220 micron. Each size captures different grades and sizes of resin heads and contaminants. We are not using every single bag configuration during this run, and we’ll go much deeper into grading, collection quality, drying and final results later in the series. But since this report already includes videos and photos of the process itself, I thought this was the perfect moment to explain what ice-water extraction actually is — and what it is not. This process is not about adding anything. It’s about separating what the plant already naturally created. Water. Ice. Agitation. Filtration. Patience. That’s it. And honestly… watching these resin-covered flowers moving inside ice water almost feels hypnotic. The harvest itself may be finished… but the real post-harvest journey is only beginning now. This report will continue in the next update very soon because there is simply too much material, too many photos and too much information to fit properly into a single upload without risking GrowDiaries crashing or losing content again. Part 2 will continue deeper into: the drying process, environmental control, trimming, flower handling, and the continuation of both post-harvest paths. And eventually, Part 3 will close the circle with curing, smoke review, flavors, extraction reflections, effects and final thoughts. As always, thank you to everybody following this journey. To Zamnesia for the genetics. To Plagron for the nutrition. To all the gear keeping this room alive day after day. To GrowDiaries itself. To the community. To the longtime followers and OGs. To the new people arriving every day. To the curious ones. To the silent supporters. To the lovers. To the skeptics. To the haters. To everyone who stopped by, even for a moment. Thank you for being here. 🌱 Part 2 coming very soon. ✨ 📡 DELETED @ 1K Please stay tuned.we never quit https://www.youtube.com/@TheDogDoctorOfficial NEW 🙏 Thank you for your patience and continued support. FOR DISCOUNT CODES AND MORE JUST FOLLOW THE LINK https://website.beacons.ai/dogdoctorofficial 📲 Don’t forget to Subscribe and follow me on Instagram and YouTube @DogDoctorOfficial for exclusive content, real-time updates, and behind-the-scenes magic. We’ve got so much more coming, including transplanting and all the amazing techniques that go along with it. You won’t want to miss it. GrowDiaries Journal: https://growdiaries.com/grower/dogdoctorofficial Instagram: https://www.instagram.com/dogdoctorofficial/ YouTube: https://www.youtube.com/@dogdoctorofficial Deleted by Youtube - https://www.youtube.com/@TheDogDoctorOfficial NEW Vimeo : https://vimeo.com/dogdoctorofficial Under construction stay tuned ⸻ Explore the Gear that Powers My Grow If you’re curious about the tech I’m using, check out these links: 🔆 Lighting & Environmental Control • Future of Grow — Advanced LED lighting technology https://www.futureofgrow.com/ DISCOUNT CODE: DOG20 • Lumiflora — Under-canopy LED lighting https://lumiflorade.com/ • TrollMaster — Environmental controllers and automation gear (past collaboration) ⸻ Genetics • Zamnesia Seeds — Genetics used in this project https://www.zamnesia.com/ ⸻ 🌱 Soil, Substrates, Boosters & Root Support • Plagron — Substrates, bio mixes, and supportive products https://plagron.com/en/ ⸻ 🎒 Storage, Curing & Preservation • Grove Bags — Curing and storage solutions https://grovebags.com/ ⸻ 📸 Photography Equipment & Tools (Not sponsors, but part of my creative toolkit) • Sony A6700 • Sony full-frame macro lens + few more • Stacking photography workflow - learning • iPhone (for behind-the-scenes shots) We’ve got much more coming as we move through the grow cycles. Trust me, you won’t want to miss the next steps, let’s push the boundaries of indoor horticulture together! As always, this is shared for educational purposes, aiming to spread understanding and appreciation for this plant. Let’s celebrate it responsibly and continue to learn and grow together. With true love comes happiness. Always believe in yourself, and always do things expecting nothing and with an open heart. Be a giver, and the universe will give back in ways you could never imagine. 💚 Growers love to all 💚 📸 P.S. – The Eye Behind the Lens All photos in this diary (for now — except for the ones showing the camera, which I took with an iPhone) are taken with a Sony A6700 paired with a Sony full-frame macro lens and a few more. Photography is part of the story — it’s how we share the fine textures, the glow, and the quiet details that words can’t always capture. I’ve also started experimenting with photo stacking — a technique where multiple images, each taken at a slightly different focus point, are layered together to create one perfectly sharp image from front to back. It’s not digital enhancement or AI; it’s pure photography — a way to reveal the plant’s beauty in microscopic depth, from trichome to petal. You’ll even see a few shots of "ghost me" capturing the shots — camera, lens, setup — because every grow deserves not just to be cultivated, but documented like art. FOR DISCOUNT CODES AND MORE JUST FOLLOW THE LINK https://website.beacons.ai/dogdoctorofficial NEW DISCORD - Official Server Invite Link : https://discord.gg/ksjAkA5T74
Likes
6
Share
This week went well I gave 1 cup of water per plant ph to 6.7 ocean Forrest will feed them for 2 weeks to a month (the soil there in)