


Likes
Comments
Share


@FoTwenny
Follow
••••••••••••••••••••••••••
Sept. 28 - Oct. 4
••••••••••••••••••••••••••
CULTIVARS:
••••••••••••••••••••••••••••••••••••••••••••••••••••••••••••••
WEDDING CAKE: STARTED = 8/10 • BLOOM = 10/1
RED HOT COOKIES: STARTED = 8/10 • BLOOM = 10/1
CHOCOLATE MINT OG: STARTED = 8/10 • BLOOM = 10/1
WILDBERRY: STARTED = 8/10 • BLOOM = 10/1
CINDERELLA 99: STARTED = 8/10 • BLOOM = 10/1
PEYOTE WIFI: STARTED = 8/10 • BLOOM = 10/1
SUGAR TITS: STARTED = 8/10 • BLOOM = 10/1
MONSTER ZKITTLEZ: STARTED = 8/10
BLUEBERRY: STARTED = 8/10 • BLOOM = 10/1
BLUE DREAM: STARTED = 8/10 • BLOOM = 10/1
HELL'S ANGEL OG X PLATINUM KUSH MINTS: STARTED = 8/10 • BLOOM = 10/1
COTTON CANDY CANE: STARTED = 9/5 • BLOOM = 10/1
•••• EXTENDED VEGETATIVE PERIOD ••••
MELON GUM: STARTED = 8/10
GREEN GELATO: STARTED = 8/10
FRENCH COOKIES: STARTED = 8/10
SOUR LEMONAID: STARTED = 8/10
LSD: STARTED = 8/10
GORILLA x COOKIES: STARTED = 8/23
••••••••••••••••••••••••••••••••••••••••••••••••••••••••••••••
WEEKLY SUMMARY:
••••••••••••••••••••••••••••••••••••••••••••••••••••••••••••••
🙋♀️Fo' Twenny here!🙋♀️
Back with another update on the viewer selected multi strain SOG. If you're just joining us, we have these photo-dependant ladies vegging in our 48"x 24" VIVOSUN tent. I have been doing a lot of heavy defoliation and pruning the past week. I also made a few upgrades in the bloom tent and moved a few of the cultivars into bloom under 12/12. Also, I realized my BlueLab Conductivity Meter has the option to switch to EC. Since EC is the most accurate way to measure the nutrient concentration in a solution, I will now be measuring and reporting EC readings rather than PPM.
I am honestly super stoked about every single plant in this run. That said, I think I am probably most impressed by the 🍭🎅🏻 COTTON CANDY CANE lady from Emerald Triangle Seeds. She is incredibly vigorous. She was started nearly a month after all the others (except the 🦍🍪 GORILLA x COOKIES) and has already caught up to some of the taller plants in the run. Special thanks to those guys for sending the freebies for me to try out! Definitely want to try more from this breeder! She is almost a month behind the other plants and is almost as tall as the tallest cultivars started on 8/10. All in all, everything looks great.
Any advice, suggestions, or constructive criticisms are always welcome.
Now, for the weekly break down!
••••••••••••••••••••••••••••••••••••••••••••••••••••••••••••••
THIS WEEK'S BREAK DOWN
••••••••••••••••••••••••••••••••••••••••••••••••••••••••••••••
9/30 - Day 52 for Majority of the Garden
- 🍭🎅🏻 COTTON CANDY CANE: Day 26
- 🦍🍪 GORILLA x COOKIES: Day 39
°°°°°°°°°°°°°°°°°°°°°°°°°°°°°°°°°°°°°°°°°°°°°
🎥 FILMING DAY! 🎥
••••••••••••••••••••••••••••••••••••••••••••••••••••••••••••••
10/1 - Day 53/Day1 of Bloom for Majority of the Garden
- 🍭🎅🏻 COTTON CANDY CANE: Day 27/Day of Bloom
- 🦍🍪 GORILLA x COOKIES: Day 40
°°°°°°°°°°°°°°°°°°°°°°°°°°°°°°°°°°°°°°°°°°°°°
📸 PHOTOSHOOT! 📸
🎥 FILMING DAY! 🎥
👩💻 UPGRAYED! 👩💻
- Added a BOTANICARE 48" x 48" low-tide flood tray on top of six 4" tall cinder-blocks with a low-profile motorcycle oil-pan for the water to drain into beneath the flood tray.
- I transplanted eleven cultivars into black 12" tall Active Aqua brand 12" x 12" square pots and inserted 3' fiberglass garden stakes into the center of the rootball near the main stem of each plant. Each stake goes to the bottom of the 12" pot. All transplants have nice solid root balls due to being slightly rootbound. I knew I'd likely run short on premixed soil, so I decided to transplant the largest plants first. Of course, I ran out of soil after 11 plants were transplanted. It seems like I used a lot more soil than usual with this method and in tgese pots.
- I mixed a new batch of soil using the same recipe. I will give the five smallest gorls a few more days to grow taller. That will give this batch of soil a little time to innoculate.
- I moved the 11 transplants into the 96" x 48"bloom tent under 12/12 lighting schedule.
🚿FEED DAY!🚿
She received approximately 1 gallon of solution. I mixed 12 gallons of solution for all the plants I have in flower. 1 gallon of that was then measured and fed to this cultivar.
👩🔬NUTRIENT SOLUTION👩🔬
⬇️Mixing Rundown⬇️
The solution starts with 12 gal tap H2O through two kdf filters mixed in a 36 gallon reservoir. The solution is applied via wand sprayer powered by a submersible pump attached to a garden hose. Nutrients and additives are added to the reservoir in the order listed below and thoroughly mixed uding a plastic stir spoon. The reservoir is oxygenated by four 4 inch air stones.
Start pH: 7.8
Start EC 1.0
TEMP: 74°F
4 ml/gal - Blue Planet Gold Shield Silica Supplement
.5 tsp/gal - Fox Farm Gringo Rasta Cal-Mag
3 tsp/gal - Fox Farm Big Bloom
1.5 tsp/gal - Fox Farm Grow BIG
.5 tsp/gal - Fox Farm Boomerang
.25 tsp/gal - Fox Farm Wholly Mackerel
.25 tsp/gal - Fox Farm Kelp Me Kelp You
.0625 tsp/gal - Fox Farm Open Sesame
pH: 6.3
EC: 2.8
Our target pH is in the range of 6.0- 6.6 prior to adding any microbial innocclants. pH already in range, no adjustments needed.
1 tsp/gal - Grower's Choice Recharge
.6 ml/gal - Mammoth P.
.5 tsp/gal - Fox Farm Kangaroots
1 tsp/gal - Azos
pH: 6.4
EC: 3
••••••••••••••••••••••••••••••••••••••••••••••••••••••••••••••
SUPPLIES & EQUIPMENT
CURRENTLY IN USE:
••••••••••••••••••••••••••••••••••••••••••••••••••••••••••••••
• A/C: Whynter ARC-14S 14,000 BTU Dual Hose Portable Air Conditioner
• TENT: VIVOSUN 48"x24"x60" Mylar Hydroponic Grow Tent with Observation Window & Floor Tray
• POTS: Black 8"tall Active Aqua brand 6" x 6" one gallon square pots/Black 12" tall Active Aqua brand12" x 12" 3.4 gallon square pots
• VEG/AUTOFLOWER INTAKE FAN: None (PASSIVE)
• VEG/AUTOFLOWER EXHAUST FAN : VIVOSUN 6 Inch 390 CFM Inline Duct Fan with Variable Speed Controller
• BLOOM INTAKE FAN: VIVOSUN 6 Inch 390 CFM Inline Duct Fan with Variable Speed Controller
VEG/AUTOFLOWER EXHAUST FAN : VIVOSUN 6 Inch 390 CFM Inline Duct Fan with Variable Speed Controller
• BLOOM EXHAUST FAN: AC Infinity CLOUDLINE T8, Quiet 8” Inline Duct Fan with Temperature Humidity Controller - Ventilation Exhaust Fan
• AIR MOVEMENT: 6-Inch Lasko FBA 2004W 2-Speed Clip Fan
• Bluelab PENPH pH Pen Fully Waterproof Pocket Tester
• Bluelab PENCON Conductivity Pen Fully Waterproof Pocket Tester
• Kolder Multi-Purpose Liquid and Dry Measuring Cup, 16-Ounce
• Fox Farm Measuring Spoons
• WATER TREATMENT: Tap H2O run through two AQUACREST Garden Hose Water Filters to remove chlorine and chloramine.
– COMING SOON: Hydro-Logic 31023 1000-GPD Evolution RO1000 High Flow RO System, White (HL31023).
• WATER APPLICATION: I use 2 different watering systems. The pump sprayer is typically used in early veg, between feeds, or for lighter feeds. Most feeds are usually run through the pump and reservoir because it's faster and easier when dealing with larger volume feeds.
– 2 GALLON LAWN & GARDEN PUMP PRESURE SPRAYER. * I removed the spray head due to clogs and it's just faster.
– Superior Pump 91250 Utility Pump, 1/4 HP in a heavy duty 27 gallon Tote attatched to a 10 foot garden hose to an Orbit Underground 56246 Green Thumb 9-Pattern Telescoping Wand.
– Aeration of the reservoir is accomplished using a General Hydroponics HGC728040 Dual Diaphragm Air Pump 320 GPH 4 Outlet attached with standard aquarium air hose to four 4-Inch Air Stone Disc Bubble Diffusers.
• VEG/AUTOFLOWER LIGHTING: 320w MosterBoard V4-PLUS powered by a MEANWELL 320H-48AB DRIVER. There are three V4-PLUS boards prewired and mounted on a 935x195x10mm black heatsink. Dimmer, UV Switch, and IR Switch included. Each board contains two hundred fifty two 3000k lm301h diodes + twelve Osram 660nm diodes plus 4 separately switchable LG UV 395nm diodes and 4 separately switchable Osram IR 730nm diodes.
• BLOOM LIGHTING: Two custom mounted lighting units: Each mount has one 480w MEANWELL 480H-48B driver and one 240w MEANWELL 240H-48AB powering 6 KingBright Quantum Boards. Each board contains two hundred fifty two 3500k lm301h diodes + twelve CREE XP-E2 660nm diodes plus four separately switchable CREE XP-E2 730nm diodes and four LG UV 395nm diodes. Hanging between the two mounts are two additional quantum boards with two hundred fifty two 3000k lm301h diodes + twelve 660nm diodes plus four constant power 730nm IR diodes and four 395nm UV diodes. That's a total of 1680 watts of quantum board power in our 96" x 48" bloom tent.
⚠️ ALL DRIVERS MOUNTED REMOTELY IN AN AIR COOLED BOX INSTALLED BETWEEN THE FILTER AND EXHAUST FAN ⚠️
• SLMOTO Universal Oil Drain Pan, 2 Gallon (8 Liter) Capacity ABS Low Profile Oil Drain Pan w/Spout Fit for Motorcycles
• Modified Botanicare Low Tide LT Black Tray - 4' x 4' - Modification: Cutaway at corners and used flex-seal tape to create a new edge that will be soft to fit between tent supports. She is supported by 6 Standard Cored Concrete Blocks (Common: 4-in x 8-in x 16-in; Actual: 3.625-in x 7.625-in x 15.625-in). ⚠️THIS TRAY WILL NOT FIT BETWEEN SUPPORTS IN A 48" x 48" or 48" x 96" TENT WITHOUT MAKING MODIFICATIONS TO THE TRAY!⚠️
• Blue Sticky Pads
• Yellow Sticky Pads
••••••••••••••••••••••••••••••••••••••••••••••••••••••••••••••
SOIL MIX DETAILS:
••••••••••••••••••••••••••••••••••••••••••••••••••••••••••••••
All components were mixed into a 50 gallon tote that is kept in a warm environment to help innocculate to promote a vast and diverse microbial life in the rhizosphere. Once mixed, add 32-64oz water once every 7-14 days as needed. The goal is to keep the soil moisten without oversaturating.
2 Part - Royal Gold Tupur
INGREDIENTS: Coco fiber, aged forest materials, perlite, and basalt
1 Part - Fox Farms Ocean Forest
INGREDIENTS: Aged forest products, sphagnum peat moss, earthworm castings, bat guano, fish emulsion, and crab meal.
1 Part - Roots Organics
INGREDIENTS: Perlite, Coco Fiber, Peat Moss, Composted Forest Material, Pumice, Worm Castings, Bat Guano, Soybean Meal, Alfalfa Meal, Fishbone Meal, Kelp Meal, and Greensand. Also contains beneficial mycorrhizal fungi: Funneliformis mosseae, Rhizophagus intraradices, Septoglomus desertícola
.5 Part - Wiggle Worm Soil Builder Pure Earthworm Castings
.5 Part - Ancient Forest Humus
.5 Part - Coarse Grade Perlite
Inocculated by mixing 1 cup of Extreme Gardening Mycos
Watered with pH 6.5 h2O
1 Tsp/gal Real Grower's Recharge
1 tsp/gal Hi-Brix Molasses
2 tsp/gal Fox Farms Kangaroots
••••••••••••••••••••••••••••••••••••••••••••••••••••••••••••••
••••••••••••••••••••••••••••••••••••••••••••••••••••••••••••••
Want to see more cultivars I have growing❓
Please, be sure to check out my other diaries & give me a follow! 👍👍
🙏Thank you for stopping by my garden!🙏
Peace, ☮️✌️
Love, 💚🤟
& Frosty Nugs! ❄️🌲
Happy farmin' my friends! ☺️🌱
- Fo' Twenny 👩🌾🏻








Processing
Likes
12
Share


@GrowGuy97
Follow
Day 35 - Ladies are way taller than I could have ever imagined & starting to get extremely dark pruple😍 make sure to check back for daily updates & happy growing friends✌️🏼🌱


Likes
5
Share


@420Hydro
Follow
This will be day one of flower ...gonna run 12/12 starting 7 am lights will turn off till 7 pm until time change then will be 6am to 6pm...also running my Moby dick under 400watt hps next to these ...got it as a freebie from greybeard..have changed res to flower nutrients... Will be fun watching these girls grow .a lot new gear running in this tent so hopefully everything goes good...only running 6inch exhaust fan atm need upgrade to 8 inch later but seems be doing ok in there.. .

Likes
1
Share


@renbuds
Follow
8/5-After letting the bottom branches grow for another 4 days they were showing plenty of amber and had firmed up enough to harvest. Did a rough trim and hung the branches in Cannatrol Cool Cure to dry.
8/11-Overall the buds were a lot smaller than previous Mephisto grows. I'm going to let them cure for 2-3 weeks and then do a real taste test.
Processing
Likes
1
Share


@Esebees
Follow
Las plantas ya se ven mejor, han crecido bastante bien, aunque la Runtz#1 parece ir peor
Likes
8
Share


@Froggman
Follow
Week 10 was more like week 11 but I dunno how to change the pics. I’ve really lost track of how long it’s been after stunting them so badly a couple months ago. I’m giving them 8 weeks (at least) in flower each regardless.
Likes
16
Share


@TheCalyxLaboratory
Follow
The Final Stretch: Heavyweights & The Big Flush! ⛽🥊
We are officially in the final countdown, and the tent is putting on a spectacular show! The plants are spending their absolute last energy packing density and resin onto these colas, and it shows.
Current Parameters & Adjustments:
Nutrients (EC): I’ve been gradually tapering off the feed, and the EC is now down to a very clean 0.75. We are in the final flushing phase, letting the plants cannibalize their remaining stored nutrients for the smoothest, cleanest burn possible.
Lighting (PPFD): Dropped the light intensity down to ~500 PPFD. This crucial step protects those precious, highly volatile terpenes from the summer heat and perfectly mimics the late-season sun to push the final ripening.
Current Status in the Tent:
The biggest update this week? Gravity is taking its toll! The buds have gotten so incredibly dense and heavy that the branches can no longer support their own weight. The colas are literally leaning and flopping over across the tent. It’s an absolute beautiful mess and arguably the best "problem" a grower can have at this stage!
Looking Ahead:
Based on the current trichome development, we are looking at about 5 to 7 days left before harvest. Just keeping the airflow dialed in on maximum and monitoring them daily now until the big chop. Let's finish strong! ✂️🌿❄️
Likes
9
Share

@TeDcz
Follow
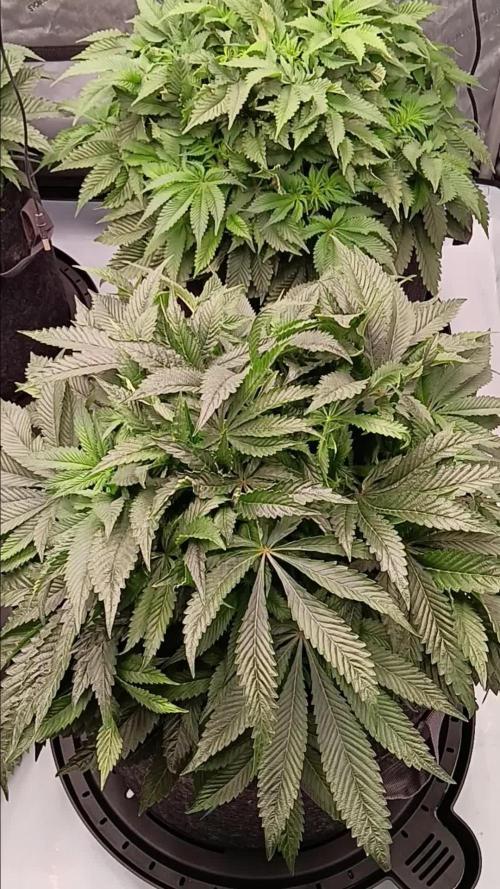
Zdarec, týden v květu za námi a holkám se daří. Dnes výměna aktivního zavlažování za systému vysoce absorpčních knotů od AC Infinity, tak uvidíme jak to bude fungovat.

Likes
42
Share


@KrautFabrik
Follow
Day 41: nutrients like plan
---------------------------------------------
Added some non organic nuts. to boost the flower.
Can someone give me advise for an organic pk booster?
She is getting frosty ❄️🦍
Happy growing 🌱



Processing
Likes
12
Share


@Tazard
Follow
Wow what a week. We are at 48” as of day 20 on the Enemy of The State plants (both are the same height now). The two White Criticals were 36 and 38 inches from the top of the tanks and the taller tops on Purple Purple are about 34”. Wedding cake is about 30” now. All my plants seem to love the 5.2 pH. Enemy of the state are on a lighter feed of about 950ppm and wedding cake is still eating from a vegetive reservoir at 1125ppm. Thanks for looking!

Likes
24
Share


@OGOZHigh
Follow
So Buddy‘s
Den Ladys geht es hervorragend. Sie machen ordentlich Fortschritte.
Wetter spielt wieder Perfekt mit.
Updates folgen ✌️
Likes
24
Share


@MediciGrade
Follow
6.02 Growth has picked up since raising the PH of my nutrient solution to 6.25-6.5. I also began foliar feeding at lights off with 5 ml/g of Cal-Mag Plus. I added .25 tsp/gallon of recharge when feeding today. It raised the PH of the solution to 7.0 and will monitor over the next 48 hours for results.
6.04 When I tied down the big plant I split the stems where they were topped the 2nd time. Taped them up and cinced with plant ties.
6.06 End of week 9. Installed my automatic watering manifold with hydro halos. I've been feeding 3 times/day for the past week, and I won't have time to hand water 5 or 6 times a day during flower. Will probably need 1 more full week of veg before I flip to 12-12.

Likes
18
Share


@thenotillwizard
Follow
At day 22, the girls has cut their water consumption by over 60%.
the strech is definitely over. The buds are now swelling. The terpenes are showing themselves.

Likes
Comments
Share


Likes
20
Share


@eldruida_lamota
Follow
Vamos familia que ya actualizamos la cosecha de estas lava Cake de Zamnesia .
Y es que me han sorprendido para bien , vaya flores que se han marcado repletas de tricomas y las flores se marcan aromas dulces
Temperaturas máximas en 28 y mínimas en 25 y una humedad estable en torno al 36%.
Os comento que tengo un descuento y para que compréis en la web de Zamnesia de un 20%, el código es ZAMMIGD2023
The discount 20% and the code is ZAMMIGD2023
https://www.zamnesia.com/
Agrobeta:
https://www.agrobeta.com/agrobetatiendaonline/36-abonos-canamo
Mars hydro:
Code discount: EL420
https://www.mars-hydro.com/
Espero que lo disfrutéis, buenos humos 💨💨💨

Likes
29
Share

@eldruida_lamota
Follow
Ya visteis , cultivo fácil, de principio a fin, pocos errores una pérdida tan solo de 4 ejemplares y por dejadez.
Pero enserio si todo se hace correctamente vais a flipar lo rápido que van y después lo buenas que están.
Humedad en el secado por debajo de 45% y temperatura media de 23 grados.
Hasta aquí es todo fumetillas, que paséis un final de año de lujo entre buenos humos.
Likes
9
Share


@drzoidberg
Follow
just watching her fill out is great seems like every time i look she is bigger and bigger been plucking fan leaves as need be have no problems to report
Likes
5
Share


@LOKO_Grower
Follow
LST again & again. My Gagarin Auto gives powerfull branches on both sides. Seems like it wants to start flowering. That's pretty early)
Likes
45
Share

@Natrona
Follow
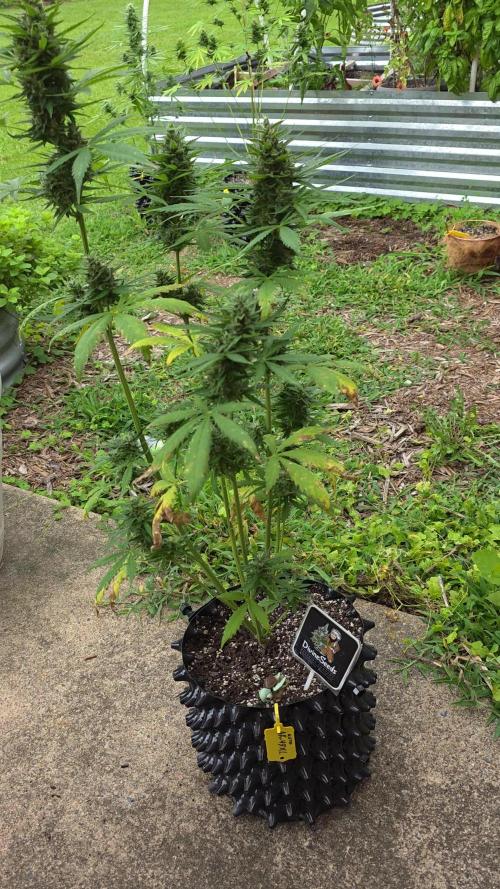
Divine Seeds 2025 Auto Contest AK-47XL Auto
👉Sponsored Grow👈
W10F6
This week’s weather has been a mix of rain, clouds and thunderstorms. Temperatures were mostly in the mid to upper 80s during the day and low 70s at night.
I watered 2 times with compost tea adding green sensation on the last watering.
Information from Divine Seeds indicates that it can handle training due to its open and branchy structure. In the beginning AK47XL topped herself. You will see she has 4 main colas and a fifth short one and did just fine with a heavy stress training technique.
Blooming plants produce massive pungent stench just as an AK-47 hybrid should. I don’t smell much currently but AK47 XL auto is fattening up her buds. The structure shows minimal hairs and mostly calyxes.
Her buds have lots of sugar leaves which possibly can trap moisture causing rot. I check all my outside plants daily in the morning. If it rained that night, I give each stem a good shake to help dry them out. So far so good, no mold or other fungus or bug issues. The pics show the trichomes starting to fill out even without a magnifier. I am getting excited to see the full development of buds, colors and smells. Let’s go!
Thank you all for your continued support and encouragement. Your likes and comments motivate me to keep sharing my journey. Let’s continue to learn to grow together!
Stay green, growers love 💚🌿,
💫Natrona💫
