


Likes
Comments
Share


@julian100614
Follow
La semana comienza bien 👍 la planta se ve sana y esta creciendo con fuerza.
La he aplicado sus primeros nutrientes añadiendo 5ml de terra Vega de Canna a 1L de agua ajustando el pH a 6 y con una temperatura de 25°C
Veremos como responde a la poda apical que la hizimos la semana pasada, aunque parece por el momento que va muy bien 😉👌


Likes
2
Share


@GrownyStark
Follow
Tip#5: keep your reservoir cool in the heat! Invest in a water chiller and be done with it. I’ve been using frozen water bottles and wreaking havoc on my roots. I was also slow to put styrofoam blanket around my reservoir and wrap with aluminum foil. I should have had that all in place not being reactive to the heat.
I've had her Outdoor all week approx 9 hours sun and 3 hours cloud/shade day. This week temperatures are soaring into the high 20s low 30s. To keep roots happy, I use ice bottles in my reservoir when hot. I try not to let the leaves go into full stress mode i'll just have them hovering near that point. I'm on the north facing slope so the shade arrives just when the plant is starting to stress out. Running grow tent lights 530am-530pm is most ideal you can get in my spot.
I cover my reservoir so the sun doesn't penetrate my basket and heat can dissipate. Night temps are down to 12 outside but in tent it is stable above 17c. I planned for budding in this weather window because of the temperature drops is said to help with terp development.
The second picture shows how important calmag is to healthy growth. Experience with RO water has taught me a lot about plant calmag intakes. Too much you'll burn tips and chance lockout, not enough can cause widespread cell death and slow growth. I halfing her calmag dose now she's in 4th week of flower. I'm also removing big bud from my nutrient line after this week's reservoir change.
Midway through the week wildfires are raging creating ideal conditions I don't have the resources to mimic. high CO2 ppms and high red spectrum light. High UV light which is damaging is being refracted into more absorb-able light. Temperatures also didn't peak above 32c today with the smoke cover and haze breezy winds: it peaked at a balmy almost perfect 27c. My prayers go out to those affected by the wildfires.
LST training today opened up more bud sites to the light. Now she no longer fits in the 2x4 darkroom tent so I had to modify a lil. Stretch phase done
It’s nearing end of week and she's drinking two 1.75 litre pitchers of solution. I refreshed my reservoir and will top up with a more concentrated solution as I think she's getting more piggy. I added h2o2 to reservoir at the wend of the week.

Likes
18
Share


@Grower_Of_Persia
Follow
week intel:
its time to harvest some of plants the ones that is mature enough. indica dominant plants will done first always so we should harvest them first
because my base nutrients and one of boosters was salt based, i'll do flushing this week to get some relieve to plants in the last days
stresses :
flushing
Drought stress via watering only one time with flushing this week
feeding:
day 1 : i flushed them with Advanced Nutrients Flawless finish and adjusted ph
day 3 : no more feeding from now on
day 5 : no more feeding from now on
guide of the week :
i harvest in 2 parts : first i harvest top of the branches and will let the lower buds to ripe another week then ill harvest the second wave.
indica dominant plants will get done 1 or 2 weeks sooner than sativa dominant plants that will often takes more than 8 weeks so be aware to harvest them sooner.
my dry and cure style is this:
3 days of hanging upside down to get water activity lower to around 0.6 in 50% humidity and 26 C temp (i know its a little high but we are in a hot summer right now and i cant get it lower even with air conditioner) and then after 3 days of drying i remove leaves and stalks, trim buds and move them to jar for the rest of their life :D . and in the first 4 days of curing i open the jar door and let hem get some fresh air in the jar for about 5 minutes and close the jar door again, after 4 days of curing like that buds are smokable but they will get better as they getting cured about 1 month.
im happy as hell with this harvest :D.


Likes
16
Share
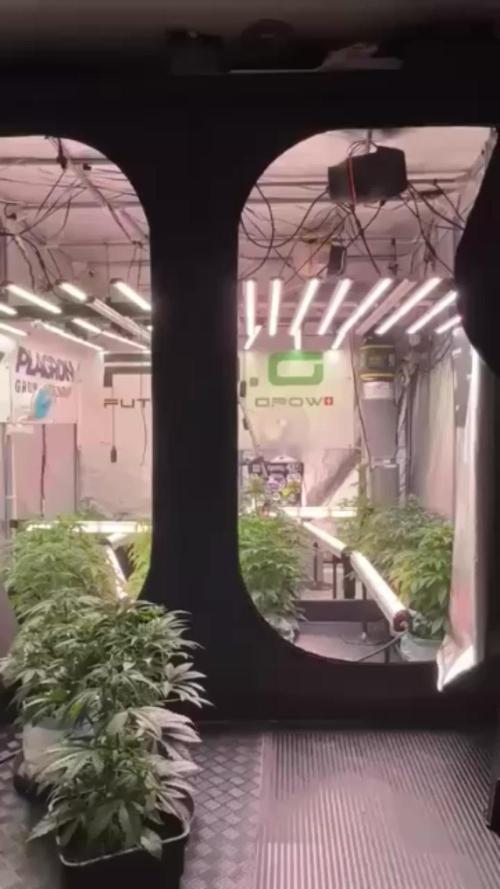

@DogDoctorOfficial
Follow
🍋🍒 Lemon Cherry Gelato — Week 6 From Seed
(Week 2 Flower · 12/12 From Seed)
Hello everyone 👋
Quick recap and a warm welcome to anyone joining the diary now, here’s where we are and how we got here.
🌱 From Seed to Now, Quick Context
These Lemon Cherry Gelato girls have been grown 12/12 from seed, and we are now entering what we consider Week 2 of flower / transition.
Pre-flowers are clearly visible, stacking has begun, and the stretch is now turning into early bulk.
They are in that beautiful in-between phase where they still look slightly vegetative, but their behavior is unmistakably flowering.
⸻
🌡️ Environment Update
• Day temperature: ~28°C (successfully raised)
• Humidity: ~65%
It’s still a bit cold outside, but as plant mass increases, lighting intensity goes up, and under-canopy lighting is added, the tent itself has become a stronger heat source.
This allowed us to stabilize conditions without forcing anything, exactly how we like it.
• PPFD: ~600–850 (depending on plant size and position)
• CO₂: ~900 ppm
• Airflow: unchanged
• vortex extraction
• cross-winds with multiple fans
• constant, gentle movement across the canopy
⸻
💧 Feeding & Nutrition Strategy
This week marks an important nutritional transition.
• EC: 2.4
• pH: 6.5
From this point forward, all feedings will be pH 6.0 and above.
The reason is simple: as flowering progresses, plants shift their nutrient uptake priorities, and slightly higher pH improves availability of key elements needed for bloom development.
Nutrient Change
• Introduced: Terra Bloom — 5 ml / L
• Removed: Terra Grow
This change is happening now, not earlier, because the plants have clearly entered the flowering transition.
There’s no rush, no shock, just following the plant’s signals.
The current recipe (our “Plagron” approach) continues to perform exceptionally well, and plant response has been outstanding so far.
⸻
🌿 Training & Plant Handling
We are continuing with a very minimal-stress approach:
• No topping
• No aggressive defoliation
• Only leaf bending and leaf tucking
This method keeps the structure open, exposes bud sites naturally, and avoids recovery downtime.
Simple, effective, and extremely practical, sometimes simplicity isn’t laziness, it’s efficiency.
The results speak for themselves:
• strong branching
• compact “ball” formations
• clean stacking
• healthy color fade beginning naturally
⸻
📸 Visual Progress
This update includes a large set of photos (studio + tent shots) to clearly show:
• the transition phase
• stretch turning into bulk
• visible growth differences over just one week
Every time the tent doors open, growth is noticeable, and comparing earlier photos to the latest ones makes that even clearer.
⸻
🔮 What to Expect Next
Over the coming weeks:
• stretch will gradually slow
• bulk and stacking will take over
• plant handling will be reduced even further
• stability becomes the priority
What not to expect:
• heavy pruning
• forced corrections
• unnecessary interventions
At this stage, the goal is to let the plants do what they already know how to do.
⸻
🙏 Thanks
Big thank you to:
• everyone following along
• newcomers and long-time readers
• supporters, critics, observers, all welcome
• the Grow Diaries Team and platform
• and all sponsors backing the journey
This is a key week in the run, and we’re excited to document it properly and share the learning with the community.
As always — we’re here to observe, guide gently, and let the plants express themselves 🌿💚
FOR DISCOUNT CODES AND MORE JUST FOLLOW THE LINK https://website.beacons.ai/dogdoctorofficial
📲 Don’t forget to Subscribe and follow me on Instagram and YouTube @DogDoctorOfficial for exclusive content, real-time updates, and behind-the-scenes magic. We’ve got so much more coming, including transplanting and all the amazing techniques that go along with it. You won’t want to miss it.GrowDiaries Journal: https://growdiaries.com/grower/dogdoctorofficial
Instagram: https://www.instagram.com/dogdoctorofficial/
YouTube: https://www.youtube.com/@dogdoctorofficial
⸻
Explore the Gear that Powers My Grow
If you’re curious about the tech I’m using, check out these links:
🔆 Lighting & Environmental Control
• Future of Grow — Advanced LED lighting technology
https://www.futureofgrow.com/
DISCOUNT CODE: DOG20
• Lumiflora — Under-canopy LED lighting
https://lumiflorade.com/
• TrollMaster — Environmental controllers and automation gear (past collaboration)
⸻
Genetics
• Zamnesia Seeds — Genetics used in this project
https://www.zamnesia.com/
⸻
🌱 Soil, Substrates, Boosters & Root Support
• Plagron — Substrates, bio mixes, and supportive products
https://plagron.com/en/
⸻
🎒 Storage, Curing & Preservation
• Grove Bags — Curing and storage solutions
https://grovebags.com/
⸻
📸 Photography Equipment & Tools
(Not sponsors, but part of my creative toolkit)
• Sony A6700
• Sony full-frame macro lens + few more
• Stacking photography workflow - learning
• iPhone (for behind-the-scenes shots)
We’ve got much more coming as we move through the grow cycles. Trust me, you won’t want to miss the next steps, let’s push the boundaries of indoor horticulture together!
As always, this is shared for educational purposes, aiming to spread understanding and appreciation for this plant. Let’s celebrate it responsibly and continue to learn and grow together.
With true love comes happiness. Always believe in yourself, and always do things expecting nothing and with an open heart. Be a giver, and the universe will give back in ways you could never imagine.
💚 Growers love to all 💚
📸 P.S. – The Eye Behind the Lens
All photos in this diary (for now — except for the ones showing the camera, which I took with an iPhone) are taken with a Sony A6700 paired with a Sony full-frame macro lens and a few more.
Photography is part of the story — it’s how we share the fine textures, the glow, and the quiet details that words can’t always capture.
I’ve also started experimenting with photo stacking — a technique where multiple images, each taken at a slightly different focus point, are layered together to create one perfectly sharp image from front to back.
It’s not digital enhancement or AI; it’s pure photography — a way to reveal the plant’s beauty in microscopic depth, from trichome to petal.
You’ll even see a few shots of "ghost me" capturing the shots — camera, lens, setup — because every grow deserves not just to be cultivated, but documented like art.
FOR DISCOUNT CODES AND MORE JUST FOLLOW THE LINK https://website.beacons.ai/dogdoctorofficial
NEW DISCORD - Official Server Invite Link : https://discord.gg/ksjAkA5T74

Likes
7
Share


@Ieiogrow94
Follow
Eccoci qui...
Tutto va per il meglio, questa settimana si inizia a vedere la resina e ora si inizieranno a formare le cime, per questo aggiungo Sugar Shot di @xpertnutrients vedremo l'evoluzione settimana prossima.
Tutto alla grande settimana molto interessante sul profilo della resina e dell'odore ora vediamo come gonfiano le cime.
Grazie a tutti per il supporto🔥🌲❤️

Likes
6
Share


@Naujas
Follow
The girl is fantastic :) she looks strong, healthy and happy :) next week, I will defoliate her to give energy to the flowers, and at the same time improve air circulation closer to the stem :) everything is going smoothly and well :).
Likes
5
Share


@Mz876
Follow
I was slightly disappointed with the yield but I’m content with the taste and affect that I got from the plant .
Likes
13
Share


@Rene1968
Follow
20-2 a New week. Day 55 Starting week 4 flowering. I feed them now with Plagron 'Green sensation'.
The distance light at 62 cm from the plants. PPFD at the middle is 981 umol/s
21-2 Flowering looking well for so far
22-2 I changed power of lamp. PPFD is 1002 umol/s. Past night all the Girls grows 3 cm.

Likes
2
Share


@SessionMeister
Follow
This is still week 7 but a couple days after last weeks pictures. The Photos haven’t fully flipped to flower but are showing clear signs. Really pleased with Somango and BCP but I’m not really liking the way LSD is growing. Doesn’t have an abundance of leaves and is growing really long Branches. We’ll see how that goes in Flower, I hope it’s not going to turn in to a lot of Space and/or humidity Problems.


Likes
48
Share


@Regenwurm
Follow
In dieser Woche gibt es nichts besonderes zu berichten ausser…..
Umgetopft von 1 l in 12,5 l Air pots.
Wurzeln extrem gesund (siehe Bild)
Heute die Ladies getopt und das Training beginnt für ca. 2-3 Wochen. Lichtleistung noch auf 30 % , ich werde ab morgen steigern. Ebenfalls Erhöhung der Düngemenge auf die Hälfte des Düngeplans von Green Buzz. Klima dank Growcontrol sehr sehr gut und konstant. Beim umtopfen etwas living organics beigegeben. Sehr enge Internodien, so soll es sein….

Likes
490
Share


@Legendaryseedthumb
Follow
Day 85: still flushing her and it starting to show on the leaves. I don’t want them to disappear because I’m going to make hash but I’m still waiting for a plant in the same tent. Have no space for drying so need to cut them all at the same time :/
Day 86: Will cut on Friday!
Day 87: switched the lights off until tomorrow.
This it the light I’m using for this grow!
Mars hydro SP3000
High PPFD at 2.8 umol/j, average yield at 2.5g/w, increasing your yield 50% or more compared with old blurple and HPS lights, 300 watts output.
Dimmer knob added, more convenient to adjust the brightness. Up to 30 lights can be daisy-chained and control together on just one light, or just have one lamp in 120x60 tent is perfect for light.
https://www.instagram.com/marshydro_aliexpress2/


Likes
16
Share


@OwnWayGoodWay
Follow
It was a very nice week.
She is growing fast and loves low stress training. There are still little flies but they are not a danger for the plant.
No problems, no deficiency, only pleasure.
Coco is ready for flowering stage 💪💪💪
Likes
26
Share


@Teamdirtbag2
Follow
She is shorter than her sisters. But im extremely excited. She is just gorgeous. Nice and tight, 4" and 4 nodes. And looking great.
Greenhouse is ready.


Likes
85
Share


@420DeepGrow
Follow
Hoy toca pasar a floracion y rezar para que no sea un macho. En pocos dias sabremos si esto continua o se termina la aventura, sin riesgo no hay beneficio.
📅 Dia 1: Descanso
📅 Dia 2: Riego con agua y nutrientes EC 1000, EC drenaje 2200, voy algo alto en EC pero lo soporta bien.
📅 Dia 3: Va muy bien, espero que no sea un macho y se acabe la aventura. Si esto pasa, pondre una feminizada directamente a floracion. 12/12
📅 Dia 4: Ligera defoliacion (Miercoles)
📅 Dia 5: Riego con nutrientes EC 1300 drenaje: 2100. Comieron todo
📅 Dia 6: descanso
📅 Dia 7: riego con agua. Ec escurrida 1750.
Es una bella dama blanca 😄, que felicidad y alegría poder continuar con este diario. Un riesgo al ser una planta regular y una alegria porque de aqui se fumaran buenos porros si continua asi.


Likes
5
Share


@Ninjabuds
Follow
My Skunk Apple plant's a little behind the others. I think it started flowering a couple weeks later. It's a smaller plant, but it's finally starting to fill out. I'm guessing I've got maybe two weeks left before it's ready to chop.
The past week has been awesome for drying my plants. The weather's been perfect – nice and dry, with just enough breeze to keep things moving. I finally got around to chopping down those two big plants I've been meaning to trim. They're almost ready, just need a little more time to dry out completely. I can't wait to see how they turned out.