







Likes
60
Share


@Dirty_Hippy
Follow
Week 8:
She just keeps growing!!!
I trained this into two main tops and it really decided that it would use all of that space.
The smells coming off htis lady have me drooling.
It is 2nd most sweet and fruity boquet I have ever smelled.(Cherry Sumo was #1)
Really excited for this lady to come down.

Likes
3
Share


@CaliJ
Follow
fast eddy measures 60 cm, the 3 gelato cookies between 70 and 80 cm, the 3 northern light from 90 cm to 1 meter 20, the smell is stronger when the tent is opened, major heat problem solved thanks to a portable air conditioning🍀

Likes
Comments
Share

@MyLittleGarden
Follow
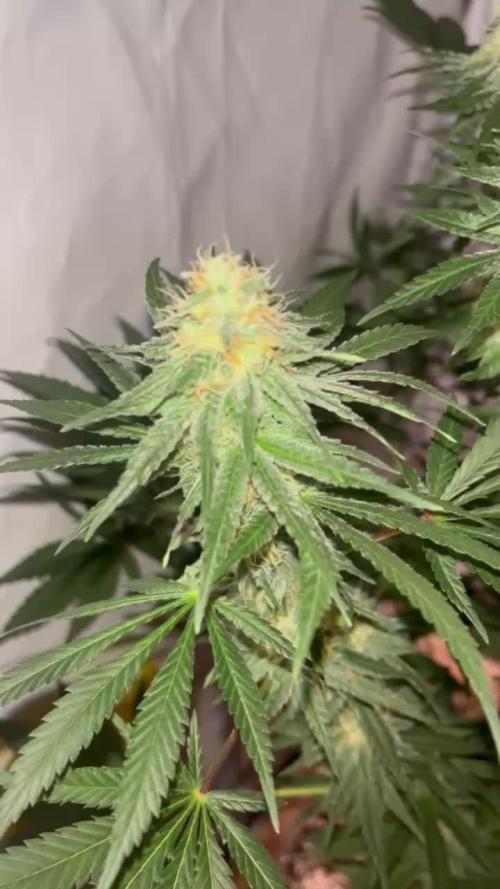
Blütewoche 5 - 13.07. – 20.07.2026
Bis auf eine leichte Entlaubung und etwa 9 Liter Wasser wurde nichts weiter gemacht.
Die Buds haben in dieser Woche deutlich an Größe und Struktur gewonnen. An den Trieben bilden sich immer mehr zusammenhängende Blütenstände, wodurch sich langsam längere Colas entwickeln. Die Harzproduktion hat spürbar zugenommen. Die Zuckerblätter sind bereits stark mit Trichomen überzogen und fühlen sich deutlich klebrig an.
Auch der Duft wird intensiver. Mittlerweile verströmt die Blue Sunset Sherbert einen angenehmen, kräftigen Zitrusgeruch. Die ersten weißen Blütenfäden beginnen sich zudem langsam orange zu verfärben .
Insgesamt zeigt sie sich weiterhin sehr vital, mit dunkelgrünem Blättern und einer gleichmäßigen Blütenentwicklung. Bisher verläuft die Blüte genau nach Wunsch und ich bin gespannt, wie groß und fest die Buds in den kommenden Wochen noch werden.

Processing
Likes
13
Share


@Beast5650
Follow
Water Day (half strength)
- [ ] Kangaroots, Microbe Brew, Grow Big, Distilled Water, Ph-6.8, PPM-890).
- [ ] Lessons Learned - Ph Up/Down from fox farms is super strong, huge upswing in 500ml distilled water with only 0.25ml of pH Up.
- [ ] I think I need to pH water before adding nutrients. Can anyone verify this please?
- [ ] Will transplant to recirculating dwc soon, until then probably watering every 3-5 days with current nutrient mix. Can’t wait to get it under better lights!
- [ ] Most likely going to mainline if it all works out ok.
6/10/19, DAY 26, UPDATE:
Water day due to transplant
Decided to change plans a bit. Transferred to big fabric pot and fox farms ocean forest soil. Will grow plant out and cut clones. Will then put clones immediately into DWC setup. This mother plant will then be moved outdoors to flower. Hopefully it all pays off!
Day 29
6/14/19
Decided to clear all fan leaves that had less than five fingers then top at the 4th node and LST the remaining fan leaves. The goal is to eventually cut two clones off of the the 3rd node and mainline everything else starting at the 4th node. At least 8 colas is the goal, ideally 16. We’ll see tho,
Very surprised at how quickly the leaves pointed back up toward the light and recovered from the lollipopping/topping/LST.
Any and all suggestions are welcome! Lofty goals for my first grow ever, hopefully it all works out.
Likes
38
Share


@Zurban_Poison
Follow
I won't say anything! look at the photos and videos and you yourself will understand everything! namely that this is just a cool bush!

Likes
6
Share


@oregonian
Follow
Experiment failed; unable to control the staked arms. Allowing them to become main stems. Expecting a dozen colas. Yellowsticky traps capture hundreds of thrips. She is just beginning to become a girrrrl.

Likes
14
Share


@LokalGrenz
Follow
The Amnesia haze 2 is turning light green yellowish some told me it could be deficiency or it could be just flowering taking energy from the leaves but I’m not sure I used Gaia green bloom recently thinking it would help I’m going to too water that haze from here out the other have and sour I’m going to continue to bottom feed
I took some trichome pics I don’t think there ready yet but I think I’m getting close to the date I feel the the amnesia haze 2 is going to hit 90+ days tho kind of hope not cause the other haze and
sour are probably going be done sooner I want to fry them all at the same time
March 7th I think the haze #2 and Sour d is ready but the other Haze is not I’m pretty sure I have another week pre maybe even two for it to be near ready I need the tent to harvest and dry what’s ready I’m going try leave the ready ones in for another week in hope it doesn’t mess them up


Likes
37
Share


@Reyden
Follow
Le 2 Fast Flowerg stanno crescendo bene e in salute, questa settimana ho dato solo acqua e zeolite per via fogliare, stanno rispondendo molto bene al super soil e alla luce, con internodi bassi e un ottima struttura..questi giorni vedrò se fare qualche potatura e settimana prossima qualche clone!

Likes
10
Share


@BR1CK_SANCHEZ
Follow
Took 2/3 plants down. Tried flushing but I used mostly organic slow release nutes, so the leaves didn't yellow much. Still letting the last girl finish up for a few days, her flowering got stalled... Took her top kola off so the under branches could get some more light and finish up. She's gonna be a larfpile but she smells good. The smallest girl turned out to be the thicccest... will update with full harvest soon ✌️
Likes
10
Share


@Thibaut
Follow
weather is insane hot ladies are loving it all started to show nice pistils with beatifull colors the bloody skunk looks redish its nice keep updating these for sure


Likes
7
Share


@Young_agronomist
Follow
22.09.23- 84 день жизни замечательного растения !
Это финальная прямая 10 дней только вода , 4 из которых уже прошло ))
6 дней воды с пш, день засухи и харвест .
Шишки очень нравятся , жду не дождусь когда попробую . Очень плотные и твердые.
Для достижения большего количества трихом , за 2-3 дня буду царапать или раздваивать ствол в качестве эксперимента .
23.09.23-Продолжаю давать только чистую воду. Смотря на трахомы я вижу , что почти все облачные !
6 дней до харвеста
26.09.23- 88 дней от прорастания Все еще получает только воду !
Сегодня я оборвал все веерные листья, чтобы растение получило стресс и выкинула трихомы.
Завтра последний полив и 2 дня засухи перед харвестом .
28.09.23- 90 дней от всхода !
Вчера положил лед для лучшей выработки трихом и 1 день засухи 🙃
Likes
13
Share


@420DeepGrow
Follow
Gracias al equipo de AnesiaSeeds y XpertNutrients sin ellos esto no sería posible.
💐🍁 Frozen Face Auto
Nueva variedad autofloreciente, tan refrescante como una mañana helada con un toque de cereza y lavanda. Esta variedad es una auténtica obra maestra de la cría, con un linaje dominante 70% Sativa que aporta una vibración edificante y energizante a tu cultivo. Perfecta para los que aprecian la belleza veloz de las semillas autofeminizadas y la mezcla única de dicha aromática.
Con un contenido de THC del 30%, Frozen Face Auto promete una experiencia tan estimulante como una zambullida en un lago fresco, dejándote fresco y vigorizado.
Ofrece rendimientos impresionantes de 550 g/m² en interior y hasta 300 g por planta en exterior. Con un ciclo de 70-75 días.
🚀🌻 Consigue aqui tus semillas:
🍣🍦🌴 Xpert Nutrients es una empresa especializada en la producción y comercialización de fertilizantes líquidos y tierras, que garantizan excelentes cosechas y un crecimiento activo para sus plantas durante todas las fases de cultivo.
Consigue aqui tus Nutrientes:
https://xpertnutrients.com/es/shop/
📆 Semana 3:
Ha sido una buena semana, ella ha dado un gran cambio, se llevó a su lugar definitivo 😎.
Se le ha aplicado un tratamiento fungicida con una infusión de cola de caballo y otro tratamiento insecticida con tierra de diatomeas, 1 cucharadita por litro de agua.
A partir de ahora se aplica riego por goteo, 1/3 de la dosis recomendada por el fabricante ya que al estar en exterior y en buena tierra tiene bastante comida.
Empiezan a tener un olor agradable 😎.

Likes
6
Share


@masterofsmeagol
Follow
5/11 I DID NOT WATER. A COUPLE LOOKED DRY BUT STILL HAD HEFT AND I COULD FEEL MOUSTURE IN THE SOIL. I should've taken more pictures. I forgot it's a new week. Oh well. I'll be back over and I'm planning to bring the girls outside for the first time if it warms up a little more. It's windy as fuck but I can put them in the garage with the doors open. As long as that's not the direction of the wind. I raised the L.E.D light and lowered the hps. I also TRIED to FIM a 10th planet and an mk ultra. I may have just topped them. We'll see how it turns out before I do anything to the others. Pink kush grows slow and compact. Very similar to my experience with purple punch. I have two plants that have slightly twisted leaves. Nothing else is wrong with anything. Looking at the stippling on the leaf I think it might just be either low humidity or slight wind burn or a combination of the two. Now that I've looked again I think it might just be the first 5 finger leaf on those pink kush that I mat have mistaken. I'll keep an eye out. I feel better having done some research. I'll put some more pictures up and I'll update what it is that I get done.
EDIT: WENT BACK OVER AROUND THREE. EVERUTHING LOOKED GREAT AND THE LEAVES WETE PRAYING ON SOME. I MAY NEED TO WATER SELECT PLANTS TOMORROW. I'LL PLAY IT BY EAR. LOWER THE HPS AND RAISING THE LED WAS A WISE CHOICE I THINK. OH AND THE "TWISTED" LEAF I WAS WORRIED ABOUT IS NOTHING. JUST THE FAN TO CLOSE AND A FOMBINATION OF LOW HUMIDITY AND MINOR HEAT STRESS. ITS BEEN TAKEN CARE OF. I WANTED TO BRING THE GIRLS OUT TODAY. ITS SUNNY AND 60° BUT THE WIND IS WHIPPING! WE'VE GOT GOOD WEATHER COMING UP THOUGH WITH TEMPS IN THE 70'S. I THINK TOMORROW ILL CLEAN/SANITIZE THE CAGE AND WASH/SANITIZE THE GROW BAGS.
5/12 Looking and lifting some of the pots I found some that were pretty much totally dry. I watered the majority of all the plants. If soil was moist I left it alone. If it looked a little dry I gave it a little water. I didn't measure the water but it wasnt even ALL of what I had left from LAST WATERING (which was like a qtr gallon If that). I just don't want to over water. The ones that I went light on last time were the ones that were dry. Plants seem to explode after watering but this wasn't nearly as much. Everything is looking great. It's easy to tell these are all indicas due to the structure and leaf shape. Much different than even the Chem Dog #4 which doesn't LOOK as "indicay" as some of the others. I wanted to bring them outside today but it's only 50 out. I'm not going to make the same mistake as years past and stress the plants. When we get a nice warm day I'll bring them out. Other plants are ready to be topped or fimmed but I haven't done it yet. Also need to clean the cage and wash the bags.
5/13 It's 60° at 9am so I think the girls will be going outside for a little bit. Didn't fully water but I used what was left of the gallon and gave them that. Some are much drier than others. I'll probably give them a full watering tomm. I only gave them a little today because I didn't want them drying out. I FIMMed a Special Kush today. WE'LL see how the hst turns out.
EDIT: WENT AND BROUGHT THE GIRLS OUT FOR FOUR HOURS IN INDIRECT SUNLIGHT. THE TENTH PLANETS WERE THE ONLY ONES THAT LOOKED LIKE THEY HAD AN ISSUE. JUST MINOR HEAT OR LIGHT ISSUES WITH A COUPLE FAN LEAVES. EVERYTHING ELSE SEEMED LIKE THEY SHOT UP IN SIZE. THE LARGER CONTAINERS STILL SEEM KINDA MOIST BUT SOME ARE DRY. I NEED TO GET ON A STABLE WATER SCHEDULE. ITS HARD WITH DUFFERENT PLANTS OF VARYING SIZES. STILL HAVE A LOT OF WORK TO DO.
5/14 One plant was super light today and was a little droopy. I WATERED EVERYTHING TODAY USING APPROX A HALF GALLON. I brought them outside for the second day. I left them out for about 3hrs. It's hot today. I'm still floored that chatgtp gave me exact directions for hardening my plants off at my exact location taking the weather into consideration! That is awesome. They're all doing good. Pink kush is the slow starter this year. Kind of like purple punch was. The only plants that had ANY damage on them was the two 10th planet's and its not really damage. It's just a LITTLE mottling on the leaf and the serrations pointing down. It's weird because this strain did great here last time. The Special Kush #1 and the Pink Kush would probably be fine to leave out soon. Hindu Kush parents make those strains extremely resilient. The one chem dog #4 looks out of place with all tjis big fat indica leaves. I'm hoping the topping and fim-ing will take. It looks like it will.
5/15 Everything is looking great! I have some work to do bit then I'll be over to bring the girls out for a few hours. I'll edit this when I do.
EDIT: BROUGHT THE GIRLS OUT FOR THREE HOURS TODAY. I THOUGHT THE TENP WENT DOWN TO 73 BUT TUAT WAS INDOORS. OH WELL. THEY STILL DID GREAT! THEY WERE ALL LOOKING OUT OF THE LEAN-TO LIKE SUNFLOWERS! THE STRAIGHTEN OUT AFTER BEING UNDER THE GROW LIGHTS. I'M PLANNING TO CONTINUE TO HARDEN THROUGHOUT THE WEEK. STILL NEED TO CLEAN BAGS AND GROW AREA. I HAVE 'A' CAMERA DOWN. TRIED TO FIX IT TODAY BUT I WOULD GET RO THE LAST PART BUT THE CAMERA WOULDNT READ THE QR CODE ON MY PHONE. I EMAILED THE COMPANY BUT IF I DONT HEAR BACK BY TOMORROW AND I CANT FIX IT ILL JUST BUY ANOTHER CAMERA TO ADD TO THE SYSTEM. ITS THE OLDEST CAMERA I HAVE AND ITS DONE ME 5 GOOD YEARS. MAYBE ITS TIME TO RETIRE IT.
5/16 I watered a few of the girls this morning with a small ring around the pot. I brought them outside and am leaving them for 3.5 hours today in the lean-to. They get indirect light without all the wind this way. I'll slowly increase the hours outside until there is enough daylight for them to go outside without revegging. When I put them out I noticed that a few were light and since it was close to 80° I watered most everything. I used under a half gallon. I'll see how they do from here and then move forward. I fixed my down security camera and secured my cage. Now I just need to finish hardening off, clean/sanitize bags/environment and put them in tjeir final homes. I'm not rushing it though. I've learned my lesson with that.
5/17 Plants did great yesterday and were perky and praying this morning. It was HOT yesterday too. Got into the low 80's. It's 57° degrees at 9am and it's overcast and sprinkling. I haven't decided if I'm going to bring the girls out today. It might be a good day to try some direct sunlight. I'll update whatever I decide to do.


Likes
17
Share


@RakonGrow
Follow
**** HAARVEST ZOE ****
Nice Strain ,
My little Zoe really made all the mistakes you could possibly make. No matter when I give light or want water or fertilizer. It grows and grows and grows, the main thing is that there is light. It was one of my free seeds from Zamnesia. So far all seeds have germinated. I store my seeds in a dark, airtight container at 6°C. Tastes kind of sweet after curing.
Greenhouse Feeding is a really easy fertilizer to use. I used the BioEnhancer again and again. My little Zoe thanked me. The BioGrow was used as topdressing and is doing its job. The BioBloom also does its job at the right time.
And that's really great and easy if you don't have an autoflower. Of course there is a corresponding product. But I was happy to get anything here at all. Legalization has wiped out the market. But for next time I have an appropriate soluble fertilizer for fast-flowering plants. It doesn't work for 8 weeks :))
I use a Sanlight Evo 3-60 1.5 with Bluetooth dimmer. There's nothing to complain about there. Set daily cycle via app. Helpful if the weather or environment is so bad that you have to regulate the light intensity.
33g after 5 days dry . 24.5 °C to 22°C with 50%-60% .
curing in a vaccum box at 18°C .
It looks like I'm drying too long. // It tastes a bit crunchy.
Day 79:
trim , slow vacuum box to cure 22°C and 61%rH .
Day 76:
videostuff: been drying for 4 days (res 640x480) ( optical zoom x200 - x250 )
Day 72:
DLI usage total this Plant : 2236.6 DLI in 70 Days .
wet trimmed, cut off, hung upside down. see you after 14 days
Day 71:
preparing for harvest . 24h long night session .
DLI : 0
Day 70:
- Sanlight DaylightCycle
- + ON 200PPFD (00:00) - 800PPFD (03:30) - 800PPFD (16:30) - 200PPFD (18:00) OFF
video and photo tryouts with the digimicro mobil x300 optical zoom , mostly freehand
Day 69:
- Sanlight DaylightCycle
- + ON 200PPFD (00:00) - 1000PPFD (03:30) - 1000PPFD (14:30) - 200PPFD (18:00) OFF
incredibly hot and rain. lost some terpene :)) Well, summer is coming,
Day 68:
- Sanlight DaylightCycle
- + ON 200PPFD (00:00) - 600PPFD (00:30) - 800PPFD (03:30) - 800PPFD (14:30) - 600PPFD (17:30) - 200PPFD (18:00) OFF
- Added 1L bottle of water
It's hot, hot, hot, Zoe would like more water.
changed daylight cycle so it match the weather problems. tent is open until my real night comes.
103 flowers (including popcorn) counted, due to an accident about 15 flowers are missing.
Day 67:
- Sanlight DaylightCycle
- + ON 200PPFD (00:00) - 600PPFD (00:30) - 900PPFD (03:30) - 900PPFD (14:30) - 600PPFD (17:30) - 200PPFD (18:00) OFF
- watering bottle water 1.75L
weather to hot , changed daylight start time and daylight cycle so it match the weather problems.
I'm lucky, buds are still growing :)))
Day 66 (we are on the road with maximum sanlight )
- analyse some trichome .
- make some Zoom Pics and Video stuff .
- Sanlight DaylightCycle :
- + ON 200PPFD (00:00) - 1000PPFD (00:30) - 1000PPFD (13:30) - 800PPFD (17:30) - 200PPFD (18:00) OFF
- DLI will stress alot ...
Anyway, it's too hot in my room... I open the tent and now everything is fine with the temperatures and I increase the Sanlight to 100% for the first time. May Zoe love it or leave it :)) We'll see what happens
Day 65 :
Sanlight DaylightCycle : ON 200PPFD (00:00) - 800PPFD (00:30) - 850PPFD (13:30) - 800PPFD (17:30) - 200PPFD (18:00) OFF
It will soon be ready for harvest.

Likes
66
Share

@RockoCalenberg
Follow
Blütetag 52 | Tag 112 gesamt
Klima – Frühling im Anmarsch
Draußen zeigt sich der Frühling deutlicher. Mehr Licht, mildere Tage, mehr Bewegung in der Luft.
Im Zelt ist dieser Umschwung spürbar. Die Pflanzen trinken mehr, der Dryback läuft zügiger durch, das Substrat trocknet gleichmäßiger ab. Der Rhythmus wirkt insgesamt ausgeglichener als noch vor einigen Wochen. Die Kurven verlaufen ruhiger, die VPD liegt häufiger im gewünschten Bereich.
Wir sind klar in der Endphase. Der Stoffwechsel arbeitet aktiv, kleine Schwankungen zeigen sich sofort – insgesamt aber ein ruhiger und stimmiger Verlauf.
🌿 Pflanzenstatus
White Gushers 33
Sie reagiert feiner auf Veränderungen, bleibt aber insgesamt stabil.
Die Blattverfärbungen nehmen weiter zu – deutliche Herbststimmung. Energie wird sichtbar aus dem Blattwerk gezogen und konsequent in die Blüten verlagert.
Das Stacking läuft weiter. Die Buds gewinnen an Volumen, wirken kompakter und schwerer. Die Oberfläche erscheint dichter, geschlossener, reifer.
Trichomstatus:
Überwiegend milchige Köpfe, nur noch vereinzelte klare. Kaum Amber. Sie bewegt sich klar in Richtung Erntefenster.
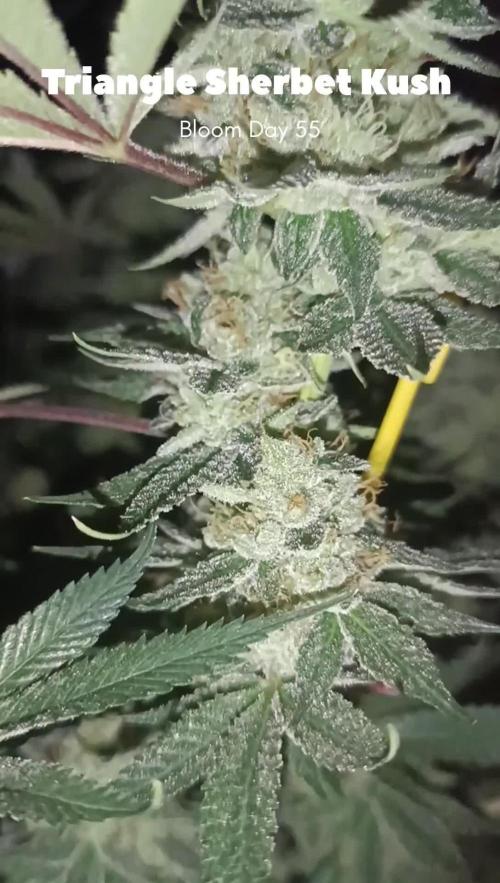
Triangle Sherbet Kush
Auch sie zeigt nun deutlichere Herbsttöne im Blattbild. Optisch etwas gelassener, aber klar in der Endphase angekommen.
Die Blütenstruktur wirkt sehr kompakt und sauber aufgebaut, extrem frostig. Minimal hinter der White im Reifegrad – jedoch im gleichen Zielkorridor.
Trichomstatus:
Milchig dominiert auch hier, mit leicht höherem Anteil klarer Köpfe als bei der WG 33. Eindeutig in der späten Reifephase.
🌸 Blüten & Duftbild
Die Buds gewinnen weiter an Struktur und Geschlossenheit.
Die Verdichtung ist sichtbar, die Form wirkt ausgereifter als noch vor einer Woche.
Aromatisch entwickelt sich das Profil weiter.
Die Frucht bleibt präsent, wird jedoch zunehmend von einer würzigeren Tiefe begleitet.
Die Komplexität nimmt zu, ebenso die Intensität.
Das Zusammenspiel der Noten wirkt runder, dichter und vielschichtiger.
Beim Öffnen des Zeltes steht der Duft klar im Raum – nicht lauter, sondern konzentrierter.
💧 Nährstoffe
Unverändert gefahren:
CalMag: 1,5 ml/L
Bloom: 1 ml/L
Keine Anpassungen.
Keine Experimente.
Konstanz bis zum Schluss.
🐞 IPM / Biologischer Pflanzenschutz
Keine neuen Maßnahmen.
Das bestehende System läuft weiter ohne zusätzliche Eingriffe.
Schimmel ist bislang kein Thema.
Aufmerksamkeit bleibt – Überreaktion nicht nötig.
🔎 Ausblick
Wir sind auf der Zielgeraden.
Noch wenige Tage – realistisch im Bereich von 7–10 Tagen, abhängig von der weiteren Trichomentwicklung.
Jetzt heißt es:
Klima stabil halten.
Nicht unnötig eingreifen.
Den Lauf sauber ins Finale führen.
🔎 Wochenfazit
Die Zeichen stehen klar auf Reife.
Herbstfarben im Blatt, milchige Trichome, fortschreitende Verdichtung.
Wir sind auf der Zielgeraden –
aber noch nicht an der Ziellinie.
Noch ein paar Tage Geduld.
Dann fällt der Vorhang.
— Rocko 🌿🔥💚
Flower Day 52 | Day 112 Overall
Climate – Spring Moving In
Outside, spring is becoming more noticeable. More light, milder days, more movement in the air.
That shift is clearly reflected inside the tent. The plants are drinking more, the dryback cycle moves faster, and the substrate dries more evenly. Overall, the rhythm feels more balanced compared to a few weeks ago. The curves look calmer, VPD stays in the target range more consistently.
We’re clearly in the final phase now. Metabolism is active, and even small fluctuations show up in the leaf expression — but overall the run feels steady and composed.
🌿 Plant Status
White Gushers 33
She reacts a bit more sensitively to changes, yet remains stable overall.
Leaf fade is progressing — clear autumn tones setting in. Energy is visibly being redirected from the foliage into the flowers.
Stacking continues. The buds are gaining volume, becoming denser and heavier. The surface looks tighter, more mature, more consolidated.
Trichome status:
Mostly cloudy heads with only a few remaining clear ones. Hardly any amber. She is clearly approaching the harvest window.
Triangle Sherbet Kush
She is now showing stronger autumn coloration as well. Slightly calmer in overall appearance, but unmistakably in late flower.
The bud structure is very compact and clean, extremely frosty. Slightly behind the White in maturity — yet within the same finishing corridor.
Trichome status:
Cloudy dominant here as well, with a slightly higher percentage of clear heads compared to WG33. Clearly in the late ripening phase.
🌸 Flowers & Aroma Profile
The buds continue gaining structure and density.
Their formation appears tighter and more developed than a week ago.
Aromatically, the profile keeps evolving.
The fruity notes remain present, but are increasingly supported by a deeper, warmer spice layer.
Complexity is increasing, and so is intensity.
The overall expression feels more layered, more concentrated, more mature.
When opening the tent, the aroma doesn’t feel louder — it feels fuller.
💧 Nutrients
Unchanged:
CalMag: 1.5 ml/L
Bloom: 1 ml/L
No adjustments.
No experiments.
Consistency through the finish.
🐞 IPM / Biological Pest Management
No new measures.
The existing system continues running without additional intervention.
No mold issues so far.
Awareness remains — overreaction does not.
🔎 Outlook
We are on the home stretch.
Likely within 7–10 days, depending on how trichome development continues.
Now it’s about:
Keeping the climate steady.
Avoiding unnecessary interference.
Guiding the run cleanly into the finale.
🔎 Weekly Conclusion
The signs are clear: ripening is advancing.
Autumn tones in the leaves, cloudy trichomes, increasing density.
We are on the home stretch —
but not at the finish line yet.
A few more days of patience.
Then the curtain falls.
— Rocko 🌿🔥💚

Likes
18
Share


@Stonyways
Follow
1/30/21Saturday morning had me lounging, watering, pruning and a photo shoot. I am hoping for a quick recovery from the middle plant after some pruning was done. I was hoping it would stretch one last time so I could move the light but I am parked there for the time.
ENJOY YOUR WEEKEND!
1/31/21Yesterday’s work paid off and the plants look a bit more on the dank side today.
Today’s feeding day which mean the last for week 11.
Happy Growing