


Likes
Comments
Share


@Qaggy
Follow
Lst went well. She was nice and bendy.
Very healthy girl with lots to give. Gave her a top dressing of charge for the upcoming weeks of vigorous training.
Topped her the day after. Was a bit daunting as I have never topped before. Went well, and topped on the 5th node. Looking forward to the next week of growth and training before I scrog for the first time as well.

Processing
Likes
8
Share


@eldruida_lamota
Follow
Que hay familia, volvemos con malas noticias, un ejemplar salió hermafrodita y toco sacarla de su hueco os dejo fotografías de algunas ramas.
Las 2 que quedan no pintan mal , se me fueron mucho de altura pero bueno XL.
Ph controlado en 6,5 temperaturas máximas 28 y mínimas 19 , sin problemas aparentes. Variedad algo difícil para principiantes.

Likes
5
Share


@Lazuli
Follow
I like these kind of phenos they got bulky heads and flower good even in higher humidity

Likes
17
Share


@JonnyKush
Follow
hello growmies! day 51 finally the pre-flowers begin to appear. I apologize for the few photos but unfortunately they really filled the box and I find it difficult. overall I have to say they look in perfect shape! I will keep you updated thanks for passing by. like and comment! good day and beautiful growth to you 🌳🌱

Likes
29
Share


@Hasard
Follow
HELLO ALL, I HAVE ONE OF MY PLANT WHICH LOOKS LIKE READY TO HARVEST, SHOULD I CUT HER NOW ??
Day74 Based on all advises I had, I will let them another 2 weeks

Likes
410
Share


@Rock_n_Roll_Randy
Follow
It's been 47 days of flower now and
The gals are still loving the fc4800 and their new 8x8 mars hydro grow tent as much as I do👍 leaves are sticking straight up towards the light. Love how easy the zippers are to open and close. Nice and strong and guaranteed to last. It has extra material on the backside of the zipper that helps for light leaksand enough ports and vents for anything you need in it👍. the tsw2000 is still going strong and is also a very good light. Its been going almost nonstop for 6 months and still working the same as when I got it👍. not much heat off both lights but the fc4800 is alot cooler and the heat-sinks work extremely well. I have it daisy chained to the tsw2000 and 1 dimmer controls the other and i don't need to be reaching in too far to dim the other light, it's awesome and I can't wait to buy more lights to daisy 4 together👍. I would recommend this light to everyone that grows with leds and have trouble with temperatures getting too high. Even if you grow with HPS lights I think any mars hydro light is a MUST TRY. I like how heavy both lights are because I know it means they are built soild and strong 💪. Very good sign with the frost they are starting to get thanks to bith mars hydro lights. I can notice more frost under the fc4800 and I'm thinking it's from the UV DIODES they put on the fc4800 👍. 2 days ago they all smelt like my nuken, sweet marshmallows. But now I can smell the monkey dough and gorilla glue and skunk monkey coming through👍. I touched a bud on the gorilla and monkey fingers smelt like fruit loops👍 really pleasant smell. Lingered on my fingers for atleast 30 min. I'm glad mars hydro is under priced compared to some brands and for how popular they are. usually companies would charge more. Thanks mars you guys are awesome 🤘🥁🎸. I'm getting a new exhaust fan soon. An 8 inch that will work alot better than my 4 inch lol. Wayyy to small for a 8x8 Grow Tent. Dehumidifier is going almost non stop to try and get the humidity down. I love how both lights on 100% power only raise my temperature 2 or 3 degrees 👍. You can rest your hand on the lights and not much heat comes off them. Obviously there is some heat but for the brightness of the lights and only raising the temp that much is awesome 👌. And if I wanted to I could remove the driver from the fc4800 and run it on the outside of my tent because the cord is so long but 2 or 3 degrees is barely nothing👍. The girls are starting to bulk up abit now and only 3 weeks of flowering, these lights are awesome 👌. My last run of monkey dough and gorilla glue didn't start showing alot of crystals until week 4. These were only 2.5 weeks and I started noticing some frost. Next week I will be able to tell more about what these custom bred seeds will be like. I love how the smell is changing now. Didn't want all them to smell like nuken marshmallows lol. It's awesome that I can get right inside the tent to do any work i need👍. Even if I wanted an 4x8 tent. I'd rather this 8x8 because it's so easy to work with the plants and have so much room to move around and massive headroom when I'm in there chillin with the gals🤣🤘.
FOR EVERYTHING MARS HYDRO VISIT:
Www.mars-hydro.com
PROMO CODE: rocknroll
Instagram: @marshydropenny
https://youtube.com/channel/UChU5ZWwNi-DvnO3oWVU3ceA
Thanks for taking the time to read and check out my shit🤜🤛
GET THE MAX FROM MARS👍: Welcome one of the newest members of the Mars Hydro family🤜🤛🤘. The Mars Hydro FC 4800 480W LED Grow Light can accommodate up to a 4' x 4' area for flowering. It has OVER 2000 LED chips consisting of the best selling Samsung LM301B diodes which has a Luminous Efficacy of: 220 lm/W
0.2 W, 3 V mid power,
Osram 660nm Diodes, Infrared light and UV LIGHT👍. It boasts the incredible efficiency of 2.8 µmol/J, maximum 2.5gram yield per watt with 30% higher Average PPFD. This High-intensity spectrum is beneficial for plants at all stages - from veg to bloom, and creates Big dense Buds👍. achieve 50% higher yields & quality compared with the old lights! Only consumes 480W for 4x4ft personal grows, and 3x3ft for commerical grow. It comes with a dimmer and daisy chain function with a maximum of up to 15 lights, the master light controls the rest👍. Wide 6-bar design offers even & wide canopy coverage and can maximizes your grow space. slim 180° FOLDABLE DESIGN... YES I SAID FOLDABLE🤘🤣 , making it compact and easy to install, it's IP65 WATERPROOF and will give you no worries while growing in a humid environment and makes it a flexible high performance commercial grow light for enormous SUPER FROSTY yields.😛😛😛. MARS GETS EM FROSTY BOYS👍
AWESOME HEAT DISSIPATION: The Low energy consumption FC4800 growing light has 6 passive-cooled bars and an aluminum heat-sink a removable driver you can upgrade later or have it outside your tent. with zero noise you can save up to 50% in your electricity bill compared to HID's or HPS lights!
It also has a removable driver so you can upgrade it in the future or have it outside your grow space for better heat control in your growroom👍
UPGRADED FULL SPECTRUM: Yield Max Spectrum with enhanced red (Top-Bin Samsung 3000k-5000knm, Osram 660nm Deep Red), speed up blooming & fruiting, perfectly suited for full-cycle growing. The FC4800 LED grow lamp was born for Big Buds, perfect for commercial, grow tent, grow room, hydroponics, and all soil grows.👍
THE BEST SAMSUNG DIODES: THE FC4800 has Top Bin genuine Samsung Osram Diodes, combined with remarkable 2.8 µmol/J Efficacy, 30% higher Average PPFD, 50% less energy consumption, to maximize your yields. They give you a TRUSTED 3 years warranty 100% Satisfactory guaranteed!!!
The MARS HYDRO 8x8 Grow Tent interior is made of a unique diamond design mylar which is highly reflective. (Other companies mylar and reflective rate is as low as 50%, and it won't provide efficient light. They use thick 1680D oxford canvas, and being double stitched, it is tear proof and perfect for locking in the light. Their grow tent keeps 100% of the light inside the tent and helps your plants absorb more light. EXTRA-THICK material means No light leaks or rips at all.👍
Strong Stable metal corner adapters and poles are the trustful supporters of the tent. It's very sturdy, neither rusting or paint flaking off. quick and easy tool-free setup. They use heavy-duty metal zippers, with double layer black lining, by far the best on the market which creates a light-proof seal.
The Easy observation windows are made by double layers of cloth. Observe the growing conditions of your plants without opening the tent and avoid disturbing your plants. The observation windows also serves to dissipate heat and ventilate the air.
The tent includes 2 removable waterproof floor trays to hold soil and water. The removable tray can be taken out to wash easily.
They guarantee the grow tents are easy to install even if you've never done something like this before. Clear Instructions and no tools needed! They also offer 30-day unconditional refunds for quality problems. Just contact their friendly 24 hours customer service 👍
Likes
8
Share


@Grow4Releaf
Follow
Just stopped grow nutrients for them all, they seem to have plenty of nitrogen going on in them , my bloom nutrients should be plenty to carry her out they rest of the way.
Still only feed nutrients as needed , usually water a few times checking my run off ppm to let me know when and how much I can feed without it burning them outright.
So far it's been working pretty well with thus tent.
But she's growing great. Starting to get a nice sweet candy smell already off her. Should be a nice smell once she's going further into flower.
I need to snap some photos tomorrow, didn't grab any today , gotta water them all Monday so plan to snap photos then.
But into week 7 we go !!


Likes
7
Share


@TheGreenLeopard
Follow
Starting to beef out more.
Came out of nowhere , however , we had a little pest issue -
Seemed to go straight for it. I hope I’ve remedies that old school way soap water spray plus sticky band to trap. Added some canna cure. Interestingly I went low on silicate and canna cure here vs the other tent. The other tent has had zero pests whatsoever. I also added smaller pots this week with biocanna pro- I hope it’s not that. Anyways - starting to look true to its name now.

Processing
Likes
21
Share


@rhodes68
Follow
9/21 No video upload so no update
9/22
Week 10 update... finally
Looks good but going to add more Phos due to some red stems showing upping to 3ml/g
9/23
Reducing Bloom nuets @10% a day for a couple, down to the 80% mark now
Add Soul Peak PK to mix as well as Koolbloom need to use up the Peak and we want to see if it brings anything special.
Be in flush within 7-10 days on all but the sativa FF2
Vids up
9/25
Adjusted nuets slightly
9/26
Like where the plants are so leaving nuets as is
9/27
And the tricones have over ruled me they are getting ready, 80-90% white 10-20% clear so taking the nuets to our ripening doses.
Up PK down Bloom nuets

Likes
34
Share


@Basementganja
Follow
Stretched vigorously once she started to transition to flower. Developed potency early in flower!
She was LST'd weekly, starting week 2. She was also gently lolipopped a few times, to maintain growth towards 5-6 nodes only.

Likes
13
Share


@HowtoBubatz
Follow
Lemon Haze is just doing her thing quietly in the background, slowly getting overshadowed by the booming Ztrawberriez ladies. 😅
She's started to give off a nice lemony haze scent, which is really pleasant, but she still looks like a small sword, tall and thin with not much going on on the sides. I don't expect much more stretch or branching at this point, but maybe the buds will fatten up a bit. Let's see what she has in store! 🍋

Likes
23
Share


@Zurban_Poison
Follow
An excellent variety. fruitful. easy and fast to grow. The taste and effect is just perfect!

Likes
9
Share


@SourLib
Follow
Saturday 28th, 2024
April (week 4 & 30 days)
The plants are getting thicker and taller, had a little mold on the bamboo skewer stick so I took all of them out. So now they’re standing tall between the garden ties. Pineapple Express (A) is winning the race for sure. I need to get a fan soon to clear out all the moisture. On Monday they’ll be a month old then it’s time for nutrients.
Sour Diesel (A)
6 1/2 inches tall
Dried piece on leaf
17 leaves
Green leaves
Think it’s behind
Green stem
Pineapple Express (A)
5 inches tall
22 leaves
Green leaves
Green stem
Pineapple Chunk
4 inches tall
18 leaves
Green leaves
One dead leaf
Green to white stem
Likes
18
Share


@AZMamaBear
Follow
Starting to see the end of triple digit days here in Phoenix metro Arizona. Just waiting for trichomes to develop.
Likes
10
Share


@Elguacho420
Follow
Buenas buenas!, cómo ven en esta 3ra semana de etapa de gestación de estás lemon cookies kush están bastante bien ( a mi parecer) , las veo crecer sanas y sin problemas, D.P.M.
El transplante les ah sentado muy bien, las dejaré una semana más y luego el cambio... El alimento de la mano de la gente de advanced nutrients, eh comprado este kit q para mí está bien, ya les contaré y veremos los resultados juntos. De momento mis niñas están muy bien y promenten ser las verdaderas! 😎🔥 Buen fin de semana para tod@s, Buenos humos para tod@s.. 👍🏻

Likes
18
Share

@Brotanical
Follow
Week 12 (Flower Week 8): Pure Diesel & Top Service
The Plant
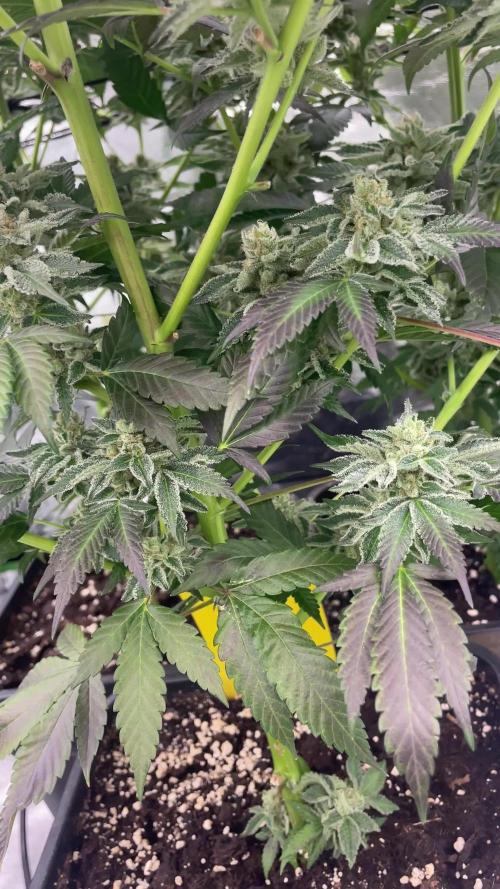
The Original Bruce Banner by Dark Horse Genetics is looking incredible in BW8. The buds are dense, sticky, and completely coated in a thick layer of frosty trichomes. The "Hulk" is showing its true power now, with a massive swelling of the calyxes.
The Terps
The smell is absolutely intense! A heavy, pungent Diesel aroma dominates the whole room, backed by those classic sweet undertones. It’s definitely one of the loudest strains I’ve grown so far.
Equipment & Support
I had to swap my carbon filter this week due to the extreme smell. A huge shoutout to Vivosun! Their customer support was outstanding—super fast response and very helpful. The replacement Vivosun ACF arrived quickly and is doing a perfect job keeping that heavy diesel scent under control. 10/10 for their service! @VIVOSUN @Hanfgarten @ViparSpectraLED 👍👍


Likes
7
Share


@LittleBigTrees
Follow
I took 4 cuttings from my outdoor plant 3 weeks ago. They have just started showing signs of growth, I'll let them veg for 14-21 days and flower them.
Likes
12
Share


@2Stones1Bird
Follow
Checkout my Instagram @smallbudz to see the Small budget grow setup for indoor use, low watt, low heat, low noise, step by step.
17/02/2020 - Fed her 1.5l of 6.4PH water with 0,2ml of each: Cal Mag (Atami), Grow, Bloom and Max, and 0,5ml of each: Heaven, Alga-mic and Vera, noticed some run off, I use about 1/4 of the nutrient dosage on the chart, to achieve about 100/150PPM (500 scale).
She's starting to smell like smelly feet.
22/02/2020 - Last feed, gave her 1.5l of 6.5PH water with 0,2ml of each: Cal Mag (Atami), Grow, Bloom and Max, and 0,5ml of each: Heaven, Alga-mic and Vera, noticed some run off, I use about 1/4 of the nutrient dosage on the chart, to achieve about 100/150PPM (500 scale).
