


Likes
Comments
Share


@Ganjagardenner
Follow
Buds are touching the top of my tiny green house! I will have to tie them down a little more as they will just get moldy minging and useless that way! Buds sites are growing fast and looking nice! Some resin production also. This is my favourite time of flowering where you can see the biggest development. Heavy feeding at the moment. But I think she’s going to need it! So hard taking good pics as she is so gangly!! And my other plants are in the way

Likes
24
Share


@Elixx
Follow
In this week wheatear was very bad. It rain a lot and plant suffer, It was attacked by mold in one of the apical buds. I remove it in the first stage of mold, I hope that spores was not spread on the rest of plant🌧️😥

Likes
8
Share

@Ruthlez
Follow
🌱 Grow Diary – Anfang Woche 6
Blütewoche 3
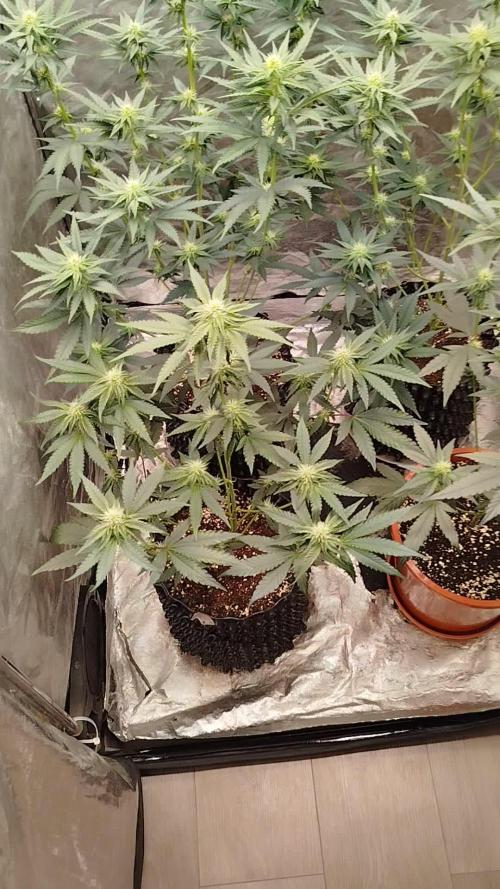
Der Start in Woche 6 und damit in die dritte Blütewoche läuft richtig gut. Alle vier Pflanzen entwickeln sich prächtig und machen insgesamt einen sehr gesunden und kräftigen Eindruck.
Der Stretch ist mittlerweile vollständig abgeschlossen. Dadurch lässt sich jetzt deutlich besser erkennen, wie sich die Pflanzen in der Blüte entwickeln und wo sie ihre Energie hinstecken. Die Blütenstände werden immer ausgeprägter und nehmen sichtbar an Volumen zu.
Ich habe noch einmal vorsichtig Blätter entfernt, um etwas mehr Licht und Luft an die wichtigen Bereiche der Pflanzen zu bringen. Gleichzeitig wurden im unteren Bereich alle kleinen, wenig vielversprechenden Knospen entfernt, sodass die Pflanzen ihre Energie gezielter in die stärkeren Blütenstände investieren können.
Besonders schön ist, dass sich bei allen vier Pflanzen bereits deutlich Zucker auf den Blättern bildet. Die ersten Trichome sind gut sichtbar und geben den Blüten und den umliegenden Blättern schon diesen typischen, leicht glänzenden und „frostigen“ Look. Für den Beginn der dritten Blütewoche ist das eine sehr erfreuliche Entwicklung.
Alles in allem bin ich mit dem bisherigen Verlauf sehr zufrieden. Die Pflanzen haben den Stretch gut gemeistert und sind jetzt voll im Blütenmodus angekommen. Die kommenden Wochen werden besonders spannend, da die Blüten nun zunehmend an Größe und Harzproduktion zulegen werden.
Fazit:
Vier kräftige Pflanzen, Stretch abgeschlossen, Unterwuchs bereinigt und bereits eine schöne beginnende Harzproduktion – der Start in die dritte Blütewoche sieht vielversprechend aus. 🌱❄️


Likes
33
Share


@Damonkey
Follow
Flushing and all going well. It looks like the flush could push up to 2 weeks.

Likes
5
Share

@CannabisDemon
Follow
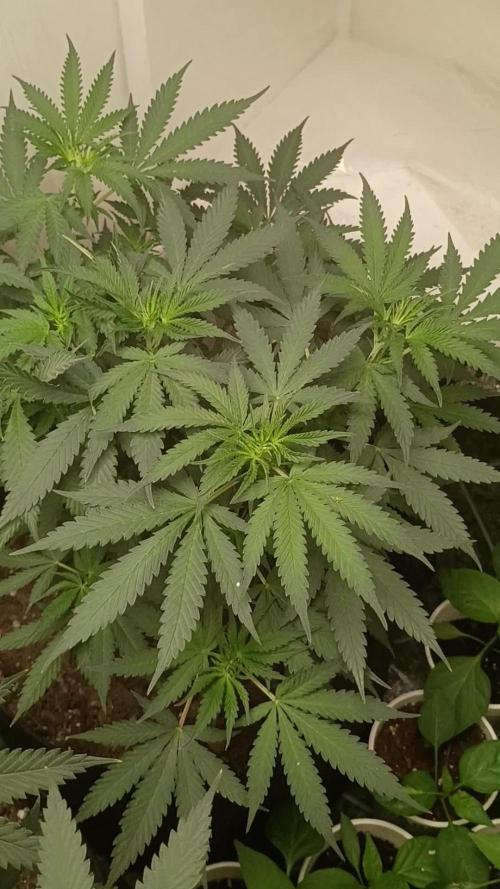
This girl is looking Amazing! I am so excited to see what this plant produces. Does anyone have any tips on what I should do with this plant as far as should I defoliate or "lollipop" it? I've never gone this far before in a grow of photoperiod!?

Processing
Likes
12
Share


@Tazard
Follow
We have a very full tent! Taz’s jungle 😂🤣. Check out the purple purple photos from day 20!!! Everyone looks absolutely beautiful I’m hoping that the white critical will be ready in 4-5 weeks. She’s going to have some fat colas!

Likes
7
Share


@XoticGROW666
Follow
( RUNTZ X F1DURB X GUSHERS )🍬🌈🍨🍧
PURP KICKIN INN END #WEEK4
CANT WAIT TILL THE BUDS SWELL UPP!!
SUPA INTENSE CANDY TERPS THIS ROUND
NOT BIG BUDS BUT SUPA HIGH IN BRIXX LEVEL WITH ALL THE ORGANIC CARBON INPUTS!! PPM 900/1200 1.2 max
(Face Off OG x Watermelon Zkittlez) X (Runtz x F1 Durb x Gushers) 🍉🍬🌈🍧🍨🍦
LIL PRUPLE TINT WIT MOUTH WATERING SUGARY TERPS KICK INN END #WEEK4 BY WEEK 7/8 SHE WILL BE PURPLE PURPLE WIT SUPER INTENSE CANDY MOUTH WATERING TERPS CANT WAIT TILL SEE THEM BUDS SWELL UPP!! PHENO A/B
NOT BIG BUDS BUT SUPA HIGH IN BRIXX LEVEL WITH ALL THE ORGANIC CARBON INPUTS!! PPM 900/1200 1.2 max


Likes
19
Share


@Chubbs
Follow
420Fastbuds
TrainWreckAuto
Week 4
What up grow fam. Weekly update on these 2 wonderful ladies. This week I did introduce some nutes and the plants seem to respond amazing. Starting to see little pistols so guessing this will be the last week of veg before the transition into flower. All in all Happy Growing
Likes
3
Share

@goatpharms
Follow
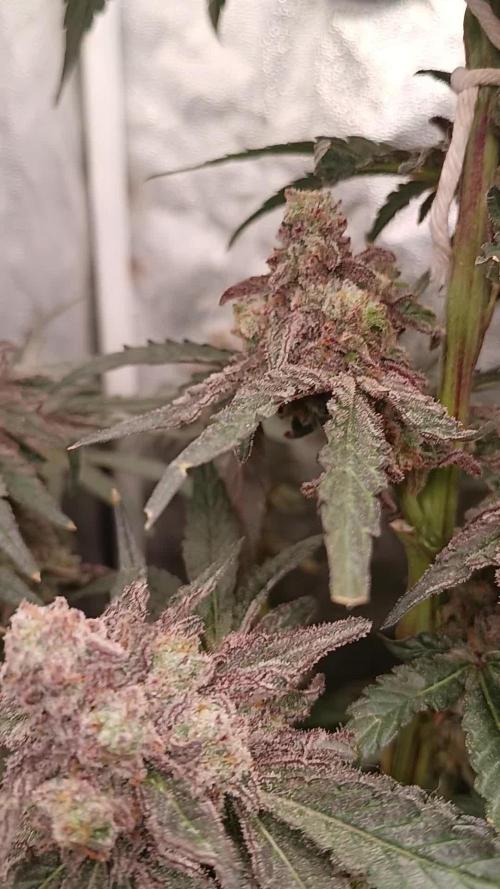
MAC is at peak maturity — buds are dense, vibrant, and resin-coated, displaying rich shades of purple, orange, and deep green. The aroma is strong and pungent (you would no it's mac straight away from the nose) , indicative of excellent terpene development. Plant health is optimal across the canopy, and all signs point to harvest readiness. Chopping her tommrow 💚

Likes
5
Share


@BigGeekSmallGrower
Follow
After massive problems with canopy height and single branches growing past the LEDs, I finally decided to move the carbon filter down to the bottom of the tent. Due to some complications with running the pipe down the bottom also, I had to keep the pipe running out the top of the tent. But thats the deal I have to take right now, I dont think t will hurt my yield significantly.
Substrate EC is on a more moderate level than the week before to promote buds stacking up the branches. Right now 3.8 with a target of 3.0 by end of week 6.
Edit END of WEEK 5:
Canopy is full with trichomes, everything glitters like its winter time. I noticed substantial bulking, so we are at the right pace ending the week 5 and going into week 6. Still 4 weeks to go, i expect a very big yield this time...
Likes
9
Share


@SwissKush
Follow
Gorilla Cookies Auto
I will be growing this in Plagron Lightmix soil, under the SANLight Evo 250 LED
Day 1
Germination Occured
Day 2
In the ground
Light is 135cm away from tops of pots, 20% intensity, temperature is 22-24 degrees in the tent, very nice, 18/6 schedule, 160ppm PH 6.0 water, 200ml.
Day 3
Signs of life
Day 4
She is up!
Day 5
fed 200ml 160ppm water
Day 6
Leafs are developing well
Day 7
incredible growth, 200ml water + first taste of 0.1ml/L TA Pro Roots
Likes
16
Share


@DrAnandamida
Follow
Esta semana se nota el estallido de la floración. Los pistilos van cogiendo vigor y tamaño. Las flores continúan oscureciendo e incluso las hojas y sus tallos van adquiriendo ese color rojizo/púrpura. 🌿 El tallo tiene un tamaño y consistencia considerable, lo que le está permitiendo resistir algunas rachas de viento sin excesivo problemas y sin necesidad de soportes o guías (por el momento). Se perciben un poco mejor los aromas de las floración, aunque siguen siendo débil. Una ya ha alcanzado los 36cm y la otra 40cm. Seguimos aumentamos la cantidad de agua, progresivamente, según van pidiendo/necesitando las plantas.
Sigo intentando no utilizar ningún tipo de "ayuda extra", salvo la tierra enriquecida de @BioBizz All-Mix donde están plantadas. Así que por ahora; agua mineral, luz solar, mucha paciencia y mucho amor!🤞😍


Likes
9
Share


@Mr_nugs_lover_David
Follow
The phenotype number #3 looks really tiny and small for the days that she is I don't know why is that because she has the same conditions as her sisters.
Likes
16
Share


@DrLaggis
Follow
🌱 Day 50 - First Day of Week 8 🌱
Hello, Grow Friends!
My plant is doing well, and it’s amazing to see visible progress every few hours. 🌱✨ The buds are in full throttle, and I feel like the plant is now needing more water as the pots are drying out faster. 💧
Watering:
I’m still watering with 1L every two days. 💦 The dosage of BioBizz Grow and BioBizz Bloom has been increased according to the BioBizz feeding schedule. The pH of the water remains constant at 6.0. ⚖️💧
Temperature & Humidity:
Luckily, the weather in Germany is cooling down, so I no longer have to deal with temperatures of up to 30°C in the tent. 🌡️🍂 I’m expecting temperatures to settle between 18-23°C now that we’re in September, and humidity should stabilize around 50-55%. This will create perfect conditions for the upcoming drying process. 🍃✨
Plant Health:
The plant is looking good overall. 🌿 I did have some calcium and magnesium deficiency symptoms recently, but I’ve managed to get that under control with CalMag. 💪 I’m continuing to carefully remove any leaves that are noticeably blocking light to the buds and hindering photosynthesis. 🍃✂️
Vibes:
Every day, my plant still enjoys an hour of Lo-fi Jazz music. 🎶🌱 I think it helps set the perfect growing atmosphere. 🎷
🌱 Day 56 - Last Day of Week 8 🌱
Final Feeding:
Today marks the last day of the fourth flowering week and the last day I’ll be feeding the plant. 🌿💧 From now on, the plant will receive only water for the final 14 days to flush out the remaining nutrients from the soil. 🚿
As a beginner, I’m unsure if two weeks without nutrients will be enough for the plant to finish properly. There’s a part of me that worries about potentially wasting its full potential by skipping nutrient periods. 🤔🌱
However, I’ve decided to stick with the plan—after 14 days of just water, I’ll harvest the plant. ✂️🍃
Humidity & Temperature:
This week, the weather has cooled down significantly, and I no longer have to struggle with high temperatures. 🌡️🍂 The temperature ranges from 19-23°C during the day, and humidity sits between 49-56%.
I think these are ideal conditions to bring out the purple hues in the buds. 🍇✨
Defoliation & Plant Care:
I’ve finished the final defoliation and trimming of the plant this week. 🍃✂️ From now until harvest, I’ll avoid making any more changes or interventions, as I want to keep the plant stress-free and allow the bud production to progress smoothly. 🌱💪
Trichome Observation:
As a beginner, I’ve started checking the trichomes this week, but I’m finding it challenging to distinguish between clear and milky trichomes. 🔍💎 I plan to harvest when I see 90% milky and 10% amber trichomes. 🌿✨
I’ll keep you all updated next week, and don’t forget—there are new pictures every day! 📸🌱
Likes
19
Share


@Grandad_Greenthumb
Follow
So far so good. 2 seeds now in pots and hopefully on the way. Be assured as soon as the babies come out i will get some pics up.👏

Likes
40
Share


@SubliminalSociety
Follow
Week 23 - kitty says hi!
This lady is getting out of control. We're 4 weeks from harvesting. Autumn gets very wet and last year I had bud rot, so end of october is the last day. I really need to defoliate to give those buds all the sun they can get.

Likes
Comments
Share


@ShiokaraiGenetics
Follow
Week two of flower nothing exiting happening yet. The plants are very healthy and happy for the most part. The Purple Shah #2 has a slight mag def I have not been able to keep up with but nothing major.
