


Likes
Comments
Share


@Teamdirtbag2
Follow
16 days transplant to 3.5 gal Dutch bucket with perlite. Auto watered every 6 hrs with newts ppm 680 we will get some burn. It will be ok. Should be mild but strain depending. We She all see who gets upset. They are now in the Greenhouse. So it's up to the Sun and 2 - 1000 watt HPS ( for supplemental light ). Grab a chair and hold on. Don't forget the popcorn.



Likes
31
Share


@Growi
Follow
Tag 92 ,
Noch 2-3 wenige Wochen und die Tage der Ladys sollten gezählt sein . 😍🙌👏

Likes
6
Share


@eldruida_lamota
Follow
Vamos familia cosecha de Original de GrowBarato.
La verdad que el secado muy bien 7 días en Malla y a los botes, 40% humedad y 24 grados es la temperatura ambiental que han tenido en el secado.
Por lo demás de miedo os la recomiendo.
Gracias Agrobeta y Mars hydro , sin ellos este proyecto no sería igual 🙏.
Agrobeta:
https://www.agrobeta.com/agrobetatiendaonline/36-abonos-canamo
Mars hydro:
Code discount: EL420
https://www.mars-hydro.com/
Buenos humos.

Likes
26
Share


@iiTzToasty
Follow
More indica leaning than I personally like. Definitely a late afternoon nighttime smoke. Have about 4gs of larf I’m making hash out of; she is very resinous.


Likes
13
Share


@Robeeriegenetics
Follow
Added nutrients to top off reservoirs everything looks good …I am content so far with testing will be dropping light schedule to 11 on 13 off to accelerate bud development hopefully shortening flowering time


Likes
7
Share


@Zuppler
Follow
Vegetation Phase - Week 2
Shoutout to Cannapot, the Austrian plug who came through with the genetics from Humboldt Seed Company. The 10 Donutz plants are pushing through their second week of veg, and while the majority are thriving, a few challenges are starting to show — all part of the game when experimenting with new soil, pots, and nutrients.
Updates & Adjustments:
Lamp Adjustment: Raised the light to reduce stress and give the plants more breathing room as they stretch and develop.
Watering: Keeping it relaxed and minimal with reverse osmosis (RO) water. No overwatering here — slow and steady wins the race.
Nutrients: If deficiency will further ill add more fertilizer.
Observations:
9/10 plants are growing steadily, with vibrant green leaves and visible progress in height and structure.
1 runt: One plant is struggling hard — stunted growth, ugly leaves, and generally looking like it’s fighting for its life. Still, it’s got a spot in the tent, and we’ll see if it can bounce back.
Some minor issues spotted on a few plants, likely nutrient deficiencies as they adjust to the new setup. It’s not surprising, given the new gear and methods, but nothing alarming yet.
Next Steps:
Staying the course with low-stress management. Let the plants adjust to their environment and dial in any issues over time. The Donutz are strong genetics, so they’ll likely power through. Even the sickly one gets a chance — no plant left behind! This sea is still on track to make waves.

Processing
Likes
11
Share


@RunningHorse
Follow
Day 71
Babes are doing amazing.
#1 is significantly taller than #2, though #2 has an almost perfect canopy.
Stripped the undergrowth on both. Flipping to flower Sept. 1st.
Likes
19
Share


@4Haut
Follow
Hi folks, now it’s almost the end of the fourth week. Three days ago, I had to repot from a 1.5-liter container to an 11-liter fabric pot. Everything went smoothly. I was a bit nervous, but it turned out to be no problem. The roots have spread throughout the entire pot and along the edges, and they looked fresh and healthy. 🌿
She is growing very well in my opinion. Two of the lower leaves are yellow and limp, but the rest are beautifully green and juicy.
Happy growing boysNgirls :)

Likes
6
Share


@GODAXE
Follow
19.08.2024 officially D140...
the additionnal week, have been benefict to this fat lady. as i can see some ambering trichrome on the remaining cola. so far so good she get is second harvest.
the 3rd and final harvest should be in 1 or two week, as i will need space in the tent for the camperberry clone, and will give the time to the leftover small and unripped nugget to finish their job.
the 1st harvest is dried a d have been trim for total weight of 121.5g. it already smell more fuity that its little sister, it have been put in a growbag for a nice curring.
the 2nd harvest give 1454.6 g of wet sticky bud expecting 180g of dried flower as they are more leaffy and have more stem comparing to the 1st harvest.
the 3/4 pound is still in sight.


Likes
18
Share


@dalemac
Follow
October 1 > Harvest morning.
New trick... get up before dawn... cut your plant down and hang her upside down... then go back to bed.
Hehe... I like this retirement stuff. We get smarter as we age. 😎
I did a fair job of plucking fan leaves before harvest morning so there wasn't that much work for me to do anyway on this girl compared to some of the other monsters she grew up with. Took me only about 90 minutes to complete my normal processing and washing. She developed into a wonderful purple color at the end there.
The unique feature of this grow for me was that I never topped this girl. Subsequently she developed a huge single top cola that grew about a foot taller than the rest of the plant. Served as a demonstration of why we top plants in general. Hard for me to imagine what a bunch of these in the wild looks like but this is what WILD looks like.
Diary note > I'll come back later and add weights and things. I threw in a weight of 100 grams as a marker to appease the gods. Total guess.
========================================================================
October 7 > Guess I underestimated my yield a tad... love when that happens. 😁 Ended up coming in at 212 grams buds and 181 grams trim. Woohoo. Another growing season officially comes to a close today. 👌✊
Initially I wasn't sure I wanted to use the Trimbag on this baby... because she was my last plant to harvest this year and I had plenty of time to hand trim her... and I harbored various possibly incorrect assumptions about the Trimbag originally which I have now shed. More on that later.
Let me lay out my personal Trimbag history here as a learning experience for the community...
========================================================================
Originally I won this tool as part of my September 2018 diary winnings... and I looked at it strictly as a tool for fairly large scale growers.. of which I did not consider myself at that time. I grew an amazingingly oversized Durban Poison for a 5 gallon pot and I got lucky I thought. ... Then I took a look at how much herb I processed this summer and I said THANK YOU Trimbag! It saved me more than enough hours of hand trimming to demonstrate it’s usefulness.
(October 12) >> Already slowing down in post-harvest mode hehe... so it looks like I did the same thing as last year diary-wise. Now I have another Trimbag on my hands but all I need is another magnet actually (hehe)... the zippers show no signs of sticking up at this point after me throwing about 2-3 pounds of herb threw the mill, and the overall bag has only lightly been used at this point IMHO. I'm a little surprised I lost that magnet and it's not a great sign for the longevity of the embroidery - so to speak, but other than that it's solid construction. And simple. I’ll be contacting Trimbag to see if I can acquire a new magnet and we’ll see how that goes.
Back to my expectations... I only used this device on stuff I grew outdoors... of which I had enough... more than twice what I grew last summer - but that was by design. If I was to set out a general rule… I would say that I expect the weight of buds to be roughly equal to the weight of trim. This is AFTER I have thrown away any fan leaves plucked on the morning of harvest which are not saved as trim. I stop plucking when buds start to get ripped up if I don’t.
Round 1 >> The first go was the early Amnesia 7 batch (Little Girl flowered early), and honestly, I was unimpressed. I looked at it as maybe I didn't let it dry long enough. I have a ritual of washing all my outdoor grown herb which has generally tended to cause things to dry a tad quicker than what one would expect in the field. I walked away from this initial experience like boy I hope I screwed that up and it works better on round 2.
Round 2 >> Cream & Cheese CBD ... I think this girl did more to confuse me than anything else. The buds were not oversized but she seemed to take forever to dry. Part of this is probably attributable to excess humidity in the first few days - a weird week - we actually had some rain which is very unusual. But even after a week of drying I only managed 63g of shake on this batch (via the Trimbag). I'm going WTF?
Ahem.... I ended up with 269 grams of buds for my Cream & Cheese. After that 63 g shake by bag I added 165 g trim by hand... and I was seriously wondering why this bag thang existed. Turns out C&C was not a good example.... so don't let the bad things weigh you down.
Round 3 >> Next came Northern Lights - and my attitude changed completely. I harvested 319g buds, but the initial run with Trimbag generated 144g trim which I followed with 186g hand trim. NL had very dense buds and large internodal spacing which made trimming EZ. She was a monster… but at the same time I had her trimmed in under 4 hours. Of all the beasties I grew outdoors this summer, this was the largest yield for a single plant - but trimming her was a relative breeze, and it felt like it. I thought I hit the sweet spot for maybe how dry the herb needed to be for the product to work well… but probably only partially correct. Plant structure is significant.
Round 4 >> Next came round 2 with Amnesia. As I noted in my diary I knew I was going to end up with a pound of herb on this particular strain so I tried to beat this particular batch up to minimize my hand trimming and see what the effect was. The end result of this was that I generated a smaller amount of buds from the larger sized pot (Little Girl was in a 10 gallon container and generated 235g buds/ 360g trim and Big Girl was in a 15 gallon container that generated 223g buds/ 493g trim).
Round 5 >> Next came where we’re at in this here diary…Purple Berry Kush. Now originally I wasn’t sure I wanted to run this baby thru the mill. I THOUGHT that maybe because I hadn’t topped this girl and I didn’t put her in a pot bigger than 7 gallons which put her at a direct disadvantage vs my other outdoor girls that the yield would be substantially smaller, but I’ll be damned she ended up with 212g buds. Very satisfied there… and this stuff smells great when I let her get some air.
The key here on trimming for this round was twofold. I let the buds dry longer than I normally would have by a few days… because I had nothing pushing me to make space for reason A… and because stuff was intervening for reason B… golf tournament… Hardly Strictly Bluegrass in SF (Robert Plant was awesome - we share the same birthday and he was 71 in August - I can only hope I’m still rockin’ that hard in 9 years)…you know - stuff.
PBK ended up working out the best of all. 212g buds vs 181g trim. That’s the ONLY variant that ended up with more buds than trim. Part of that was how easy PBK was to maintain. I only did ONE major pruning of internal growth - probably later than I should have - I was trying hard to let her grow as wild as possible. But she was very easy to prune fan leaves off when that purple time came.
It’s seems clear at this point that indica’s are easier to trim than sativa’s with a Trimbag…. but I’m not sure that’s going to be a revelation to anyone. As far as I’m concerned, anything that grows with an inter-nodal spacing that allows you to neatly separate your buds will work better with the Trimbag. DRY is a necessary ingredient for using this device. Probably drier than I am accustomed to… but that’s why somebody invented Boveda packs right?
Anyway… I’m a VERY SATISFIED Trimbag customer at this point. It takes a little work to determine how dry your herb needs to be but even if you have to experiment, the number of hours you save from hand trimming will eventually make it worth your while… and as a newly minted senior citizen I can say that while my time might be free - anything that helps reduce pain - including time spent trimming - becomes quite significant.
NOW —> The other side of this coin is that I will probably NOT use the Trimbag when I get back to indoor growing in early December… because I expect to be growing much smaller plants. Most of the things I’ve grown indoors top out at less than a couple ounces so it’s not clear to me that Trimbag is necessary with a yield that small… but I can test that theory later this winter.
=================================================
hehe… I kinda promised myself “no more winter crops” after last summers bounty but I found that making edibles consumes a significant quantity of herb, and I really like my brownies. So now that I’ve stocked up to solve that problem, I plan to get back to some indoor growing (because growing is FUN)… mainly autoflowers. I actually have better control of temperature for things that I grow in winter as opposed to summer… but I have to add the heat to make that happen. That compares with the difficulty of adequate cooling if I run my lights during daytime in summer - even with night lights summer temps can be a problem with no AC. I don’t have AC in my house. It’s a function of California microclimates. If I lived 15 miles east of here - we’d BAKE with no AC (air conditioning). If it weren’t for coastal fog - this whole place would be a desert. With climate change - we’re heading that way even WITH the fog. We roll the dice here every winter and hope we get enough snow in the Sierra to hold off the firestorms that will come in the fall. We went thru a period of “drought” here in California a relatively short while back but even though we are officially out of our drought phase the fall firestorm intensity seems to be getting worse every year. But this is a clear sign I’ve consumed too much indica for one evening and I’m starting to lose track of.... just about everything.
Anyhow… I think I’m about diaried out for this year. I have a pretty freaking serious vacation planned to celebrate my retirement for late next month…
Las Vegas golf > Joshua Tree National Park camping > Palm Desert resort golf > Beach camping South Carlsbad > Torrey Pines golf > Laguna Beach > Pismo Beach camping > Monterey. It’s been about 30 years since I did anything this crazy (and that was a Grateful Dead tour in 1987 thru Arizona/Utah/California for my 30th birthday). Big difference this time around? Cannabis is LEGAL for the entire trip. I will be well stocked enough to sedate anything that gets near me. See y’all in December.
😎

Likes
56
Share


@Master_weeda
Follow
Bonjour à tous les padawans et les maîtres jedis
Le LST est fini mon tronc en forme de colonne vertébrale fais un tour sur lui meme (vidéo jour32) cette forme me satisfait pleinement je décide donc de retirer la majorité des fil de fer servant au LST
Le pincage d'Apex offre à la plante une canopé homogène (photo jour 32 34)
Jour33 arrosage avec 2 litres d'eau ph6 à laquelle j'ajoute 0.5ml de topmax biobizz (dosage très léger pour ne pas provoquer un lock-out) cela favorisera son entrée en floraison.
J'effectue une légère defolliation pour permettre une meilleure pénétration lumineuse aux apexs du bas.
Quesque la defolliation ?
LES CULTIVATEURS AMATEURS, PRENEZ GARDE, MAIS NE PRENEZ PAS PEUR
La défoliation consiste à retirer les feuilles des plants de cannabis en intérieur afin d'accroître le rendementfinal. Le cultivateur amateur doit faire preuve de vigilance lorsqu'il commence à appliquer cette technique de taille. Malgré le débat sans fin entre ceux qui prônent cette technique et ceux qui la dénigre, il n'y aucune raison pour qu'un amateur ne s'y essaie pas afin de voir si ça lui convient ou non.
COMMENT DÉFOLIER
Que vous tailliez les feuilles ou les branches des plants de cannabis, il vaut mieux utiliser un sécateur stérile qui est confortable en main. Arracher des feuilles à la main manque de finesse et engendre souvent par accident, l'arrachement des couches d'une tige en plus de la feuille. L'objectif principal de la défoliation est de permettre une meilleure pénétration de la lumière et de promouvoir la production de plus grosses têtes. Les feuilles éventails qui font de l'ombre doivent être retirées. Tailler la tige principale et/ou les pousses secondaires n'est pas de la défoliation.
La règle d'or lorsque vous donnez à vos plantes un rafraîchissement est de commencer avec les feuilles nourricières les plus grandes et les plus larges, en taillant du bas vers le haut. Il est important de retirer les feuilles stratégiquement et non pas au hasard. Pensez également qu'il vous faut limiter votre rafraîchissement à approximativement 10 à 20 % des feuilles totales de votre pied. Il est très facile de s'emporter durant la taille et de se retrouver avec des plantes chauves. Un excès de taille de feuilles empêchera la photosynthèse et paralysera vos plants.
QUAND FAUT-IL DÉFOLIER
Il est assez rare d'appliquer la défoliation comme seule technique pour obtenir un fort rendement. La taille des feuilles est généralement associée à d'autres méthodes de tailles et de palissage pour un meilleur rendement telles que le topping ou étêtage, le FIMming, le LST, le manifolding, le supercropping et le ScrOG. Les cultivateurs utilisant la méthode ScrOG auront besoin de retirer toutes les croissances inférieures ainsi que les feuilles et les tiges se trouvant sous le filet.
Les plants de cannabis peuvent être défoliés dès lors qu'ils sont passés de la phase de plantule vers la phase de croissance végétative. Cependant, il est recommandé aux cultivateurs amateurs de laisser aux plantes 1 à 2 semaines de croissance végétative avant de s'attaquer à la défoliation de celles-ci. De plus, certaines variétés sont plus sensibles à la taille que d'autres et de ce fait, seront plus stressées par la taille des feuilles. Surveillez minutieusement le comportement de vos plants après la taille. Une période de convalescence de minimum 3 à 7 jours avant de recommencer la défoliation est fortement recommandée pour éviter trop de stress aux plants. Les cultivateurs peuvent également défolier pendant la phase de floraison, ce qui permettra à l'énergie de la plante d'être concentrée vers la production de têtes tout en limitant l'ombre et l'excès d'humidité. Néanmoins, il est important de ne pas défolier trop tard sous peine de simplement blesser ses plants inutilement.
LES AVANTAGES DE LA DÉFOLIATION
Évidemment, l'avantage numéro un de la défoliation, c'est l'augmentation du potentiel de rendement de cette technique de taille pour tous types de cannabis allant de la photopériode aux variétés autofloraison. Ce n'est pas un secret que les fleurs qui reçoivent plus de lumières deviennent plus grandes et larges que celles dissimulées dans l'ombre des feuilles. De plus, retirer les feuilles intérieures des plants touffus aide à prévenir toutes menaces de moisissure. Les plants très feuillus avec un feuillage intérieur dense produiront une quantité importante de têtes pop-corn. Dans le pire des cas, les branches de têtes et les têtes qui sont denses succomberont au pourrissement.
Si vous observez des gouttes d'eau se former sur la surface des feuilles, il est grand temps de penser à faire de la défoliation. Libérer la zone inférieure et médiane des feuilles est un excellent moyen d'améliorer la circulation de l'air.
LES DÉSAVANTAGES DE LA DÉFOLIATION
Les plants de cannabis en intérieur bénéficient de la défoliation pour deux raisons. La première est parce qu'ils reçoivent la lumière d'une source stationnaire au-dessus d'eux, et la deuxième est parce que les conditions environnementales sont contrôlées par le cultivateur et non Mère Nature. Les plants d'extérieurs eux, n'y gagnent pas beaucoup, car les cas échéants se vérifient pour eux. Le soleil traverse le ciel, illuminant sur sa route, différentes portions de la plante de son lever à son coucher.
Les cultivateurs en extérieur n'ont pas besoin de manipuler les plantes afin qu'elles se développent en adoptant une structure plate puisque le soleil est infiniment plus puissant que n'importe quelle lampe de culture et qui plus est, il est toujours en mouvement. Tailler les feuilles des plants extérieurs les rend également plus vulnérables aux conditions humides et brise leurs barrières naturelles contres les nuisibles.
De nombreux cultivateurs d'intérieur peuvent, et malheureusement, c'est souvent le cas, réduire le rendement final à cause d'une défoliation faite au mauvais moment et/ou excessive. Tailler les plantules n'est pas conseillé et engendre souvent des plants nains. Scalper les plants matures est encore pire, et au lieu d'obtenir de longues branches de têtes, vous obtiendrez probablement encore moins de fleurs. De même, tailler des plants malades ou en mauvaise santé à n'importe quelle période de la croissance risque de paralyser la croissance plutôt que d'encourager la formation de fleurs denses.
Que la force soit avec vous 💪


Processing
Likes
22
Share


@Rtush
Follow
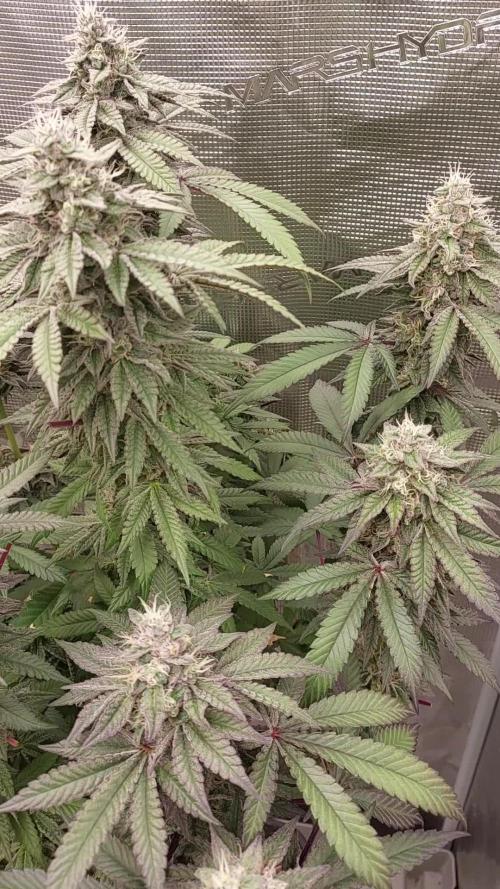
Entering week 7 and this plant is one of a kind!
Really getting fat, not a lot of frost on her but still enough time for her to shine!
Sturdy little girl, recovers very well from HST (and accidentally topping)



Likes
148
Share


@CrazyHorse
Follow
So far so hairy... 🙏
Hello everyone, another week of flowering, you can already see how the white hair begins to grow beautifully and slowly turn into buds. I think I screwed up the description of which day it is, but when I finally find some time, I will try to verify it for you.
All the best, You Lovely Girls Growers 😇
