
Likes
Comments
Share


@dank604
Follow
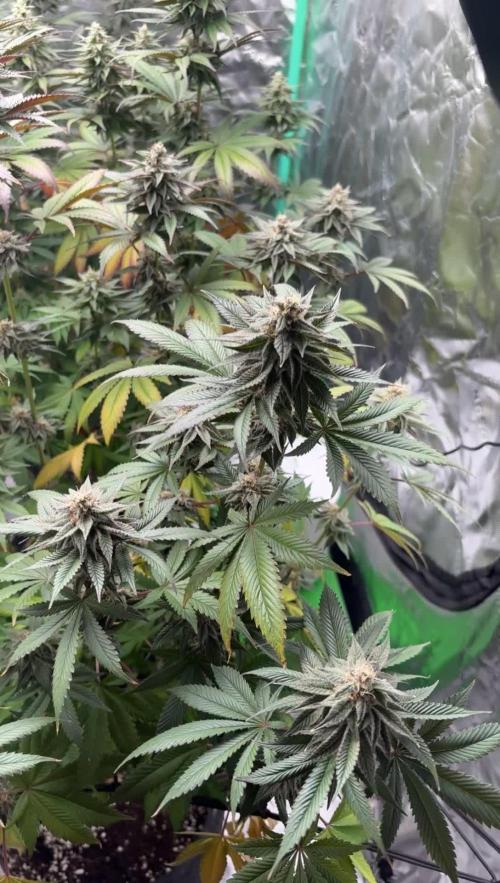
So far so good. Lowering the light was a bit of a mistake as the main cola started to show light stress. The main cola is 7" higher than the rest which is a bit of a PITA. I'll be much more aggressive with the LST next time around - comments on how to prevent such a taller main cola are welcome :)
I've trimmed about a dozen or so leaves to get more airflow and I moved the LED strips up to support the middle section of the plant, seems to have helped (I think).


Likes
1
Share


@DmbTexasRanger
Follow
I’m happy with my canopy. I’m trying my best to sit and watch. Slow season with 1 3x3 waiting for dry back/ feed


Likes
12
Share


@Nofeckingclue79
Follow
Howdy my fellow grow friends as you can see my poorly plant is still doing poorly and my other plant is still firing on all cylinders the only problem I have now is height in my small grow tent I've had to snap the main cola to make it the same height as the rest of the plant but apart from that all good the only thing is I am still getting to grips with filling out my grow diary I have only just realized I have been putting the height of my planet at one and a half centimeters instead of one and a half meters lol 🤬😂👍


Likes
23
Share


@squalino
Follow
📝 Journal de Culture : Phase de Transition (Stretch)
Date : 09 mars 2026
Âge : J+35 (Semaine 6)
Génétique : Wham Boom Auto (Anesia Seeds)
📏 Mesures & Environnement
Taille de la plante : 27 à 28 cm.
Distance Lampe-Canopée : 68 cm (Intensité : 50%).
Température : Jour : 23-24°C / Nuit : 20-21°C.
Humidité (HR) : 55% - 60%.
💧 Nutrition & Vie du Sol (Session du jour)
Volume d'eau : 0,5 Litres.
pH : 6,3.
Additif : 1g de Bactrex.
Technique : Arrosage ciblé sur les bords du pot car le centre reste humide.
🛠️ Technique de Culture : LST (Low Stress Training)
Action : Séance de palissage intensif effectuée hier soir et 3 feuilles enlevées afine de libérer les têtes inférieures.
Réaction : Récupération immédiate, les têtes se sont déjà redressées vers la lumière.
Observations : Le tronc principal et les branches secondaires sont devenus particulièrement épais et rigides, rendant les manipulations plus délicates.
🔍 Analyse
Explosion du Stretch : La plante a pris près de 8 cm en une semaine. On voit sur les photos que les entrenœuds commencent à s'espacer, signe caractéristique du début de la pré-floraison.
Densité du Feuillage : La couleur est d'un vert forêt profonde et uniforme, indiquant que la plante est parfaitement gorgée de nutriments (merci aux BioTabs et à l'Orgatrex).
Apparition des Pistils : En observant bien les têtes sur les photos de près, on commence à voir les premiers pistils blancs (stigmates) sortir au centre des nouveaux départs de feuilles. La Pré-floraison va démarrer !
Maîtrise de la canopée : Malgré la rigidité du tronc, le LST a permis de maintenir une canopée très large. La lumière atteint maintenant les sites de fleurs inférieurs qui étaient auparavant cachés.
11/03
donne 1 litres d'eau + 5ml Orgatrex PH 6,3
😫😫😫😫😫😫😫😫😫😫😫😫😫😫😫😫😫
ACCIDENT J'AI CASSER UNE BRANCHE.
J'AI LA RAGE EN FAISANT UN LST
TEMPIS UNE BELLE TÊTE EN MOINS J'ESPÈRE QU'ELLE SERA PAS TROP TRAUMATISER .
C'EST UNE PLANTE PAS FACILE POUR LE LST. SES BRANCHE SONT TELLEMENT EPAISSES QU'ELLE CASSE PRESQUE SI ON ETIRE DE TROP .C'EST PAS UNE PLANTE QUE JE CONSEILLERAIS AU DÉBUTANT. DÉJÀ CONFIRMÉ AVEC DE L'EXPÉRIENCE..

Likes
18
Share


@KurbinTurbin
Follow
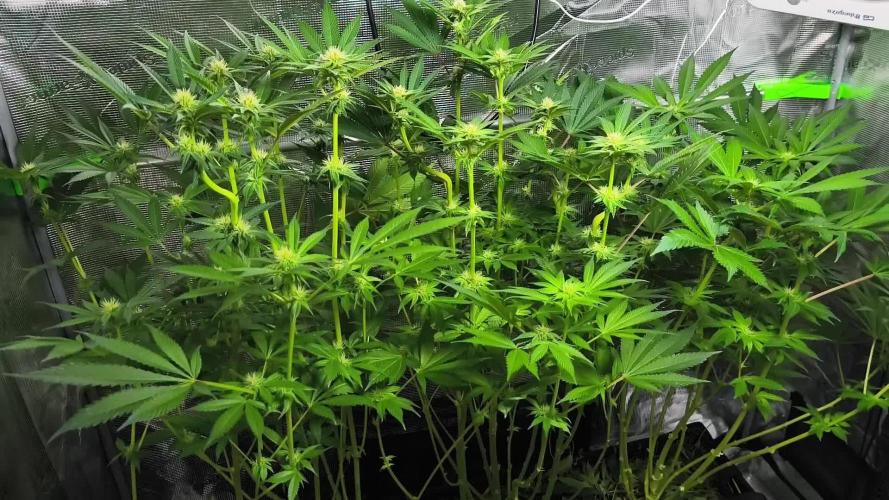
The transfer was a success! Went from a 5’ x 4’ Scrog to 8’ x 8’ and gave them a 40 Gal drink of water.
Also was able to drop the taller ladies to have an even canopy.

Likes
31
Share

@StickyHands
Follow
Day 21 of Flowering
The ladies are doing great and have finished stretching.
Today, they will be defoliated and lollipopped.
As always, they are getting compost tea.


Likes
21
Share


@OGTrauma
Follow
Now it’s our POST PANDEMIC VIRGO SEASON & as Spring and ‘Fiestas Patrias’ are coming here homies!!! Have Big Gas Puff on my Behalf! 👽
Declaring on September the First, Im Setting officialy the photopheriod as 20/04 hours resting too, they start in midnight as they will help to provide an ideal temperature at night, and thats the reason why stick with covering most of the day yet respecting some time off the grid, as for both mary jane plant processes like foliar feeding or the transplant depicted below and electronics used requires a bit of resting as lifespam testing and recomendations tend to stick on ‘calm your tits homie’ even on autoflowering scenarios, last consideration is the electricity bill as can become bothersome in some countries too.
Moving on plant growth , I personally consider up to this date , a healthy growth even when i changed the substrate it has quite a possitive impact and that’s on having a number of survivors above the mínimum of plants i want to be spread each on 11 lt of ’ Organic Life Light Mix’ for the most oustanding Killer Kush FV, by using the growth vigor & not stressed AF criteria , as it’s always good to do backups in case i had a strong damping-off or like a bad germination scenario. Notice the quirk of ‘Pot on Pot’ made the transplant a bit easier, and how can make some small upgrades if added in your grow , if its on your market and fits your style as well.
Regarding to feeding, new transplant soil was watered with Hesi boost, Top candy and BAC Calmag’s 2.0 (I chose this Brand specifically as it present other useful micronutrients on its composition ), as they first ones show to have quite a stimulant and refreshing effect on the babies, considering the size of more than decent root samples took before being moved on their final containers. This experience also introduced me the carencies i must attend usually on these type of soils, who also i do consider that being this deal of too light substrate, is a deal of a trade off too , like, im saying this this Organic Life Light Mix it’s not a bad product at all but consider is way more needy unlike traditional soils or even fuck, this shit is more airy than other light soils compositions hhahah, so, final words here, like at the same time the speed gained plus not a total damping off on germination phase & good interaction with fertilizers i use as plant interaction shows quite a good evolution, specially being keen on carencies and disbalances are faster to present and faster to attend , it requires more handling specially on feeding like all shit that is making this grow go at super fast speed , as i took some pics of root mass and it’s development shows it’s quite advanced yet on the optimal point to transplant.
PS: I will stay with the non finalists , the more pansy Killer Kush aren’t totally discarded as the point of having backups to have a better coverage regarding to uncertainity of germination and the fact that still fuck up things and shit my pants in the near future, as usual, im a shitty grower if not noticed ! 😂😂😂.
HAVE A BIG DICK ENERGY SEPTEMBER MFS !!!
// i'm uploading the photos asap as possible :P


Processing
Likes
3
Share


@Frankvalen
Follow
Hey guy ive started a grow with a new time of way of growing stat tune and let me know if you like what I’m building
Likes
27
Share


@DopeLeaves
Follow
I've added a video review about this strain, and here's the information about Beary White from mephistogenetics.com:
-Beary white is a medium sized variety, she doesn't veg for too long before rapidly entering the flowering phase. She has a nice balance of resin coverage on both leaves and flowers. Flowers grow nicely compact and the quality is great. She is a lovely all-rounder in many aspects.
-Effect - Strong, Happy, relaxed, but not too inda-couch.
-Medicinal Benefits - Great strain for pain and stress relief.


Likes
71
Share


@Roberts
Follow
Started the flush this week. She started fox tailing a lot with excess heat with 100 degree summer days. I am updating my extraction fan after this grow. She grew good under the Spider Farmer SE5000 light, in New Level Hydro buckets. Next update will be harvest. Thank you New Level Hydro, Spider Farmer, and Amsterdam Marijuana Seeds. 🤜🤛🌱🌱🌱
Thank you grow diaries community for the 👇likes👇, follows, comments, and subscriptions on my YouTube channel👇. ❄️🌱🍻 Happy Growing 🌱🌱🌱
https://youtube.com/channel/UCAhN7yRzWLpcaRHhMIQ7X4g
Www.amsterdammarijuanaseeds.com
SE5000
https://amzn.to/3qFpAML
Spider Farmer Official Website Links:
US&Worldwide: https://www.spider-farmer.com
UK: https://spiderfarmer.co.uk
CA: https://spiderfarmer.ca
EU: https://spiderfarmer.eu
AU: https://spiderfarmer.com.au
Coupon Code: saveurcash (is stackable in most cases)
Www.newlevelhydro.com
Www.hygrozyme.com


Likes
12
Share


@cookingwithninja
Follow
day 38 stopped giving PK, carbs. only humic, folvic fishsh!t in watering. lifted terps video sticky icky video
day 39 just humic and folvic into water.
day42 bridal party gained a lot of weight, started to lean over blackberry. I feel like I could chop today.. slight chance might meet remo :)

Likes
23
Share


@Zuppler
Follow
Grow Report by Zuppler - Week 3 Veg Phase
Ayy, what it do fam? Zuppler back on the check-in with that week 3 veg report, live from the capital. Yo, these girls ain’t playin’ no more – they really startin’ to stack up, lookin' thick in the canopy like they preppin' for somethin’ big. We still runnin’ that Advanced Nutrients like clockwork, straight through that RO water, keepin’ it pure as a Miami night breeze.
The nodes are gettin’ tight, leaves spreadin’ out nice and wide, takin’ all that light. I hit ‘em with a little scrog, just a lil’ bend here and there, makin’ sure that light hit every corner of the canopy. You already know I’m tryin’ to maximize that potential. Stems got that thick structure, and no signs of nute burn or nothin’. We’re talkin’ flawless execution, fam.
At this point, it’s just watchin’ ‘em fill out, keepin’ the environment dialed in and lettin’ ‘em do their thing. We’re settin’ the stage for a strong finish when we flip ‘em to flower.
Zuppler out, stay blessed.
Likes
168
Share


@Tropicannibis_Todd
Follow
💩Holy Crap We Are Back💩
Well i had so much fun the last round , that we are going at it again 😁 OUTDOOR GROW👈
So super happy to be trying this one out , can't wait😝 .....The hope here is to do better then last summers outdoor grow ..👍
It's been a full week and she's doing great , very nice Growth, so I'm just waiting on mother nature and out they go 👌
👉NutriNPK NUTRIENTS USED FOR FEEDING 👈rain water to be used entire growth👈
👉www.nutrinpk.com right now get 10% off using SPRING2022 as the coupon code👈
