




Likes
40
Share


@valiotoro
Follow
easy trim✂️
The buds are Absolutely perfect,exactly what i was looking for🤩
Green pheno : cookie,diesel & gelato🍪⛽️🍦
Purple pheno : flower,sweet & honey🌸🍯
After 7 days on the dry rack she was ready for the jar to start the curing process.😋


Likes
18
Share


@Scarface_007
Follow
She's becoming a very big lady and the smell it's amazing. A couple more weeks and then it's harvest time . Hope i can provide her a little bit more shelter for if the rain is there. ,,,🍀🙏🌞🤞
Likes
52
Share


@Salokin
Follow
The plant again doubled in size. Not sure if it’s the light, but the plant is growing super bushy. I have already started removing some of the inner shoots, to focus the energy into building some length. The roots are developing phenomenally and she seems to be overall quite happy. Once she is a bit taller, I will probably top her to make sure that I can fill the SCR.O.G. Properly. Light intensity is currently set to somewhere around 80% veg only.


Likes
62
Share


Likes
100
Share


@m0use
Follow
The time is finally here to post the harvest. I waited till it was all done and dry before updating the dairy so will add in the dry weights next on the 2nd half of the harvest entry.
I enjoyed this plant a lot, its grew well and loved how it was shorter and fatter. I wonder if it was at the dame distance from the plant if It could have done even more. Had some issues with the yellowing that was happening on the other plant in this tent. I should have treated this faster with a flush but was super reluctant and it may have hurt the yields a bit. The top best looking buds looked and smelled amazing even the lower buds where doing well not so larfy like the other plant.
There was crazy strong smells with this plant, sour berries and hints of lemon, it was a best smelling plant I have grown to date. This would be a great plant to grow for beginners, cant take a lot of stress and still produces quite well and even on lower wattage leds it was good. It was not the most crystally looking plant, not like the maltezerz but still had some finger hash buildup but a small amount. I feel this plant would be a winner for a rosin press.
I don't plan on growing this strain out again despite me liking a lot of qualities about it. I'm only trying to grow cbd dominate plants is the main reason. If my friends really like this I have some clones so can always give them some. Speaking of clones they are doing well outside, greened up a lot and showing signs of revegging.
Took some photos of the weed hang drying on day 1 in the tent and a week later to show how much they shrink.
Only some of the lower growth is larfy, will make good edibles or hash, that will be a fun project to do and may include that in my projects diary.
That's about all I can think of if you have any questions just ask.
m0use
Disclaimers:
1. I have divided the total watts of light in half, 300w(150w) for this diary. It will accurately reflect the g/w ratio as the two plants growing in this tent are listed in two separate diaries.
2. I include any shake/trim in my gross totals as I use them to make edibles.
3. I did not follow any proper ways of listing my nutrients. Some are ml/l of total solution watered, others ml/l of total medium and some are just the total amounts I added, not as a ratio.
If you have any questions let me know!
+++++++++++++++++++++++++++++++++++++++++++++++++++++++++++++
Cost + Time Analysis Of Growing Cannabis. m0use’s Breakdown
+++++++++++++++++++++++++++++++++++++++++++++++++++++++++++++
Light Schedule
===
Veg [Dec 18th 2021 - Mar 11th 2022]
18h on 6h off - 6am-12pm
Flower [Mar 12th 2022 - May 10th 2022]
12h on 12h off - 9am-9pm
This is extra tricky this harvest as I went through 2 different hydro rates in three different periods, plus a veg and bloom switch between them.
Mon-Fri are TOU rates, all weekends are off-peak pricing all day.
Off Peak = 7pm-7am + all weekend
Mid peak = 11am-5pm
On peak = 7am-11am + 5pm-7pm
TOU rates:
Dec 18th 2021-Jan 17th 2022
Cost of kwh with on-peak "17.0c", mid-peak "11.3c" and off-peak "8.2c".
Jan 18th 2022 - Feb 7th 2022
Cost of kwh with on-peak "8.2c", mid-peak "8.2c" and off-peak "8.2c".
Feb 8th 2022 - Current
Cost of kwh with on-peak "17.0c", mid-peak "11.3c" and off-peak "8.2c".
—
Dec 18th 2021-Jan 17th 2022
Weekdays “21 days”
6am - 7am -- 1hr @8.2c/kwh off-peak
7am - 11am -- 4hr @17.0c/kwh on-peak
11am - 5pm --6hr @11.3c/kwh mid-peak
5pm - 7pm -- 2hr @17.0c/kwh on-peak
7pm - 12am -- 5hr @8.2c/Kwh off-peak
Weekends “10 days”
6am - 12am – 18hr @8.2c/kwh off-peak
6h @17.0c/kwh
6h @11.3c/kwh
6h @8.2c/kwh + 18h@8.2c/kwh weekdays/weekends
—
Jan 18th 2022 - Feb 7th 2022
Weekdays “15 days”
6am - 7am -- 1hr @8.2c/kwh off-peak
7am - 11am -- 4hr @8.2c/kwh on-peak
11am - 5pm --6hr @8.2c/kwh mid-peak
5pm - 7pm -- 2hr @8.2c/kwh on-peak
7pm - 12am -- 5hr @8.2c/Kwh off-peak
Weekends “6 days”
6am - 12am – 18hr @8.2c/kwh off-peak
18h @8.2c/kwh + 18h@8.2c/kwh weekdays/weekends
—
Feb 8th 2022 - Harvest
Veg
Feb 8th - March 11th 2022
weekdays “24 days”
6am - 7am -- 1hr @8.2c/kwh off-peak
7am - 11am -- 4hr @17.0c/kwh on-peak
11am - 5pm --6hr @11.3c/kwh mid-peak
5pm - 7pm -- 2hr @17.0c/kwh on-peak
7pm - 12am -- 5hr @8.2c/Kwh off-peak
weekends “8 days”
6am - 12am – 18hr @8.2c/kwh off-peak
6h @17.0c/kwh
6h @11.3c/kwh
6h @8.2c/kwh + 18h@8.2c/kwh weekdays/weekends
—
Flower
March 12 - May 10th 2022
weekdays “42 days”
9am - 11am -- 2hr @17.0c/kwh on-peak
11am - 5pm --6hr @11.3c/kwh mid-peak
5pm - 7pm -- 2hr @17.0c/kwh on-peak
7pm - 9am -- 2hr @8.2c/Kwh off-peak
weekends “18 days”
9am - 9pm – 18hr @8.2c/kwh off-peak
4h @17.0c/kwh
6h @811.3c/kwh
2h @8.2c/kwh + 12h@8.2c/kwh weekdays/weekends
—
Total hours in each peak period
126+144+168 = 438h @17.0c/kwh
126+144+252 = 522h @11.3c/kwh
306+378+288+300 = 1,272h @8.2c/kwh
Lights
===
LED’s I use are 48w and 18w, per stick, they are arranged on an array totaling 300w.
6400k 18w*6 = 108w + 3000k 48w*4 = 192 108w+192w=300w | 300w/1000 = 0.3Kw
* note I am using 150w as stated in my disclaimers to account for the missing plant in a separate diary.*
Using the previous c/kwh numbers above I can find out the total cost of the lamps in the 3 peak periods. I converted the cents into dollar amounts beforehand to avoid dividing by 100. 8.2c/h = 0.082$/h
438h * 0.17c/kwh = $74.46kw * 0.15kw = $11.17 on peak
522h * 0.113c/kwh = $58.99kw *0.15kw = $8.85 mid peak
1,272h * 0.082c/kwh = $104.30kw *0.15kw = $15.65 off peak
The "h" hours and "kw" kilowatts cancel out and we are left with a value of $ dollars per peak period, add all the peak periods up and you get your total cost of running the lights in dollars.
$11.17 + $8.85 + $15.65 = $35.67 for the grow light only.
My light grew for 20 weeks and 4 days, or 144 days. almost 21 weeks total.
$35.67 / 144d = 0.2477$/d average of about 25c a day in electricity
337.2kw for the entire grow.
Using the regular calculation of grams harvested divided by watts used is not accurate to me, it does not account for all the time the lamps are on, the length of grow to the over all cost. The calculation that makes sense to me is this, harvested dry weight of usable cannabis buds/trim/keif/whatever in grams divided by total kw used. Could also combine it with grams per total single use costs “anything you used only for this grow and wont reuse in the next, or fractions of multi use items like fertilizers if they ½ full” and see how much you’re investing per gram.
"kw" ÷ "g" = kw/g
"$" ÷ "g" = $/g
I have harvested 4.57oz or 129.6g on 337.2kw.
337.2kw ÷ 129.6g = 2.60 kw/g of usable cannabis. This is not an ideal ratio for me and looks like a lot of energy waste happened from the extended veg period.
$35.67 ÷ 129.6g = 0.28c/g
It cost 28c/g when comparing total electricity cost to gross yield, almost identical to the comparison of total electrical cost to the number of days in the grow 25c/day.
Neat!
legend,
kwh = kilowatt per hour
kw = kilowatt
w = watt
h = hour
c = cents
$ = dollars
d = day
LED= Light Emitting Diode


Likes
1
Share

@Tropical_Growerz
Follow
Hi,
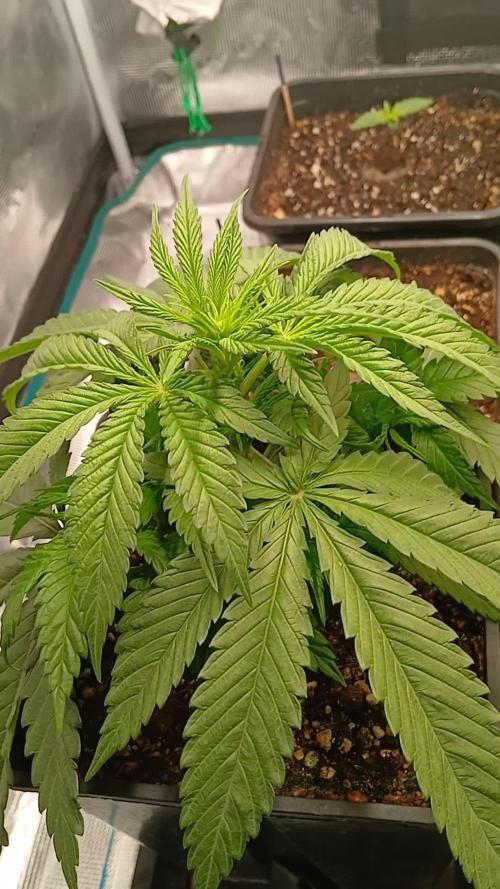
Growth is going well; I had to move a GorillaZ plant into this grow box to force it to flower.
I'm carefully observing their progress.
I'm thinking of taking some cuttings to preserve certain specimens.

Likes
3
Share


@Elguacho420
Follow
Buenas a tod@s... Segunda semana y las nenas de momento van bien, algo de enraizante, muy poco y listo... Eh tenido unos problemas pero todo bien, nada sin solución... Vamos a ver q tal siguen... 💪🏻💪🏻
Buenos humos para tod@s!💨💨 😎💎
🇦🇷🤝🏻🇪🇦
Likes
10
Share


@Bread_n_Buds
Follow
Our Slurricane is one of those plants that I always say are my favorites, I am fascinated by low internode plants for their style.
It is one of those plants that is doing well I would already promote it but to avoid the risk of speaking too soon, let's see what grass it will give us.
For each strain we have at least two plants there is also a specimen that is growing straight that you do not see in the photos for now for each strain of her I have a very small one still probably I will do another diary.
We have done our best Zamnesia has put superb genetics and at home B&B we are working to show you the plants in all their possible meanings.
This plant like all the other photoperiodic ones has been worked with a topping x16 buds, simply repeating the topping technique without doing anything else than cleaning the leaves from time to time and now the branches that I believe do not give me good flowers at the bottom.
The 16 florets are perfectly aligned and the growth is very regular.
The flowering fertilizers have helped us get back to a good balance in a very short time and now we go straight to making big buds.
We are still using soil, fertilizers and all the additives recommended by Plagron 100% organic.
The plant has been flowering for 3 days, in the diary I leave it indicated as the last week of vegetative growth but let's move on to the flowering fertilizers.
We have now moved on to the flowering start program which maintains the same additives Power Roots, Sugar Royal, Pure Zym and adds the flowering stimulant Power Buds. Now the basic fertilizer is now Alga Bloom with which I find myself very very well even more than Alga Grow which sometimes I have to understand well how to dose in some particular cases (topping). Probably I will try to prepare the soil with Plagron Super Mix or with the Zamnesia Pellet.
The Green Sensation will arrive as an end-of-flowering hero and at the same time it will be time to remove power roots and a week later the Pure Zym enzymes.
---- Decide on the right soil and calculate your fertilizer card based on the soil on the official website.
-- www.plagron.com
Try a seed of this strain that drives us crazy... It's a super News!
---- https://www.zamnesia.io/it/11177-zamnesia-seeds-slurricane.html
Zamnesia Description // Do you want to add a prestigious genetics to your grow room? Slurricane is a premium US strain created by In House Genetics and now available to growers thanks to the breeding processes implemented by Zamnesia. Born from the fusion of Purple Punch and Do-Si-Dos, Slurricane is 60% indica and incredibly vigorous. Whether grown indoors, outdoors or in a greenhouse, this strain can produce large quantities of dense and aromatic buds. Add Slurricane to your assortment and enjoy growing one of the most beloved hybrids in the United States.
All the best that mother nature can offer is on ---- www.zamnesia.com
Likes
8
Share


@pzwags420
Follow
Started off week 6 off by adding 5ml of Flying Skull Z7 to reservoir and adjusted reservoir PH to 6.0. I've got the blumats nearly dialed in and keep making small adjustments every 24 hours. I am holding off a few days on the nutrients to see what the plant tells me. The clawing seems to have improved(combo of over watering and not getting runoff on hand watered nutrients I believe). When I apply nutrients going forward I will make sure there is plenty of runoff so I don't repeat the same mistakes. 😬 on day 2 I applied 1 gal of nutrients and watered until runoff. On day 3 I defoliated the bottom of my plants to improve the air flow. On day 6 I added 5ml of flying skull Z7 to the reservoir. I noticed a possible calcium deficiency on one plant so on day 7 I applied my 1 gal of nutrients with the addition of calmag and silica. Ive only used calmag once growing in coco and it burned my plants...so I assumed there was enough from my tap water and nutrients. I know this goes against all advice.. I think it finally caught up with me LOL.LIve and learn to buffer your coco. Next grow I will buy buffered coco and use a calmag product 😅 I defoliated the center of my plants to increase airflow and expose light deeper into the canopy.

Likes
88
Share


@NAS_Garden
Follow
🌸🌿 Week 3: Blooms Unleashed! 😁
The stretch has gracefully come to an end, and now, the buds are making their grand entrance! 😁 Standing tall, our Lemon Orange proves to be a formidable presence, prompting the need for some strategic topping and ScrOG to keep its height in check.
Growth Management:
Given its impressive stature, a little intervention with topping and ScrOG is in order to ensure the plant stays within bounds. It's all about orchestrating the dance of growth.
Aromas in Bloom:
As the buds unfurl, so do the enchanting aromas. A symphony of citrus notes fills the air, signaling the flourishing flower stage. The pace is exhilarating, promising a delightful harvest in the making.
Nutrient Nurturing:
In the spirit of balance, I've opted for a mindful approach, utilizing only 80% of the recommended nutrients by Terra Aquatica. It's a careful dance to provide just what our Lemon Oranges needs for optimal growth and flavor development.
The stage is set, and our Lemon Orange beauties are gearing up for a floral spectacle. With each passing week, the anticipation for the harvest grows, and the journey unfolds in a crescendo of green and citrusy bliss! 🌼🍊🌿

Likes
12
Share


@SiriusBlack117
Follow
I think the stretch is nearly done, they could have filled out a little better but overall I’m pretty pleased, this is the fewest I’ve run in here and to have it this even and filled out im pleased.
If low temps stunt growth we will find out soon, these had a brief stint in the mid 70’s toward the end of veg but they’ve been experiencing sub 50 degree nights for basically the whole run.
Anyways, flowers are coming in, probably towards the end of next month, but who knows, they’re never simple.
Thanks for checking this out!

Likes
31
Share


@XperencdGmanXG
Follow
What can I say this thunder fuck is so smooth to smoke, I just can't stop growing it! I am in uncharted waters here because I've gone full organic no till. This will be my first time using grassroots living soil pots and first time using this brand new soil mix. Also to help with costs I decided to make a 5 gal tea reactor, to grow out the EM1 which will save me about 75% on all microbe products, and also save on feralization when used in conjunction with foliar sprays. Wish me luck!
Likes
7
Share


@Zuppler
Follow
Grow Report: Zuppler's Sea of Green - Florida Gang Style
Strain: Donutz (Humboldt Seed Company)
Grow Tent: 120x60cm
Light Setup: 320W LED
Medium: Floragard Growmix soil
Containers: 3.7L pots
Water: Reverse osmosis (RO) water
Nutrients: Greenhouse Feeding (planned for later stages)
Week 1 - Poppin' Off
The journey begins with a 10/10 germination rate — strong genetics showing their strength right off the bat! All seeds have sprouted and broken through the soil surface, ready to ride the wave of growth under a 320W LED, casting down consistent rays in the 120x60cm tent.
The initial focus? Establishing solid roots and healthy shoots in Floragard Growmix soil. No nutrients added yet; the young Donutz ladies are riding on the starter mix's nutritional buffer. RO water keeps everything clean and pH balanced, ensuring no unwanted minerals creep in this early.
Observations:
All seedlings looking vibrant, green, and strong.
Uniform growth across the board — perfect for the Sea of Green (SOG) method.
Temps stable, ensuring no stress.
Light is dimmed a touch for the youngins, keeping nodes tight but not overwhelming.
Next Steps:
The plan is simple — maintain stable conditions, keep an eye on humidity, and prepare to introduce Greenhouse Feeding once the seedlings are ready to crank up the nutrient game. For now, it's all about building those roots and establishing a foundation for the dense, resinous canopy that’s to come.

Likes
3
Share


@metlotter
Follow
Two of the seedlings were showing some really marked chlorosis. A little odd, because all 4 buckets should be the same mix, but... I checked the EC of all the buckets and they were consistent. pH was a smidge high on those two, so I dropped it from about 5.8 to closer to 5.4/5.5. After a couple of days, I decided to just remix those two buckets. I didn't want to spend a lot of time trying to fiddle with a nutrient deficiency with autos. After a couple of days the meristem areas were coming in green again, so hopefully it's fixed! The other two plants looked fine.
Edit: Immediately after writing this entry, I was like "Oooh, it's nute burn." so I dumped 1/2 of the reservoirs and replaced with filtered water to get the ppm down. pHed it to 5.5 again, and we'll see!


