




Processing
Likes
Comments
Share


Likes
16
Share

@World_Breeders
Follow
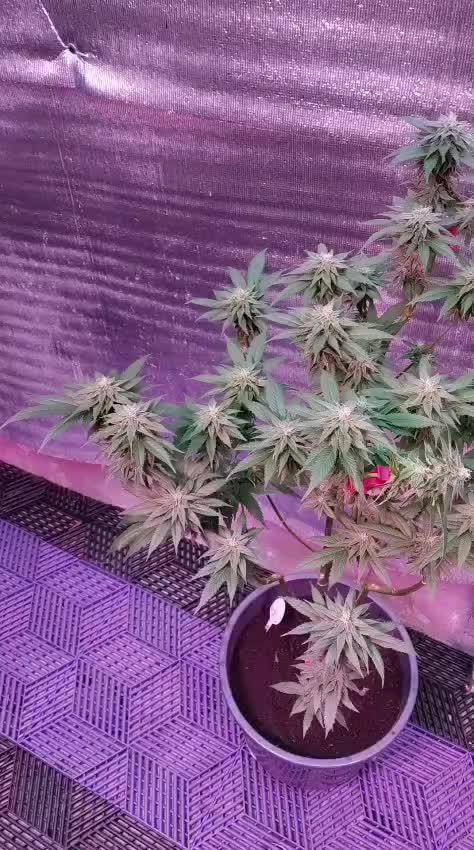
Pink Truffle continues to impress in week 6 with a clear increase in flower density and resin production. The buds are stacking tightly across every branch, creating compact, frosty colas with excellent bag appeal. Trichome coverage is now heavy, extending well onto the sugar leaves, while the terpene profile becomes richer and sweeter. The plant has maintained great structure throughout flowering and is now entering the final ripening stage with outstanding resin potential.
Seeds by World Breeders
Cultivated by Piperoots 🇲🇦 🌱🔥
Likes
11
Share


@Silverback_Guerilla
Follow
SUNDAY 4/21:
I fed them about 1/3 gallon each today. Switched to Beastie Bloomz and increased terpinator.
I inspected them for nanners and found one.. Will take some photos tomorrow-
MONDAY:
Life got in the way and I didn't have much time for the garden.
TUESDAY:
I rearranged and took some photos today.
I've still got Candy Canes in both tents. One big one and one small one in the big tent, and 2 small ones in the little tent.
WEDNESDAY:
Took some photos and a video. WIll water tomorrow-
THURSDAY:
I watered with about 1/3 gallon and included some terpinator, calimagic, and beastie bloomz.
The biggest one is finally starting to put on the pistils. She'll be the slowest CC I've grown to date, but also possibly the biggest yielder.
The other 3 didn't do much stretching, but I did a bunch of training on them to get some separation and better light penetration into the lower flowers
FRIDAY:
I did some more training on them today and I made some improvements to my fresh air a/c intake in the tent that dropped the temp a couple of degrees, and the new dehumidifier is keeping the RH right where I want it..45-50%.👌 This allows the evap cooler to be more effective at cooling as well...above 50% RH and it's basically just a fan..

Likes
56
Share


@Master_weeda
Follow
Bonjour à tous les padawans et les maîtres jedis
Pour cette semaine 3 au jour 19 ma plante fais 21 centimètres et son septième noeud apparaît je décide donc de pratiquer un LST sur ma plante.
Pour ce j'utilise du fil de fer galvanisé que je plante directement dans le substrat en faisant attention de ne pas endommagé les racines car n'oublions pas que ce qui pousse dessus pousse aussi dessous.
Jour 17 je pulvérise du une solution composé d'une cuillère à café de savon noir mou (marque briochin) dilué dans un demi litre d'eau en prévention d'éventuels nuisibles.
Pourquoi le savon noir mou ?
Savon noir : quelle utilisation pour le jardin ?
Le savon noir est un produit naturel dont les propriétés nettoyantes sont connues depuis l'Antiquité. Utilisé pour l'entretien de la maison et pour les soins corporels, ses vertus antibactériennes et insecticides en font un allié précieux pour le jardinier bio.
Le savon noir est fabriqué à partir de potasse et d'un corps gras de type huils végétale comme l'huile d'olive, de lin ou de maïs.
Produit naturel et biodégradable (s'il ne contient pas d'additifs, comme cela peut-être parfois le cas), c'est un très bon produit nettoyant, pour les sols, la cuisine, la vaisselle, le linge, etc... Très polyvalent, il est également économique, comparé aux multiples détergents classiques du commerce.
Le savon noir se trouve sous forme de pâte molle et brune ou sous forme liquide, dilué avec de l'eau. C'est du savon noir liquide dont on se sert généralement au jardin, car son utilisation est plus simple. Il s'achète dans les magasins bio ainsi qu'en grandes surfaces ou jardineries.
Attention : la recette du savon noir de ménage et celle du savon noir utilisé en cosmétique ne sont pas forcément les mêmes ; les savons noir de ménage (multi-usages) peuvent contenir davantage de potasse afin d'améliorer le pouvoir dégraissant (irritant ou desséchant pour la peau), voire même certains additifs chimiques.
Au jardin, ce sont en priorité les propriétés antiseptiques et insecticides du savon noir qui sont utilisées.
Le savon noir liquide est utilisé pour lutter contre les pucerons, les cochenilles, les araignées rouges, les aleurodes, les psylles et autres thrips. C'est un insecticide de contact ; il tue les larves et nettoie le miellat qui englue les feuilles.
La recette de l'insecticide à base de savon noir (mou pour ma par marque briochin) est simple à réaliser : une ou deux cuillères à café de savon noir mou (briochin) diluées dans 1 demi litre d'eau tiède (dilution à 5 %) ; une fois la préparation refroidie, pulvérisez-la sur les plantes atteintes, en prenant soin de ne pas oublier l'envers des feuilles. À renouveler 1 à 2 fois si nécessaire, pour être totalement débarrassé des indésirables.
Comme il est de mise pour la plupart des traitements, ne pulvérisez pas la solution à base de savon noir en pleine journée, sous le soleil (ni sous la pluie !) ; procédez le matin de bonne heure ou patientez jusqu'à la fin de journée, lorsque les températures sont en dessous de 20°C.
Jour 18 Je corrige mon LST suivant la pousse de ma plante ...
Pour ma par c'est la manière dont je procède mais petit rappel de la technique du LST
Quand commencer à appliquer la technique LST ?
De nombreux cultivateurs commencent la manipulation dés que les plantes possèdent entre 3 et 6 nœuds ou une paire de feuilles. Durant cette première étape de la croissance, le tronc encore flexible est pliable sans risque qu’il ne se casse, même si au fur et à mesure du développement de la plante il sera de plus en plus difficile de le plier. Nous pouvons continuer à guider la croissance des branches durant toute la culture, même durant la floraison, ce qui pour cette étape représente un grand avantage face à la taille, qui n’est pas du tout recommandé une fois que la formation des têtes commence, cela stressera en effet la plante, ce qui aura pour effet de retarder la récolte.
Comment appliquer la technique de guidage LST
Si nous sommes prudents, la flexibilité naturelle des fibres du cannabis permet de plier leur tronc et branches avec une relative facilitée, même durant la floraison des plantes.
En utilisant une corde fine, nous pouvons accrocher la pointe de la plante à la base du pot par exemple ou à un tuteur que nous aurons planté dans le substrat. Nous plierons le tronc avec précaution et nous le fixerons avec la corde, à partir de là, nous pouvons augmenter progressivement la tension de la corde, chaque jour un peu plus, jusqu’à obtenir la position souhaitée. Soyez attentif à la réaction de la plante, essayez de ne pas appliquer trop de pression sur la corde et rappelez-vous que la flexibilité des branches peut varier d’une plante à l’autre.
Pour obtenir de meilleurs résultats, il suffit de suivre quelques règles simples. Pour commencer, nous devons choisir une corde fine mais pas trop pour ne pas blesser les troncs au fur et à mesure qu’ils grandissent et qu’ils deviennent plus gros.
Nous pouvons utiliser des crochets en plastique souple ou de n’importe quelle autre matière flexible pour éviter d’endommager les plantes. Spécialement en intérieur, utiliser des cordons en plastique de couleur (voir les diaries de @Silky) est très pratique pour voir facilement les accroches et faciliter le travail au milieu du réseau formés par les cordes, les tuteurs, les mailles ou les supports que nous aurons dans la culture. Bien entendu, en culture extérieure et surtout en guerilla nous ferons juste le contraire et nous utiliserons des matériaux de couleur qui n’attirent pas l’attention pour que notre jardin reste discret.
Pour stresser les plantes au minimum, la mieux est de réaliser ces manipulations le soir ou juste après que les lampes en intérieur s’éteignent, ce qui leur permettra de se remettre durant la nuit. Normalement, le jour suivant nous pourrons observer comme les pointes des branches que nous avons pliées se dressent de nouveau vers le haut à la recherche d’une source de lumière.
Que la force soit avec vous💪

Likes
23
Share


@HillCountryHempCo
Follow
It started to flower halfway through week four. Saw the first Pistol hairs today.

Likes
9
Share


@Unnamed
Follow
This is the start of my second grow and also second Northern Light Auto from RQS, the goal is to hit #1 in g/plant for that Strain.
I didn't take as many notes as in the last grow but there are timelapses, some photos and metrics from probes.
Started with 3 Seeds and then picked the 2 strongest.
The System is a NFT System but due to the size of the tube and root growths the solution with submerge the roots ~70% later on.
To combat that I use 3 small 1.5w air pumps, these are super silent, if one dies I got 2 more running and to be honest air pumps used in DWC systems are often oversized and rely on Broscience.
In my Salad/Herb NFT Systems I don't use any air pumps and the plants are just fine and grow great.
This time I added sprinklers to humidify the air inside the tube, slightly moisturize the Rockwool and speed up root growths.
Spoiler: Was a great success :)
The ratios for the fertilizers are not accurate in the following weeks, I have a 120l Reservoir that is filled 90-110l I top it up once or twice a week to sustain PH and EC, if you want to copy it just go by the EC and use the B (Calcinit) and A (Kristalon Blue/Orange) 50/50.
I mix the solution myself with dry salts that I bought in bulk 25kg bags.
4l Water(distilled/RO preferably, tap water is OK) + 1kg salts mixes just fine, keep the solution dark and cool and it will stay stable for months.
Dry salts don't expire if kept cool and dry so only mix what you need and keep the rest stored as dry salts.
40ml A + 40ml B is about 2EC and 6PH with my tap water, very similar to Canna, Plagron etc. isn't it? just with the twist that I pay ~20% of the known brands.
P2O5, K2O, MgO etc. are always the same as long as they are produced by a good manufacturer, Yara is a world leader in fertilizer production just not to be found in you general hydroponics or hardware store.
Any other known manufacturer is fine as well, pick the cheapest.
Check Hoocho on Youtube to see a guide on how to mix your own solutions, it ain't that difficult trust me.
From week 5 onwards I also use Oxygen granulate (KMPS, CAS-70693-62-8, 2KHSO₅ * KHSO₄ * K₂SO₄) if you want to use this check pool supply stores and buy the cheapest.
Keep this one dry, cool and dark.
I used a old pill bottle to keep some ready to go because it came in a 1kg container and I only need 2-4g per serving + the bottle has a silica pack in the cap.
From week 6 onwards I used Haifa Grow Clean for Details check week 6, I use this one as dry salts and add it directly to the tank, it does not interact in a bad way with the solution.
For meassurements I use a generic 8in1 Meter "PH-W218" branded by many companies, as usual, check stores and buy the cheapest. (Check week 1 for an image of it)
I got mine from Aliexpress for ~70€ it uses the Tuya app so you can always check your metrics and export them aswell.
The PH and EC probe are accurate and are giving me stable results for almost 1 year now, I re calibrate the PH probe once in a while and it is tops 0.15 off after a month, always double check your results with PH drops/paper.
Bluelab is... A LOT more expensive for less value.
For the timelapses I use 2 Tappo C210 2k Cameras, these have the ability to make the stream available trough RTSP so that you can access it trough a link in a browser and that way I snap a Screenshot with a raspberry pi :) after that I just render it with blender to a timelapse.
Sadly they seem to have trouble with the bright lights and I get image trouble over the course of the day, if you have a recommendation hit me up :)
The script I use to take the Images:
#!/bin/bash
##########################################################################################################################################
##### A script to save images from a rtsp capeable IP cam, Tapo C210 (2k image quality) for example in my case.
##### Images are saved in a directory named "2024_01_01" for example, it uses the "date" command within the system it is running on.
##### You can then render the images to a timelapse, I use blender for that.
##########################################################################################################################################
RTSP_URL_LEFT="rtsp://:@:/stream1" #sets the variable for cam LEFT access
RTSP_URL_RIGHT="rtsp://:@:/stream1" #sets the variable for cam RIGHT access
while true; do
TIMESTAMP=$(date +"%Y_%m_%d_%H_%M_%S") #sets the timestamp variable
DIRECTORYLEFT=/$(date +"%Y_%m_%d") #sets the directory variable with current day for LEFT
DIRECTORYRIGHT=/$(date +"%Y_%m_%d") #sets the directory variable with current day for RIGHT
mkdir -p "${DIRECTORYLEFT}" #makes a directory for each day if it doesn't exist for LEFT
mkdir -p "${DIRECTORYRIGHT}" #makes a directory for each day if it doesn't exist for RIGHT
ffmpeg -y -i "${RTSP_URL_LEFT}" -frames:v 1 -vf "format=yuvj420p" "${DIRECTORYLEFT}/${TIMESTAMP}.jpg" #captures a frame from the RTSP stream and save it as a JPEG image for LEFT
ffmpeg -y -i "${RTSP_URL_RIGHT}" -frames:v 1 -vf "format=yuvj420p" "${DIRECTORYRIGHT}/${TIMESTAMP}.jpg" #captures a frame from the RTSP stream and save it as a JPEG image for RIGHT
################################################################################################################################
##### Waits for 180 seconds, change that depending on how precise you want the timelapse to be, less waiting = more images
################################################################################################################################
sleep 180
done
Hope you like my diary, leave a comment and a like if you like it :)

Likes
13
Share


@Canadian
Follow
Today They have pop in my new room is completely ready for a New girls season I am going to use a rosin press for a large quantity off all the flowers That we produce And I will be reviewing that brand ones it arrive





Likes
46
Share


@Capo420
Follow
Week has had ups and downs🙃
Plants seem to be growing fine 🙂 But there is yellowing and spotting still that I cannot resolve.🙄
Day 22- Still having some kind of deficiency/issue. They are growing well, don't really seem to be stunted. I think I may have burnt them with nutes.🤧 Flushing may help. 🤷♂️😅
Run-off pH is at 6.08, PPM 266
I have flushed them, lowered feeding... I'm driving myself crazy. Hahaha
Update 119 Day 23- Things are looking better. I definitely have been overfeeding them.😅
They are responding well to half nutes.🙌
Issues seem to be getting much better.
Happy Growing!
🤙💚💪🌱😎🌱💪💚🤙
Likes
2
Share


@Fatbudz
Follow
I switched the girls aside.
wedding crasher on the right and el patron on the left.
The two in front are the autos 😏
Likes
9
Share


@Wicked_Stix
Follow
The voodoo juice x platinum hermed this week so moved it to it's own tent. We have 6 plants remaining in the room. I cut out the maxigro this week. They are getting .5 tsp per gallon of maxibloom now. Seems to be keeping everyone happy. Not much to report other than that. Buds seem to be progressing pretty nice.
Likes
4
Share


@TiRobotProds
Follow
Excellente souche de Green Barato les colas sont de plus en plus gros et givré, elle a une odeur très remarquable d'agrumes frais.


Likes
14
Share


@JamieKnolliver
Follow
Hey Leute!
Das ist nun der Stand nach Woche 3.
Die Blütenstände entwickeln sich allmählich und allgemein macht sie mir einen guten Eindruck.
Einige Blätter werden langsam gelb-lila farben, was hoffentlich auf den Fortschritt der Blüte hindeutet und nicht auf einen Mangel.
Wenn ihr da mehr drüber wisst bzw. Sagen könnt, gebt mir doch gerne mal ein Kommentar.
Möchte nochmal erwähnen, dass ich kein Profi bin sondern dies mein 2. Grow ist.
Falls ihr Tipps für Verbesserungen habt oder Anregungen für Veränderung, gerne kommentieren!
Habe die Zufuhr von Stickstoff nun angehoben um auf den erhöhten Bedarf zu reagieren, da mir die Blätter etwas zu hell aussahen.
Likes
Comments
Share


@Pecci
Follow
Zdarec všem felákům včera switch do květu a sranda může začít holky vypadají fajn a zdravě vzhledem k povaze strainu přijde v nejbližší době na řadu i podpůrná síť.....🤟 zvlhčovačka jde ze hry už není potřeba a hlavně se nevejde ..

Likes
2
Share


@Green_Peace
Follow
Won't be a big harvest from this girl, although the buds are fattening up nicely. Will stop adding PK in the next few days before getting ready to flush in the next couple of weeks. This plant is on the left of the timelapse video.