


Likes
Comments
Share

@ThatsmyGrow
Follow
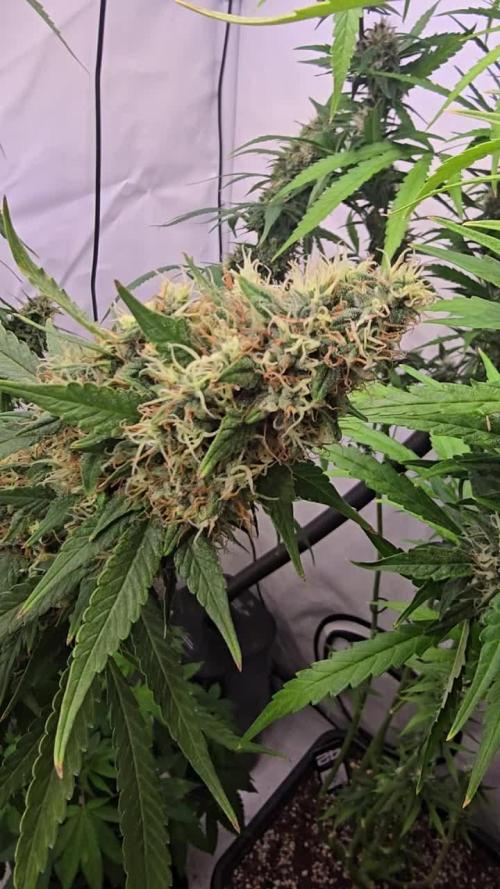
🌸 Week 12 – Gorilla Cookies Auto Pheno Hunt
Another week has passed, and we are finally reaching the end of this pheno hunt. It has been an exciting journey with plenty of highs, but unfortunately also a few setbacks during the final weeks.
📈 Current observations:
Unfortunately, Pheno #1 didn't make it to the finish line. Several buds developed bud rot, and rather than risking further contamination, I decided the best option was to remove and dispose of the entire plant.
Pheno #3 never fully recovered after I had to remove multiple main colas earlier in flower because they were growing into the SANlight fixture. That stress significantly reduced its flower production, and in the end it simply wasn't worth keeping until harvest.
Pheno #4 and #5 have now been harvested and are hanging to dry. Unfortunately, Pheno #4 accidentally snapped during handling, so I had no choice but to harvest it immediately. Luckily, it was already mature enough for harvest.
That leaves Pheno #2 and Pheno #6 as the final two plants still standing in the tent. They are continuing to finish their flowering cycle, and I'm expecting Pheno #2 to be ready for harvest sometime next week.
📊 Current environment:
Temperature: 31°C
Relative Humidity: 63%
VPD: ~1.66 kPa
SANlight fixture at maximum height
Light intensity: 90%
🌿 Final thoughts:
Even though not every phenotype made it to the finish line, that's exactly what a pheno hunt is about. Every plant tells a different story, and every run teaches something new. Some phenos exceeded my expectations, while others showed weaknesses under the exact same conditions.
Now the focus shifts to the final harvests, drying, curing, and, of course, the smoke test. I'm especially excited to compare Pheno #4, #5, #2, and #6 once everything is properly cured to see which one truly deserves the top spot.
💬 Which remaining pheno do you think will finish as the winner of this Gorilla Cookies Auto pheno hunt?

Likes
44
Share


@biggreens420
Follow
love this strain it grows easy just quite tall and dosnt like too much training I expected a lot more than 4oz and 6g of her as she was in a 30l pot had a longer veg, time more space and more light I'm just putting it down to growing in soil lol my first time and as u guys know I'm a coco grower but as said on previous diaries I have dried with a higher temp than usual so maybe lost some weight through that otherwise I'm always happy with some gorilla I love it . thanks again to all the guys n girls that follow chat comment like and help thanks for reading happy growing guys


Processing
Likes
12
Share


@Silverback_Guerilla
Follow
1/14:
This morning, I did a foliar application of big bloom and fulvic acid, then about 5 hours later I watered them with about a half-gallon of rainwater each and added armor si, humic acid, endoboost myco/tricho, liquid molasses, and a bunch of cal-mag. Today, I also I wired up and mounted my new samsung sun board strips (660nm/730nm) and my Solacure FlowerPower UVB fixture.
I'm running the deep red/far red bud boosters a few hours per day right now, but will run them for the entire photoperiod once I start flowering them. I'll run the UVB for 4 * 15-minute sessions a day for the full flowering cycle, and if they don't protest too much I'll increase each session by 5 minutes and evaluate again. Some strains are more forgiving than others and I've got 5 different strains in this space...so really not sure much time I'll get away with exposing them to the deadly rays without damaging them too much...😈
1/15:
I received one of the rapid led/growmau far red initiator pucks today. With the placement of my UVB light, I'm realizing I'll need another far red puck to have even and intense far red coverage, so I'm ordering another with Prime delivery and waiting to start flowering until I receive it.
I sprayed them down really well with ph adjusted rainwater tonight to rinse off nutrient build-up from foliar applications.
1/16:
I'm really excited to try flowering under 14/10. I grew photos indoors on an off for 15 years before I semi-retired. If I added up all the additional flowering time I could have done through the years if LED technology existed, I'd have had an extra truckload of bud to smoke.
I did another application of Axiom Harpin a|b Proteins this evening, right before dark. I'm expecting a big growth burst this week, leading up to the flower stretch. I really need them to trigger under 14/10 within 4 or 5 days🙏
...if not, I'll switch to 13/11 and wait a few more days🙏😟..if still no pistils are poppin, I'll go to 12/12 and chalk it up as bad luck or varietal indifference to Pr and Pfr manipulation.
1/17:
I fed each of them about 3/4 gallon of full strength veg nutes. This will be the last. I'll go with half-strength veg and half-strength bloom for a week, then go with full strength bloom nutrients until I start flushing them in 6-8 weeks.
1/18:
I installed the second far-red flowering initiator today and got all my timers configured for flowering:
=========================================
timer#1 - power strip with qb's and red boosters
10:00am -12:00am
timer#2 - (dual/independent setting)
sideA- 3-way cube with uva bars
10am - 3pm
7pm - 11pm
sideB- flowerpower uvb
1pm - 1:15pm
4pm - 4:15pm
7pm - 7:15pm
11pm - 11:15pm
timer#3 - far red pucks
11:00pm - 12:15am
timer#4 - sub-canopy tube
10am - 1pm
3pm - 6pm
8pm - 11pm
========================================
I also did some testing on the timers and sealed myself into the closet to check for any light leaks. All good.👌
1/19:
Tonight is their first long night. It's ON!👍
1/20:
I watered them today with about a half gallon each. I'm seeing calcium and magnesium deficiences here and there, so added some boomerang and heavy cal-mag-Fe along with liquid molasses, humic acid, and endoboost myco. I also foliar fed with big bloom and fulvic acid.
That's it for week 4-

Likes
16
Share


@GODSGIFT_2005_JM
Follow
🍼Greenhouse Feeding BioGrow & Bio Enhancer
⛺️MARSHYDRO
The ⛺️ has a small door 🚪 on the sides which is useful for mid section groom room work. 🤩
☀️ MARSHYDRO FC 3000 LED 300W
☀️Also special thanks to VIPERSPECTRA P2000 (200W) & XS2000(240w) LED growlights
🌱 DUTCH HEADSHOP SEEDS:
www.dutch-headshop.eu
www.dutch-headshop.nl
ONE STOP SHOP
. 100% germination success on first try! with HUGE seed selection!
. Very friendly customer service
. Best bio-seed packaging
. Sells other products @ best prices:
. Nutrients
. Vaporizers
. Smoking accessories (grinders, cones)
. CBD Tinctures
. Resin Extracts
. Boveda humidity packs
. Ziplock bags
. Other health supplements such as:
. Lion’s Mane Organic Capsules
. Hemp Seed coffee

Processing
Likes
20
Share


@Easygrower
Follow
Hello growers day 65 with the gorilla glue auto she’s starting to show a lot of bud sites I gave her abit of a trim took afew leafs off I think she put her final stretch in this week her tops are sort of level iv turned my light up to full power so hopefully don’t piss her off to much that’s all this week so be safe and happy growing ✌️🏻


Likes
52
Share


@HazeyBobby
Follow
The week ends Mar-31, being day 91 - week 12 of flowering since flipping the lights / day 75 since from first pistils shown. This strain is expected to flower 60-70 days.
Harvested the plant in 2 stages over a 10 day period. Lower buds got exposed to more light and definitely seem to have ripened further since the tops were harvested. Fertigation was resumed using GHE Ripen for first 5 days followed by a flush and water only (no pH adjustments) for the last 5 days. The remainder of the plant was trimmed, manicured and separated into A, B grades and trim/larf buds. The buds and sugar leaves are completely covered in resin glands - glistening away in every angle.
This last harvest was done after an extended period of darkness (24hrs). Trichomes across the board looked good and ready with 70% cloudy, 10% amber and 20% clear. The water consumption definitely was slowing down in the last week.
The drying buds have a very strong strawberry smell after being hung, whilst during the harvest and trimming there was no noticeable scent of weed. Really great stealth type of plant for harvesting :)
Using the tent now as a drying area maintaining a higher humidity of 50-60% between 17-19*C, hopefully to extend the drying period whilst hung. Buds are placed in jars once dry to touch then managed until in the curing zone.
-----------------------------------------------------------------------------------------------------------------------------------------------------------------------------------------------------------------------
The grow setup includes;
- Secret Jardin DS120W tent (120cm x 60cm x 180cm) placed inside the bedroom. Passive & active intake of air is from a closed off section of the room where the central heating boiler sits - the intake is warm air (20 degC.) and fairly dry (40% RH) during the winter months.
- Mars Hydro SP250 LED light
- extraction fan - AC Infinity Cloudline T6
- ventilation fans
- aquarium heater
- small oil heater
- small dehumidifier
- 20L Airpots and 3.5L general pots for seedling stage
- Canna Coco substrate and nutrients
- GHE Flora trio nutrients
- pH and EC/TDS meters
- 2x Govee Thermo/Hygro meters (one at canopy the other at the roots level)

Likes
19
Share


@Mattyice
Follow
Hasn't grown much taller but bud sites have been forming all over the place for a week now. It's now to the point where you can see all the various spots on camera. I'm so stoked I think I'm gonna get a decent yield on my first grow. 60+ grams but I don't want to get too bold. What a journey it's been so far I can wait to see how fat my flowers get any tips as to getting fat flowers?
Likes
2
Share


@eldruida_lamota
Follow
Que pasa familia, vamos con la cuarta semana de vida de estas Orange Sherbet Fast Flowering, de FastBuds.
Agradezco a Agrobeta todos los kits obtenidos de ellos 🙏.
Vamos al lío, El ph se controla en 6.2 , la temperatura la tenemos entre 22/24 grados y la humedad ronda el 50%, añadimos ya varios productos de la gama de Agrobeta.
Las próximas semanas veremos cómo avanzan, trasplanté a maceta definitiva.
Agrobeta:
https://www.agrobeta.com/agrobetatiendaonline/36-abonos-canamo
Hasta aquí todo, Buenos humos 💨💨💨


Likes
48
Share


@pifflestikkz
Follow
Day 43
12/08/24 Monday
Feed today using de-chlorinated tap water pH 6, she is thriving 😍✌️💚
Day 45
14/08/24 Wednesday
De-chlorinated tap water pH 6 only today.
Day 48
17/08/24 Saturday
Another watering today using de-chlorinated tap water pH 6 only.
No picture or video updates this week as was very poorly and struggled to sort the tent whilst I'll.
Back to it next week ✌️💚

Likes
7
Share


@TheSpoonieCrone
Follow
I failed so badly on the LST with this girl. Me and Sour Diesel are having a rough start. I nearly killed her on my very first grow, and this time I neglect to properly do her training. It's ok, I'm trying, she knows it, and she is going to be in the next grow. Nothing worth something is ever easy. We got this SD <3

Likes
14
Share


@AndrewC
Follow
So this is the Tear Down week. The timing of it makes it so i will need to the harvest flag in a few days when I can weight and test the plants.
I have included the Cleaning, and Cutting and some Root Porn.
I will make the harvest post in about 4-5 days, when I can trim these plants. There is a lot of Plant here. I got way more than I was expecting. I don't have a scale that measure this amount of plant, without taking like 10 measurements and then adding them together. So I will just be posting the dry weight. I will post the wet weight as dry weight * 1.65.
Autopots: Wow, what a great product. I have been blown away by how well and how easy it was to work with them. They really did solve the watering issues. Excellent product. If you are a beginner, start with Autopots.
-= Lessons Learnt =-
- Overdrive the air to your Autopots. In my control plant, I used a small rectangle air stone (instead of a standard air dome). This lead to root rot and some other issues, it also put significantly less air into the water. The root rot, give the material for the Brown Algae to grow. Using a huge Air-disc-Air-Stone would be an excellent combo to mix in with the air dome itself. Something like this: https://www.amazon.ca/Pawfly-Diffuser-Suction-Hydroponics-Aquarium/dp/B01MY3AQ33 at the bottom and the air-dome on top of it, will be what I do with my next experiment.
- Air stone in the reservoir. I had two instances where algae grew into the res. An air stone would have helped. It would have also helped my control plant get less root rot. Given the amount that the air-domes and air sources got engulfed, having the water have more o2 in it would have only been beneficial.
- Don't grow 6 plants in a 4x4. Since my control plant was about 1/8th the size of the others, I think I could have grown 5 in the shape of a 5 (on a 6 sided dice)⚄ This placement would give a much more spaced canopy for airflow and more importantly light. The sides of some of the plants were lighter green and produced larf due to lack of light penetration.
- This tent was on 19-5 schedule. This worked out very well for this strain. After every lights on, they were in the praying position, so this strain was able to recover in that 5hrs off. If I had more seeds, I would run these again, and try 20-4. I think this strain could handle it. All for all, I think I'm going to 19-5 as my default timing. This kept up a solid DLI.
- Staring at .9EC (really .7 EC cause my water here is .2 EC) Then bumping up at .1 a week, until 1.6EC worked out VERY well. I experimented on this crop all the way up to 1.9EC, which burnt the tips of this plant. I think if I did this strain again, I would do 1.6EC until 3-4 weeks left then crank it to 1.9. It did plump them up when I went to 1.9, however it left them looking rough. Bulk was added though.
- Sticking to 6.0PH for all of veg, and 2 weeks into flower worked great. The plant had solid and consistent color and leaf shape . The plant's did get hurt, due to some issues (as noted on the weeks). I switched to 6.5 PH in the last 3-4 weeks and it helped them recover, and plump up noticeably.
-VPD. The #1 thing I focused on was VPD. I keep it .9kpa range, as best as humanly possible. It was honestly, HUGELY noticeable compared to my other grows. I know truly understand the value of properly dialed in VPD. This is the one lesson that will stick with me forever.
- Super-cropping: On the plants I give the chiropractic treatment too, had much thicker stems as much larger channel internally. I did this treatment to 4 of the 6, and the 4 that had it done has larger buds and recovered from defoliation faster.
TLDR; VPD is king. Super-cropping is worth the time. Keeping PH and EC dialed in were all wins. Autopots kick ass.
Likes
6
Share

@Sensemillia
Follow
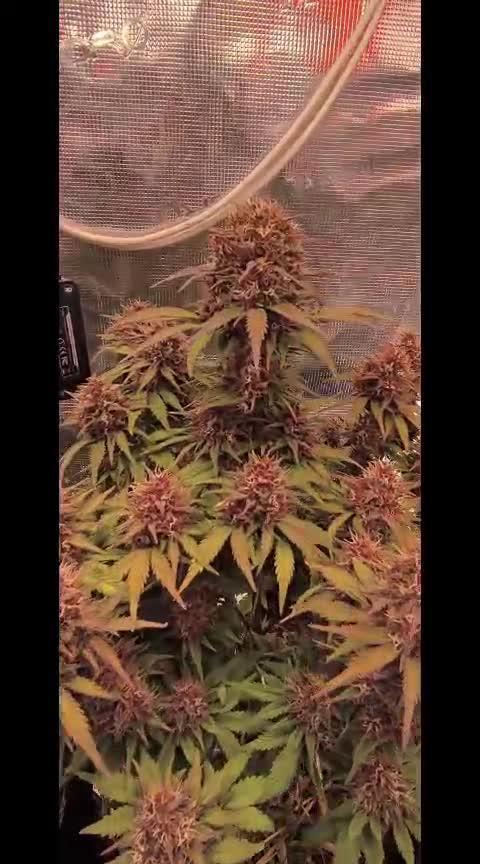
Day 64 from seed
Smooth sailing to the end.
Edit:
Day 68 from seed.
The left one is almost done, the right one seems to need a little more time.
Turned on 440 nm blue light for tri production.
Still hoping to harvest on day 73.
Gave them their last drink.
Also the 440nm and the 660nm adlites + full spectrum main and side lighting looking awesome :D
Likes
9
Share


@Tobecobe
Follow
08/10 - 10l nute water top up, then I noticed her leaves had some spotting which identified as nitrogen toxicity. Dumped the res, ran clean ph water for a couple hours, dumped that res and then refilled at 32% strength. 25ml Micro, 4ml Grow, 35ml Bloom. Will see how she does.
09/10 - PH bumped to 5.8.
10/10 - PH has been plummiting, but I think my pens busted. Ordered a new one next day. Topped off with 8l of water at 40%.
11/10 - PH pen was indeed busted. New one just arrived and PH was around 4.7. I've now bumped it back up to 5.8.
13/10 - Full Res Change. Ran ph water for 3h to try and flush some N before adding 25ml Micro, 5ml Grow, 40ml Bloom. PH at 5.75, EC at 1.15. Some leaves at the top of the canopy are dying off due to the Nitrogen tox causing Cal lockout which is unfortunate, but hopefully she gets back on track with the nutes dropped back somewhat. Shes still growing, now at 11" from the light, and the buds are fattening up decently.
14/10 - Ph and EC stable! Debating a W6 flower defol.
Likes
1
Share


@Elguacho420
Follow
Buenas a tod@s....🏻♂️ Bueno esta fue la última semana de gestación para las red cookies gelato, es verdad que crecieron mas q las otras dos variedades, se adaptaron bien y todo, aun así eh tenido algunos fallos con esta variedad, manchas en las hojas y hojas malas q tuve q quitar, eh pasado mal rato al verlas así medias pochas pero con un poco de cariño y mucha fe se van a poner muy bien y fuertes, es verdad q ahora están mejor q antes, pudo haber sido algo estrés, x el cambio de temperatura o la comida imagino, cuestión q ahora se las ve bien. 🙌🏻Tanbm controlando mucho la temperatura en esta época del año q hace más frío, lo demás van muy bien... Ahora cambio de siclo y vemos a ver q tal van... Buen fin de para tod@s y buenos humos... 💨💨😎👍🏻 🇦🇷🤝🏻🇪🇦


Likes
8
Share

@420DeepGrow
Follow
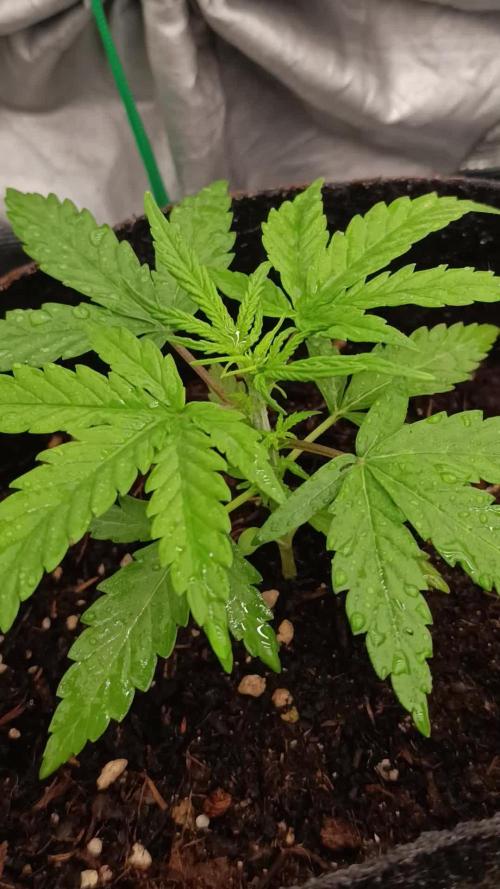
📆 Semana 3:
La adaptación al exterior continúa de forma positiva, con una planta cada vez más asentada al entorno y mejor respuesta al clima variable. El crecimiento sigue constante, aumentando número de nudos y reforzando la verticalidad sin perder equilibrio estructural.
El sistema radicular continúa colonizando la maceta, lo que se traduce en mayor estabilidad, mejor consumo de agua y una respuesta más rápida en días soleados. Se aprecia follaje sano, buena orientación al sol y color uniforme, sin signos de estrés destacables.
Se mantienen riegos controlados según peso de maceta y condiciones ambientales, favoreciendo ciclos húmedo-seco que impulsan raíz y vigor general.
⚡ EC: 0.4–0.5
💧 pH: 6.2–6.4
🌡️ Agua: 18–20°C
🌫️ Humedad: 50–65%
☀️ Luz: ~13–14h abril / aumento progresivo
🌡️ Temp ambiente: 16–22°C
🔥 Nota: Cuando la planta se adapta al exterior, cada semana suma más de lo que parece: raíces fuertes hoy, explosión vegetativa mañana.
Seguimos creciendo fuerte 💪!
Likes
30
Share


@MrGoonai
Follow
10/17/24 Short facts:
- Continued with LST
- Watered: 1 x 1.2L, 1 x 0.3L, 1 x 1L
- VPD @ 0.9 — raised by 0.1
- Light @ 50% ~500 to 560 PPFD
- Removed 2-3 leaves
---------------------------------------------------------------------------------
As promised last week, i made a video and explained the progress so far, and did show you the plant.
Not much to report. I continued LST, though I’ve stopped for a few days now since the branches are well spread out, and that should be enough for the time being.
The Lemon Cherry Cookies is lacking behind in her development, maybe she got a little bit less light, because she is a little bit smaller than the other two plants.
Likes
3
Share

@Fyno_TH
Follow
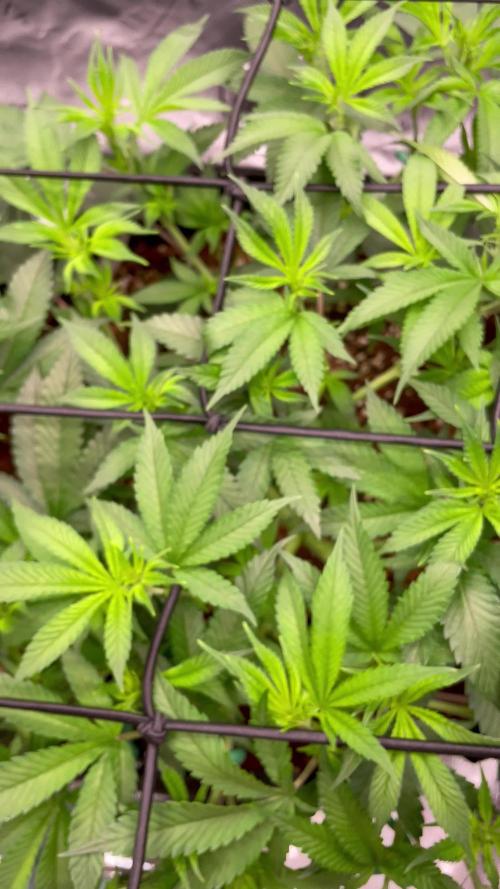
Week 4 update 🌱✨ — the tent is filling out fast! The main plant is spreading beautifully under the trellis after topping + LST. Side branches are shooting up and filling the grid nicely 👀🔥.
Second plant is still smaller but showing strong recovery — fresh green growth and stronger branching since the 5-gal transplant 💪.
Feeding Corex + Eldex + Terra + CalMag + Mira (~1,400 ppm @ pH 6.0) always to 10–20% runoff. Both are drinking heavy now and responding well.
Temps holding around 27 °C with RH 60–70% 🌬️ — leaves are praying all day. Trellis training continues this week as I prep them for a strong stretch before flip. Flowering is getting closer 🚀🌿.”
