


Likes
Comments
Share

@DogDoctorOfficial
Follow
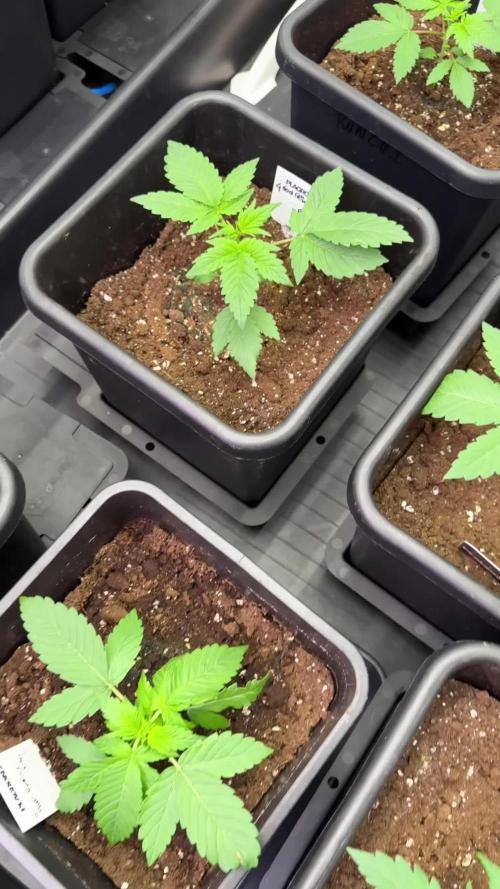
🌱 Week 3 | Purple Haze Photo | Folder 6A | Building the Foundation
Every phenotype tells its own story, and this Purple Haze is beginning to reveal exactly the kind of structure I was hoping to see. Looking back at the photographs from the beginning of the week and comparing them to where she stands today, the progress has been remarkable. The increase in leaf size, stem thickness, and lateral branch development shows that the plant has settled comfortably into her environment and is now entering a period of rapid vegetative growth.
This diary is part of my Project Blue series, where every plant receives its own individual journal. Although they all share the same environment, nutrition, and cultivation method, documenting each phenotype separately allows me to observe the subtle differences that make every plant unique. Two seeds from the same pack can behave very differently, and that’s exactly what makes growing from seed so fascinating.
Like every plant in this project, Purple Haze is being grown using the 12/12 From Seed method. Instead of giving the traditional vegetative light schedule, the plants receive a flowering photoperiod from the moment they emerge. This technique keeps the plants compact while still allowing them enough time to develop a strong structure before flowering naturally takes over. It’s an approach I enjoy because it produces efficient, manageable plants while still allowing each phenotype to express its personality.
Throughout the week the environment remained extremely stable, providing the consistency young plants need to thrive.
Environmental Conditions
• Day temperature: 27°C
• Night temperature: 25°C
• Relative Humidity: 55%
• Root Zone Temperature: 21°C
• Nutrient Solution Temperature: 20°C
• pH: 6.0
• EC: 1.3
• CO₂: approximately 666 ppm
• Light Schedule: 12/12
• Average PPFD: 600–700
Maintaining these parameters allows the plants to dedicate their energy to healthy growth rather than constantly adapting to environmental fluctuations.
Feeding Schedule
This week the nutrition remained focused on root establishment and balanced vegetative growth using the Plagron Terra line:
• Terra Grow — 1.8 ml/L
• Power Roots — 1 ml/L
• Pure Zym — 1 ml/L
• Sugar Royal — 1 ml/L
The goal isn’t to push maximum growth as quickly as possible but to encourage strong, healthy development while building a vigorous root system capable of supporting heavy flowering later in the cycle.
A Beautiful Structural Evolution
The difference between the first photographs of the week and the last ones is immediately noticeable.
The stem has thickened considerably, becoming sturdy enough to support future flower production without any assistance. Internodal spacing remains tight, creating a compact plant with multiple future flowering sites already beginning to establish themselves.
The leaves are broad, flat and richly coloured, showing no signs of nutrient deficiencies or environmental stress. New growth emerges with a healthy lighter green before maturing into the darker foliage characteristic of vigorous vegetative development.
Perhaps the most exciting change is the development of the secondary branches. Each node is now pushing strong lateral shoots, giving the plant a naturally symmetrical structure that should translate into an even canopy during flowering.
Why I’m Using Leaf Tucking Instead of Defoliation
One of the techniques I’ve been using throughout the week is leaf tucking.
Rather than removing healthy fan leaves, I simply tuck them underneath neighboring branches to expose the developing shoots hidden beneath the canopy.
This offers several advantages:
* More light reaches the lower branches.
* Airflow improves naturally.
* The plant keeps all of its solar panels, allowing maximum photosynthesis.
* No recovery time is required because nothing is removed.
Young plants need every healthy leaf they can keep. Fan leaves are the engines that drive growth, so whenever possible I prefer repositioning them instead of cutting them away. Defoliation can always come later if it becomes necessary, but at this stage gentle canopy management is more than enough.
Looking Ahead
Purple Haze is quickly becoming one of the strongest structured plants in the room. She has responded beautifully to the stable environment, balanced nutrition and simple canopy management. Every day she’s producing more side branches, larger leaves and a noticeably thicker main stem.
If she continues at this pace over the coming weeks, she should enter flowering with an excellent framework capable of producing an even canopy and plenty of well-positioned bud sites.
Sometimes the best training isn’t about bending, topping or cutting—it’s simply about giving the plant everything it needs and then getting out of its way.
A huge thank you to Plagron, Zamnesia, GrowDiaries, and everyone following this Project Blue adventure. Mr. Baggy made his usual inspection this week and left with a big smile. According to him, Purple Haze has officially entered her “future forest” phase, and judging by the way she’s growing, it’s hard to disagree.
Growers Love 🌱🛍️


Likes
19
Share


@GoldenWeedGrower
Follow
Legend
Timestamp: 📅
EC - pH: ⚗️
Temp - Hum: 🌡️
Water: 🌊
Food: 🍗
pH Correction: 💧
Actions: 💼
Thoughts: 🧠
Events: 🚀
Media: 🎬
D: DAY, G: GERMINATION, V: VEGETATIVE, B: BLOOMING, R: RIPENING, D: DRYING, C: CURING
________________________________
📅 D105/R01 - 28/02/24
⚗️ EC: 0.9 pH: 5.2
🌡️ T: 21-25 °C H: 50-65 %
🌊
🍗
💧
💼
🧠 Ripening starts
🚀
🎬 Added timelapse and screenshots and monthly rate of T-H and VPD 📈📈📈 from TrolMaster App
Translate
________________________________
📅 D106/R02 - 29/02/24
⚗️ EC: 1.2 pH: 6.7
🌡️ T:21-24 °C H: 50-65 %
🌊
🍗
💧 Added pH+
💼
🧠 If someone who followed the diary from the beginning is asking himself what about mother plant "Mamma Aglio", here I posted some picture of her which demonstrate the difference between a bad and a good grow
🚀
🎬 Added pics of Nicole and pics of "Mamma Aglio" to show the difference between a bad and a good grow with sounds and TrolMaster logo. Added usual timelapse and screenshots.
________________________________
📅 D107/R03 - 01/03/24
⚗️ EC: 0.8 pH: 6.4
🌡️ T: 20-24 °C H: 45-65 %
🌊 2L
🍗
💧
💼
🧠
🚀
🎬 Added Timelapse and screenshots. 4 pics added
________________________________
📅 D108/R04 - 02/03/24
⚗️ EC: 0.8 pH: 6.7
🌡️ T: 20-25 °C H: 45-70 %
🌊 1L
🍗
💧
💼
🧠
🚀
🎬 Added Timelapse
________________________________
📅 D109/R05 - 03/03/24
⚗️ EC: 0.8 pH: 6.7
🌡️ T: 21-25 °C H: 45-65%
🌊 RES Changed 💦💦💦
🍗
💧
💼
🧠 I'm starting the flush, as trichomes look milky and quite ready. In this last week the ripening will be complete and th girl would be ready for harvesting.
🚀 Flush started
🎬Added 8 pics of trichomes, Timelapse and sceenshots. Two pics and two videos of my "garden's pre-harvest magic" 😋😋😋
________________________________
📅 D110/R06 - 04/03/24
⚗️ EC: 0.2 pH: 7.5
🌡️ T: 19-25 °C H: 55-65%
🌊
🍗 Flawless finish
💧
💼
🧠 1 day with pure water and now I added Flawless finish
🚀 Flushing
🎬Added Timelapse and sceenshots
________________________________
📅 D111/R07 - 05/03/24
⚗️ EC: 0.2 pH: 7.5
🌡️ T: 20-25 °C H: 55-65%
🌊
🍗
💧
💼
🧠
🚀 Flushing
🎬Added 8 pics. Added timelapse and screenshots. I also prepared a timelapse of the entire week with some music 🎵🎵🎵 and weekly rate of T-H and VPD 📈📈📈

Likes
155
Share


@deFharo
Follow
Bienvenidos cultivadores de marihuana clandestinos y también a los que tienen la fortuna de no serlo!🖐️👨🌾👍
Este es un relato semanal de técnicas, experiencias de cultivo y Bio preparados orgánicos caseros, los cuales llevo experimentando dos años en cultivos de marihuana interior.
Esta semana voy a escribir sobre: CARBÓN VEGETAL ACTIVADO CON MICROORGANISMOS DE MONTAÑA. esta es una práctica avanzada pues al menos se necesita tener el inóculo sólido de Microorganismos de Montaña (MMS), aunque al final intentaré dar otras opciones para aquellos que no tengan MMS. Puedes consultar en la semana 3 la manera de hacer Microorganismos de Montaña Sólidos (MMS): https://growdiaries.com/diaries/134104-grow-journal-by-defharo/week/725879
El carbón vegetal es un excelente componente para toda clase se mezclas de sustrato, tiene varias propiedades muy interesantes, ayuda a la estructuración del suelo y la creación de humus, es un regulador térmico en lugares fríos, favorece la expansión de las raíces y su estructura de microporos promueve la retención de humedad y nutrientes, se dice que en 1cm cúbico de carbón puede contener de 8 a 30 millones de Microorganismos. Y es precisamente la propiedad de retención de humedad y nutrientes, de la que se aprovecha esta práctica.
El carbón vegetal llamado "activado" que se usa en filtros de agua o aire, tiene mala fama entre los aficionados a las peceras, porque se dice que roba nutrientes, principalmente Nitrógeno, esto tiene una explicación y no es un problema para cultivo en macetas, el carbón seco tiende a absorber humedad y los nutrientes que se encuentra en el sustrato o en los riegos, porque es muy poroso, y de repente, tiene que saturar todos sus microporos, pero esto apenas va a tener incidencia en un cultivo.
En mi caso lo que hago es mezclar el carbón con los Microorganismos Sólidos y después lo humedezco con agua y melaza para activar la Microbiología del inóculo, dándole la energía necesaria, de esta manera tengo un carbón inoculado con Microorganismos de Montaña, y una vez en el sustrato, con humedad, estos MM, se propagarán. En este caso el carbón, de momento, no captura nutrientes porque está saturado, pero después de unos riegos, será la casa perfecta donde los Microorganismos y los nutrientes convivirán ofreciendo una fuente extra de nutrientes, para que las raíces se alimenten en periodos de escasez de alimento o humedad.
Supongo que quien tenga inóculos bacterianos comerciales, podría usar esta práctica para multiplicarlos.
INGREDIENTES BÁSICOS:
Agua pura: 500ml
Carbón vegetal, para usarlo en macetas conviene que los trozos de carbón no sean grandes. 750 gramos.
Melaza: 75g
Microorganismos de Montaña Sólidos (MMS): 225g
PROCEDIMIENTO:
Se mezcla el carbón y los Microorganismos sólidos.
Se disuelve la melaza en el agua.
Se humedece el carbón lentamente, mezclándolo bien, porque el carbón vegetal puede almacenar mucha humedad y necesita tiempo para saturarse.
Se guarda a oscuras durante un mes en un recipiente cerrado.
Hasta aquí la fórmula básica, yo hago algunos añadidos, como se puede ver en las fotos.
Añado 260g de Leonardita, que es un carbón vegetal con millones de años y en el proceso de convertirse en mineral, aunque todavía no lo es, es además, la mayor fuente de ácidos húmicos y comparte las propiedades del carbón.
Añado Microorganismos de Montaña Activados (MMA) de forma líquida para aumentar la inoculación de microbiología, también un lacto fermento de frutas que aporta muchas vitaminas, nutrientes y enzimas... en la última foto se ve el recipiente después de un mes.
Siguiendo el principio de saturación previa de los poros del carbón, para mezclas de sustratos, y sin tener acceso a microbiología, se podría, por ejemplo, saturar el carbón con alguna mezcla nitrogenada para el comienzo del cultivo, después el carbón seguirá cumpliendo sus funciones de estructuración de suelos, creación de humus y para retener humedad y nutrientes.
Hasta la próxima...
SALUDOS A TODOS LOS CULTIVADORES... 🖐️👨🌾
Likes
44
Share


@GERGrowDesigns
Follow
Dear Growers ,
Welcome to Week 9 or Flower week 6 // Day 63-70 from Kannabia Lemon Haze Auto .
Incase of Moving to a New Home . I Decided to skip some Weeks from every Diarie of the 12x12 Automatic Project . Everything should be Normal in the next Weeks .
Whether you're a beginner or an expert, you are warmly invited to join, ask questions, and share your own experiences along the way!
Project Setup & Conditions:
• Brand/Manufacturer: Kannabia Seeds
• Tent: 222cmx150cmx150cm
• Light: 2x 720 Watt Full Spectrum
• Humidity: 50%
• Soil: Narcos Organix Mix
• Nutrients: Narcos Products
• pH Value: 6
The Pictures Showing genetic 1 and 2 of Lemeon Haze Auto
If you want Germinitation results like mine , check out Kannabia Seeds with my link [https://www.kannabia.com/de?ref=61966] and grab the germination device or the strains I used . Trust me – it’s worth it for sure !
Get another 20% Discount at all products using the code [GGD] at the Checkout .
Stay curious and keep up Growing —we look forward to welcoming you back for the next chapter soon!

Likes
29
Share


@Sidbank
Follow
3.07 I checked for signs of bananas. All clear. Some of the plants needed to be tied up. Strong flowering begins. I hope nothing happen to them
4.07 During the day in the tent was heat as hell. While I slept they were warm. I cannot switch on clima during the day because of technical problems.
5.07 Clima is broken, i water Penahyah from Hype Company cause of too much heat, and little dose of Frooting Power from BAC.

Likes
31
Share


@Santica_Garden
Follow
This is how the ladies are looking, not much to update same old same old, they are just packing on their Budz, well see how they look in the next 7 days. More info on the video I uploaded.
Happy Growing guys 👍🏾


Likes
19
Share


@proud_to_grow_loud
Follow
I switched my nutrients to Nectar For the Gods because I didn't have the funds in the beginning to do so. I got their spartan regiment with the extras. Photo-plus and SLF-100 which I use separately and not during feeding. Im watering everyday and feeding every other day. Water days I use SLF-100 and the next water day I use tea with Photo plus. my tea I use bloom by cultured biologics organic easy bloom and compost worm castings from my personal vermicomposting bed. alternating water days with the slf and photo plus was a massive growth in buds. They dense' nd up and just started putting on trichomes. brilliant brand- Nectar! OCGFAM for life now. Feeding is a pain but damn its worth it.
Pricy but worth the investment!


Likes
24
Share


@Lycheegrow
Follow
Decided to flip to flower this week.
Ramped up to 1.1 ec before flipping. Probably a tad too slow since they look hungry. Will slowly increase.
Did some more LST to widen them up a more during the stretch. .
Likes
55
Share


@Natrona
Follow
Blue Cheese F1 automatic
Week 5 2/2-2-8
The Cheese gals are in full flower and are stretching like crazy. At the beginning of the week, they were 7 inches tall, Wed 10 and today 2/7 they are 14 & 15 inches tall. They have doubled in height.
I’ve moved the pins out to the edge of the pot. For future training, I must add some wires thru the pot holes to keep the branches lower as the outer rim is taller than the center.
I reduced nutrients in the feed solution since Runtz and Pink Rozay are showing some purples/blues in the leaves. These gals are vigorous and don’t seem to mind the full strength feedings. Hopefully they won’t start showing deficiencies.
I added Green Sensation this week then read the instructions said add in 4th week flower.
Blue Cheese is supposed to be a 10 week flower from seed to harvest. If I wait till the 4th week, it will only be used for 2 maybe 3 weeks. Would that actually benefit the plant. So I think I will add some each time but a 25% strength. Calls for 4ml/g I will use 1ml. They are autos and I should be lowering the nutes anyway. Pinned more branches. I add 2 gallons of water to the T700 humidifier daily to keep the VPD in line.
2/5 4 gal fed 2 liter each nutrients added at ½ of recommended amount. Making 4 gallons since I have 2 pots of carrots and Dill in the back.
Bloom Juice 60ml
Plant Juice 60 ml
Royal Rush 15 ml
power bud 15ml
green sensation 7.5ml
Recharge 2.5ml/gal
7.5 ml
Ppm 333
Ph 7.02
Temp 66
2/7 3 ltr each
Bloom Juice 60ml
Plant Juice 60 ml
Royal Rush 15 ml
Power bud 15ml
Green sensation not added
Ppm 298
Ph 6.5
Temp 65
Your likes and comments are appreciated. Thanks for stopping by.
Growers love 💚🌿
💫Natrona💫
Likes
4
Share


@Adam22
Follow
Needed to go in big pots will sort that tmro watered late today they will be fine again once in bigger pot these have been on 12/12 for a few days. Will pl out the gavita they need some hear for a week or 2 led lights not powerful enough now for the plant age it's not growing much now fed today water tmro with transplant
Likes
17
Share

@RakonGrow
Follow
Harter ritt diese Dame , alles viel zu schwer das es gleich umknickte beim defolieren .
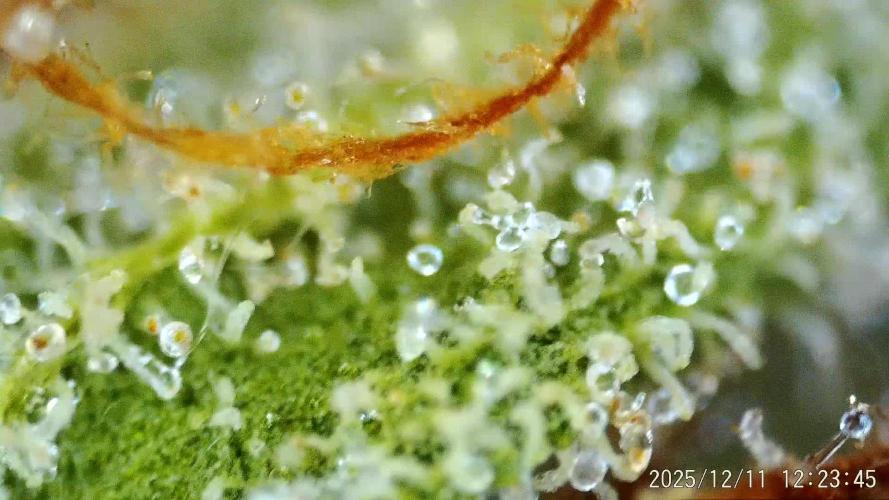
Hab mal ein getrockneten Bud aus der mitte genommen und Trichom analyse (Videos und Bilder) gemacht . ja viel klar wenig milchig und einige rot . Ergo , zuviel Licht an der Spitze (abstand zum licht viel zu gering) und im Boden zu kalt ist keine gute Kombination .
Likes
3
Share


@LittleBigTrees
Follow
Just been feeding, defoliated slightly.
I've started feeding plagron sugar royal.

Likes
19
Share


@Ganjagrandaddy
Follow
Day 63: Another week passes and the girls are now building nice long Colas all over . Buds are looking good and smelling so pineapple/fruity now. Buds are looking nice and hairy without looking airy.
#1 In the organic soil is overall the widest and area hungry lady but her sisters are taller .
#2 has been quietly pushing her way through the middle position in the grow and has some nice fat looking buds forming.
#3 Is a surprise for me as I wasnt sure it would make it this far. No matter what I do , the leaf continues to look awful but the size of her and her now forming so many stacking buds , I am glad I kept her going now !. I do think at least 3 weeks for these ladies before harvest but hope to give them room to swell when the space is opened up.
Processing
Likes
6
Share


@StonedWietParkiets
Follow
Defoliated them a little. Nothing special.
I try to keep at least 3 or so big leaves below the net jfust in case there is an issue with the plant where it shows the symptoms at the lower branches first.
I believe this way I'm faster to diagnose in case something does go wrong with feeding.
Oh yeah, trellis is about 30cm (give and take) above the pots

Likes
9
Share


@Piorkeed
Follow
Week 11 (03/04 - 09/04)
During this week I'll continue to flush the plants. I guess that this will be the last week for all of them. I'm waiting to chop in order to obtain a balance of 60/40 or 70/30 of milky/amber trichomes. Moreover, due to the fact that I have to use the same growbox to dry them, I must cut all the plants the same day. Doing this I think I'll have a more mature Fat Banana #2 and, I hope, a good variety of Blue cheese and Fat Banana #1.
03/04 D71: one liter of tap water each @ pH 6.3. Trichomes check: all three plants show milky trichomes for the most; few amber on the main branches of two fat bananas
04/04 D72: one liter of tap water each @ pH 6.3
05/04 D73: one liter of tap water each @ pH 6.5
06/04 D74: -
07/04 D75: end of the journey.
Chopped all today.
Light wet trimming to avoid rot and I've put them drying in the grow room. I will wait a couple of week

Likes
37
Share


@Smoking_Joe_Frasier
Follow
Week 3: Adapting and Thriving
Transplanting to Larger Pots
This week, I transplanted the plants into 11-liter fabric pots filled with Plagron coco coir mixed with perlite (70/30). The small pots were already root-bound. It's often said that a plant will stop growing when the taproot reaches the bottom of the pot. Personally, I think this is nonsense, but we'll see. This transplant provides them with more space for root development and better aeration, promoting healthier growth.
Growth Observations
The plants are showing significant growth, with vibrant green leaves and sturdy stems. The increased light exposure from the greenhouse setup is clearly benefiting them. Their resilience is impressive, and they appear to be adapting well to their environment.
Feeding and Watering
As the coco mix dries out, I am preparing for their next feeding. Following the Terra Aquatica Tripart feeding chart, I have increased the nutrient solution to an EC of 1.0 mS/cm. This should provide them with the necessary nutrients without the risk of nutrient burn, especially for autoflowering strains. I will not go higher than this concentration to ensure their safety.
Improved Weather Conditions
The weather has improved significantly, with very little rain and temperatures ranging between 19°C and 22°C for the next few days. This stable weather is ideal for the plants, providing them with consistent conditions to continue their healthy growth.
Daily Care Routine
My daily routine includes checking the plants in the morning and evening, adjusting the greenhouse openings as needed, and monitoring the moisture level of the coco mix. This consistent care helps me stay on top of any changes and address them promptly.
Looking Forward
As we progress into the third week, I am excited to see how the plants continue to develop in their new, larger pots with the adjusted nutrient levels. The combination of a controlled environment, balanced nutrition, and diligent care is setting a strong foundation for their growth.
Update on 11.06.2024
Today, I fed my plants for the second time this week. During this feeding, I adjusted the nutrient amount for the vegetative phase (2/3 of the recommended amount from Terra Aquatica):
CalMag: 2 ml/l (Starting EC before adding nutrients: 0.45 mS/cm)
Grow: 1.2 ml/l
Bloom: 0.8 ml/l
Micro: 0.4 ml/l
EC: 1,166 ms/cm (536 ppm PPM-500/TDM)
PH: 5,83
The plants were watered with approximately 20% drain.
Stay tuned for more updates as we continue this journey.
Likes
4
Share


@DeepRootsGrowTrees
Follow
CHERRY 🍒 COLA by FASTBUDS
Week #9 Overall
Week #4 Flower
This week she's had to deal with all the elements from the heat to pests she's done a great job for a plant in late flower to be in the intense heat she's got some good 👍 genetics!! She's stinky for a little plant smells great!!
Stay Growing!!
FASTBUDS
CHERRY 🍒 COLA
Likes
5
Share


@Anditsch
Follow
Very nice Plant, had problems while growing, but it was my mistake.
Drying was no problem, great taste and smell.

Likes
7
Share


@Manollo420
Follow
Almost done here, one or two weeks remaining
Buds are getting nice n fat
Gonna keep a close look on those trichomes
Learnt a lot this grow, got a lot of cool plans for the future
Stay tuned