Likes
15
Share


@Mystummyhurt
Follow
Having some bad issues with maybe a deficiency. Learning I need to examine my plants more closely more often!

Likes
8
Share


@Elixire
Follow
• Just get the seeds already soaked them up on water waiting them to crack open 😝.
• 48h after 2 of them pop out the fast honey cream and also the critical.
• They finally all pop out and looking nice and healthy after a complete 72h
18/05/2020
• I lower the light yesterday the 🌱 did not react . They didn’t stretch at all they look green and healthy Day 2.
• everything seems ok hot days on my place fighting the heat 30c inside the tent today
• after 6 days little bit of red stem due to light level, i raise up the light until the stem turn back to green. No deficiency for know they look healthy and 😃


Likes
30
Share


@WeWantItToGrow
Follow
Simply put I am so very pleased with the way this plant has performed my only worry is how to properly dry and cure this magnificent specimen

Likes
31
Share


@KitaKush
Follow
78 grams roughly 2.8 oz! Pretty happy with that as I’m looking for quality and potency and no longer quantity and quickness.
She has a good amount of frost and super pungent stank radiating off her.
Unfortunately for me I had issues with drying and at one point a few hours of 70% humidity which led to a few areas of mold…I threw away those buds and the rest are top notch..probably my most resinous plant harvested so far and strongest smelling. I also grew a runt which will give me less than an ounce now I know it’s just best to call quits on those stumpy odd growing plants and start fresh.
Lastly my humidity stayed at 52-56% and I should’ve harvested 1-2 days earlier so the buds are much drier/crispier than I’d like. I’m still trying to find a good drying location..one room had that low humidity and my grow room had way too high at 70..will figure it out eventually.
Also 200watt for lighting I can’t go back and change it.
Likes
36
Share


@Ferenc
Follow
Day 80, 2nd of December 2020:
Beautiful bushy, great genetics. Well done.
Nice buds are on the way and the smell is great. I am absolutely excited :)
All good the lamp is now on 11 hours and off 13 hours. Every week 15 minutes was taken off and after 4 weeks here we go. Strated 12/12 and now 13/11 wanted try to imitate the nature as the light days are getting shorter.
Fertilization has changed no more epsom salt from this week and I will stop giving nitrogen as well from next week.
All good :)

Likes
5
Share


@GODAXE
Follow
25.08.2024
day 14 of flowering.
finally got somme sun after 6 day of rain, the camper berry look fine. showing nice grow and nice flower build up.
the blackberry just look like shooting star in the night sky.
fast berry have start to show dark coloration to, with the night temp getting colder as the summer slowly past by she should have a nice dress by end of september.
Likes
3
Share


@Farad9650
Follow
Just fed dilute 900 ppm general hydroponics flowering stage from the feed chart at 12 days into flower
Likes
2
Share


@Earthsower
Follow
Magnesium deficiency has struck this lady. All I can do for now is give her a diluted solution and keep an close eye on her to see if she response


Likes
5
Share


@TagoMago
Follow
81th TOTAL GROW DAY, 40th BLOOMING DAY:
Flushed suddenly down to 0,4, alternating with pure RO water, 0,03 or so. Dealing with a hot summer can't keep lower temps, sure there'd be more colours if temps were decreasing... But no complains at all, it's a fruity- skunky breath in the air.
Likes
5
Share


@CreoWeed
Follow
Hello guys!
Here we are with another week... At the end she was indeed flowering already, due to the stress and, I guess, some heat issues in the tent... Well, so we start seeing some very awesome, little purple flowers popping out everywhere.
I'm still using LST technique to better fill up the tent, as well as defoliating some fan leaves. I also finally moved her to the 20 liters pot, and soon gonna be in the tent alone, as the other diary I have, the gigantic Glue Galato, it's almost getting to an end.
I've started the flowering nuts dosages and for now all looks pretty fine, there's any sign of deficiency!
I'll keep you posted with what, in my opinion, seems to be a funny diary, thanks to this incredible strain.
Stay tuned and stay high!

Likes
Comments
Share

@ellioschka
Follow
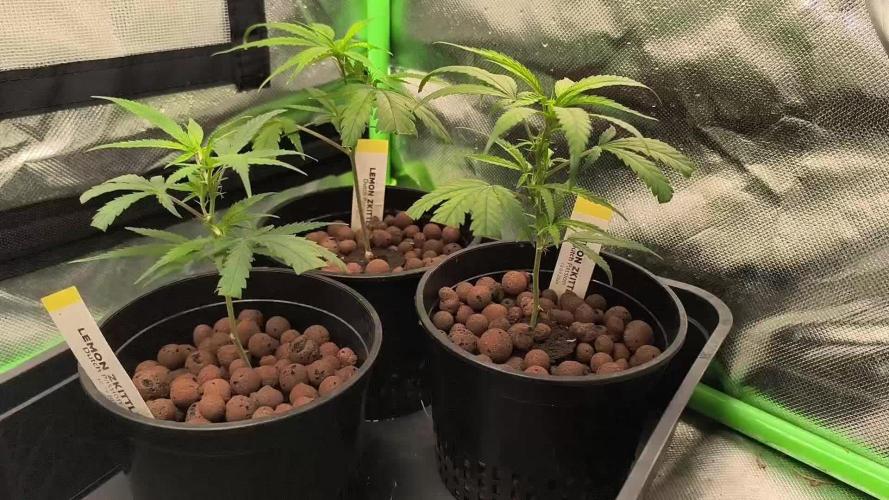
Stecklinge kamen innerhalb eines Tages per Overnight Express von MannyT. Richtig schöne Pflanzen, kerngesund und tolle weiße Wurzeln! 👌
Frisch angekommen durften sie sich kurz ein bisschen am Fensterbrett in der Sonne ausruhen und wurden dann ins Aufzuchtzelt gestellt. 30W Licht für 2 Tage zum Abfangen des Transportstress, danach dann 100W vom Spinnenbauer. 😊
Danach wurde in 1L Gitternetztöpfe gefüllt mit EuroPebbles umgetopft. Der Blähton wurde vorher mit ausreichend Alpine Nutrients 3-Part Düngelösung gespült und geprimed. (3-Part Düngeschema für Hydroponik, Woche 1-2 Roots. pH 5,7 mit Schwefelsäure eingestellt)
Um das Durchwurzeln der Pebbles zu gewährleisten, wurde darauf geachtet, dass die Pebbles immer wieder etwas rücktrocknen, bevor erneut gegossen wurde. Zwei mal am Tag zusätzlich Blattapplikation des gleichen Gießwassers via Sprühflasche.
Bei den Lemon Zkittle war an allen Stecklingen eine kleine Vorblüte zu sehen was für das Alter der Genetik spricht. 😇
Code für 15% Rabatt auf top Stecklinge und genialen Dünger:
AlpineNutrients15 (auf mannyt.at)
MEHR-ERTRAG-15 (auf alpinenutrients.com) 💪😎

Likes
2
Share


@Mpgrow
Follow
Week 5 and all 6 Autos are kicking out white hairs
Auto ultimate still the biggest out the lot tallest being just over 3ft tall the rest are around 2/2.5ft tall and still stretching


Likes
18
Share


@TheCannaProphet
Follow
~ FASTBUDS TESTER #2206 ~
Well friends, here we go on another 'canna-venture' together!
The grow room has had a complete remodel and some upgrades done to it including brand spanking new 4x8 and 4x4 tents and a Trolmaster Hydro X controller along with a new Control Panel.
This tester strain is one of six tester strains that FastBuds has graciously provided me with and I'm looking forward to seeing what this girl has to offer when she's grown to her full potential!
One drawback of 'testers' is I have little to no information on it other than its number and that it's an autoflower... 🤪 But, it's ALWAYS a blast growing them for me because not knowing a lot allows me to just concentrate on the essentials: Light, Environment, Water, Nutrients and possibly a bit of LST... not complicated, just basics like keeping a constant temperature and RH in the tent at a level that gives a good VPD, watering when almost dry and maintaining proper light levels according to their stage of growth.
____________________________________________________________________________________________________________________________________________________________________________________________________________________________________________________________________________________________________________________________________________________________________________________________________________________________________________________
~THE SETUP~
~Initially seeds were lightly scuffed, then soaked for 3 hours in 78℉ distilled water after which they were transferred to moist paper towels laid out in a Jiffy Pellet plastic starter tray with lid. Underneath the tray was placed a Vivosun Heat Mat with Controller that was set to 78℉ where they stayed until their tap roots emerged.
~Planted into Jiffy Peat Pellets that were hydrated with distilled water warmed to 78℉ with a 7.0 ph.
~Once roots emerge from the Jiffy Pellet they're transferred to their fabric pots.
~Grown 100% organic in a 4g Gronest fabric pot and a 3g fabric pot by Wraxly filled with Mother Earth 70/30 Coco/Perlite medium and initially amended with Dr. Earth 4-4-4 / Earthworm Castings / Dr. Earth Flower Girl 3-9-4 and Coast of Maine Stonington Blend Organic Plant Food 5-2-4.
~19/5 light cycle for the entire run with supplemental UVA added during flower. Lights are controlled by a Trolmaster Hydro X controller set for a 15min Sunrise/Sunset simulation.
~Top dressing every 3-4 weeks with slow release dry amendments and Earthworm castings.
~Straight water ph'd @ 6.2-6.8 when needed and bi-weekly Compost Tea's.
____________________________________________________________________________________________________________________________________________________________________________________________________________________________________________________________________________________________________________________________________________________________________________________________________________________________________________________
Weekly Updates:
12/29- Here we go into Week One of Flower! It's been a month since these pretty ladies popped out of the ground and they're both looking perfect and have pistils popping out everywhere!
Their fabric pots were still heavy when lifted, and they looked happy, so I skipped watering today and will check them tomorrow morning after the lights come on.
Since being topped roughly a week ago, they have two new shoots that are emerging and looking extremely healthy with excellent vigor and have a beautiful healthy green color! The #1 is now at 9" tall and the #2 a bit shorter at 7".
12/31- Today was a 'dry day and all I did was refill the humidifier and some canopy maintenance, tucking shade leaves and gently bending branches.
It's been a little over four weeks since they were planted in their amended medium and it's time to give their microbes a good feed so they can continue to provide them with all the macro and micro nutrients they need so, yesterday they got a good watering with 0.5g of de-chlorinated water with GreenGro's Veg, Flower, Green Aminos, Natures Brix and Granular Myco added to it @ 1.5 tsp/g and then ph'd to 6.4 @ 73℉.
01/02- Today I watered them from the bottom with 0.5g of de-chlorinated water to which I added 3ml/g of Earth Juice OilyCann cal-mag to prevent any Cal-Mag issues they may encounter before they arrive.
I also have the HLG 650R set 36" above canopy and it's set at 60% power which is being controlled by a Trolmaster HydroX controller. The tent environment is on point with temp's running 70 when the light's off and 74℉ with the light on. I'm keeping the RH at 55-60% right now but will drop it as flowering progresses. Finally, I've been keeping the VPD in the tent running 0.85 - 1.05 which I'm happy with!
01/04- They have both been doing really well getting watered every other day and yesterday they received 0.5g each of de-chlorinated water with 3ml/g of Fish Head Farms Fish Sh!t Soil Conditioner which was then ph'd to 6.3 @ 72℉.
They're both doing fantastic but were really beginning to get choked up with growth so I went in and selectively removed a few shade leaves from both to get some light penetration down into their canopies to give that lower growth some much needed light. While I was doing that I also did a little more LST on both to also increase light penetration.
Well, there goes another week in our journey and I'm looking forward to the coming weeks as flowering gets cranked up! 😍👍
😎💚 Thank you for checking out my passion in life! Please visit as often as you wish and I hope you enjoy this journey as much as I know I will! Grow Strong! 💪😎🤙
Likes
6
Share


@Lovemabud
Follow
Buds are really fattening up. Now comes the difficult part, deciding when to start the flush and then when to harvest. With likely warming days, quite likely an early harvest is on the cards so I can avoid curing in a hot tin shed. Closely monitoring the extended forecast to hopefully harvest at the perfect time as all will be wasted if curing in a 30c tent. At the moment due to a changing forecast its possible I will only achieve a 5 day flush, and have 3 days to cure in mild temps. Unfortunately from then it looks.like things seriously heat up, if extended curing is required then likely I'll bring in side the house in mason jars during the heat of the day then cure further on the drying rack in my tin shed till during the cooler evenings until ready. No. I know this isn't ideal but I've done this previously and always ended up with good.buds just way more effort that's for sure. This being a secret grow has additional challenges that's for sure. My wife, and 2 teenage kids have no idea what goes on in this shed as to their knowledge only garden tools are stored here, if anyone in my house did gardening apart from me then this grow would be impossible that's for sure
Likes
27
Share


@RDWCGrowing
Follow
4/1/2023
Week 7- Day 1 of Veg (Day 59 overall)
Water Change Day!!!
Water was really low it was just above the hump in the Res cutting it close to not having enough water in the system to keep it going. They drank a lot making it close going the full 14 days. I am still going with the previous grows and adding 36 Gallons but even looking at the root I think the SILICA is working and the roots are further along at this point than in previous grows. This next two weeks will watch how much they drink and how low my Res starts getting, and will make a decision on changing the water weekly from here on out or still keep on the plan of every other week until Week 4 of Flower.
Added 36 Gallons
Mammoth SILICA= .5Mil/Gal = 18Mil
CALMAG= .5Mil/Gal = 18Mil
Root Drip= 1Mil/Gal = 36Mil
FloraMicro = 5.4Mil/Gal = 194Mil
FloraGrow = 4.2Mil/Gal = 151Mil
FloraBloom = 4.6Mil/Gal = 166Mil
ORCA = .5Mil/Gal =18Mil
PPM= 536
PH=5.84
PPFD=500
Tent Temp= 76.5
Water Temp= 71.4
Humidity= 58%
4/2/2023
Week 7- Day 2 of Veg (Day 60 overall)
Not much today, PH was at 5.81, I brought that back up to 5.90. I took care of some badly needed defoliation in each of the back sides .. I was able to see some really good clone material to use on the lower backside of each of the plants. I will be taking two clones from each to breed over the next few weeks depending on when I am going to flip them.
4/3/2023
Week 7- Day 3 of Veg (Day 61 overall)
A little FIMing, A little Topping, and a Little bit of defoliation.
Might have to take my clones during the week this week, I am trying to wait until Saturday to hit week 8 but again they are getting all over the place and I need to trim some of the sides and lower areas.
4/4/2023
Week 7- Day 4 of Veg (Day 62 overall)
I decided to take my clones and clean up the lower half of the plants. I took 2 clones from each plant to go into the cloning machine.
4/5/2023
Week 7- Day 5 of Veg (Day 63 overall)
Water Temp is sitting at 73. Right in my ideal range for my setup.
Ideal range 70-74
My Temp Tent is my ideal zone75.6
Ideal for this grow 70-78
The lights are still waiting the switch to flower to get maxed out...
The Humidity is coming in right at 60% I love it..
I took so much off yesterday I figure it was a good day to let them rest.
4/6/2023
Week 7- Day 6 of Veg (Day 64 overall)
I needed to Defoliate some and I topped a little. The plants might force me to flip them soon. Next Wed is the 10 week mark half way through the 20 weeks. The net is Bingo... Which means that If/when the plants hit the net I will have to flip them. The Net is set to the max height that I can let them get based on the Breeders Stretch report 75%.
4/7/2023
Week 7- Day 7 of Veg (Day 65 overall)
#3 is 22 inches Tall, #2 is 19 Inches Tall.
Net is set at 24 inches. Net is also set as my Bingo point, if they hit the net then I have to flip no matter what to account for the Breeders recommended 75% Stretch allowance. I think I am going to have to flip right at the 10 week mark of the Competition which is Wed 12 Apr.
I topped a little, I de-foliated a lot to start getting it ready for the anticipated Flip.

Likes
6
Share


@organicman
Follow
1 seed dead:
1 strawberry pie
seeded 1 new:
1 strawberry pie
2 seeds dead:
2 euphorias
seeded 1 new:
1 white widow x big bud
___________________________________________
light- and watering schedule: see photos
now:
16 plants
3 x Auto Orange Bud > Dutch Passion (early80's)
3 x Haze Berry Automatic > Royal Queen Seeds (2018)
2 x Auto Euforia > Dutch Passion (late 90's)
2 x Auto Bubblegum > TH Seeds (late 80's)
2 x Original Auto BubbleGum > Fast Buds Company (late 80's)
1 x Strawberry Pie Auto > Fast Buds Company
1 x Gorilla Cookies Auto Seed Stockers (2015)
2 x Auto White Widow x Big Bud > Female Seeds
setup + strategy:
18 seeds
3 x Auto Orange Bud > Dutch Passion (early80's)
3 x Haze Berry Automatic > Royal Queen Seeds (2018)
3 x Auto Euforia > Dutch Passion (late 90's)
2 x Auto Bubblegum > TH Seeds (late 80's)
2 x Original Auto BubbleGum > Fast Buds Company (late 80's)
2 x Strawberry Pie Auto > Fast Buds Company
1 x Gorilla Cookies Auto Seed Stockers (2015)
2 x Auto White Widow x Big Bud > Female Seeds
setup:
18 x gronest 2 liter
60 cm x 120 cm x 180 cm (2 x 4) growtent
4 l humidifier
25 watt axial fan
15 watt clip fan
ro-filter
bath room with a 50 watts room fan (-> carbon filter not necessary)
...and a lot of odds and ends.
grow strategy:
max yield by stressing with:
1. tiny shoes (2 l fabric pots standing on 3 plastic rings (4 cm) for max oxygen)
2. tiny growspace (17 plants on 0.72 sqm)
3. many strains (8 strains)
4. annoying neighbourhood (mixing old - i.e. bubblegum (late 80's) - with young- i.e. hazeberry (2018) - genetics)
5. no stress by light or food or water
plus:
- no lst - no hst - just leaf tucking
- positioning bigger strains (euphoria, orange bud, haze berry) or just bigger phenos on less intense light spots (end of tent + edges)
- music-rotation: 24 hrs reggae (for sativas) - 24 hrs classicals (because it's scientifically proofed) - 24 hrs traditionals from the hindukush region (for the indicas)
max efficiency (min electricity - max yield):
- light: 23 h on - 1 h off
- keeping the distance of 18" (45 cm) and dimming to the right par (lux) - value depending on growing stages (see sheet: beginning 185 par ( 10000 lux/100 watt )/end 340 par ( 18000 lux/175 watt )) => ends up in approx. 150 watts in average over max 12 weeks
temperatur management:
- using approx. max. half of what the lamp can do keeps temperature low:
my tsl 2000 is pulling max. 360 watts of the wall - i need only 175 watts, results in less temperature than using a 175 watts lamp
- adjusting the temperature by using a humidifier outside of tent:
blown in humidity is soaking degrees and is transported out by fan, works much better than doing the same with pure air
summer extreme: no humidifier: 36°C / 35 rh - with humidifier: 29°C / 65 rh
works for 1-2 weeks of real hot summer days, no mould, no signs of stress in two summers
germination:
seeding in soil
spraying "basic"-water: ro-water (22 ppm) + calmag to 180 ppm every 4 - 8 hours
man versus fungus gnat:
5 days before seeding i'm running the tent with "basic"-watered pots as if there were plants inside - led on, fans on, humidifier on. Fungus gnats coming with the soil might take the chance to come out now for breeding. i'm waiting with a 9 mm rifle. in the past i found 6 gnats in 2 of 8 x 50 l biobizz lightmix bags coming out of the soil. i could eliminate every single gnat successfully ;)
rotating harvest:
the little ones will be harvested completely when ready. at this point only the top branches of the big ones will be cut...and the new (basic-watered) pots of the new grow will move into the tent. 2-3 weeks later the second half of the big ones will be cut and the second half of the new grow will move in...
nutes:
individual feeding schedule/once a week:
bloom,grow,topmax,activera,algamic
+ aminopower instead of bio heaven (too expensive)
individual feeding schedule:
veg: 200 - 600 ppm
bloom: 600 - 900 ppm
water:
ro-water with:
veg: 100-150 ppm calmag
bloom: 150 ppm calmag