



Likes
1
Share


@Cannerd
Follow
How ya doing mates?? Awesome week last week - all photos and logs have been added so be sure to check it out! This week is going great so far! I've switched to an early vegetative state nutrient system. As you'll see in the daily logs early this week, this bumps up the micro and grow nutes, and keeps the bloom at 0.6ml/gal. A quick note about last week - I'm unable to update the measurements, but please note that those nutrient amounts are measured in ml/gal, NOT ml/l.
Anyhow, this week I'm just waiting to get my order of diatomaceous earth so that I can make up another batch of soil. I'm still debating between topping this week before repotting or letting them take root in the new pots first. Decisions decisions lol. I think at the very least I'll clean up some of the lower growth to make sure the energy is being spent at the right places. I've been switching back and forth between just LST and mainlining in the past - but I think I really like the ease and cleanliness of mainlining. The draw back is the recovery time they take in the process haha.
UPDATE:
The D.E. has come in, and I repotted the girls this week. I mixed in about 1.5-2 cups D.E. for the whole pot, as well as some Bat Guano and Kelp Meal for micro and macro nutrients to use on dry cycles.
I've also included some photos of the mother plant to give an idea of what's to come! I've just started to flower it, which is the first time for this strain - so I'm pumped!
Day 15:
M.C. 01-21 After reviewing the last set of photos from last week, I figured I'd play it safe and dimmed the light back down to 25% strength. The mother plant is almost ready for flower, and I'm down some tents so she'll be taking this one over shortly. These photos were taken shortly after the lights went off, and they look quite happy! You can see some of the side branch developement in today's photo for MC-01. The pots are fairly dry now, and I've decided to move to the next stage in the nutrient regime. This kicks up the Micro and Grow nutes, while maintaining the Bloom amounts.
M.C. 02-21 A nice top photo for MC-02, you can really see the lighter green in this photo. Not to worry though, as these will darken back to a vibrant green as long as I give her what she needs shortly! The pots are fairly dry now, and I've decided to move to the next stage in the nutrient regime. This kicks up the Micro and Grow nutes, while maintaining the Bloom amounts.
M.C. 03-21 Look at that little leaf poking out from the 2nd node! Some slight yellowing you can see too, but again, not to worry. The new mix should rectify that. I've decided to move to the next stage in the nutrient regime. This kicks up the Micro and Grow nutes, while maintaining the Bloom amounts.
Day 16:
M.C. 01-21 Today is the day - for the mother! I've cleared out some space and moved plants around. So back out to the grow room these girls go! MC-01 seems much better today with the reduction in light. The 5th node is almost flattened out and the 6th coming through still. Most notably though, you can really see the work she's put into the side branches! The branches at nodes 2 and 3 are starting to produce more leaves - great sign! The new growth at the top is also a nice dark green. Added 500ml water to the tray.
M.C. 02-21 MC-02 seems to have liked the adjustment of light as well. She's got nice dark green growth at the top, and the little branches at the 2nd node seem to have a full leaf! Added 500ml water to the tray.
M.C. 03-21 The photo from today is cool, because you can see how close MC-01 & 03 are, even though there's almost a full node difference. MC-03 is stretch out a bit to compete with her sister for the light haha. She's also put some more effort into the side branches that you can see. Added 500 ml water to the tray.
Day 17:
M.C. 01-21 I figured a video would be the best way to illustrate the changes today! They've been back in the grow room under the Veg dedicated light for a day now and seem to be loving it! MC-01 has its' 5th node out, splitting the 6th node, and I can JUST see the 7th node coming in. I don't think they'll get too much more height, as you can see that the side branches are starting to stretch now! She's definitely going to be well tangled in the roots by the end of the week when I hope to repot her.
M.C. 02-21 MC-02 is doing great despite the difference in height! You'll notice the side branches stretching out at nodes 2 & 3. The pots are also still fairly wet at their center, so I'll hold off on water most likely. At least this clone will have time to root more while we wait for the supplies!
M.C. 03-21 MC-03 also has great side branching! If you take a look at the group photo from today, you'll see that both MC-01 & 03 are practically the same height, but MC-03 snuck in there by the stretch haha.
Day 18:
M.C. 01-21 My order of D.E. came in last night, perfect timing! As you can see, her roots have fully reached the bottom, and have started to migrate upwards with the water that's absorbed. The soil was a little dry for my liking, which made things a little difficult/dusty but still no mishaps! Watered around the root-zone before covering with more soil to keep the gnats down.
M.C. 02-21 Not quite as much lateral root growth as MC-01, but still plenty enough for a repotting! Her soil was a little dry as well. Ideally I should have given them a light misting from the top of the soil and let is drip down to keep the dusty bits together haha.
M.C. 03-21 Nice and thick root growth, no issues with repotting, and strong stalk. The extra spacing in the nodes may prove to be helpful during the training phase.
Day 19:
M.C. 01-21 Some nice top shots today as they slowly get acclimated to their new homes. Once I see them push out a new node, I'll probably top them. This is to make sure that they're taking to the new pot without causing any extra stress before they can take it. Today I watered them with an early veg nutrient. I like to stay cautious with nutrient boosts since they're in soil - not to mention the added nutrients from the repotting.
M.C. 02-21 Top shots for the girls today. Not much change, but also no immediate signs of shock either, so I'll take it.
M.C. 03-21 You can't really see it in this angled shot, but the small branch at the second node is coming along nicely! I think the girls are happy that they each have their own tray not haha.
Day 20:
M.C. 01-21 Definitely noticing some slow changes to the top nodes when comparing the pictures from the previous day. The leaves are slowly starting to separate, and I'm not noticing too much yellowing yet which is good. Watered with 500ml water to keep water migrating upwards to meet the roots.
M.C. 02-21 Not noticing much change in this girl today, but that's okay. She's most likely focusing on the root developement instead which I can't complain about! Watered from the bottom.
M.C. 03-21 Maybe seeing some separation in the top leaves, however more notably are the small branches at the 2nd node that you can see better here. Still a bit of stretching with them as they get longer. I might even keep them on for clones later on. Watered from the bottom.
Day 21:
M.C. 01-21 Looks like she gained some distance last night, as the top node is now above the fan leaves, unlike 2 days ago. I'm really getting eager to top them, as I don't want them to waste too much time and energy growing tissue that I'll just end up cutting off. I'll be bumping the nutrients up starting next week to keep the progress going, moving to a mid-veg stage shortly. I'm going to let things dry up tonight for a fresh boost of water tomorrow to give it a dry cycle as the pot is still a bit heavy.
M.C. 02-21 MC-02 really worked hard last night it seems, as she almost completely flatted out her top leaves! I think she's ready for a topping, but I'll let her benefit from the headstart and let the other two catch up and root before. dry cycle for her tonight as well.
M.C. 03-21 MC-03 was busy last night too and is now slowly flattening out the top node as well! Maybe tonight they'll have enough progress to go topless afterall haha. Dry cycle in prep for watering tomorrow.
Likes
13
Share


@Drawer
Follow
I still found a few places with bud rot and I keep removing every spot I see.
The plants have been doing fine beside that, they are looking and smelling great, they are super dense and I can't wait for them to be ready.
Most trichomes are still clear so I am awaiting for the first ambers to show up, aiming for around 5% amber and 95% milky.

Likes
13
Share


@MR_FLEXOPONIC
Follow
6/6 day 52of veg
6/6 day 10 of flowering
2nd week of flowering
I put 1 of the 4 Runtz plants into flower back in week 6 to see how it would be I put a net on it so after 2 week thought about how big the other 3 plants after vegging for 14-16 week I had to buy a new bigger tent *on the way
Likes
31
Share


@Alex8o
Follow
Last full week till Harvest,plants are very solid and smell so fruity😍. Can't wait till next cycle to do better!
NOTE: I usually start counting days from the first couple of serrated leaves
Likes
3
Share


@Sup3rNov4
Follow
She is looking fantastic the buds started putting on size yesterday last couple weeks me things can’t wait to try her

Likes
6
Share

@Enki_Weed
Follow
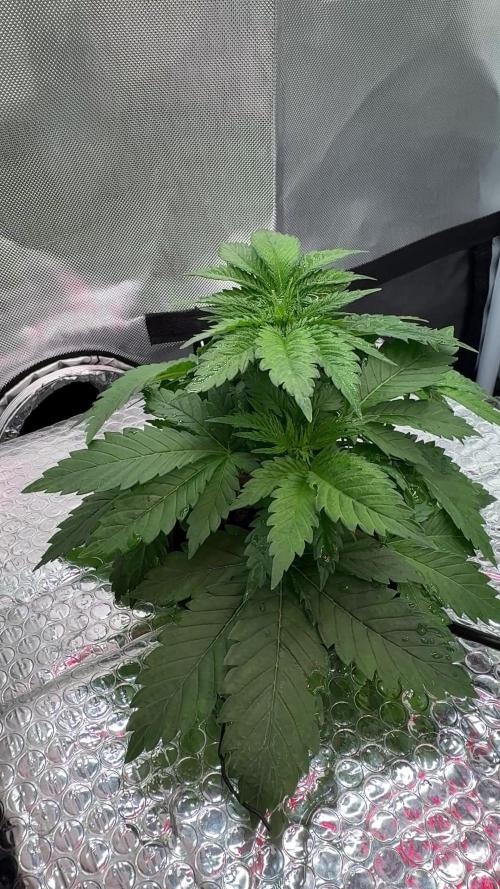
Vier Wochen sind rum, und die Babys sind offiziell in die Pubertät gekommen! Schaut euch nur diese Blattmasse an – meine Early Skunks explodieren förmlich und bilden einen dicken, gesunden Busch.
🔪 Die Topping-Operation
Wichtiges Update: Eine der beiden Diven hat heute einen kleinen chirurgischen Eingriff bekommen: ein Topping! Sie ist jetzt offiziell die "Zwei-Kopf-Pflanze" und bereitet sich darauf vor, ihre Energie in die Breite zu schicken, um einen monströsen Busch zu bilden. Die andere genießt noch ihren natürlichen Wuchs, aber ich beobachte sie genau.
🚿 Generalinventur und Algen-Check
Pünktlich zum Start der neuen Woche gab es die obligatorische Generalreinigung der DWC-Anlage. Der Tank ist blitzblank und bereit für die nächste Wachstums-Runde.
Das 4-Wochen-Menü à la Hesi
Der Nährstoff-Tank wurde nach Hesi-Anleitung für die 4. Vegi-Woche frisch aufgesetzt. Die Kleinen kriegen jetzt den vollen Speiseplan, um noch mehr Power zu entwickeln.
Die aktuellen Klimadaten im Profi-Check:
• Lufttemperatur: Konstante 26–27°C – Perfekt zum "Chillen" und Wachsen.
• Luftfeuchtigkeit (RLF): 55–60% – Optimal für die Vegi-Phase.
• Wassertemperatur: 19°C – Absolut top! So bleiben die Wurzeln glücklich, weiß und frei von unerwünschten Besuchern.
• Licht-Power: Mit 450 µMol ist die Lichtintensität ideal.
🤯 Wurzel-Alarm!
Die Wurzeln sind ein wahres Kunstwerk – dicht, buschig und strahlend weiß. Ein klareres Zeichen für gesunde DWC-Arbeit.

Likes
23
Share


@WolverineGreens
Follow
Everything lookin and smellin good. Found a random macaw hanging out under one of my gelatos in the middle of my garden and finally got a pic of my other buddy kermit the toad.
Poor bird was extremely thirsty and hungry and dont look to b in great shape. 😞😟 lucky i caught em cause he tried to leave after he drank his fill.


Likes
9
Share


@Rock_n_Roll_Randy
Follow
SOME SEEDS ARE STARTING TO POP OPEN AFTER 1.5 DAYS SO I WILL PROBABLY BE PUTTING MOST OF THEM IN THE SOIL ON APRIL 23RD👍
FOR EVERYTHING MARS HYDRO VISIT:
www.mars-hydro.com
www.marshydroled.ca
PROMO CODE: rocknroll
VISIT THE ALIEXPRESS STORE:
@marshydro_aliexpress
Instagram: @marshydropenny
Thanks for taking the time to read and check out my diary🤜🤛
TS3000 FEATURES:
WIDEBAND SUNLIGHT FULL SPECTRUM LED GROW, Infinite close to natural sun light, suit for all plants whole stages indoor growing, rapid plant response from seed to flower, achieve maximum quality and quantity, much better than traditional HPS grow systems.
HIGH REFLECTIVE & NOISE FREE-Fanless LIGHT BOARDS design will make your growing life easy and quiet, quickly heat dispersing material aluminum reducing light lost to aisles and walls, increase the light intensity up to 20%, allowing your plants receive more energy and without burning your plants for maximum headroom.
HIGH EFFICIENCY ENERGY SAVING PLANT LIGHT, high-power NEW LED grow, Compares to traditional 3000 watt HPS lamp and other brand led grow light while only 450 watts true output with 1016 LEDs, more scientifically and energy-efficient! Perfect for 5' x 5' veg stage, 4' x 4' bloom stage, higher intensity in a MARS HYDRO grow tent, reflective area, or by crossing over using multiple TS3000.
BOOM YIELD LARGE GROW LIGHT, NEWEST SMD LED technology provide highest PAR/LUMEN output(1095.6umol/), makes you get 30% higher yield compare OLD led lights, can get max yield at 2.5g/watt, less pay but get more yield, bring a amazing grow trip to any home grower as it beams huge amounts of light energy to plants below.
COMMERCIAL LED GROW LIGHT, Updated easy dimming & daisy chain function, main light controlled, especially come with two waterproof and dimmable Mean Well Drivers, auto sensing power supply works on both 120VAC and 240VAC and 277VAC, suit for Large Rooms and Commercial Setups.
Low Energy-Consuming LED Grow Light: Consuming 300w and also mounted with 1016 chips, TS3000 has the ability to replace a 450w HPS light while reducing 40% power intake.
High Efficiency LED Grow Light: With overall light output PPF 343umol/S as well as amazing PPE 2.3 umol/j, it's 50% even more photon efficient and can assure a 30% more return than the old HPS/MH lights.
Patent Highly-Reflective Hood Shape: The reflector design on TS3000 is patented, which can effectively gather the light dispersed in all directions to enhance its light intensity as well as assist plants in absorbing more light.
Full Spectrum Plants Favorite Spectra: By the unique mix of spectra that makes most light in the 400-700nm waveband, incredibly conducive to plant photosynthesis. Adequate IR(730-740nm) is additionally consisted of in the range to generate larger buds.
Dimming And Daisy Chain Feature Available: Upon an independent dimming button on the external driver, backing 0-100% settings adaptation and up to 30 LEDs daisy-chained in a group, it supplies different light levels for various plant stages meanwhile saving energy.
Safety Certifications And Service Warranty: CE, ETL, RoHS, UKCA security certifications accepted, 50,000 hours durability, 5-year service warranty, and local after-sales repair
5x5 GROW TENT:
LOCK ALL LIGHT INSIDE MARS HYDRO Indoor Grow Tent interior is made of diamond mylar which is highly reflective. (Other brand's mylar and reflective rate is as low as 50%, won't provide efficient light. )MARS HYDRO 1680D canvas, being double stitched, it is tear proof and has perfect light locking. Mars Hydro's grow tent keeps 100% lighting beams inside and helps your plant absorb more lights. EXTRA-THICK --No light leaks or rips at all
DURABILITY GROW TENT Stable metal corner adapters and poles are the trustful supporters of the tent, standing sturdy, neither rusting nor paint-falling, quick easy tool-free installation. Mars Hydro's heavy-duty metal zippers, with double layer black lining, are the best on the market which create a light-proof seal
EASY OBSERVATION FOR YOUR PLANTS. Special observation windows are made by double layers of cloth. Observe the growing conditions of your plants without opening the tent and avoid disturbing plants. The observation window also serves to dissipate heat and ventilate air
AUTOMATIC 6 INCH EXHAUST FAN KIT W/ CONTROLLER:
Mars Hydro 6'' Inline Fan uses a mixed-flow design to maintain peak performance in a high static pressure environment.
GROW TENT FAN: MARS HYDRO inline fans are designed to ventilate hydroponic grow rooms, transfer heating/cooling, cool AV closets, and exhaust odors.
EFFECTIVE VENTILATION: Variable speed controller for easy fan speed adjustment. Optimal ventilation for your planting.
LOW NOISE LEVEL: Durable plastic fan housing and blades for extremely low noise(32dB-A); create a truly quiet growth environment.
EASY INSTALLATION: Removable duct ends with locking tabs for quick removal and easy maintenance and a cord length of 4.9 feet for hassle-free setup. This grows tent fan with a controller for easy fan speed adjustment.
BASIC PARAMETERS: Ventilation exhaust fan size: 6” | Dimensions: 315mm*225mm*210mm. | Weight: 2.7. | Airflow: 402CFM | Noise: 32dB-A | Bearings: Dual Ball.
Likes
11
Share


@ButterfliesLittleFarm
Follow
Hello Diary,
Apollo F1 is in full bloom, progressing nicely.
The flowers fill in nicely, they are hard and compact and take on an increasingly intense scent.
It progresses quite quickly considering the fourth week of flowering.
In this week he reached his maximum height, at the last measurement I found that he has not grown since last week.
Watering has become a little more frequent, I have to water every three days because they drink a lot of water.
I continued this week with the addition of nutrients, bio flowering booster and easy bloom tablets.
The conditions inside the grow box are good, the temperature is around 28 degrees and the humidity is around 45%.
Here's a quick recap of the week.
12/06/2023 - Day 44.
Watering.
I prepared 8 liters of water, added all three components from the bio flowering booster, lowered the pH. at 6.0 and with that amount I watered all three plants evenly.
15/06/2023 - Day 47.
Watering.
I prepared 8 liters of water again, inserted one easy bloom tablet, lowered the pH. and again with that amount I watered all three plants on the farm.
17/06/2023 - Day 49.
The end of the seventh week and it's time to take photos.
That's all from me for this week, see you soon.

Likes
4
Share


@DmbTexasRanger
Follow
Outdoor harvest smells and looks better than indoor. AN bloom boosters (full lineup) made a huge duffe


Likes
10
Share


@HideAndFly420
Follow
Day 64 my baby is going really well by now, she s been running fast until now and I think that’s enough with fertiliser. From today o start my flush, I will give today my last dose of regulator and from next irrigation just on controlled water until the end of maturation, I want this baby to eat everything .
day 65 started flushing. ph controlled water at 6.0 i think 20 more days at max before m
Day 68 First check with micro today. The baby looks already milky and amber on the top buds but the rest of the plant is still transparent. I’ll wait at least until this weekend for a re check maybe I’ll cut her in two rounds. As I be been watching a lot with micro I noticed so many dust and other stuff on the buds so I think I’ll wash her in water.
Today watered ph 6.
Let’s see!
🌱🔥🌱🔥🌱🔥🔥
Likes
4
Share


@AustinRon
Follow
OG 4Q24 Flower Week 4 (Plant Week 7)
Orangegasm (Fem) [ IRIE Genetics ]
12/12 @ Bolt (Day 21)
Germination: 20 November 2024
#3A Earliest Harvest Date: 9 February 2025
#3B Latest Harvest Date: 19 February 2025
_________________________________________
Start of Week: [Wed Jan 3,
2024 CR2 4Q24 22:F:4:1]
End of Week: [Tue Jan 9, 2024 CR2 4Q24 28:F:1:7]
OrangeGasm Fertigation: Max EC: [ 2.4, mS]
_______________________________________
RLA Hydro - Auto Irrigation
(RLA Primer A&B ONLY - No Silica Skin. While Silica Skin is largely Reservoir stable, One WILL NOTE a brown Patina on lines in a few days - eventually causing clogs across any irrigation small orifices.
FEED Application - Dehumidifier Reclaim: (EC: 0.0, pH: ~7)

RLA Hydro Auto-Fertigation (1 Gal), EC: 2.4:
- Primer A: [ 18, ml, gal]
- Primer B: [ 18, ml, gal]
- Mammoth-Silica: [ 4, ml, gal]
- Photosynthesis Plus: [ 6, ml, gal]
- Quillaja 60 Powder (Surfactant): [~scant~]
Feed Application FILTERED TAP WATER, pH ADJUSTED: EC: [ 0.3, mS/cm], pH: 7 (Phosphoric Acid Amended)
__

RLA Hydro Auto-Fertigation (1 Gal), EC: 2.4:
- Primer A: [ 15.8, ml, gal]
- Primer B: [ 15.8, ml, gal]
- Mammoth-Silica: [ 4, ml, gal]
- Photosynthesis Plus: [ 6, ml, gal]
- Quillaja 60 Powder (Surfactant): [~scant~]
Wed Jan 1, 2025 # Happy New Year!!!
OG 4Q24 22:F:3:1
Runoff: 1 pt, ec: 2.0
- [x] Post Grow Diary - Week 5
Check Reservoir
- [x] Rough Amount: [ 4, gal]
- [x] Temp: [ 58, °F]
Harvest Dehu:
- [x] Amount: [ 5.7, l]
1. Count the Nodes (From TOP)
2. Remove Fan Leaves From Lowers ( 3 Nodes
Defoliation: # Remove Each Plant From Tent - Defoliate, Replace
- [x] Remove Large Stem FAN Leaves BELOW Canopy of Spread Flowers (Nodes 3-6)
- [x] Remove Fans originating FROM and BETWEEN the TWO Stems of each plant, AT and BELOW Spread Flowers. (We NEED Airflow WITHIN Each Plant)
The Rainbird XeriBird contains a FINE FILTER, which is largely clogged after a few runs. It seems to develop a film over the screen, that washes off/out with difficulty.
Will replace Today.
If Clogging Continues - I will REMOVE filter from XeriBird - and monitor the emitter lines.
This is the biggest challenge right now - maintaining consistent fertigation.
__
Thu Jan 2, 2025
OG 4Q24 23:F:3:2
- [x] How are the girls AFTER Wednesdays Defoliation?
- Tbd
- [x] Readjust Light Distance to 19.5”: Reset to ~20.5” to Tallest Stem.
- [x] Consider raising to 77%: RAISED
Harvest Dehu:
- [x] Amount: [ 5, l]
Runoff:
- [x] Amount: [ 1, gal]
- [x] EC: [ 2.4, mS/cm]
Loaded Dehu in Res - Had to Augment with Filtered/pH Remediated Tap Water.
EC: [ 2.5, mS/cm]
REPLACED µFilter in Xeribird, washed and soaking in k. Vinegar.
I Do Not Think we can run with this filter - It clogs DAILY.
Need to evaluate long term


__
Fri Jan 3, 2025
OG 4Q24 24:F:3:3
Environment:
- TempRange: [ 79, 82, °F]
- RH: [ 64, %]
- VPD: [ 1.0, kPa
- Light Intensity: [ 770, µMol/m2/s]
Xeribird Filter
- The issue with the Xeribird is the micron filter pre-manifold. It has clogged on each of the past 3 days.
- Creates a film that is DIFFICULT to remove - Have used Kombucha Vinegar & Phosphoric acid to soak.
- Mechanical Cleaning (Nail scratching the surface of the screen) removes SOME of the brown build up.
- Possible Causes:
- RLA Silica Skin (Eliminated from Feed)?
- Quillaja 60 Powder (Surfactant)?
- Mammoth Silica?
- Predicate between Primer A&B?
We’ll eliminate ALL BUT Rooted Leaf Primer A&B, Microbelife Hydro Photosynthesis Plus, and SLF-100 (Enzymatic root cleaner).
- If we’re clogged again at Lights On - Need to
- [ ] Dump Tank
- [ ] Clean Surfaces
- [ ] Assure Pumps are CLEAN
- [ ] Assure NO Precipitates in bottom of res.
Harvest Dehu:
- [x] Amount: [ 1, gal]
@1900
Runoff:
- [x] EC: [ 2.7, mS/cm]
- [x] Amount: [ 1, gal]
- [x] Replace Filter - Assess ‘Clog’
__
Sat Jan 4, 2025
OG 4Q24 25:F:3:4
EC: 2.7
LightDistance: 19” From Tallest Top - NOT INCREASING (We’re almost at the Vertical Limit of the Tent)
Irrigation Maintenance: @1939:
Cleaned Xeribird Filter.
- Contains Orange/White coagulated Goo after 24 hrs
- We’ve 30% ‘Clear’
- Will Monitor DAILY
- Is the Orange from Primer B, Photosynthesis Plus, Silica Skin, or NATIVE Orange Yuck?


If we have LESS than 100% Clog after 24 Hours, Continue to monitor CHANGE IN AMOUNT of precipitates in filter. (Perhaps weigh the filter pre-cleaning.
@1900
Runoff
- [x] Amount: [ 0.5, gal]
- [x] EC: [ 2.7, mS/cm]
- [x] Replace Filter - Assess ‘Clog’
__
Sun Jan 5, 2025
OG 4Q24 26:F:3:5
Dehumidifier Reclaim
- 1.6 Gal, 2.7 EC
- Refreshed Reservoir
- PrimerA&B: [ 30.5, ml]
- Photosynthesis Plus: [ 9, ml]
- SLF-100: [ 7.5, ml]
Runoff
- [x] Amount: [ 0.25, gal]
- [x] EC: [ 2.7, mS]
- [x] Inspect/Clean Xeribird Filter
We’ve got about 1/3 to 1/2 the Crud of Yesterday.
Feeding only RLA Primer A&B, Photosynthesis Plus, and SLF-100


Measure Light Intensity
- [x] Tops: [ 510, µMol/m2/s]
- [x] Main Canopy: [ 730 , µMol/m2/s]
Stretched ANOTHER 2” overnight AM NOT CHANGING LIGHT Distance - In Fact, Raising Dimmer to just more than 3 o’clock.
__
Mon Jan 6, 2025
OG 4Q24 27:F:3:6
INPUT EC: 2.7
PPFD TOPS: [ 844, µMol/m2/s], DLI: [ 36.4, mol/m2/s]
PPFD Main Canopy: [ 585, µMol/m2/s], DLI: [ 25.3, mol/m2/s]

Objective: Optimal Light
- Keep Dimmer @ 92%
- AFTER STRETCH Reduce Light Distance 2 clicks/ day until TOPS are At ore Below 4” from Light
Light Distance
- Stretchers: [ 15 ,in],
- The Rest: [ 25, in]
Measure Light Intensity
- [x] Tops: [ 510, µMol/m2/s]
- [x] Main Canopy: [ 730 , µMol/m2/s]
- [x] Runoff
- [x] Amount: [ 0.25, gal]
- [x] EC: [ 3.0 , mS/cm]
- [x] Runoff Delta: [ tbd, mS/cm]
- If at ANY POINT we BREACH 0.4 mS/cm - Increase Watering DURATION ~20%
- [x] Check and clean Xeribird Filter (As Needed)
- Similar or Less residue to YESTERDAY.
Reclaim Dehu
- [x] Amount: [ 1, gal]
Refresh Res:
- [x] 1 Gal, EC: 2.7
Primer A&B: [ 20, ml]
SLF-100: [ 5, ml]
Bypassing Photosynthesis Plus to see if that’s the cause of the precipitate/film in the irrigation filter daily.
__
Tue Jan 7, 2025
OG 4Q24 28:F:3:7
INPUT EC: 2.7
Tallest: 32.5”
Shortest: 20”
Light Distance: 14” To Tallest (Lowered 3 Clicks @ 92% Dimmer)
Runoff
- [x] Amount: [ 0.33, gal]
- [x] EC: [ 3.2 , mS/cm]
- [x] Runoff Delta: [ 0.6, mS/cm] # CAUTION LEVEL
- Increased Fertigation Duration 5 Seconds
- Watered about 2 minutes extra.
- Need to bring Runoff Delta to ≤ 0.4, mS/cm
Reclaim Dehu
- [x] Amount: [ 0, L]
Defoliation:
- [x] Remove LARGE FANS Covering SMALLER PLANTS

Processing
Likes
6
Share


@MissSolasolita
Follow
End of week 2 flower for both Power Plant xl
Main plant 47 cm and one in shared pot 63 cm
All plants looking super healthy

Likes
8
Share


@MeeXXn
Follow
Hello GrowBros,
At the moment we are in the 3rd flowering week👍🏻
The Led got some Red Light for better flowering.
Still watering with 2,5 L each plant every 3 days (ph is 6,1 and added with Biobizz grow, Bloom and CALMAG)
Smell is very good😎
Let them grow ✳️


Processing
Likes
29
Share


@CanadianFillmore
Follow
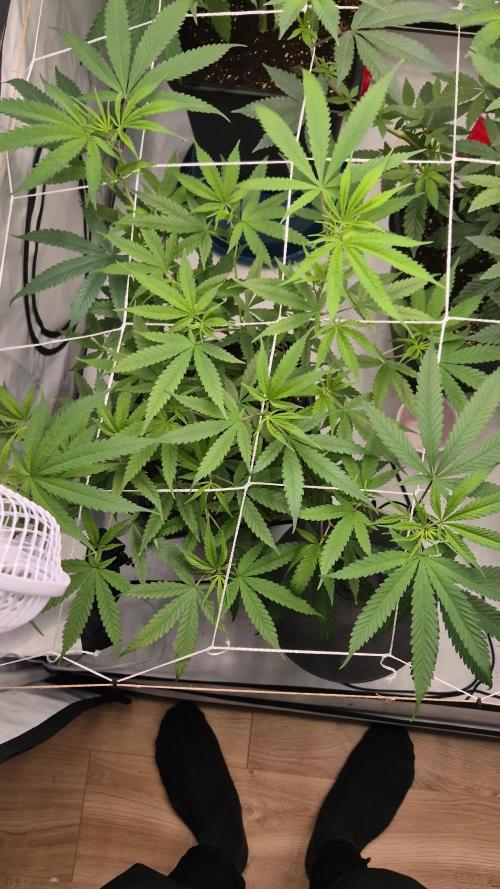
Week 4 begins for LSD, the good trip continues! Lots of nice bud sites developing and she has a somewhat sweet aroma. Removed some larger leaves and some yellowing one's. Overall plant looks great. I also increased feeding to 5 liters.
Thanks for looking 👽🔥🌳



Likes
21
Share


@Whitebelt
Follow
Plans this week: new bluelab guardian connect coming (ph/ec/temp monitor for the reservoir tank) I think I’ll finally mount things neatly on the wall. More pruning the lower canopy; and some low stress training maybe. I hope the flowers keep maturing and start really gaining some girth this week. I’m excited and hopeful but a bit scared of the pk booster and overall nutrient level/EC increase - I’ll keep watch for nutrient lockout etc. Other: Utility sink/drain/water line install I hope. This grow is taking up all my “project time” - Hopefully I can finally spend some time on my arcade cabinet project starting this week.
The plants didn’t get light for 37 hours the other day (6/23?) . I had removed the lights to build the frame. I thought I had everything ready for a quick swap. And then I got sick; daughter’s car broke down; my plan for the light frame wouldn’t work; I ran out of angle aluminum; and did I mention I got sick. Anyway they missed only one 12 hour light period plus 1 extra hour (plus their normal dark periods before and after- so that’s how I calculate 37 hours) They actually seemed to mature and redden a bit faster with the extra darkness. Gotta think positive.
Upgraded the tent! (6/24/19) It’s now a hydropolis 3x3 “plus size” (extra few inches bigger all around and 8 inches taller than my old vivosun) - much nicer. Wow what a tough job. Very tight space in my room. This is way too late to be moving plants to a new tent - but sliding the old removable tent bottom with all four plants and scrog all at once over to the new tent wasn’t as bad as I feared. Setting up the whole tent again and moving everything was a pain in the ass though.
I did a little pruning of the back side of the plants which I hadn’t gotten to in a while - some dead leaves under the scrog mostly. I wonder if all this trim (from recent days too) is gonna yield any amount of even sorta decent bubble hash. I’ll freeze it and try.
I hope they like their new home. I did a lot of the swap and setup with the lights totally off in my basement and using only a green headlamp. Argh.
I partially failed in my effort to make a complete aluminum frame. I didn’t include the 4 solstix in the frame. But I did make a frame for the two HLG 135s - I re-hung the solstix individually and with their lame individual drivers that are underpowered (I’ll get to the the rewiring and driver replacement one of these days)- I added the far red puck, and I finally added the new HLG QB36 UVA (I’ll try it for the first time tomorrow - with sunglasses on!) - update: tried it. Seems pretty sweet - wish I had some directions or some idea if I should only be using only one stick like I am or the entire 4 that I think they sent me in error.
I’ve got a reasonable amount of space between my lights and top of canopy now (15+ inches) - if the damn stretch is finally done I might be ok. I really shoulda flipped sooner like everyone warned me. Live and learn.
The utility sink/drain line/water line is still not installed - so I’m still carrying water up and down stairs which sucks.
I’ll use pk13/14 this week after this rez tank empties and I give it a good cleaning in a day or so. I’ll also continue to use mammoth p and all the other nutes. - ok tank cleaned and making a new soup for feeding later today (pk 13/14 started on 6/25/19 11:30pm - I plan to use it for 7 days??)
I changed the drain/waste bucket to a small bin - and placed it inside the tent — it works well with the condensate pump- so tomorrow I’ll drill holes in it, install grommets and run the drain lines to it permanently - which will be much better than the 5 gallon bucket sitting outside the tent in my small space - plus the gravity drain lines were a pain coming out of the tent and I had to weigh them down to keep their height below 2.5” - now it’ll be just one pumped line. - ok done. I drilled a bit too fast and cracked two of the holes. Siliconed it for now- I’ll replace the little bucket this week or next - it’s fine for now. (6/25/19) So much better! - now no more gallons of water weighing down the drain lines and no more drain lines coming out of the tent - except for the single pumped line that goes out the standard tent hole. And so much neater in the tent etc. Woot!