
Likes
Comments
Share

@birdmountain
Follow
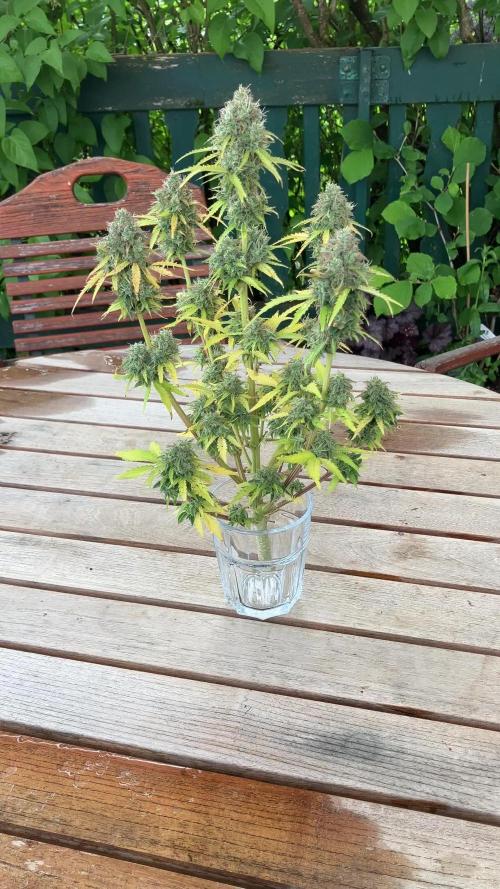
Der zu betreibende Aufwand um noch mehr aus der Pflanze herauszuholen hätte sich nicht mehr gelohnt. So stand sie noch 36 Stunden im Dunkeln bevor sie geerntet wurde. Sie hängt nun in der Growbox und wird langsam trocknen und ich noch gegen Ende des Monats einen Rauchbericht abgeben können.

Likes
10
Share


@Chubbs
Follow
Little late on the update. These 3 are absolutely beautiful. They'll be getting the chop this week and wow it's been a pleasure growing them. Super fast and easy not requiring any special treatment. Super frosty and have a pungent smell. Happy

Likes
6
Share


@Plantinator
Follow
I was learning a lot just about water itself.
Currently the method I use was inspired by an article I found on Canna Nutrient’s website:
Rainwater + tap water to EC 0.2 (100ppm)
Add CalMag to reach EC 0.4 (200ppm)
Ph down (first diluted a small amount in water)
Nutes
Day 58:
Increased the feed to 3/4
Day 59:
Replaced the tap water to liquid silicon.
Rainwater + Liquid silicon to EC 0.2 (100ppm)
Add CalMag to reach EC 0.4 (200ppm)
Ph down (first diluted a small amount in water) to ph 5.6
Likes
14
Share


@CampaCavallo
Follow
8ª Settimana di Fioritura 💐💐💐💐💐💐💐💐
Buongiorno amici 💚! Guardate com'è diventata bella la nostra Mimosa Shot 🌼🎇


Likes
39
Share


@Mrs_Larimar
Follow
March 11th.
Seedling is showing up... wonderful
It was a fast Seedling strong Growing
Shes under a" open Dome" for more Humidity for the next Days
She get Sprayed with " Fast Plants Spray"
March 13th.
Iam done with setting up
Now i have another Babytent. and Inside the New Viparspectra XS-1000
and the other Stuff to run the Envoirement
I already ca see a difference between both Tents. If you stand outside and just look with Eyesight
the Viparspectra seems to be brighter// has another color of Light.
I made a Unboxing Video for more informations.
Amazon: http://url-9.cn/0y9i
Amazon US: https://amzn.to/3e0P2bk
Amazon CA: https://amzn.to/3bTnEJC
Amazon discount Code:
it10mlarimar XS1000 10%
it15mlarimar XS1500 5%
it20mlarimar XS2000 5%
it40mlarimar XS4000 5%

Likes
22
Share


@MadeInGermany
Follow
Flowering day 59
since time change
to 12/12 h.
Hey guys :-)
The lady is slowly coming to an end 😍.
The buds start to swell extremely .
The trichomes mature day by day.
This week she was given a very light flush with Clean Fruits so that she can use up her remaining nutrients in the coming days 👍.
It will be harvested in the next 6-10 days 😍.
I can't wait to try them all :-) .
Otherwise everything was cleaned and checked.
Have fun and stay healthy 💚🙏🏻
👇🏼👇🏼👇🏼👇🏼👇🏼👇🏼👇🏼👇🏼👇🏼👇🏼👇🏼👇🏼
A thank you for this wonderful strain goes out to
Herzog
https://instagram.com/herzog030?utm_medium=copy_link
and the Exotic Seeds team
You can buy this Nutrients at :
https://greenbuzzliquids.com/en/shop/
With the discount code: Made_in_Germany you get a discount of 15% on all products from an order value of 100 euros.
You can buy this Strain at :
https://www.exoticseed.eu/
Water: Osmosis water mixed with normal water (24 hours stale that the chlorine evaporates) to 0.2 EC. Add Cal / Mag to 0.4 Ec Ph with Organic Ph - to 5.8 - 6.4
👆🏼👆🏼👆🏼👆🏼👆🏼👆🏼👆🏼👆🏼👆🏼👆🏼👆🏼👆🏼
MadeInGermany

Likes
70
Share


@MrJones
Follow
Sky Walker
~~~~~INDOOR~~~~~
DAY 141 Above Dirt
💬SUNDAY 01.13.24 - So this is the update that I did not have time to do over the weekend, the girls are bouncing back from the hard time I put them through last week, and the flowers are starting to chunk up along with more foliage, however, there will be no more defoliation until we are close to completion, for now, its just water, and wait, allowing the Gaia Green to do its thing, the light is at 100% and the girls love it.
~~~~~~~~~~~~~~~
🌱Sky Walker
👨🌾🏽Sativa Jones
🌤️@Medicgrow420
SeedBank Seeds
📝@gaiagreenorganics
📝Bokashi Biochar
~~~~~~~~~~~~~~~
📝 Skywalker OG Strain is a top-shelf Indica dominant hybrid. It is a cross of Original Amsterdam Blueberry, OG Kush, and the indica strain Mazar from Afghanistan, and is best known for its super potent effects and sky-high THC levels.
Likes
10
Share

@Radagast_
Follow
11.07.
OG KUSH
Day 77#
Today is the end of the eleventh week for the plants.
There were storms all week and with the fact that they spent almost the whole week under stress (they were also under heat stress a couple of days before), I am certainly satisfied with the progress.
On Tuesday, they were watered for the last time, with clean water, then it rained, and the next day it rained all day, since then they have not been watered, as soon as the soil dries I will feed them.
Below in the table is the food that they received last time, but it is included in this week, and I introduced that as well.
Stay High and Keep Growing!!!

Likes
8
Share

@StoneyApple
Follow
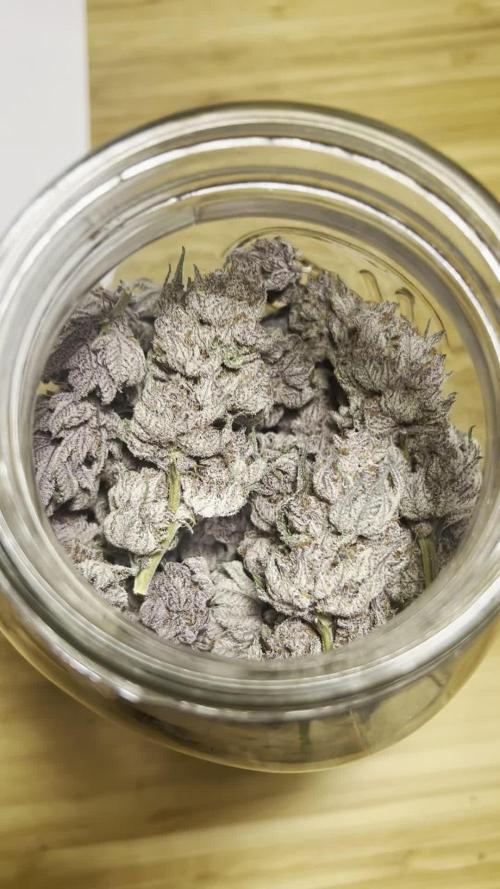
I harvested them on day 58.
A very sticky job.
The branches were hung upside down for 10 days at 17 °C and 60% RH. After that, everything was jarred up, where it will now cure over the next few weeks.
Overall, I’m very happy with this run. Aside from a few minor issues, everything went smoothly.
Likes
4
Share


@GrapevineGrower2
Follow
NOTE 1: Afgooey Auto pheno #3 turns out it's a MALE. Resembled nothing like her two sisters ran at the same time. In fact, I had to move her to the 12/12 tent to initiate flowering. Little did I know or expect She would be a He. Lola by the Kinks is rattling round my brain about now ;)
FEEL FREE TO HIT THE LIKE BUTTON IF YOU LIKE WHAT YOU SEE ;)
2x4 French Macaron - at the time of this posting, FM is heading into week 8 flower. Second extensive flushing w/fresh rain water due to acidic conditions (ph >5). Been struggling with ph the entire flowering. I speculate ph issues due to over feeding. Ph is roughly 5.8 to 6.0 after flushing. At this point, flushing with plain RO water until harvest.
NOTE 2: I've introduced two 5 gallon bubble buckets into the 2x4 grow tent. Both buckets have medium air stones running from a 125 gph air pump. Given French Macaron isn't scheduled for harvest until mid-January, I might not have cutting ready. First grow may have to be from seed. Update later.
3x3 Afgooey Autos and clones from previous grow - Afgooey #1 and #2 are firing on all cylinders. #2 running a bit acidic (>5), so flushed back to neutral with roughly 7-8 gallons of fresh rain water ph at 7.0 to 7.2. Same with clones (i.e., ph very low). Flushed with fresh rain water too. A couple days later plants look so much better. Wait till plants nearly dry before next watering. Trimmed and cleaned up three of the clones growing weird. Felt a bit like trimming a bonzai tree. Let's see how they respond.


Likes
5
Share


@Weedseed
Follow
Llevo poco tiempo pero la verdas que bastante bien, cada vez vamos aprendiendo mas
Likes
12
Share


@Socal6pak
Follow
GROWING REALLY WELL. THIS WEEK REALLY BOLTED. 4 OUT OF 5 SPROUTED OUTDOOR. NOW THIS IS TRUE OUTDOOR. B/C I POP THE SEED OUTDOOR. IN MY EXPERIENCE IT IS EASIER TO SPROUT THE SEED IN A TENT BECAUSE MORE CONTROLLED ENVIRONMENT HIGHER RATE OF SPROUT. THESE GIRLS IS DEFINITLY GETTING BIGGER. BUT STILL KINDA SMALL FOR 3RD WEEK. AGAIN, NOT GONNA TRAIN THESE. I WANT TO SEE HOW TALL THEY WILL GROW W/O TRAINING. WILL IT REALLY REACH OVER 1M FOR ME?
Likes
11
Share

@ThatsmyGrow
Follow
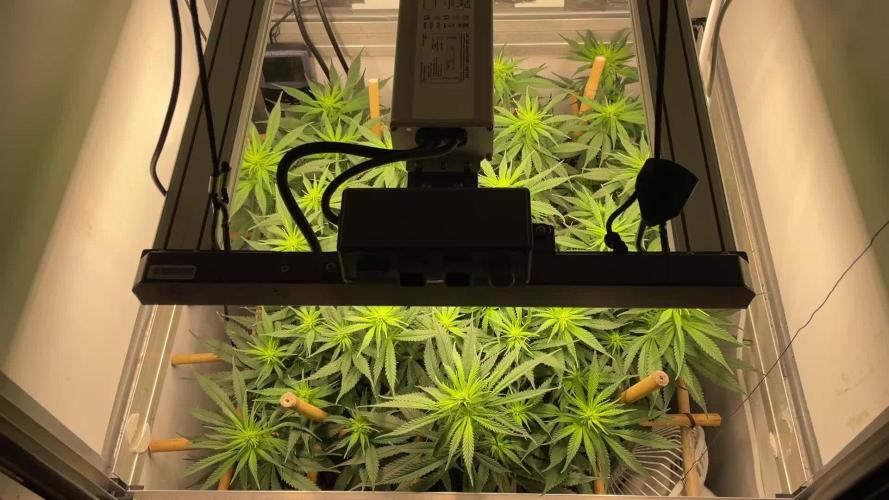
🌱 Week 3 – Gorilla Cookies Auto Pheno Hunt
Another week down and the differences between the phenos are becoming more obvious every day 👀🔥
The environment stayed very stable this week with temperatures, humidity, and VPD remaining consistent. Because all plants are growing under the exact same conditions, it’s really interesting to see how differently each phenotype develops genetically.
📈 Current observations:
Several phenos are already reaching close to 30 cm in height
Meanwhile, some smaller phenos — especially Pheno #6 — are still around 13 cm
Leaf structure and overall plant shape continue to vary a lot between phenos
Growth vigor is clearly different from plant to plant now
💧 Feeding & maintenance:
This week the plants received their first proper feeding with around 4 liters of nutrient water.
Some phenos seem to react more sensitively to the nutrients, as a few plants are starting to show slight brown leaf tips, so I’ll keep a close eye on them over the next days 👀
I also removed more large fan leaves to improve light penetration and allow the lower branches to develop more evenly.
📊 Current environment:
Temperature stable around 26°C
Humidity staying between 63–65%
VPD maintained around 1.3 kPa
Light intensity remaining at 35%
Now I’m really curious to see when the first flowering signs will appear 🌸🔥
💬 Which pheno would you pick so far?
Likes
5
Share


@CanarianGrow92
Follow
First week of flowering for the girls.
We started with some master bloom from Xpert nutrients and continue with master root also from xpert nutrients.
We placed a net above the poants to guide some of the taller branches and create a more equal canopy.
We defoliated some lower leaves and for the rest it looks quite good, some plants showed a little sign of overfeeding so we lower the dosis this week.
Likes
4
Share


@DatGuyGrows
Follow
The hairs are really showing right now and a slight fruity perfume is filling the grow closet. The bright colors glisten and captivate and I just stare and stare. In between dunk feeds I do regularly top pours. The plants are still short. Not much of an early flower growth spurt. But the bud sites are looking healthy and sticky already so I expecting some top shelf, even if it’s not much of it 🤣

Likes
21
Share


@Staffedition
Follow
Привет друзья. Моей растихе сегодня 146 дней
20.10 перевёл свет в режим 12/12
Начал применять LST технику на 19 дне, а 18 августа добавил ДЕФОЛИЗАЦИЮ
С 20.08 ДЕФОЛИЗАЦИЮ
С 20.08 LST технику
На сегодняшний день влажность 54%
5.09.2023 заметил высокий Ph 7.9
С 48 дня Ph не ниже 5.8
На сегодняшний день Ph 6.0
Начал кормить с 60 дня Canna Terra Vega
PPM 870
Всем мира и добра!
Не забудь поставить лайк❤️, если понравилась как прошла неделя
И читайте наш TELEGRAM: https://t.me/smail_seeds
#Smail_Seeds 😀

Likes
2
Share


@MrGreen_theOG1978
Follow
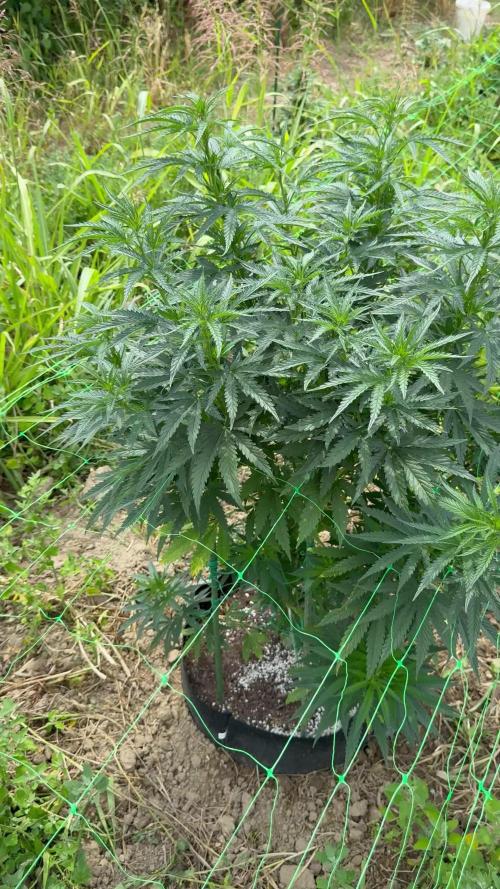
Got the scrog net added and super cropped. Probably let them go another week then flip to flower. It's been a pretty great experience with flora flex pH has been stable haven't needed to use the pH controler. Top off with 5 gallons of water every few days. I do over fill the buckets a bit they come up to the bottom of the net pots.
So stick around the fun is only beginning

Likes
65
Share


@Dendegrow
Follow
Week 4 update! 🌱 Week 3 is done, and the ladies are now three weeks into their flowering phase. So far, everything has gone really well. However, one bud and the plants in the front showed slight signs of potassium overfertilization, which likely caused a calcium uptake issue and led to minor necrosis.
No worries, though – today I completely flushed the entire system and replaced it with a fresh solution. With this reset, everything should be back on track 💪💧.
On top of that, I decided to bring out an old Cree& Osram LED lamp as a booster. This will provide the two smaller front plants with more light intensity so they can metabolize the higher nutrient levels more effectively 💡🌿.
Everything is looking great so far! Stay tuned, follow along, and let’s see how this journey continues 🌺📸.
Woche 4-Update! 🌱 Woche 3 ist geschafft, und die Ladies sind jetzt drei Wochen in der Blütephase. Bis jetzt lief alles super. Eine Bud und die Pflanzen vorne zeigten jedoch leichte Anzeichen von Kalium-Überdüngung, was wahrscheinlich zu einer Kalzium-Aufnahmehemmung geführt und leichte Nekrosen verursacht hat.
Kein Grund zur Sorge – heute habe ich das komplette System gründlich durchgespült und die Lösung durch eine frische ersetzt. Mit diesem Reset sollte jetzt wieder alles reibungslos laufen 💪💧.
Außerdem habe ich beschlossen, eine alte Cree& Osram LED-Lampe als Booster herauszuholen. Damit bekommen die beiden kleineren Pflanzen vorne eine stärkere Lichtintensität, damit sie die höheren Nährstoffwerte besser verstoffwechseln können 💡🌿.
Es sieht alles richtig gut aus! Bleibt dran, folgt mir, und lasst uns schauen, wie sich die Reise weiterentwickelt 🌺📸.

Likes
216
Share


@Ju_Bps
Follow
Hello my friends 👨🌾👩🌾,
Still in GD Jail since 2 week, hope will be solved asap, thanks for your coms and likes I can't reply you my friends.
The cherry cola 🍒🍒 grow up really fast this week, she's now biggest than hier sister Fat Banana Purple Punch 🌲🌲
Start to be frosty and sweet smeel.
💦I've given this week 2x 1.75l/plant
- Water + tera flores + canna boost
- Water only
PH@6
She need more and more water, and she tell me when I'm in late watering 😠, it's an exigent ladies,
Look a bit overfet so I've given water only this last watering and tomorrow I'll give only water also.
Lamp 75%
See you next week and have a good week end my friends 🔥👨🌾👩🌾
Thank to Mars Hydro and @marshydrococo2 for sponsoring the FC3000 ❤️❤️, as well as @Fast_Buds for sponsoring the Seeds ❤️❤️
If you want a litle discount on your Mars Hydro order, add this coupon to your cart,
Ju_Bps
Thanks community for follow, likes, comments, always a pleasure 👩🌾👨🌾❤️🌲
Mars Hydro - FC3000
https://www.mars-hydro.com/fc-3000-samsung-lm301b-led-grow-light
42 Fast Buds - CHERRY COLA 🍒🌲
https://2fast4buds.com/seeds/cherry-cola-auto