Check the winners The Grow Awards 2026 🏆 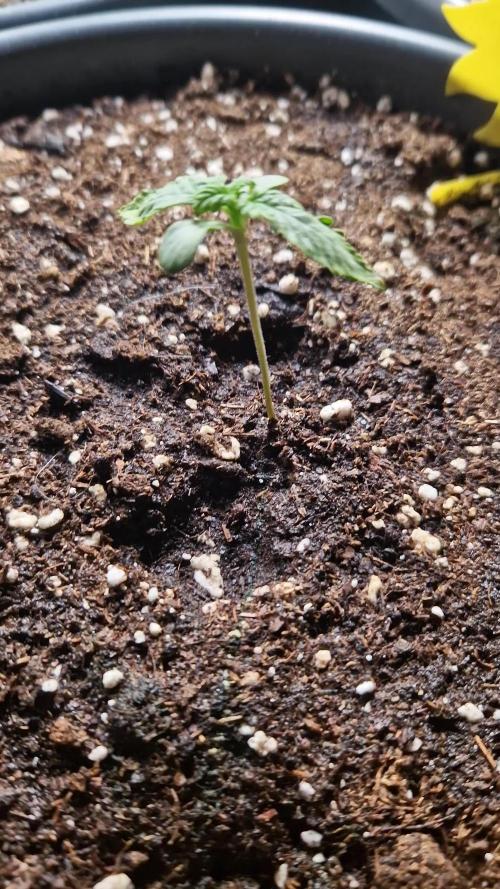


Likes
Comments
Share
@TrickzGrowz
Follow
Servus Moin!
Die Blätter zeigen leichte Anzeichen von Stress. Sie entwickelt sich auch eher langsam.
Likes
5
Share
@CanadianFillmore
Follow
Start of week 4. Week 3 went very well, even though this girl is losing more leaves that the OG kush, they yellow and die quicker, she's still developing nice bud sites and is starting to stank and get sticky.

Likes
34
Share
@Roberts
Follow
FBT 2308 is growing great under the Medic grow mini Sun-2, and in the Agrogardens nutrition. She had her first lst today. Plus she had a good root pruning. She is looking really good so far. Thank you Medic Grow, Agrogardens, and Fast Buds. 🤜🏻🤛🏻🌱🌱🌱
Thank you grow diaries community for the 👇likes👇, follows, comments, and subscriptions on my YouTube channel👇. ❄️🌱🍻
Happy Growing 🌱🌱🌱
https://youtube.com/channel/UCAhN7yRzWLpcaRHhMIQ7X4g

Likes
18
Share
@growingpepini
Follow
This girl is exploding in the last weeks.
The buds are getting so thick finally and our expectations for harvest are getting better than last week.
We are not feeding her a lot as we already want her to suck up everything the soil already has. 👇
The weather here is also pretty humid, she is not showing signs of water lack.
I would love to hear from anyone opinions on the maturation point. How ready is she? 🙌
This is our first time with a lens so we can't really tell just by looking at it.
hope you enjoyed, see you next week! 😛😁
18-10
leaves are looking really bad, looking for some advice


Processing
Likes
74
Share
@Mr_Maes
Follow
We are officially in full bloom. The have been enjoying 6-7 hours of sun light per day for about 4 days now, then brought back in under the cobs. The girls are all exploding with growth and stacking what I expect to be huge buds.


Likes
4
Share
@Wescoas
Follow
Let the girls do their thing for the most part this last week. Started to stack up real nice, started to notice white pistils coming in. After 2-3 days there were more popping up and some beginning to flush to orange. Decided to LST and defol one last time, watered without any nutes. Today marks week 5 with the ladies, and I will officially say they are ending their veg cycle and transitioning into flower. Cranked the fans up tonight to circulate more air, tapering humidity down. Been pretty easy going so far

Likes
9
Share
@Growbody
Follow
Tag 76: Ich weiss, 11 Wochen haben 77 Tage, aber so groß wird der Unterschied nicht sein, zwischen heute und morgen. Allerdings für die Wurlz schon, heute wurde Sie das letzte Mal gedüngt. Nur ganz wenige weisse Blütenfäden, wenige klare Trichome aber auch wenige Orangefarbene. Die Blüten lassen sich kaum zusammendrücken, so fest sind die. Ab morgen wird blank gewässert. Der Geruch im Growroom ist stärker geworden, ich kann nicht sagen, welche Pflanze am stärksten riecht, deshalb bei allen Geruch = stark.

Likes
18
Share
@Grower_Of_Persia
Follow
week intel:
its time to harvest some of plants the ones that is mature enough. indica dominant plants will done first always so we should harvest them first
because my base nutrients and one of boosters was salt based, i'll do flushing this week to get some relieve to plants in the last days
stresses :
flushing
Drought stress via watering only one time with flushing this week
feeding:
day 1 : i flushed them with Advanced Nutrients Flawless finish and adjusted ph
day 3 : no more feeding from now on
day 5 : no more feeding from now on
guide of the week :
i harvest in 2 parts : first i harvest top of the branches and will let the lower buds to ripe another week then ill harvest the second wave.
indica dominant plants will get done 1 or 2 weeks sooner than sativa dominant plants that will often takes more than 8 weeks so be aware to harvest them sooner.
my dry and cure style is this:
3 days of hanging upside down to get water activity lower to around 0.6 in 50% humidity and 26 C temp (i know its a little high but we are in a hot summer right now and i cant get it lower even with air conditioner) and then after 3 days of drying i remove leaves and stalks, trim buds and move them to jar for the rest of their life :D . and in the first 4 days of curing i open the jar door and let hem get some fresh air in the jar for about 5 minutes and close the jar door again, after 4 days of curing like that buds are smokable but they will get better as they getting cured about 1 month.
im happy as hell with this harvest :D.

Likes
113
Share
@PEAKYPLANTERS
Follow
gentlemen .... start dancing by flushing .....
I have had many difficulties in the last few weeks .... one of these is too hot ... but my girls have hexagonal balls and go on their way!
prosperous and abundant crops at all ... see you around
Likes
35
Share
@XxxAuto
Follow
Again thanks too Fastbuds, for this amazing strain.... it's SOOOOOOOO fucking good !!!!!!!! 😘😍 and a beautiful lady
Likes
7
Share
@LSDR1
Follow
Interesting to see how different the phenotypes of the same strain can look. Pretty much doing the same as always. Quite a lot of light. Some height issues. but whatever. Will likely take 2-3 more weeks due to the slow flower development early.

Likes
27
Share
@RDWCGrowing
Follow
1/20/2023- So much to do pre grow and over the next 16 days, absolute first order of business is that I have to take down my current Grow---TIMBER-- Then I have a list of things I have to get done in order to be ready to start this grow 1 Feb.
With that said
T - 2 days until start 48 hour Flush
T - 2 days until Start 48 hours of Light
T - 4 days until TIMBER!!!
Items that need to be done before 1 Feb 2023
1. I need to clean the tent out
2. I need to clean the equipment- Proper Sanitization between grows in Hydro is a must!!!
3. I need to get the hole in the ceiling above my tent repaired- For my last grow I had a deep sink installed in my grow room, to make Hydroponics a little bit easier and have a water source in the same room. The seals on the pipes they were installing broke and leaked through the ceiling causing some damage all the way across my grow room, I was already weeks into my grow and couldn't risk them working above my tent and it would have been very awkward positon for them to be working in as well, so have to get this done quickly between chop and germination.
4. I have to install my new light- I was using a Vivosun 4000 and for this grow I am switching up to a Spider-farmer SF 7000.
1/20/23- For this upcoming grow I am working with M/F photo seeds so I ordered 4 Sex determination kits. I recieved my my 4 Sex determination testing kits from Rimrock Analytics today. I will be using these to test my plants at week 2 of Veg so that when/if I take clones I know I am taking them off females. As well as I don't want to accidently pollinate my tent during this grow I am looking for big beautiful buds not seeded buds. :-)
1/24/2023- Harvest of current grow- Started at 2:00pm and finshed wet trim and firt batch into the freeze dryer.
1/25/2023- Next batch into the freeze dryer and cleaning all my equipment for this Grow.
T-1 Day until the workers are supposed to be here to fix the hole in the Grow Room.
T-3 days until I instll my new Gorilla Grow Tent and my New Light Spider Farmer SE-7000 for this grow.
T-7 Days until Start of Germination
1/26/2023- Harvest is done ran through the Freeze dryer and dry tim completed.
1/27/2023- Grow Room repairs completed. Hole is gone Letting the paint dry before I install the new tent.
T-2 days until Install the New Gorilla Grow tent and the new Light
T-3 days until I put the hydro equipment in the new tent
T-5 days until Germination
1/29/2023- Day 0- Final Pre Germination activities
Germination Start T-3 days
The paint on the ceiling was dry and it was time to finish prepping for Germination. I got the following items knocked off my list.
New 4X4 Gorilla Grow Tent is up and ready
New Spider Farmer SE-7000 Light is installed- Thanks Moony Grows for the suggestion and for the Code that got me some money off and free shipping (Moonygrows)!! I turned the lights all the way up to max and set the timer to 18/6 0600-0000. I will keep an eye on the temperature and humidity without my plants and see how hot it gets with the new light.
I put my Hydro system back together and put in 40 gallons of water into it, time to monitor for leaks the next few days.
I Setup my cloning machine for Germination Days 3-11
1/30/2023
let me break down the situation, ROOM in the TENT.. Enough said.. No really I tried putting my exhaust system up in the new tent with my new light, The light is so big corner to corner that it really didn't give me enough room for the lights be be raised, with the exahust hanging the buckets my plants are Starting in are 2 and 1/2 feet off the ground, great for plenty of room for roots but not so great for upwards space for the plant to grow. In a 6' 11 tent with the exauhst in side and hanging that only gave me a little over 4 feet of grow room to play with. My last grow if you saw my diary, anyone could tell I was struggling to keep the buds off the lights. No good, Since space was such an issue I was running my carbon filter inside on the ground but It really needed to be up sucking the heat out not shooting the cool out. With that setup I was sucking air through the filter and pushing it out the tent at a bottom exhaust hole cold out. Wasn't doing me any good for my heat. I was hitting temps of up to 85 degrees. I bought a portable AC unit and have been running it in the grow room to try and keep temps below 85 and I have had to lower the power on my lights during grow also not ideal.. With that said a friend of mine MoonyGrows (Check out his diary) took the time to look at my issue send me a picture of my grow tent setup with detailed instructions on how to suck the air out from the top but putting my filter and fan on top of my tent so no room issue and I am sucking the air out from the top where the heat is instead of pushing the air out from the bottom where the cool is... THANK YOU MoonyGrows For taking the time to help me get this straightened out.. Now I have room and I have the exhausts working right and now my temps with everything at 100% are topping out at 80 this dropped the temp by 5 + degrees at 100% max.
T-2 days until Start of Germination
Prepped my seed tray with humidity dome
Prepped my Rapid Rooter plugs. I Used RO water, and I added a few drops of Hydrogen peroxide to Oxygenate the water. I then PH balanced between 5.7-6.0 the same that they will be getting in the Cloning Machine and when they get to thier final grow pod. I perfere the 5.8x range and I hit 5.84 for these rapid rooters. If you want to see a complete video on the process HowWeedGrow has an amzing video that shows step by step how to do it and explains it better than I ever could including how to plant the seeds. Which I will cover when I get to that step on Wed. https://www.howweedgrow.com/how-germinate-weed-seeds-cannabis-rapid-rooters/
1/31/2023
T-1 day until Germination Start
All set and ready have my Rapid Rooter plugs ready to go have my seeds out.. Have my seed tray warming up tonight. Tomorrow morning right into the Rapid Rooter then strait into the tray. I will spray the dome to start the humidity in there.
2/1/2023
Germination Day!!
Let the games begin!
0600am Put the seeds into the Root Riots. And then put the seeded Root Riots into their first home the Seed tray. I have them under the light 24/7. Sprayed the dome
7:30pm Sprayed the Dome to keep humidity going on the dome.
2/2/2023
Day 1 of Germination
Sprayed the Dome in the morning
Sprayed the Dome in the evening
2/3/2023
Day 2 of Germination
Roots are starting to come out the bottom of the root riot plugs and the heads are slowly popping out of Number 4 just below the surface.
Afternoon- Number 4 has popped up
Evening- Number 3 has popped up as well. Happy Dance!!
2/4/2023
Day 3 - Germination
Surprise Surprise Surprise- all 4 have now poked their heads up.. Happy day!! 100% Germination succeeded.
Now major milestone to track is how many are female and how many are male.
I will take look at the roots this afternoon/evening and see if they have enough root to go into the cloning machine for the next 7 days before they go into their Hydro Pods.
Day 3 - Germination - Evening..
Roots looked good and they were tall enough to make it into the cloning machine.
Now that they are all in the cloning machine I have switched the lighting to veg state 18 on 6 off.
2/5/2023
Day 4 - Germination - Morning
All the Ladies (fingers crossed) looking great stretching nicely and look nice and green, Photo synthesis underway....
UPDATE!! After a very interesting POD cast on FSTS by Dr. Bruce Bugsbee from Utah University, I have shifted my lighting to 24 hours on through seedling and then I am going to shift to 20 hours on the rest of Veg.
2/6/2023
Day 5 - Germination
While Checking on my conditions inside the new tent last night, I found that the Humidity was down to 39 Percent. I added an AquaOasis Cool Mist Humidifier, the reason I selected this humidifier is that I needed one that could be turned on and off utilizing my Inkbird Humidity Controller IHC200 that I have my Pro Breeze Dehumidifier currently running with.
Root structures are starting to get there about 1/4 of an inch.
2/7/2023
Day 6 - Germination
Everything seems on track more roots poking out of each today. They are each getting a little taller as well.
Checked in the evening and number 3 was drooping the Root riot plug on the bottome was dry and the roots were not in the water yet. I raised the water just enough that the longest root that was sticking out is now hitting the water.
2/8/2023
Day 7 - Germination
Everything looked good while checking in on them this morning number 3 is now full up and no droop again.
2/9/2023
Day 8 - Germination
T-2 days until Plant into Forever Pods and we start week 1 of Veg .. :-)
Surprising thing to me is that number 1 and 2 were later in popping then 3 and 4 but the roots are growing longer in 1 and 2.
2/10/2023
Day 9 - Germination
Number 1 and Number 2 are definitely ready for transplant today.. Based on how they were yesterday and where they are today I am hoping by tomorrow 3 and 4 are ready. Today they look to me where 1 and 2 did yesterday.. I really hope 3 and 4 catch up by tomorrow since..
T-1 day until transplant to new/ final home for grow.
Need the roots long enough to have some clay down in the basket to keep the root riot out of the water and only roots in the water..
2/11/2023
Day 10 - Germination
Today they got placed in thier forever Home, 7 days from Sprout and 7 days until Week 1 Start.
PPM- 180 this is water out of the Tap
Temp Water: 70.7
Temp Tent: 77
Humidity: 40% I have a humidifier going 24/7 to try and bring this up.. I also have Humidity Domes on each plant.
2/12/2023
Day 11 - Germination
Sprayed the domes, all are looking good.. Nothing much to do at this phase but Keep monitoring the PH level in the system and making sure they have a comfortable home.
T-6 days until Week 1 start
2/13/2023
Day 12 - Germination
Sprayed the domes, They were looking a little yellow today so I moved the light down to assist. Nothing much to do at this phase but Keep monitoring the PH level in the system and making sure they have a comfortable home.
T-5 days until Week 1 start
2/14/2023
Day 13 - Germination
Sprayed the domes, They were looking a little Florissant yellow today, with what looks like slight burn on the tips, I talked with a fellow grower and we agreed that It was probably that I was drowning them, Yes you can drown you plants even in Hydro, but only early on.. :-) It usually happens with the water being too high, which soaks not only the roots but the medium (root Riot plug in this case). I lowered the water from touching the bottom of the pot to about 1" away. This will probably take 3-4 days to resolve. I will continue my daily monitoring.
T-4 days until Week 1 start
2/15/2023
Day 14 - Germination
Sprayed the domes, continue my daily monitoring they look a little darker green instead of lime green now that I lowered the water levels in the system, so I think that I might have resolved the issue but it will take a few days for recovery to happen.
T-3 days until Week 1 start
2/16/2023
Day 15 - Germination
I looked in on them this morning, 3 and 4 look like they are doing well and recovering nicely. Number 1 not so much it has brown spots on the leaves, this very well can still be a side effect of the overwatering but I decide to go ahead and add Nutes earlier than I was planning just incase. I was going to wait until Saturday but I think intervention is necessary now especially after drowning them early on.
I added 1/2 what I am planning on adding for week 1 start. I also think I am going to adjust my chart to add 1/2 2 days after plant from now on. I don't think it would hurt it to have some Nutes to pull from.
.25ml/Gal Calmag = 12.5ml
1ml/gal GH FloraMicro= 50ml
1ml/gal GH FloraGro = 50ml
1ml/gal GH FloraBloom = 50ml
T-2 days until Week 1 start = I will drain the system and start it over on Saturday with Week 1 Nutes.
2/17/2023
Day 16- Germination
I didn't even want to post today after looking in on them this morning, 3 of the 4 are now showing signs of dronwing.. Brown spots on the leaves, the water levels were still too high.. I drained about another inch out of the tanks.. Will see how quick they recover.. I start week 1 tomorrow and will have to ensure my water levels are at least 1" away from the basket on this round.

Likes
200
Share
@Ferenc
Follow
Day 65, 14th of November 2020:
Amazing week....
RQS Wedding Gelato does not strech a lot and pistils coming out nicely....
Original Sensible Seeds has amazing gentics they are so strechy except Black Ghost OG, rest of them crazyyyyyyy..... I also broke two of the sides from Gelato Original Sensible Seeds but fixed with tape and now all good lol 🤣🤣🤣
Pre flowers out and I really hope they stop growing lol.
I also noticed that the Original Sensible Seeds strains have nice purple colours of the fan leave's stem.
All the same fertilization happens every 2nd day with the mix above and ratio.
One more thing:
I set the lamp 15 minutes shorter to switch off earlier so they receive 11:45 of darkness. I would like to imitate the nature when longer nights come with time till the 4th week (when they will receive 13 hours darkness a day 15 minutes minus 4 times = 1hour) so every week 15 min longer darkness for 4 weeks and then back to 12/12 to have bigger buds from the 4th week....

Likes
89
Share
@nonick123
Follow
Dia 1 (17/01): La semilla ha germinado! (+3 días) 💥 Enciendo la lámpara del armario a PPFD 225
Dia 2 (18/01): Fuerte y vibrante plántula
Día 5 (21/01): Las plántulas se han estirado ligeramente, por lo que subo a PPFD 300
Día 8 (24/01): Las chicas están asomando las raíces por la parte inferior de la maceta. Parecen fuertes!
Nutrients by Gen1:11 - www.genoneeleven.com
Substrate PRO-MIX HP BACILLUS + MYCORRHIZAE - www.pthorticulture.com/en/products/pro-mix-hp-biostimulant-plus-mycorrhizae
Likes
16
Share
@eldruida_lamota
Follow
Unos esquejes brutales pero las condiciones del cultivo no fueron óptimas tuvimos retrasos al principio con el crecimiento problemas de nitrogeno, algo de humedad alta al principio de la floración y aun así salió el producto muy bueno, tanto de sabor como de cómo con.
Sencillez es fácil de cultivar es rápida de cojones y además es resistente.

Likes
12
Share
@ScrogFreak
Follow
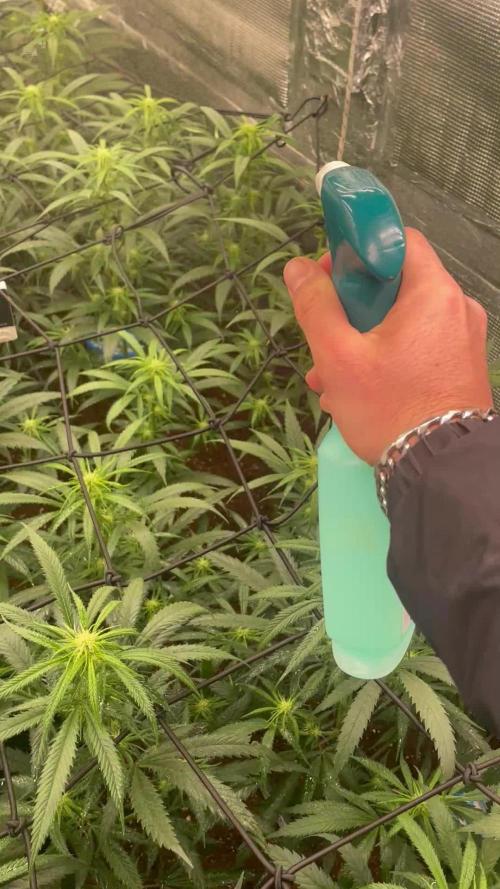
The SCROG net was installed on the last day of Week 6, I included a couple pics from that night, to compare with how the plant looked the next day, which was the first day of Week 7. My nerve damaged fingers caused me to be a little rougher with her while the net was going on than I like, but as you can see, she bounced back very quickly and was reaching for the light less than 24 hours after being mangled lol.
I will continue to systematically defoliate the upper canopy every night or two for the next several weeks, and will completely strip most everything below the net. Every night or two I'll tuck any branches that need tucking, and will remove any fan leaves covering bud sites.
She spread out pretty well in the net, and truth be known i probably could have gotten away with a 6 week veg after, plants are a decent size in the net with the stretch left to go. Flip happens at the end of Week 7
The manganese issue seems to be getting much better by the end of the week. Will keep my pH levels at 5.8 for the remainder of this grow, and any subsequent grows.
I also devised a fan mount to save on space in the net. Instead of standing the fan, i simply cut a piece of 1x3 to length, drilled 2 holes in each end, large enough for zip ties to pass through. then I simply zip tied it to the tent poles, took the legs off the fan, and screwed the base to the board. I placed a piece of foam on top, as the screws were a shade long and I was afraid the small protruding tip would eventually puncture the tent. Works much better than expected. No movement in the mount at all.

Likes
8
Share
@carlitoshaze44
Follow
Así es como empezamos la tercera semana,seguimos con humedad alta pero la vamos controlando..
Estos días da buen tiempo la humedad en la calle será mucho más baja así podré meter aire sin tanta humedad..
De momento todo bien en el cultivo ningún problema hasta la fecha.
Ya podéis ver,y comentar sobre algo que veáis que yo no!
Como dicen! Ven veinte ojos mejor que dos!
🖖
Día 12
Último fungicida prevención mutritis,hongos
humedad.
Primer riego foliar hormonas producción de flores.
🌹
Día 13
Nada en especial solo observar si veo algún cambio tras las hormonas,aún no veo grandes observaciones fuera de lo natural del paso de los días.
En el día de mañana por lo que me recomendó el fabricante se verán los resultados a la vista!
Comentar que seguimos con la iluminación al 100x100 de capacidad
Marshydro sp3000 x2
Hero led Ignator t720
Yxo led 60w ir+un espectro completo
En la siguiente semana me llega el nuevo driver de philips para poder conectar la lámpara de IR que pude adquirir a Yxo nuevamente! Lampara led espectro completo + IR 70w .
Me vendrá muy bien para el pequeño espacio de la puerta que necesita más iluminación para poder desarrollar bien esas dos plantas,de la entrada.
La humedad fue cosa del pasado.
Evite el uso de desumificador eléctrico añadiendo varios de sales,deciros que funcionan muy bien no dan un control exacto pero mantienen una humedad interior estable para todo el periodo de floración!
50% de humedad lo demuestra!
Hoy añadi un poco más de sustrato. 110 litros exactamente sobre la cama de cultivo que tenía de topcrop con humus de lombriz,tierra diatomeas y alimentada con npk.
Después de eso tengo en mi cama de cultivo 810 litros de sustrato para mis 44haze. 💐
Saludos
Día 14
Anulado el intractor,ya que el propio extractor mete aire fresco por las rendijas de ventilación..
En lo largo de la noche iré viendo el resultado en datos..
Ya coloque los soportes para la nueva iluminación que en estos días llega su driver de sustitución
E visto que algunas plantas en estos dos días están en 67-70cm..
Ya colocado el sistema de riego para evitar más pisadas en el cultivo ya que algunas se realentizaron por pisar encima de sus raíces..
Le e metido una pequeña poda de bajos para airear más la zonas bajas del cultivo.
Pequeño riego de folacion con remedio de agua azúcar para dos que estaban más estresadas.
Día 15
Hoy era día de regar pero el sustrato aún parece húmedo en gran proporción aplazare el riego.
Día 16
Hoy me acerqué a ver las niñas en caso de que necesitaran algo..
Se ve todo correcto parece que no tienen mucha sed.. llevamos todo el día de alta humedad y lluvia en el exterior..
Las dejaré hoy sin riego también.
El sustrato está bien alimentado.
Mañana seguramente se presente el armario con una plantación pidiendo agua a gritos!! Jejeje.. así comerán con más ganas!,veremos qué tal..
Dia 17
Perfecto,las plantas se han mantenido muy bien para estar el sustrato ,prácticamente casi seco..
Se le aplicaron 32litros a la cama de sustrato con el riego de goteo
Y la humedad se ha mantenido bastante bien .
Una vez termine el riego la temperatura en el armario cayó considerablemente,llegando este a 16 grados.
Una vez se cierra todo vuelve a sus parámetros controlados de 23/24 grados.
Día 18
Hoy es el quinto día de la tercera semana,aplique el riego ayer en proporción de 850ml por planta.
La humedad subió por unas horas a 62%
Después de las 24 horas del riego el área se encuentra en un 55%.. esta noche llegará a el valor determinado de 48/50
Las plantas están desarrollando las formaciones
de flores muy rápido!
En unas semanas veremos!,algunas pequeñas en este último riego del día 17,sufrieron un poco más debido a la subida de la ec .
Esta vez trabajamos con 1200 totales.
Que a muchas le sentaron fenomenal pero a otras cinco no tanto..pero es lo que tiene el riego por goteo..
Día 19
Dia6 de la 3 semana de floración
Hoy hemos pulverizado de nuevo las hormonas para producción de flores 0,3ml/l y bicarbonato sódico 1,5grm /l. Preventivo que es el bicarbonato de sódico contra algunos insectos y buen aporte para las plantas en carbohidratos.
Tengo que decir que que volveré a pulverizar las hormonas y el bicarbonato sódico a mitad de la 4 semana de floración finalizando hay los pulverizados.
En adelante todo será a través de riego,o en caso excepcional de alguna aparición de plaga, o algun hongo malicioso..
Podéis ver las plantas.
Los chicos se comunicaron en videollamada para observar cómo llegaban a la media floración!,solo obtuve buenos comentarios!
No soy solo el que las ve bien!,tambien mis otros compañeros que trabajan con el mismo clon también lo piensan.. veremos quien saca el máximo potencial!
Tengo que añadir,que me llegarán lombrices californianas para añadirlas a la cama de cultivo!
Likes
22
Share
@bypado_farm
Follow
Day 57:
Watered each plant with 1L with nuts
1588 ppm, 3380 us/cm, 3.3 EC (purple punch, strawberry banana, wedding Cheesecake)
1690 ppm, 3595 us/cm, 3.5 EC
(gorilla cookies)
2 different feedings for the 10 plants
Day 60:
Watered each plant with 1L with nuts
1563 ppm, 3325 us/cm, 3.3 EC
Day 62:
Watered each plant with 1L with nuts
1726 ppm, 3712 us/cm, 3.7 EC (purple punch, strawberry banana, wedding Cheesecake)(I gave them more than usual, by mistake)
1528 ppm, 3525 us/cm, 3.5 EC (gorilla cookies)
2 different feedings for the 10 plants
Day 63:
Watered each plant with 1L with nuts
1563 ppm, 3325us/cm, 3.3 EC (purple punch, strawberry banana, wedding Cheesecake)
1523 ppm, 3301 us/cm, 3.3 EC (gorilla cookies)
2 different feedings for the 10 plants
Day 65:
Watered each plant with 1L with nuts
1518 ppm, 3210 us/cm, 3.2 EC (purple punch, strawberry banana, wedding Cheesecake)
1359 ppm, 2891 us/cm, 2.9 EC (gorilla cookies)
2 different feedings for the 10 plants
Next feeding I will start to flush some plants, 1st week with flawless finish, 2nd week clean water, 10x the pot, 150L each
Day 67:
Watered each plant with 1L with nuts
1379 ppm, 2908 us/cm, 2.9 EC (1 purple punch, wedding Cheesecake)
1250 ppm, 2687 us/cm, 2.7 EC (gorilla cookies)
285 ppm, 606 us/cm 0.6 EC (3 strawberry banana and 2 purple punch) (2L each)
3 different feedings for the 10 plants
Started to flush all the strawberry banana and 2 purple punch with flawless finisher. (1st week flawless finisher, 2L each, 2nd week clear water, 150L)
Likes
9
Share
@Vega0284
Follow
Had a hell of a week with Blue Dream 2.
In the previous week I had added some molasses to the nutrient solution, 2 of the 3 plants took very well to it. However Blue Dream 2 got a real bad case of root rot. I ended up having to trim up the roots, and do a hard rinse on them. I flushed a bit with Hydrogen Peroxide and then let it soak in a resevoir with nothing but hydroguard for 36 hours. The other two had a small outbreak, but nothing near Blue Dreams 2. All in all a few days later she has recovered.
Thats the biggest reason I added the tomato cages, blue dream 2, with weak stems already (got to find a silica supplement next run) she couldn't hold up the buds. After she recovered I just put the cages around all 3.
I want to say 2 more weeks, but am still super green to all this, I'll post pics of the buds and tell me what you guys think.
Cheers
Likes
8
Share
@GERGrowDesigns
Follow
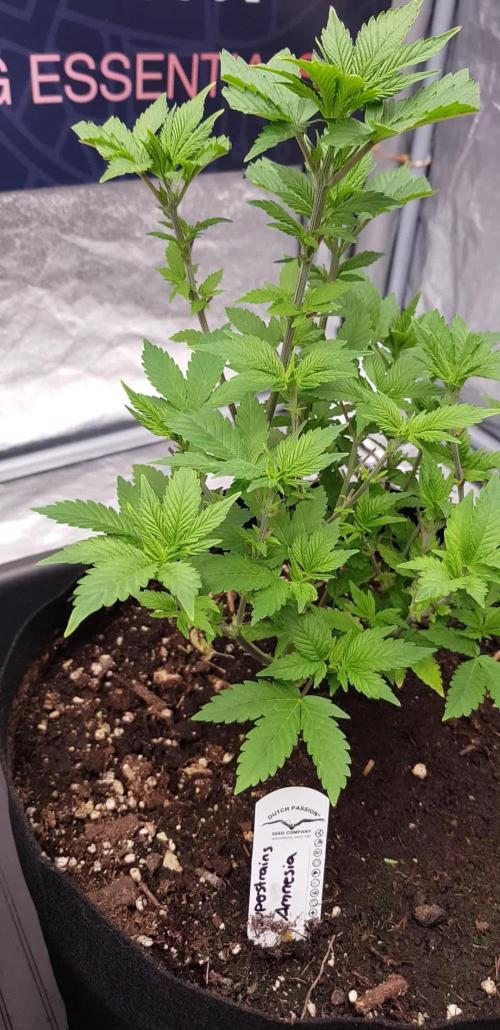
Welcome to Veg Week 5 of SuperStrains Amnesia
I'm excited to share my grow journey with you from my
SuperStrains Project . It's going to be an incredible ride, full of learning, growing, and connecting with fellow growers from all around the world!
For this Project , I’ve chosen the Feminized Photo Strain Amnesia :
Here’s what I’m working with:
• 🌱 Tent: 120x60x80
• 🧑🌾 Breeder Company: SuperStrains
• 💧 Humidity Range: 60
• ⏳ Flowering Time: 10 Weeks
• Strain Info: 25%THC
• 🌡️ Temperature: 26
• 🍵 Pot Size: 20
• Nutrient Brand: Hy-Pro
• ⚡ Lights : 600W x 2
A huge thank you to SuperStrains for allowing me to try my Best with this amazing collection from Photo Strains they managed to Sponsore side by side with theyre Hy-Pro Nutriets . Big thanks for supporting the grower community worldwide! Your genetics and passion speak for themselves!
I would truly appreciate every bit of feedback, help, questions, or discussions – and of course, your likes and interactions mean the world to me as I try to stand out in this exciting competition!
Let’s grow together – and don’t forget to stop by again to see the latest updates!
Happy growing!
Stay lifted and stay curious!
Peace & Buds!
