


Likes
Comments
Share

@Aleks555
Follow
Hello friends! 🌱
White Domina from Kannabia Seed Company — Day 23
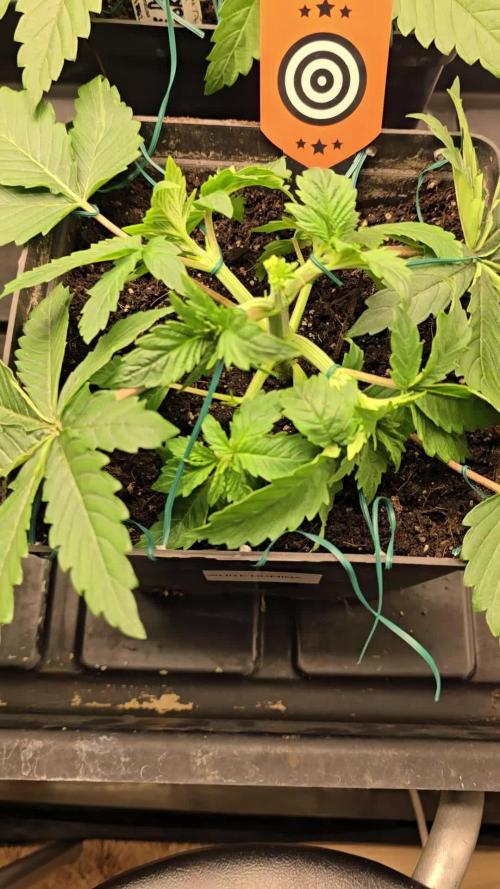
Everything is going great, and she’s really spreading out — over 30 cm wide now! She looks amazing, with big, healthy leaves, already showing more than 6 fingers per leaf. After topping, she has gained noticeable mass in just 6 days — a real chunky girl 💪
She has very beautiful leaves with an interesting, almost round shape, reminding me a bit of strawberry leaves. The color is rich and vibrant, and she’s already starting to give off a light aroma — not strong yet, but definitely noticeable.
Also, take a look at the leaf shape and how thick the stem has become — she’s building a very strong structure.
Watering: 0.5L every 2 days
Day 26 — we performed defoliation
Today we stretched her out again and will continue to enjoy watching her grow.
Lighting: 50% power, about 45 cm from the top
Temperature — Day: up to 27°C | Night: 19–22°C
Humidity — around 80% day and night
We are not using any nutrients yet, as the soil is already rich and provides everything she needs for now.
We really love how she looks — what do you guys think? Drop your comments, ask questions, don’t be shy! Let’s share experience and knowledge — we’re all here to learn and help each other 🤝

Likes
38
Share


@J_diaz420
Follow
Enamorado totalmente de cada una de estas genéticas, ésta me tiró 4 monstruos de plantas 😍

Likes
8
Share

@carlitoshaze44
Follow
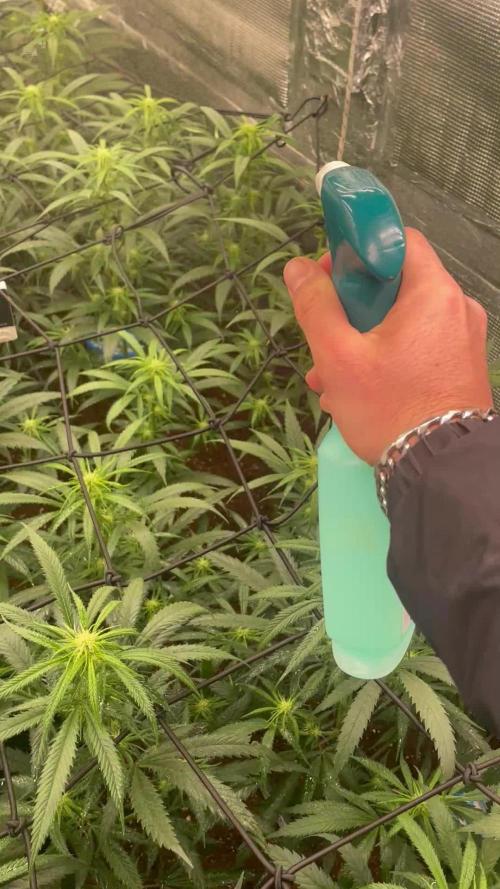
Así es como empezamos la tercera semana,seguimos con humedad alta pero la vamos controlando..
Estos días da buen tiempo la humedad en la calle será mucho más baja así podré meter aire sin tanta humedad..
De momento todo bien en el cultivo ningún problema hasta la fecha.
Ya podéis ver,y comentar sobre algo que veáis que yo no!
Como dicen! Ven veinte ojos mejor que dos!
🖖
Día 12
Último fungicida prevención mutritis,hongos
humedad.
Primer riego foliar hormonas producción de flores.
🌹
Día 13
Nada en especial solo observar si veo algún cambio tras las hormonas,aún no veo grandes observaciones fuera de lo natural del paso de los días.
En el día de mañana por lo que me recomendó el fabricante se verán los resultados a la vista!
Comentar que seguimos con la iluminación al 100x100 de capacidad
Marshydro sp3000 x2
Hero led Ignator t720
Yxo led 60w ir+un espectro completo
En la siguiente semana me llega el nuevo driver de philips para poder conectar la lámpara de IR que pude adquirir a Yxo nuevamente! Lampara led espectro completo + IR 70w .
Me vendrá muy bien para el pequeño espacio de la puerta que necesita más iluminación para poder desarrollar bien esas dos plantas,de la entrada.
La humedad fue cosa del pasado.
Evite el uso de desumificador eléctrico añadiendo varios de sales,deciros que funcionan muy bien no dan un control exacto pero mantienen una humedad interior estable para todo el periodo de floración!
50% de humedad lo demuestra!
Hoy añadi un poco más de sustrato. 110 litros exactamente sobre la cama de cultivo que tenía de topcrop con humus de lombriz,tierra diatomeas y alimentada con npk.
Después de eso tengo en mi cama de cultivo 810 litros de sustrato para mis 44haze. 💐
Saludos
Día 14
Anulado el intractor,ya que el propio extractor mete aire fresco por las rendijas de ventilación..
En lo largo de la noche iré viendo el resultado en datos..
Ya coloque los soportes para la nueva iluminación que en estos días llega su driver de sustitución
E visto que algunas plantas en estos dos días están en 67-70cm..
Ya colocado el sistema de riego para evitar más pisadas en el cultivo ya que algunas se realentizaron por pisar encima de sus raíces..
Le e metido una pequeña poda de bajos para airear más la zonas bajas del cultivo.
Pequeño riego de folacion con remedio de agua azúcar para dos que estaban más estresadas.
Día 15
Hoy era día de regar pero el sustrato aún parece húmedo en gran proporción aplazare el riego.
Día 16
Hoy me acerqué a ver las niñas en caso de que necesitaran algo..
Se ve todo correcto parece que no tienen mucha sed.. llevamos todo el día de alta humedad y lluvia en el exterior..
Las dejaré hoy sin riego también.
El sustrato está bien alimentado.
Mañana seguramente se presente el armario con una plantación pidiendo agua a gritos!! Jejeje.. así comerán con más ganas!,veremos qué tal..
Dia 17
Perfecto,las plantas se han mantenido muy bien para estar el sustrato ,prácticamente casi seco..
Se le aplicaron 32litros a la cama de sustrato con el riego de goteo
Y la humedad se ha mantenido bastante bien .
Una vez termine el riego la temperatura en el armario cayó considerablemente,llegando este a 16 grados.
Una vez se cierra todo vuelve a sus parámetros controlados de 23/24 grados.
Día 18
Hoy es el quinto día de la tercera semana,aplique el riego ayer en proporción de 850ml por planta.
La humedad subió por unas horas a 62%
Después de las 24 horas del riego el área se encuentra en un 55%.. esta noche llegará a el valor determinado de 48/50
Las plantas están desarrollando las formaciones
de flores muy rápido!
En unas semanas veremos!,algunas pequeñas en este último riego del día 17,sufrieron un poco más debido a la subida de la ec .
Esta vez trabajamos con 1200 totales.
Que a muchas le sentaron fenomenal pero a otras cinco no tanto..pero es lo que tiene el riego por goteo..
Día 19
Dia6 de la 3 semana de floración
Hoy hemos pulverizado de nuevo las hormonas para producción de flores 0,3ml/l y bicarbonato sódico 1,5grm /l. Preventivo que es el bicarbonato de sódico contra algunos insectos y buen aporte para las plantas en carbohidratos.
Tengo que decir que que volveré a pulverizar las hormonas y el bicarbonato sódico a mitad de la 4 semana de floración finalizando hay los pulverizados.
En adelante todo será a través de riego,o en caso excepcional de alguna aparición de plaga, o algun hongo malicioso..
Podéis ver las plantas.
Los chicos se comunicaron en videollamada para observar cómo llegaban a la media floración!,solo obtuve buenos comentarios!
No soy solo el que las ve bien!,tambien mis otros compañeros que trabajan con el mismo clon también lo piensan.. veremos quien saca el máximo potencial!
Tengo que añadir,que me llegarán lombrices californianas para añadirlas a la cama de cultivo!


Likes
14
Share

@DogDoctorOfficial
Follow
GMO Cookies Served with Extra Curiosity ?🍪
Week 14 — Harvest Report | Fresh Frozen Experiment
And here we are.
Week 14.
Harvest week.
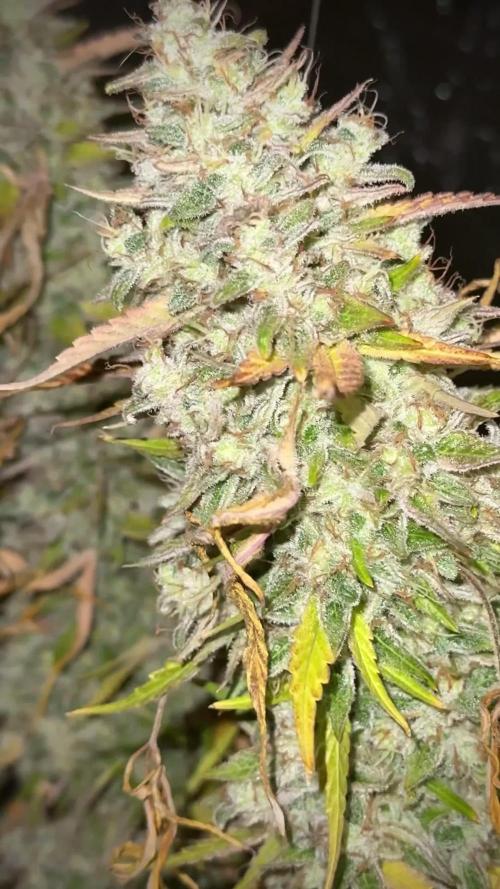
And honestly… the room looked absolutely unreal.
Before we even touched the scissors, before a single branch was cut, before the freezer bags started filling up, there was already this feeling in the room that these girls had become something special.
Massive structures.
Heavy flowers.
Long spears.
Dense tops.
Colors everywhere.
Deep greens.
Fading yellows.
Lime tones.
Hints of gold.
Dark shadows between swollen calyxes.
And then the smell…
Oh man.
The smell.
This is one of those cultivars that genuinely makes the room feel less like a grow room and more like walking into a kitchen where someone is preparing something loud, greasy, savory, and unforgettable. The GMO side of these genetics speaks immediately and unapologetically.
Garlic.
Onion.
Savory funk.
That unmistakable “food terpene” profile that GMO became legendary for.
But underneath all that aggression, there is still sweetness hiding in there too. Cookie dough warmth. Earthiness. Creamy backend notes. A weird balance between offensive and delicious that only certain genetics can truly achieve.
And honestly?
We loved it.
But before diving fully into this week, let’s do what we always do and quickly recap the journey, because by now many people arrive only at the final reports and never see the earlier stages of the diary.
So first of all:
yes… once again we divided the harvest into multiple reports 😄
And honestly, we know it starts becoming a cliché at this point.
But there is simply too much here:
* too many photos,
* too many details,
* too many observations,
* too many experiments,
* too much resin,
* and too much love for the plant itself
to throw everything into one rushed update.
This run deserved time.
From seed until now, this GMO Cookies run was grown under a 12/12 from seed cycle using the F.O.G. LED setup, inside the Mammoth Elite tent environment, with careful environmental management throughout the run. The girls received multiple rounds of LST, selective defoliation, and continuous observation to maintain airflow and light penetration while still allowing the plants to express themselves naturally.
And express themselves they absolutely did.
These plants developed huge vascular systems and incredibly thick stems by the end of flower. Once harvest began and we started cutting branches down, the insides looked almost like miniature tree trunks. Thick water highways running through the center, dense supportive tissue everywhere, strong skeletal structures carrying massive tops from beginning to end.
You could physically feel how much water and energy these plants had been moving daily.
Some stems genuinely felt more like wood than plant tissue.
And that strength translated directly into the flowers themselves:
dense,
heavy,
greasy,
stacked,
and extremely aromatic.
Now here comes the part that will probably make some people cry a little 😄
Because normally, growers harvest and dry most of their flower for smoking… while only freezing smaller amounts for hash washing later.
We did the exact opposite here.
Most of these girls went directly into the freezer.
And yes…
intentionally.
Why?
Because this plant was screaming hash potential from the beginning.
The resin texture,
the greasy leaf rub,
the finger stickiness,
the way trichomes smeared across gloves,
the density of the heads,
the aroma intensity…
everything about this cultivar felt like it was asking to become fresh frozen.
So after removing fan leaves and preparing the flowers carefully, we separated the majority of the buds specifically for freezing.
Not whole plants.
Not stems.
Not unnecessary material.
Just flowers.
Pure bud material prepared for future washing.
Final fresh frozen numbers landed around:
755.5 grams total including bags,
which leaves us somewhere roughly around the 700–730g range of actual fresh frozen flower material once packaging weight is removed.
And honestly…
that is incredibly exciting.
For anyone unfamiliar with fresh frozen:
this means the flowers are frozen immediately after harvest instead of being dried first.
The goal here is preservation.
Fresh frozen material helps preserve volatile terpenes, delicate aromatic compounds, and resin characteristics that can partially disappear during traditional drying and curing.
Later, this material can be processed into:
* ice water hash,
* bubble hash,
* live hash,
* live rosin,
* or other solventless extractions.
And despite some people debating whether water itself should technically count as a “solvent,” the reality is that this process remains one of the cleanest and most beautiful extraction methods in cannabis culture.
Ice.
Water.
Movement.
Separation through resin density.
That’s it.
And based on what we already felt from simply handling these plants?
This could become something truly beautiful later on.
Even during harvest, the resin behavior was already honestly ridiculous.
The gloves became sticky almost immediately.
Fingers started collecting greasy residue after only small amounts of handling.
The scissors became coated quickly.
And the texture of that resin…
dark,
oily,
greasy,
almost greasy-food-like in character,
which feels incredibly fitting for a GMO cultivar.
This is the type of resin that makes hash makers smile instantly.
Now of course, we did not freeze absolutely everything.
We intentionally kept select flowers aside for traditional drying and curing because we want to compare the expressions later:
* cured flower terpene profile,
* versus fresh frozen hash expression,
* versus eventual solventless extraction results.
That comparison itself is part of the experiment.
And honestly, that is one of the beautiful things about growing:
sometimes the harvest is not the end of the project.
Sometimes harvest is simply the beginning of several new ones.
The flowers we kept for drying are currently hanging under controlled conditions while the frozen material quietly waits for its transformation later on.
And yes…
there will absolutely be future reports about the washing process.
About the ice water extraction.
About the resin quality.
About the yields.
About the terpene preservation.
About the final hash itself.
But for now?
This week belongs to the harvest.
To the skeletons.
To the colors.
To the smells.
To the giant branches hanging in silence.
To the freezer bags packed full of greasy flowers.
To the excitement of possibility.
And honestly… to experimentation too.
Because growing is not only about repeating safe formulas forever.
Sometimes it is also about curiosity.
Trying things.
Learning.
Observing.
Comparing.
Taking risks.
Seeing what happens.
And this entire harvest feels driven by exactly that spirit.
We also brought these girls into the studio before harvest because honestly they deserved their final photoshoot.
And wow.
They looked incredible.
Some shots leaned cinematic and dark.
Others focused on vivid greens and flower structure.
Some highlighted the towering spear-like colas.
Others focused on greasy closeups and texture.
And under the studio lights, the resin coverage became even more obvious.
The flowers looked almost wet in certain angles.
Sticky.
Alive.
Heavy.
Exactly the kind of flower that instantly tells you:
“This is not going to stay clean for long once trimming starts.” 😄
Which brings us to next week.
Next week will likely focus on:
* drying,
* trimming,
* resin collection,
* finger hash,
* scissor hash,
* handling techniques,
* curing preparation,
* and possibly the beginning of the washing process if time allows.
If not, the washing report will arrive later as its own chapter.
And honestly?
That feels right.
Because this run deserves patience.
Now before ending this report, as always:
Thank you.
To Zamnesia.
To Plagron.
To F.O.G.
To the gear.
To the platform.
To the community.
To the growers sharing knowledge every day.
To the silent supporters.
To the curious people discovering the diary for the first time.
To the macro lovers.
To the hash makers.
To the flower lovers.
To the skeptics 😄
To everyone spending even a few seconds here with us.
This plant may already be harvested…
but honestly?
This story still feels far from over. 🌱
📲 Don’t forget to Subscribe and follow me on Instagram and YouTube @DogDoctorOfficial for exclusive content, real-time updates, and behind-the-scenes magic.
GrowDiaries Journal: https://growdiaries.com/grower/dogdoctorofficial
Instagram: https://www.instagram.com/dogdoctorofficial/
YouTube: https://www.youtube.com/@dogdoctorofficial Deleted by Youtube - https://www.youtube.com/@TheDogDoctorOfficial NEW
Vimeo : https://vimeo.com/dogdoctorofficial Under construction stay tuned ⸻
Explore the Gear that Powers My Grow
If you’re curious about the tech I’m using, check out these links:
🔆 Lighting & Environmental Control
• Future of Grow — Advanced LED lighting technology
https://www.futureofgrow.com/
DISCOUNT CODE: DOG20
• Lumiflora — Under-canopy LED lighting
https://lumiflorade.com/
• TrollMaster — Environmental controllers and automation gear (past collaboration)
⸻
Genetics
• Zamnesia Seeds — Genetics used in this project
https://www.zamnesia.com/
⸻
🌱 Soil, Substrates, Boosters & Root Support
• Plagron — Substrates, bio mixes, and supportive products
https://plagron.com/en/
⸻
🎒 Storage, Curing & Preservation
• Grove Bags — Curing and storage solutions
https://grovebags.com/
⸻
📸 Photography Equipment & Tools
(Not sponsors, but part of my creative toolkit)
• Sony A6700
• Sony full-frame macro lens + few more
• Stacking photography workflow - learning
• iPhone (for behind-the-scenes shots)
As always, this is shared for educational purposes, aiming to spread understanding and appreciation for this plant. Let’s celebrate it responsibly and continue to learn and grow together.
With true love comes happiness. Always believe in yourself, and always do things expecting nothing and with an open heart. Be a giver, and the universe will give back in ways you could never imagine.
💚 Growers love to all 💚
📸 P.S. – The Eye Behind the Lens
All photos in this diary (for now — except for the ones showing the camera, which I took with an iPhone) are taken with a Sony A6700 paired with a Sony full-frame macro lens and a few more.
Photography is part of the story — it’s how we share the fine textures, the glow, and the quiet details that words can’t always capture.
I’ve also started experimenting with photo stacking — a technique where multiple images, each taken at a slightly different focus point, are layered together to create one perfectly sharp image from front to back.
It’s not digital enhancement or AI; it’s pure photography — a way to reveal the plant’s beauty in microscopic depth, from trichome to petal.
You’ll even see a few shots of "ghost me" capturing the shots — camera, lens, setup — because every grow deserves not just to be cultivated, but documented like art.
FOR DISCOUNT CODES AND MORE JUST FOLLOW THE LINK https://website.beacons.ai/dogdoctorofficial
NEW DISCORD - Official Server Invite Link : https://discord.gg/ksjAkA5T74
Processing
Likes
3
Share


Likes
13
Share


@DeepRootsGrowTrees
Follow
DIVINE OG KUSH / DIVINE SEEDS
WEEK #10 OVERALL
WEEK #9 VEG
This week she's still under LST training with the bud clips and I'm still topping her to control the height of the plant right now. She's doing great no issues with training or topping. Stay Growing!!!
Thank you for stopping by and taking a look it's much appreciated!!!
Thank you DIVINE SEEDS!!!
DIVINE OG KUSH / DIVINE SEEDS
BUDTRAINER.COM BUD CLIPS

Processing
Likes
5
Share


@Lotuspro
Follow
Realy stepped up the nutes and trying out snoops nutrents they came late but 1 bottles of a and b bloom only was enuf for 1 water change because I'm using the flow and grow and the res is like 50gal at 17mil a gal that's 850mil a week or 2 in bloom forget that but I have to say that 2weeks I did use it the plants realy looked amazing I think I should just move in to my grow room I cant even remember what my girlfriend and kids look like I found a new love and passion I can work 18hrs straight like it's nothing if I'm not looking after my new babys I'm building a new grow system or water filter system. I now have 2 familys and there both beautiful if my girlfriend makes me choose shes out the door .


Likes
17
Share


@EduardoLV885
Follow
Ya padamos el jiffy con la planta al sistema hidroponico , usamos floraflex en la solucion de nutrientres con un ph de 5.5 y una electroconductividad de 400 ppm

Processing
Likes
34
Share


@Mr_Gezeta
Follow
-Esta semana simplemente las he regado un par de veces con un litro y medio cada una.
-A una de las GG ya estoy haciéndole el flush final
-Empiezan a enfermarse las hojas. Puede ser falta de calcio, potasio, magnesio...no lo se. Les he echado uns buena dosis de potasio y las que están más afectadas les he echado sgua limpia y un poco de potasio.
-una de las GG le falta poco para cortar. El resto les quedará poco menos de un mes

Likes
220
Share


@CRiSPrGrow
Follow
These had a pretty good life. I actually only fed NPK the one time . Germinated them in a Zambeza propagator, i really recommend getting one of those propagators, they're reusable and really take the heat off those first days when you're sweating. Pooped them into their plugs they sprouted out strong, germinated 5 kept 3. transplanted them no problem. Veged these for 4 weeks, then they shot up. during veg they stretched out a bit early on i should have been giving some specialised micro i had on had but for some reason on the other i didnt. They needed extra support for their first three weeks, so i decided to LST them around week 2. Two camping hooks one anchor for the main stem and one to keep the plant down. Once i dialed in my lamp to plant distance they benefitted by slowing down on the stretch a bit. they all took to LST extremely well, bushing out and creating an nice even canopy. They pushedout these thick indica leaves, one of my plants was a lighter colored leaf pheno, the vertafort one. The Six Shooter genetic really stretches, if just off the top of my head it seems that the plants quadrupled in size over an 8 week period, completely eclipsing their neighbours and creating a thick dense canopy throwing shade down below. Each turned into a bush with three or more mains sticking out the top by week 6. IThe results start to look real pro around week 8. Before that though I hadn't been defoliating. This and simple lack of light means that I had loads of undevellopped colas. If I'm honest I should have tried to harvest in stages but by colas. Anyway these kind of grew like a gorilla glue but with much different and much better flower structure. The plants started pushing out flowers and pistils and preflowers etc early, but then took a while to gear up towards towards getting fat. The flower branch out in a spiral pattern up and down the main and secondary colas evenly, creating this misssile shaped colas, but they branch out once sometimes twice, which means less branch to nug ratio than a gorrilla glue by a full multiple. They started smelling like lemons around the time they were fattening up. Then they started getting buff, really little by little, what did rippen rippened evenly. Some colas was basically waste especially the colas stuck on the sides of the tent and some of the colas where for some reason or another there was no light there due to the dense canopy. Truly a BEAST OF A PLANT, HIGH POTENTIAL, great BRANCHING, if you look carefully each plant has more than a dozen colas,
Timed it so the harvest was on a day the plants were chock full for plain water after ten day's worth of additive aided flushing. hung to dry slowly in the tent, got it around 55RH inside the buds over 12 days then trimmed and jarred in miron glass with boveda 62. The trim was a great experience, took a while but not that long because the flowers were so nice in the way they are. you do have to trim every sugar leaf one by one though if you're doing it by hand, broke these sizzors that @Mrs_Larimar sent me because of the resin lol. so I pull these plants out my tent and I just kinda look at them and they're basically dark green because of all the sugar leafs, i'm thinking to myself "shit i messed up this isnt even that frosty". well, what i found out is every time i clipped one of those trademark long sugar leafs off it revealed absolutely resious white frost. That's what can keep someone motivated. ! Once jared, if there's boveda in your jar, you dont really need to burp it daily, or even weekly i just let it sit there, obviously i've been smoking it and following the cure, let me tell you this one needs longer to cure than you're used to maybe, at least two more weeks of cure after a slow dry. Four weeks after the chop , it's a strong weed !
Didn't smell all that loud, but I have a 1300M3/H exhaust so... i'm not surprised. I will say though that my neihbour said she could smell weed even when I wasnt home and she could smell weed in the corridor, from the times I was trimming and basically every time I open my jar. Gonna need a new carbon filter for the next grow. I retired my lightbulb too. Hard to put my finger on the taste because the smoke is so smooth, and when i saw GD had a tag for Woody, i knew right away this was that taste i felt. I will say this though, cure this correctly, dont rush, dry it real slow, then cure it, citrussy tastes, usually those will evaporate, leaving this distinguished terpene heavy hitter much better tasting. So what can i tell you, this weed is white weed, so frosty. Bag appeal is great too, this strain pushes out pistills like no other, maybe even more than the gorilla glue. that means this is a chill weed right? One of the phenos I grew had more pistils than the other two. Mr. B's did, but i dont know if you can really tell from the close ups, i'll try to put some more pictures up. I got two maybe three phenotypes in terms of taste. Mr. B’s is much pine-ier than the others, and when the joint goes out and you light it again, it’s even more piney … I’m actually really happy about that reminds me of white rhino from the east coast back in the day but way piney-ier than that even. When you smoke the other phenos the smell is incense and the taste is really really smooth & woody. Sometimes I find different after tastes on the exhale like coffee, pepper, and maybe sweet/fruity sometimes too depends on the pheno I'm toking on. It is LOUD THOUGH, always have a spare filter on hand IT’S NOT WORTH IT get it !
Well at the end of my first grow, i'd like to quickly review all of Bulbi's own :
Bulbi"s Own Early VegMicro: Fine green powder with calcium and all the rare metals in it. I didnt use it ! Damn, next time I'll amend my soil with it like i did this time on the FBT1
Bulbi's Own Cal Mag : Organic fine white powder with calcium and magnesium, i used it in the feed and sometimes as a spray. I didnt know how much to put in because these things dont come with instructions so i ended up putting 1/4 doses most of time. The correct amount should have been 2.5G/L.
Bulbi's Own Flower Micro : Organic fine beige powder that I used mixed in with the sulfur. I think this one's a keeper, really helped my plants make it through the stress of bottom feeding and all that heat.
Bulbi's Own Mag Sulfur : Organic fine red powder that I used mixed in with the Flower Micro I used this one in my spray too , to great effect, in my opinion
Bulbi's Own Beneficials Trio : This was the base beneficials mix I had, you need to put 7.5 to 15g/l , watch out for clumps, use at the night fall, or when still dark.
Bulbi's Own Anti Afid : I threw it in there i think just in time to protect my plants when I intentionally overwatered when I went on my trip. There were some white flies that emerged, because... well that's what they do isnt it. but there were just a few of them and they ended up flying around wierdly, and within four days, no more white flies, didnt even use yellow sticky tape ! You mix this one with the trio for even more effect. I used these in a spray I think , also.
Bulbi's own Anti-Worm : This one is more directed against larvae, and can be combined with the base trio. I was weary of using it, but I'm glad i did to give my soil matrix that full spectrum of biological protection.
Bulbi's own Humic Acid : This one i loved, looking back I'm regretful not having used it more. the dry humic acid is a great experience, the quality of it was impressive, clumps would seperated into more clumps ad infitum the feed slowly turning completely ink black. definituely using this once a week from now on
Bulbi's own Amino Acids : this one is just amino acids, maybe next time I'll use it at the same time as the humic acid, but I'm not 100% on that. What i did do was spray the top layer of the soil with amino acids when I accidently ran into some issues from spraying kelp all over the place. So in that sense it's an absolute life saver and a must to have on hand.
Bulbi's Own Kelp Extract Concentrate. Loved this one too haha, so thick, and green, check out the video of when i pour it lol. Worked great, raises the pH some so be careful, i used this one as a sprat aswell to get those plant growth hormones pumping during the seeding and veg stage.
Bulbi's Own CO2 : well part of what I set out to do was to test the CO2 theory. Like roots do absorb CO2 but at a lower efficiency than leaves say 15% vs. 85% the theory being enriching your water or feed with CO2 would ultimately benefit the plant. So i enriched water with these ceramic based co2 tablets, because CO2 is a soluble gas, it stays in water. Then i fed the plants in this manner in the feed and also as a spray. The idea behind that was that co2 enriched water would come in direct contact with the plant allowing for absorption of some quantity of CO2 through the leafs. Someone explained to me that these are actually old school techniques. Well I know i started late and didnt follow a regular schedule like i wished for but the plants didn t die, or show any immediate negative upon innoculation, so what can I say? I'm doing this again, perhaps. Only problem is that these things are really a pain to pH correctly
General Hydroponics Dry pH Down : GREAT PRODUCT, hard to find but amazing – not registed on GD for some reason
I still have to make my bubble hash so any advice welcome ! 🚀
Likes
66
Share


@CHILLING_RACOONS
Follow
Dear Friends ❤️
in this week we topped again and bended this great Headshot by Seeds Mafia
I topped the plant and remove big fan leaves that covered bud sites
I missed to give top crop Big one at 14 october, it is important to give 10 days before flowering
The last day of this week we switched the light to 12/12
week #5 of vegetation
The 240w light is working at 50% power and now it is combined with the 480w quantum board.
I consider week 4 the week from 18/10 to 24/10.
day to day fert schedule:
📅 18/10
📅 19/10 NEEM OIL
📅 20/10
📅 21/10 Top Veg 3ml/L-Deeper Underground 2ml/L - Green Explosion 2ml/L - big one 2ml/L - PURPINATOR 1,2ml/L
📅 22/10
📅 23/10
📅 24/10
ABOUT HEADSHOT BY SEEDS MAFIA
Headshot is a feminized cannabis strain that may grow in any environment, whether it is indoors or outdoors, and is therefore recommended to both experienced and inexperienced growers. The plants grown from the Headshot Feminized seeds are tall, compact and robust, and reach a medium height of 100-150 centimeters. Their flowering period is short, about 50-55 days. They give dense buds fully covered with a thick layer of resin.
Also, this variety has quite a popular feature, it has a high productivity. It may be harvested in October and yields about 550 grams per m2. The plants reach a high THC content of 19%.
Obtained by crossing AK47 and White Widow, Headshot Feminized is 30% sativa and 70% indica. Its flavor is sweet and reminds of sandalwood and oriental incense. Its name comes from its effect, which is rather cerebral and uplifting, perfect for relaxing and calming down.
Data Sheet:
Sex: Feminized
Grows: Indoor, Outdoor, Greenhouse
Height: ≈ 100 - 150 cm
Yield: ≈ 800 - 1000 gr m2
Flowering time: 8 - 9 weeks
Complete life cycle: October
Cannabis Genetics: White Widow х AK-47
THC: 19%
Type: Sativa 30%, Indica 70%
💸💸💸💸💸Buy Headshot: https://seedsmafia.com/en/feminized-cannabis-seeds/headshot-feminized.html
OUR GERMINATION METHOD STEP BY STEP
I Germinated all seeds in cotton pads because in my opinion is the best way, I'll tell you why.
Why use cotton pads? You should use cotton pads because it is one of the fastest way to germinate seeds, it is also one of the more reliable way.
This is a NOOB-FRIENDLY tenchnique, you have to respect some little and easy steps:
-take one cotton pad, spray it 5 times with water;
-dispose seeds in the sprayed cotton pad, remember to leave minimum 1cm of space between seeds,
-take a new cotton pad, spray it 3 times with water, face it down and put it on the seeds of the first cotton pad;
-now, spray the dry side 3 times.
-put this/these "sandwich/es" in a sealed container of a sufficient size to store them, I use like a plastic tupperware (glass or plastic are equal) with about this size: 15x30.It contains about 8 "sandwitches".
-store the container in a dark place with a temperature from 17°C and more. More light they see and colder is the place,slower will be the germination and lower will be the germination ratio.
*(-If your seeds are old, not good stored and with a low germination ratio, I suggest you to use Seed Booster by Plagron. Old seeds and maybe stored in a very hot place for a long time may will be death may will not never germinate).
Generally a normal cotton pad is good for 3 seeds.
If you follow these steps, you will hardly have problem of non-germinating seeds. I tried all methods (except rockwool cube) and in the last two years (and I germinated a lot of seeds) I can tell that this is the faster and reliable way. I loved to use paper towel but with this metod is very easy to put too much water and it will be slow down the germination step.
I really hope that this "rule" will help noob growers and maybe will help other growers to improve their skills.
I personally do the step by step draw guide.
ENJOY.
🔧💡WHAT WE ARE USING💡🔧
-LIGHTS:
💣Quantum board - 480w - 4x120w Boards by Zhoangshan Koray Opto-Electronic Ltd.
Samsung LM301B 288 led/board
+24led/board led Osram 660nm
Efficiency 2.6 umol/J 220 lm/w
Driver: Meanwell HLG-480H-36B
temperature: 3000k
Heat dissipator board: No
Noise: 0dB
💣Quantum board - 240w - 2x120w Boards by Shenzen Yuanhui Led Ltd.
Samsung LM301H 504 led
+24led/board led Osram 660nm
Efficiency 2.7 umol/J 220 lm/w
Driver: Meanwell HLG-240H-48B
temperature: 3500k
Heat dissipator board: YES 15MM
Noise: 0dB
-ESTRACTION FAN:
Blauberg 125 Turbo Pro Series
Power: 42-50W
RPM: 1940-2620 minimum -1
Maximum air flow: 430-560 m³ / h
Sound pressure level at 3 m: 32-44 dBA
-FANS:
A)OSCILLATING FAN
Maximum consumption: 20 W
Minimum consumption: 17 W
Fan diameter: 15 cm
Housing diameter: 20 cm
Height with handle: 35 cm
2100 revolutions per minute
Two speeds
B) COMPUTER FAN Sunon DP200A - 230V
Nominal power: 22/21 Watt
Noise level: 44 / 49dB (A)
Rated speed: 2700/3100 RPM ± 10%
Air delivery: 95/115 CFM
C)Cornawall Electronics Multifan Turbo, three speeds, can be used both on support surfaces and mounted on the wall. High capacity, about 740 m3 / h, can be used in medium-sized rooms. High silence and reliability make it adaptable and versatile.
Technical details:
Rotation range of 90 degrees
Tilt adjustment
Three speeds of rotation
Suitable for wall and ceiling suspension
Power Consumption: 35 Watts
Air Flow: Approx. 740 mc / h
Operating noise: approx. 39 db
Diameter: 20 cm
Voltage: 220-240V
Frequency: 50Hz
Dimensions: L 28 x D 16 x H 28 cm
💊💉💊FERTILIZERS:
MAIN FERTILIZER BRAND: TOP CROP
I use these products:
-DEEPER UNDERGROUND: to stimulate roots system
-TOP VEG: for a excellent growth in the vegetative phase
-GREEN EXPLOSION: to promote creation of bud sites and to allow a faster growth
-MICRO VITA: bacterias for equilibrate the soil and to make the plant healty
-BIG ONE: to stimulate bud sites and to stimulate resin production
-TOP BLOOM: to achieve excellent big and hard buds
-TOP CANDY: to feed the buds with molasses for a tastier smoke and to gain weight
-TOP BUD: to enlarge buds and to gain weight
PLAGRON: PK 13-14 to have big and hard buds and to feed plants with lower effort
ADVANCED NUTRIENTS: Sensi Cal-Mag Extra-> for cal mag deficiency
GROTEK: CAL MAG for cal mag deficiency
HESI: PowerZyme to clean and balance the soil. It feeds the plant cleaning the soil.
GHE: - Final Part (ex Ripen) accelerate the final flowering phase, dissolves minerals in excess
- Flash Clean to flush the plant and to be sure that all excesses are out from plant and pot
These two products improve A LOT the smoke of our babies
-PURPINATOR to stimulate flavonoids and to have a better taste and smell.
____________________________________________________________________________________________
❤️ THANK YOU FOR BEING HERE ❤️
Please leave a comment with your opinions, it is very important to us to have a comparison.
If you like our job, tap the weed button and follow us. It will be really appreciated.🙏
🌿Thank you again🌿
❤️Sweet hugs❤️
👨🌾CHILLING_RACOONS👩🌾

Likes
15
Share


@AustinRon
Follow
LJ4Q23 Flower 9
SOP LJ4Q23 - 8-Plant SOG from Cuts
Harvest Window
- Earliest: 2024.02.01
- Latest:
2024.02.10
Objective:
- 8 Plants - Single Colas - No Branches
- Harvest Lemon Jeffery (Narrow Leaf Phenos): 70±5 days
- Light Intensity - Ramp up from 200
- 40 DLI, at 13 hour ScotoPeriod, will need MAX Light to Achieve
______________________________________
Start of Week: [ 2023-01-24, LJ4Q 57:F:8:1]
End of Week:
[ 2024-01-30, LJ4Q 63:F:8:7]
Plant Height: [ 21, in]
Temp: [ 78, °F]
RH: [ 61, %]
VPD: [ 1.2, kPa]
Light Intensity Peak: [ 850 , µMol/m2/s]
Light Distance: [ 11, in]
Environment Targets (Flower 7 - 9):
- Scotoperiod: [ 13, h] # Contiguous dark hours daily
- TemperatureMax: [ 78, °F]
- RH: [60, %]
- VPD: [ 1.1, mS]
- LightIntensityMax: [ 1000, µMol/m2/s]
- LightDistance: [ 8, “]
Fertigation Plan:
- RLA Hydro Chart, EC 2.0 - 1.1
- Primer A: [ 6, ml, gal]
- Primer B: [ 6, ml, gal]
- Silica Skin: [ 2, ml, gal]
- Resin Bloom: [ 2, ml, gal]
Penultimate 3 Days (before Harvest)
- RLA Resin Bloom, EC: 0.8
__
Wed Jan 24, 2024
LJ4Q 57:F:8:1
- [x] EC: [ 3.3, mS]
- [x] Runoff: [ 500, ml], [ 62.5, plant], [ 15, %]
Estimate 440 ml/plant/day (10% of Container Volume)
Confirmed 1 min increase in event duration yields Runoff 200 ml/day
@ 5 Minutes, we’re delivering 1 Liter per event, 6 Liters per day TOTAL, .75 Liter/Day/Plant
Refresh Reservoir
- [x] EC: 1.8, 2 Gal
- [x] PrimerA: [ 9, ml, gal], [ 18, ml]
- [x] PrimerB: [ 9, ml, gal], [ 18, ml]
- [x] Silica Skin: [ 4.5, ml, gal], [ 9, ml]
- [x] Resin Bloom: [ 4.5, ml, gal], [ 9, ml]
- [x] Photosynthesis Plus: [ 6, ml, gal], [12, ml]
- [x] Quillaja20 Powder: [ 0.5, tsp, gal], [ 1, tsp]
- [x] SLF-100: [ 5, ml, gal], [10, ml]
__
Thu Jan 25, 2024
LJ4Q 58:F:8:2
- [x] EC: [ 3.4, mS]
- [x] Runoff: [ 600, ml], [ 62.5, plant], [ 15, %]
- Reduce Fertigation Duration :30 per event
Runoff Estimations
- RunOff Total/Day: [ 500, ml]
- RunOff per Container/Day: [62.5, ml]
- Estimate 10% Irrigation/Day: [ 440, ml, plant]
- Runoff %/Day: 62.5/440: 15%
Estimated Deliver/Plant/Irrigation
- Irrigation: [ 440, plant, day]
- Runoff: [ 62.5, plant, day]
- RunoffPCT: [ 15, %]
- Total Irrigation/Day: 3.6, liters, Day (Just Shy of 1 Gal/Day)
TempAvg: [ 79, °F ]
RHAvg: [ 59, % ]
VPD: [ 1.12, kPa ]
PPFDAvg: [ , ]
LightDistance:
__
Fri Jan 26, 2024
LJ4Q 59:F:8:3
- [x] ECReservoir: [ , mS]
- [x] Runoff: [ 600l+, ml], [ , plant], [ , %]
- [x] ECRunoff: [ 3.4, mS]
__
Sat Jan 27, 2024
LJ4Q 60:F:8:4
- [x] Back off Light 1” (3 Clicks)
- [x] Runoff: [ 600, ml], [ , plant], [ , %]
- [x] ECRunoff: [ 3.5, mS]
__
Sun Jan 28, 2024
LJ4Q 61:4:F:8:5
- [x] Runoff: [ 500, ml]
- [x] ECRunoff: [ 3.3, mS]
- [x] Med (2.7) chart for EC: 1.5
- [x] Primer A:
[ 8, ml, gal], [ 16, ml]
- [x] Primer B:
[ 8, ml, gal], [ 16, ml]
- [x] Silica Skin: [ 5, ml, gal], [ 10, ml]
- [x] Resin Bloom: [ 6, ml, gal], [ 12, ml]
EC: [ 1.6, mS]
__
Mon Jan 29, 2024
LJ4Q 62:F:8:6
- [x] Runoff: [ 500 , ml]
- [x] ECRunoff: [ 3.3, mS]
__
Tue Jan 30, 2024
LJ4Q 63:F:8:7
Refill Res: ~2 gal
- Primer A
- Primer B
- Silica Skin
- Resin Bloom
EC: [ 1.3, mS]
- [x] Runoff: [ 475 , ml]
- [x] ECRunoff: [ 3.3, mS]


Likes
12
Share


@420DeepGrow
Follow
📆 Semana 3:
La planta muestra un crecimiento sostenido y elegante. 🌱
Los brotes laterales comienzan a despuntar, señal de que la estructura se expande con vigor. Las hojas, firmes y anchas, capturan la luz con eficacia, y el tallo central gana robustez.
Es buen momento para ajustar el tutorado, redistribuir hojas si es necesario y preparar el entorno para un estirón próximo.
El lenguaje del verde habla de salud y armonía. Todo sigue su curso natural, con una energía que se intensifica día a día.
¡Seguimos creciendo fuerte! 💪


Likes
9
Share


@JKwonTheChef
Follow
Purple purple purple! I want to keep her going until the entire thing is purple but the trichomes are mostly amber and without side lighting the bottom buds are just not developing fast enough comparatively. So rather than make the experience just be me falling asleep every use, I'm going to opt to chop her tonight or tomorrow probably. It's been 4.5 months and I need to get the tent set up and make this bucket 100x better!
Likes
10
Share


@iLoveGoodWeed
Follow
She is growing large and fat looking forward to next week's to see the monster ladie