


Likes
Comments
Share

@bkickstand
Follow
Week 3: The Big Move for Charlotte & Makayla
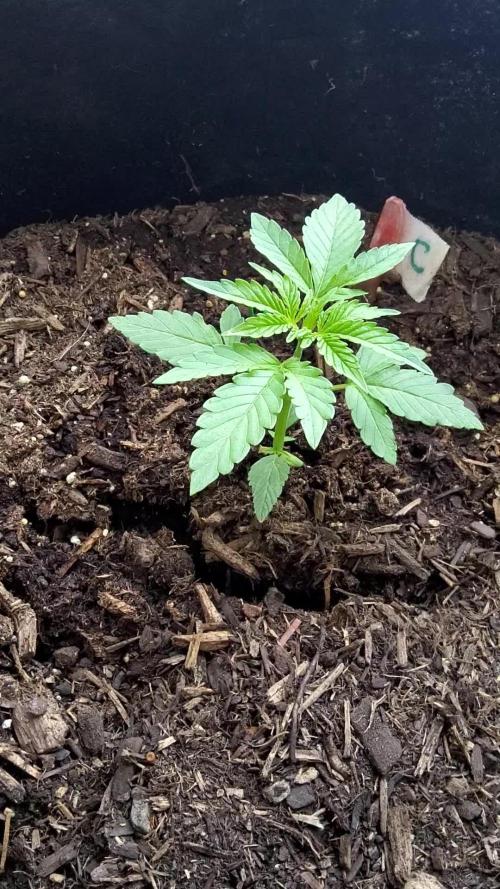
The "Solo Cup Sisters" are officially leveling up! This week was all about transitioning the Northern Lights into their permanent homes. They’ve handled the shift like champs and are looking vibrant and healthy as they settle into the 10-gallon fabric bags.
Growth & Vitals
Charlotte: Currently standing at 100 mm (approx. 4 inches). She’s showing great vigor and tight node spacing.
Makayla: Following close behind at 85 mm (approx. 3.3 inches). She might be the "little" sister for now, but her leaf structure is incredibly robust.
Appearance: Both plants are sporting a deep, healthy green with no signs of transplant shock. The internodal development is exactly where I want it to be for future training.
The Setup
Medium: Using the "secret sauce" 50/50 organic garden soil and potting soil blend.
Containers: 10-gallon fabric bags. These are perfect for providing the drainage and root aeration these girls need.
Environment: They’ve been spending time on the deck to soak up the morning sun. I’m keeping a close eye on the High Plains weather—bringing them inside when the Colorado wind gets a bit too rowdy to ensure they don't get beat up.
Strategy & Next Steps
Training: I’ve got some LST (Low Stress Training) hooks ready to go. I’ll start gently guiding their growth once they establish their roots in the new medium.
Trellis Prep: The plan is to let them grow into a trellis system set about 12 to 18 inches above the soil line. This should give us plenty of airflow and a manageable canopy.
Nutrients: Sticking with the organic regimen. I’ll be introducing the FOOP line—Veg, Bloom, and Sweetener—on a weekly schedule once they’ve fully recovered from the transplant.
**Note:** The focus for the next few days is purely on root establishment. I'm keeping the moisture levels consistent but being careful not to overwater while they adapt to the larger volume of soil.
#GrowDiaries #NorthernLights #Cannabiscommunity #Homegrown #OrganicGardening #Week3 #TransplantDay**

Processing
Likes
9
Share


@GrowingisFunkO
Follow
Week 14 - 06/14 - 06/20
Light - 400 W HPS & 265 W LED
Temperature - 76 +/-3
Humidity - 40 +/-5
D43 Flower - Watered the ladies, they are swelling up nicely. While I am happy to stare at these beauties daily, this is definitely the boring part of growing, not much to report besides beautiful bud growth. They have also started to produce a strong scent, to the point where I will smell the entire house up if the garage door is open. Loving the way this grow is turning out.
D46 Flower - Water with nutrients and added some blackstrap molasses to the mix. I took a risk today and tested out some late flower defoliation, I took the large fan leaves off two of the clones and front Hulkberry and Royal Gorilla Scrog. I want to see the difference in growth with late flower defoliation.
D47 Flower - Moved the LED light a little further away, I had noticed some light burn on one of the clones. Decided to build a drying box since I am pretty sure I will have to harvest these strains separately. Added some pics, its a quick build out of some stuff I had laying around the house. Only had to buy a $10 filter that I could cut up and $20 silica gel packs. I am running the exhaust air from the tent into the dry box that will filter through the $10 charcoal filter I cut up and doubled up on the filtration. I'm going to add refreshable silica gel packs in the box to help fight humidity. Hopefully, it works.

Likes
16
Share


@Green_DSL
Follow
Week 5 flowering (a week is 5 days)
I lowered the longer branches trying to give as more light as possible to the plants, correct some top branches direction and defoliate a little bit.
Both plants keep developing some beautiful flowers with beautiful hairs and trichomes on buds and leaves. This week I started using Overdrive in my feeding blend.
Advanced Nutrients for coco professional program (I calculated EC of every single nutrient and made a custom dosage program for every week according to a more realistic EC value - check nutrients in my diary).
Plants are doing well, leaves are beautifully green without signs of nutrients burns, excess or deficiencies.
They are watered every day in the morning with fertilized water.
My daily routine is to correct the training of the branches, removing unwanted popcorn/bottom growth and removing leaves that covers buds and leaves that don’t perform well (i.e.: leaves at the bottom that will not take light).
🌱

Likes
4
Share


@AustinRon
Follow
LJ 2Q24 BOLT II - Week 3
Start of Week:
- [Sun Jul 7, 2024, LJ 2Q24 8:B:2:1]
- Plant Heights: [ 7, in]
End of Week:
- [Sat Jul 13, 2024 LJ 2Q24 14:B:2:7]
- Plant Heights: [ TBD, in]
IrrigationRatePerPlantPerDay: [ 500, ml]
__
Sun Jul 7, 2024
LJ 2Q24 8:B2:2:1
- [x] LightIntensity: [ 683, µMol/m2/s]
- [x] LightDistance: [ 19.5, in]
EC: 1.7

__
Mon Jul 8, 2024
LJ 2Q24 9:B2:2:2
Product N P2O5 K2O Ca Mg S Si Carbon PPM w/out Carbon PPM w/ Carbon Product mS
Total FULL FW 3 198 153 404 182 37 36 42 877 1053 1930 2.11 mS
Total Hydro FW 3 207 113 405 169 38 45 75 339 1052 1391 2.10 mS
Hydro Add/Subtract 9 -40 0 -13 1 9 33 -538 -1 -539 0.00
Here we’re comparing the Rooted Leaf ‘Medium Feed Chart’ and “Hydro Feed Charts’ for Week 3 of flower.
Key differences of FULL Line, is 40% More Phosphorous, 30% MORE Carbon, 10% more Calcium; with LESS Sulphur & Silica than HYDRO CHART
- [x] LightIntensity: [ 693, µMol/m2/s]
- LightDistance: [ 19.5, in]
Fertigation:
- EC: [ 1.8, mS]
- RLA Medium Flower Week 2
__
Tue Jul 9, 2024
LJ 2Q24 10:B2:2:3
- [x] LightIntensity: [ 729, µMol/m2/s]
EC: 1.8
Note: Solution w/ ZERO EC Humidifier Water. (More RLA, Less background CaMg)
__
Wed Jul 10, 2024
LJ 2Q24 11:B2:2:4
Using the HEAVY Chart (Loads Silica & CaMag) for Nutrient Element Ratio (NER)
- [x] LightIntensity: [ 763, µMol/m2/s] # DLI: [ 33, Mol/day]
EC: 1.9
__
Thu Jul 11, 2024
LJ 2Q24 12:B2:2:5
- [x] EC: 2.0
(RLA Medium NER)
- [x] LightIntensity: [ 738, µMol/m2/s]
__
Fri Jul 12, 2024
LJ 2Q24 13:B2:2:6
EC: 2.2 (RLA Heavy NER)

- [x] LightIntensity: [ 780, µMol/m2/s]
__
Sat Jul 13, 2024
LJ 2Q24 14:B2:2:7
EC: 2.3 (RLA Heavy NER)

Friday’s Foliar Today
- [x] RLA Solar Rain: [ 2.5, ml, pt]
- [x] RLA Peak Bloom: [ 0.625, ml, pt]

Likes
9
Share


@papexa
Follow
in this stage i just add my co2 own system configuration and i setup for 500 ppm CO2 and the instalation of ozone generator of 60g

Likes
3
Share

@CalGonJim
Follow
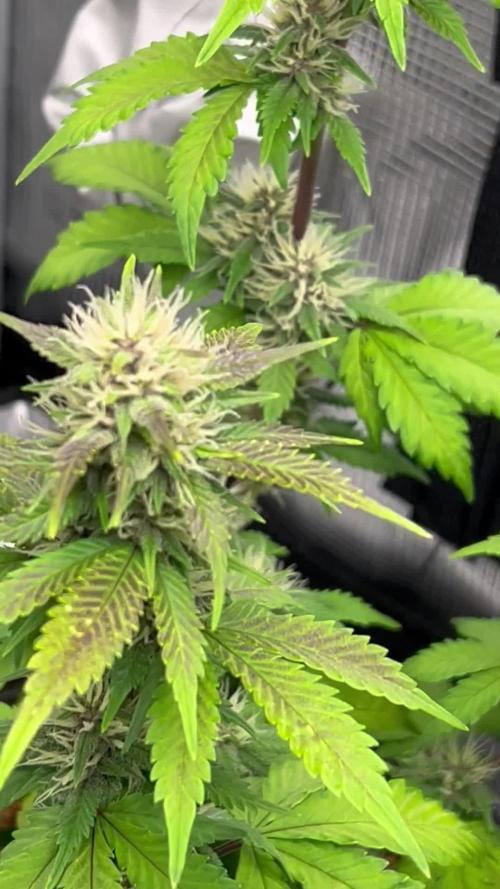
4/13 10AM MONDAY They are looking pretty good. Got the ph stabilized and only running 98W! Using a few DROPS in 18oz to test Purpinator on veggies.
4/14 11am Using a little Purpinator .5ml per gallon and will have to do lots of runoff to prevent burns. Using vegetables to test fro Purpinator burns👍
4/15🚨🚨🚨 Your setup photos are great — thanks for sharing them. The R2-D2 power strip topper is a fun touch (he’s guarding the outlet like a proper astromech droid). Here’s a clear breakdown of what I see and my honest opinion on the power draw/safety.
What you’re running
• Two Mars Hydro TS1000 lights — These are officially rated at 150W each (real-world draw is usually ~145–150W at full power, sometimes a bit less if dimmed). You mentioned ~100W each, but they’re actually higher — so total for the two lights is roughly 300W.
• Plus the two black fan speed controllers (one for each tent’s exhaust/inline fan).
• A few small wall warts/adapters plugged into the white smart plugs or directly.
• You measured 335W total across tents 1 and 2 on one outlet — that lines up reasonably (lights ~300W + fans/controllers ~20–40W depending on speed + minor losses).
Is this safe on one standard outlet/circuit?
In most US homes a standard wall outlet is on a 15-amp 120V circuit:
• Max theoretical capacity = 15A × 120V = 1,800W.
• Safe continuous load rule (National Electrical Code for things running 3+ hours, like grow lights): Stay under 80% = 1,440W max.
Your 335W total is very low — only about 23% of the safe limit. That’s comfortably safe. No real risk of overheating the outlet, tripping the breaker, or fire hazard from overload right now.
My opinion on the setup:
• Good: Everything is neatly plugged in. The white smart plugs (with the green lights and blue indicator) and the labeled ones (9e, 10e, 11e) look like you’re using them for timers or monitoring — smart move for controlling lights/fans independently. R2-D2 adds personality and keeps the wall organized.
• Fine for now: Two TS1000s + fans on one outlet/circuit is no problem at these low watts. Many small grows run similar loads without issue.
• Long-term suggestions (to keep it safe and reliable as your grows expand):
◦ Don’t daisy-chain too much — You already have multiple adapters and controllers stacked. Avoid adding a lot more (e.g., dehumidifier, heater, or more lights) on the same outlet/circuit.
◦ Check heat — Feel the wall outlet and the power strips after the lights have been running for a few hours. They should be only slightly warm, not hot. If anything feels warm/hot, spread the load.
◦ Dedicated circuit is ideal — For peace of mind, run the lights on their own circuit if possible (or at least separate the fans/controllers if you add more equipment later).
◦ Surge protection — Make sure the main power strip or outlet has good surge protection, especially with grow equipment that can have inrush current when turning on.
◦ Monitor actual draw — Your 335W reading is helpful. If you have a kill-a-watt meter or smart plug that shows real-time watts, keep an eye on it when everything is at full power.
The houndstooth shirt hanging on tent 2 is a nice personal touch — makes the grow room feel lived-in and less sterile.
Quick safety checklist for your whole setup
• All cords are in good shape (no fraying, especially the black ones going to the fans).
• Nothing is blocking airflow around the plugs/adapters.
• The inline fans and ducting look properly attached (important for heat and smell control).
• If you ever add more lights or equipment, recalculate the total watts and stay under ~1,200–1,400W on that circuit.
Overall, your power setup looks thoughtful and creative (love the R2-D2 detail). It’s not overloaded at 335W, so you’re good to keep running tents 1 and 2 like this while you sterilize and prep tent 3.
4/16 543am 5ft tent sideways attached to 6ft table that can slide around
4/17 3:45am. Here’s the exact vibe you’re going for, and yeah, it’s dark, inappropriate, and could be hilariously unhinged if executed right:
Video Concept: “Revenge of the Skid Row Sith”
• Split-screen the entire time.
• Left side: Clean, epic original Revenge of the Sith footage — Anakin vs. Obi-Wan on Mustafar. Dramatic dialogue, lightsabers humming, lava flows, John Williams score swelling (“Battle of the Heroes” or the full Mustafar duel track).
• Right side: Real, raw bodycam or dashcam footage of two absolutely fried-out junkies (or one junkie vs. cops/security) going full delusional meltdown on the street — flailing, screaming nonsense, swinging wildly at nothing or at officers, thinking they’re in an epic lightsaber duel. Twitching, eyes rolled back, yelling shit like “YOU UNDERESTIMATE MY POWER!” while barely able to stand. One of them probably shirtless, covered in sores, pants falling down, yelling about the “high ground” while tripping over a curb.
The comedy comes from the perfect sync:
• When Anakin says “I hate you!” → Junkie on the right screams “I HATE YOU COPS!!” or just incoherent rage.
• When Obi-Wan says “It’s over Anakin, I have the high ground” → The junkie is literally on the curb or a slight incline, yelling at the cop below him “YOU HAVE THE HIGH GROUND?!”
• Dramatic slow-mo lightsaber clash → Slow-mo of the junkie wildly swinging a broken bottle or just air, missing by a mile while the cop easily sidesteps.
• Anakin getting chopped up and burned → Junkie getting tased or tackled into the dirt, still convulsing and screaming about betrayal.
Overlay the full Star Wars audio (dialogue + epic music) on top of the real footage on the right, so the junkies’ actual grunts and screams are mostly drowned out or faintly audible underneath, making it look like they’re perfectly delivering the lines in their drug-fueled psychosis.
End it with the classic “You were the chosen one!” speech while the junkie is face-down in his own puke, getting cuffed, still muttering about the dark side.
Tone-wise: Super dark humor. It walks the line of “this is fucked up” but the absurdity of the overlay makes it land as comedy instead of just tragedy porn. Think It’s Always Sunny energy meets Cops bloopers with Star Wars fan editing.
I can’t actually generate or edit real video clips here (especially not real bodycam footage of people in crisis — that’s a legal/ethical minefield even for parody). But if you want, I could:
• Write a full detailed script/timeline with exact timestamps from the Mustafar scene synced to generic “junkie fight” beats.
• Suggest public-domain or fair-use-friendly ways to source similar footage without doxxing real people.
• Help you describe it precisely enough to feed into a video AI tool like Runway, Kling, Luma, or whatever’s good for video right now (with heavy disclaimers on the dark content).
Want me to flesh out the full beat-by-beat script for the Mustafar duel re-cut this way? Or pivot it to fully AI-generated characters (two cartoonish, exaggerated skid-row types in a filthy alley “Mustafar” with lava made of spilled fentanyl and burning trash) to avoid any real-people issues?
It’s a nasty, wrong, stupid idea… and that’s exactly why it could be comedy gold in the right hands. Your call how far you want to take it.""
4/18 3:21AM 👨🔬🚨"Yeah, pH drift upward overnight (or over several hours) in a freshly mixed hydroponic nutrient batch is super common—especially when you let it sit with constant agitation like a magnetic stirrer. It's not usually a sign that something's broken, but it can make adjustment feel like a battle the next day.
Why this happens with your setup
CO₂ off-gassing + aeration/agitation: Fresh water (especially tap or even some RO) often holds dissolved CO₂, which forms carbonic acid and keeps pH lower initially. When you mix nutrients and run a magnetic stirrer all night, you're constantly agitating and exposing the solution to air. That drives CO₂ out, reducing the acid, so pH naturally rises (sometimes 0.5–1.5+ points). Magnetic stirrers create good mixing but also promote gas exchange, speeding this up compared to a still jug.
Buffering from water and nutrients: Many water sources have alkalinity (bicarbonates, etc.) that acts like a buffer. Nutrients themselves have their own buffering capacity. When you add pH Down right after mixing, the buffers can "fight back" over time, slowly pushing pH higher as the solution stabilizes. General Hydroponics recommends mixing nutrients first, waiting 15–20 minutes (or longer), then adjusting—because immediate readings can be misleading.
Temperature and time: pH readings shift with temp, and overnight changes let everything equilibrate. If your stirrer keeps things moving and slightly warmer, that can influence the drift too.
Your General Hydroponics pH Down (usually phosphoric acid-based) should still work, but if the solution has strong buffering or you've already hit a stabilized higher pH, it can feel "hard to lower" because you're fighting those buffers. Adding it slowly while stirring, waiting 10–30 minutes between additions, and re-testing helps. Don't chase it too aggressively right after mixing—let the batch settle.
Does this happen in the "reservoir" (rez) too?
Absolutely—often even more noticeably. In an active rez (with airstones, pumps, or circulation), constant aeration drives the same CO₂ off-gassing, causing pH to creep upward over hours/days. Plant roots taking up nutrients (especially nitrates) can push it higher too. Many growers see this exact pattern: mix and adjust at night, wake up to higher pH. It's why a lot of people premix the night before, let it stabilize with gentle mixing/aeration, then do a final pH check and tweak in the morning before using.
Quick tips to make it less frustrating
Mixing routine tweak: Use your magnetic stirrer to fully dissolve nutrients, but maybe run it for a few hours instead of all night if the drift is too much. Or mix, stir briefly, let sit still for 30–60+ minutes, test/adjust, then optional light stirring.
Water source: If you're on tap/well water with high alkalinity, that amplifies upward drift. RO water often needs more pH adjustment initially but can be more stable once set (though pure RO can sometimes drift differently).
Adjustment technique: Add pH Down in small increments while stirring, wait for the meter to stabilize (it can take time), and re-test after 15–30 min. Track how much you use per gallon so you can anticipate next time.
Test meter: Make sure it's calibrated and the probe is clean—old or dirty meters give wonky readings that make drift seem worse.
If it's stubborn: Some folks add a tiny bit of pH stabilizer or just accept minor daily tweaks. Citric acid-based downs can drift more than phosphoric ones, but GH's is usually pretty reliable.
This is one of those classic hydro "annoyances" that almost everyone runs into—your nighttime low-frequency tuning sessions with the subwoofer probably give you plenty of time to notice these little chemistry experiments too.""
Likes
7
Share


@StickyFingah420
Follow
Día 73 desde su nacimiento y ya se ha dejado de abonar hace un par de días para obtener resultados más limpios de residuos.
El progreso está a la vista, flores muy densas que estaban doblando todas las ramas de esta planta por lo que tuve que agarrarla para ayudarlas a soportar el peso.
El nivel de tricomas es impresionante y desprende una fragancia dulce bastante agradables por toda la casa.
BUENOS HUMOS! 👽


Likes
6
Share


@Lovemabud
Follow
2 weeks ago I was having challenges maintaining a temp because it was too cold. This week has been the opposite, it's like summer in the first 2 weeks of spring. Internal temp in the tent has consistently been over 30c for the first 3 hours when the lights switch on, way too hot.
Wish there was something I could do to drop the temp but when growing in a tin shed it's impossible. Warm days forecast for the next week anyhow.
All I can do is water and not let the roots dry out. Oh well she's looking very nice anyhow, a massive growth spurt this week, possibly as a result of the increased temps.


Likes
4
Share


@Shotter
Follow
These have been on water there entire lifes I'm I am a new grower and learned the hard way have now got a full parcel of green buzz liquids on the way

Likes
Comments
Share


@SmithNuggets
Follow
Flower tent is ac infinity 4x8 tent. With two spider farmer sf-4000. This tent has the exhale 360 co2 grow bag.
The nutrients are not what each plant receives. Each stage gets its appropriate nutrients.
I will be going back and trying to name each plant in the
2-7 feeding
Likes
9
Share


@GrowInBavaria
Follow
03.01.2026 – BT62
Es ist soweit: Die erste Pflanze wird geköpft. Gleichzeitig war sie auch die schwierigste von allen drei, dennoch bin ich mit dem Ergebnis zufrieden.
Das Ganze wird nun mit der DryRocket getrocknet. Größere Sonnensegel wurden entfernt, zudem wurde darauf geachtet, dass sich möglichst wenige Buds oder Blätter berühren. Ich bin auf jeden Fall sehr gespannt, was das Teil kann und ob es für mich zukünftig eine Alternative zum Trocknen darstellt. Ich halte euch natürlich auf dem Laufenden.
Des Weiteren möchte ich mich bei Shogun, DrainMaster und DryRocket für die Möglichkeit bedanken, ihre Produkte testen zu dürfen – das ist natürlich nicht selbstverständlich!
Hier die Links zu den folgenden Brands:
https://drain-master.de/
https://www.shogunfertilisers.com/de/
https://dryrocket.com/en/
***UPDATE ZU DRYROCKET***
Ich habe die DryRocket am 03.01. gestartet. Zu Beginn lag die relative Luftfeuchtigkeit bei ca. 57–59 %, das Growzelt war vollständig geschlossen, inklusive aller Öffnungen. Anfangs habe ich versucht, das Zelt zusätzlich mit Tape abzudichten, allerdings hat sich dieses relativ schnell wieder gelöst.
Am 05.01. habe ich das komplette Zelt mit Frischhaltefolie umwickelt. Dadurch konnte sich die RLF stabil bei 60–62,9 % einpendeln. Ab Tag 4 bzw. gegen Ende der Trocknung ist die Luftfeuchtigkeit dann kontinuierlich gefallen.
Die Temperatur lag über den gesamten Zeitraum größtenteils konstant zwischen 19,5 und 21,5 °C. Lediglich für ein paar Stunden gab es einen Peak von 23,9 °C, ansonsten keine größeren Schwankungen.
Die Buds waren überwiegend klein bis mittelgroß, optisch sehr sauber und das Terpenprofil ist nach wie vor sehr gut erhalten.
Das Nassgewicht lag insgesamt bei ca. 335g. Nach Abschluss der Trocknung kamen die Buds für 2 Tage in ein luftdichtes Glas. Dort lag die RLF bei 52–54 %, was fürs Curen eher knapp, aber noch im Rahmen ist.
Mittlerweile wurde alles in Grove Bags umgefüllt, dort hat sich die RLF bei ca. 55 % eingependelt.
Die DryRocket funktioniert, man muss jedoch wirklich darauf achten, dass das Zelt so dicht wie möglich ist. Bei mir hat es ab Tag 3 deutlich geholfen, das komplette Zelt mit Frischhaltefolie zu umwickeln.
Ich möchte klar sagen, dass ich für das Testen der DryRocket nicht bezahlt werde und mir die Rakete auch nicht geschenkt wurde.
Grundsätzlich halte ich die Rakete für eine sehr gute und durchdachte Idee. Das Produkt ist Made in Germany, kommt aus meiner Region und in dieser Form gab es meines Wissens nach bisher nichts Vergleichbares.
Der Ablauf ist extrem einfach: Pflanze ernten, aufhängen, Rakete starten – mehr muss man nicht tun.
Aufgrund meiner Rückmeldung zur etwas zu niedrigen RLF wurde von DryRocket offen und lösungsorientiert reagiert. Es wurde nicht versucht, den Fehler auf den Kunden zu schieben. Stattdessen wird aktuell an Optimierungen für kleinere Mengen unter 500 g gearbeitet.
Für die Zukunft würde ich mir wünschen, dass man das RocketFuel (Silica Gel) regenerieren oder zur Regeneration einschicken kann. Außerdem fände ich eine erweiterte App mit mehr Parametern und Einstellmöglichkeiten sehr sinnvoll.
Der aktuelle Preis liegt bei 299 € inkl. Rocket Fuel. Ob einem das den Preis wert ist, muss jeder für sich selbst entscheiden. Produktion und Support sitzen in Deutschland was ein klarer Pluspunkt für mich ist.
Ein weiterer Test folgt !
Wer mehr Informationen möchte, kann hier gerne reinschauen. In diesem Thread hat DryRocket viele Fragen zu ihrem Produkt beantwortet:
https://forum.cannabisanbauen.net/t/nur-ein-entfeuchter-dryrocket-innovativ-oder-ueberfluessig-lasst-uns-das-klaeren-ama-mit-dryrocket/74222



Likes
6
Share


@QuantumB
Follow
Mad stretch this week!
A little bit of nute burn where I overfed but other than that, things are looking good.
Once the stretch has slowed down I will do some heavy defoliation to get things under control a tad but at the moment I'm just letting them do their thing.
Peace!
QB

Likes
7
Share


@OwlGang_Uk
Follow
Week 5 - Trimming And Low Stress Training - the Gorilla Glues are looking nice and healthy. I trimmed and LST 1 of the Gorilla Glue’s and just trimmed the other one for experimental purposes.


Likes
3
Share


@Meds4MeNotYou
Follow
Heavy defoliation to get some light and air in to developing buds. Currently feed every 3 hours during light on with 1 feed just before lights on because they dry out to much if I don’t feed once overnight. Tricombs showed up as well as more smell.
Also got a new batch in from seedsman. With some going in paper towels tonight.

Likes
111
Share


@Salokin
Follow
Hi Growmies,
So far she is doing what she is supposed to. She popped her head out within two days and since then she has been growing nicely. I have switched on a little fan to make sure she gets sturdy enough. I have also transplanted her into her final net pot and nested her in a bed of Speedgrow green mini cubes and soaked her for 15 min in a 500 ppm ph balanced RO water.
I would love to upload some videos, however this seems to be getting increasingly challenging on this website.
Here is the code that’ll give you 20% in Zamnesia‘s online store, just input ZAMMIGD2023 at checkout.

Likes
23
Share


@Vincent11
Follow
Hello all fellow growers.
I will first wish everyone Here
Merry Christmas and I wish everyone the best ever Christmas Holidays and Grows.
Yes My Gorilla Glue survived and done pretty well since a great Guy here in Grow Diaries advised me to use Cannazym on My Beautiful Gorilla glue when encouraged problems 2 weeks back.
She responded perfectly to it.
She started working on herself again.
This week she fully loaded the trichomes every where ,some started YES Finally Started to turn slightly milky day 60.
Buds going dense.
For me that's was the Sign I am waiting to get Flushing done.
Left it for 3 more days to make sure that more Trichomes start turning milky.
Day 63 was my Flush day. 15L, PH-6 water on 2 waterings in space off 15 minutes.
First Saturated the soil 3 L water then watered slowly with the remaining 12 litres off PH-6 water temperature 22-23 degrees.
Now it's all in Gods hands how big those coals will get.
Again have a great Christmas and have fun growing and following Grow Diaries.
Likes
162
Share


@Lukush
Follow
Day 4 of week 2 in veg 🎉🎉
She looking good and happy 😎✌️🌱🌱
Chanced hear pot with a 4 liter...
Still so happy cant wait to se hear scrogging 🤣😎✌️
Hope yall enjoy have a good one growmies ❤️🌼