Check the winners The Grow Awards 2026 🏆 


Likes
2
Share
@ThatsmyGrow
Follow
Ich mag den Wachstum, schön buschig, geilen Abstand. Fastbuds einfach beste


Likes
76
Share
@Roberts
Follow
Purple Ryder auto is growing great under the Medic Grow Mini Sun-2, in the Agrogardens nutrition. She has a great canopy full of budding sites. She is starting to develop a aroma as well. Everything is looking really good, and she is ready for another week. Thank you Medic Grow, Agrogardens, and Doctors choice. 🤜🏻🤛🏻🌱🌱🌱
Thank you grow diaries community for the 👇likes👇, follows, comments, and subscriptions on my YouTube channel👇. ❄️🌱🍻
Happy Growing 🌱🌱🌱
https://youtube.com/channel/UCAhN7yRzWLpcaRHhMIQ7X4g

Likes
46
Share
@squalino
Follow
Journal de Culture : Frost 1 (Semaine 5)
Génétique : Frostbanger (F2 Perso) | Système : Autopot 20L
📣 Remerciements
Un immense merci à toutes les personnes qui suivent ce journal depuis le début ! Un merci tout particulier à @MIA_BIOTABS et à Mrs_Larimar pour leurs précieux conseils et leur accompagnement. Merci à tous pour votre soutien !
🛠️ Configuration Technique (Rappel)
Éclairage : Lumatek ATS 300W Pro (réglé à 75%)
Distance lampe/canopée : 75 cm
Climat : Jour : 25°C / Nuit : 21°C
Humidité (HR) : 50%
Tente : 1m80 de hauteur
📅 Évolution & Entretien : Structure et Patience
plante 1:
64 centimètres (+31 )
une croissance incroyable
les têtes se développent à toute vitesse
les photos et video parle d'elle même.
me manque de la hauteur dans la tente et de la place .
NUTRITION (12/05)
que de l'eau Ph 6,3 du réservoir Autopot.
le 14/05
apport de 50 cl de tea compost
preparation tea compost :
LE MELANGE :
15 grammes tea compost avec 5 ml d'orgatrex pour 1 litre d'eau ( 4 plantes donc ×2. 50cl par plante ) .
mélanger le tous dans un sceaux.
LA PREPARATION
materiel :
1 sceau
1 pompe à air pour aquarium. ( 15 euro ).
je vais utiliser pour 18h00 la pompe de mon aire dôme de l'autopots. j'ai acheté aussi 2 petit diffuseur d'air à 4 euros . ustensil utiles pour aérer le tea compost .
mettre les diffuseur dedans allumé la pompe et laisser pendant 18h00.
normalement le température idéal pour que les micro-organismes se développent est entre 18 degrés et 22 degrés.
pour ma part le mélange était dans ma salle de culture à enciron 24 , 25 degrés.
voir video et photos ajouter
18h00 après
filtrer le mélange pour éviter touts dépôts susceptible de moisir et ramener des champignons.
donner au plante 50 centilitres .
Le tea compost se garde mal donné dans l'heure qui suis le stop de l'aération.
encore 1 semaine et elles auront de la place et je pourrai mieux m'en occuper.
PS:
I NEED HELP
MES AMIS J'AI BESOIN DE VÔTRE AIDE ET DE VÔTRE SOUTIENT .
VENEZ LIKER LE POST DU CONCOUR 《《DRYROCKET 》》S'IL VOUS PLAÎT. J'EN AI BESOIN LES AMIS MERCI À TOUS


Likes
4
Share
@Nargileus
Follow
Die pflanzen bekommen so langsam einen Schub, wir hatten die letzten Tage auch super Wetter bis 30 Grad. ich habe ein Paar kaputte und Alte Blätter entfernt. Die Klebefallen ausgetauscht. jetzt gehen sie in die Vorblüte und bekommen ab Montag noch Plagron Powerbuds dazu.
Likes
10
Share
@toscky
Follow
Esta semana seguí con 18 hrs unos días hasta que hoy le cambie el fotoperiodo a 12/12 y le puse otro foco más.
Seguiré así una semana y luego pasaré a nutrientes de flora.
Likes
35
Share
@SAC87
Follow
Hey growers.
This week I decided to water with a heavier ppm as the plants didn’t seem too happy. They were showing some yellowing on the lower leaf tips. Guess I was right bc they exploded up to about 12” +-. Then I decided to top and LST the main stem. Today I just adjusted the ties, removed 1-2 leaves from each plant depending if there was any in the mud or not. Yesterday I watered with 525 ppm, but unfortunately the water was a bit on the cold side and they’re having trouble soaking it up. I have since created a rez in my grow room just to hold RO water at approx 70 degrees. So that problem should be rectified.
I think I’m right on the cusp of preflower as I’ve seen one or 2 pistils.
Regardless they’re doing their thing and I’m trying to do as little as possible to keep them vegging as long as possible and end up beastly!!!
Happy Growing 🌱


Likes
3
Share
@JardineiroBr
Follow
Plantas vieram pra o lado de fora , já estão grandes e na pre flora .
Logo mais cadastro a floração.
Acredito que os pássaros não vão atacar elas desse tamanho atual.

Likes
16
Share
@osmrducks
Follow
Day 43: Watered at 6.5 today. Girls looking pretty good other than a small amount of clawing on some leaves. Thinking I have the fan blasted on them too much. Backed it off a touch and we shall see. Also, my rust spots are starting to come back barely and I think I may up the nutes next go as they are hungry. Stacking up nicely though.
Day 44: Busy, no update.
Day 45: Girls looking frosty! Think I may have screwed the pooch on one of the girls. Got a little rough picking up the pots and may have snapped a main cola. In the uploaded video notice where its zoomed. Praying! 🙏
Day 46: Letting the girls dry out today. Will give em a thorough watering tomorrow. Not able to upload pics/vids currently.
Day 47: No new updates.
Day 48: The girls look great! 💪 Gave them a cleanse and just fed with CalMag and Sensizym. Looks like they are finished with the stretch and starting to build mass. Hoping for at least a couple huge colas!
Day 49: Looking good. No new updates. I have been keeping a very close eye on the runoff PPM's as I am starting to have some rusty splotches on the leaves again. I have upped the CalMag to see if this helps as that is what it is looking like.
Likes
1
Share
@OldskoolHed
Follow
Getting frostier every day. Smells like over ripe fruit and bubblegum. Sweet terp profile. Starting to fade a little early but I do not want to add any nitrogen at day 35 in flower. I will let her ride it out. Hoping for some purple colors but we'll see.
Likes
16
Share


Likes
20
Share
@JohnnyCash420
Follow
6.4. Die 3 Babys wurden jeweils in 15l Stofftöpfe von Zamnesia 1,5cm unterhalb Erdfläche eingelegt und mit Erde bedeckt.
Als Erde wird die 420Grow Erde von Gardenboss verwendet und es wurden jeweils 10gramm von Rhizobacter (RQS) der Erde beigefügt.
Im untersten Teil der Stofftöpfe wurden Blähtonkugeln ausgelegt.
Die ersten 2-3 Wochen sollen die Pflanzen auf der Fensterbank zur Südseite wachsen und dann in einem Foliengewächshaus (Kesser) auf dem Balkon (ebenfalls südliche Ausrichtung) bis zur Ernte bleiben.

Likes
3
Share
@CheeRz
Follow
We are nearing the finish line! Both ladies look great, and the delicious aroma wafting from the tent brings a smile to my face every time. I think we should finish the run in about two weeks. 🍋🍋🍋

Likes
6
Share
@TyRun
Follow
Placing a dehumidifier or humidifier in the grow box turned out to be ineffective when both devices have their own automated settings. For instance, a humidifier set to 55% humidity works within a ±5% range, meaning it waits until the humidity drops below 50% to turn on and runs until it hits 60%. Since its sensor refreshes every 30 seconds, it might show 54% one moment and jump to 61% the next—not exactly stable at 55%. The dehumidifier behaves similarly.
To achieve more consistent results, it’s better to rely on a hygrometer inside the grow box and use “dumb” devices that simply turn on when powered. Connecting these devices to smart outlets provides more precise control.
For manual control, I maintained around 55% humidity by turning the humidifier and exhaust fan on and off via phone. Most moisture and aroma are released during the first three days, then taper off. The common rule of “when thin branches snap, it’s dry” led me to overdry my buds. A more reliable method is to monitor the hygrometer. When humidity stabilizes after the initial rise, wait one more day and then jar the buds.
Rehydrating Overdried Buds:
Overdried buds can be revived with a small piece of mandarin (or orange) peel, about 2.5x2.5 cm. Thoroughly wash the peel (even sanitize it if needed), cut a square, and place it on top of the buds in the jar. In my experience, this brought the humidity from 46% to 62% within 4 hours. Afterward, burp the jars for 15 minutes and monitor the hygrometer. If the humidity drops below 55%, return the peel for a few more hours. Once stable at 60-62%, remove the peel and continue curing, burping the jars twice daily for 15 minutes.
As for humidity packs like Integra Boost or Boveda, I used them because I had some lying around. These packs are designed for 12 grams of product, so they don’t make a big difference in larger jars. If you burp jars daily and gently rotate the buds, they’re not really necessary.
Trimming and Results:
After 7 days of drying, I decided to trim dry this time. It turned out to be somewhat more convenient—everything gets covered in resin anyway, but the remaining leaves easily fall off, speeding up the process. I went for a tight trim, removing as much as possible. During the process, I felt disappointed seeing how little remained on the branches. The buds turned out airy and small, and I started cursing American genetics halfway through the trim.
However, when it came to weighing, the results were surprisingly decent.
Considering the buds' poor appearance, they’re not going to impress anyone visually, so it might have been easier to shred everything and use it for extraction. I don’t have extraction equipment, so I’ll make cannabutter from the trim, and the buds can rest in jars for now.
Takeaways:
Use a proper hygrometer for humidity control, not built-in sensors on humidifiers or dehumidifiers.
Overdried buds can be easily rehydrated with citrus peel.
Daily burping and rotation are sufficient for curing without humidity packs.
Dry trimming can be faster and more convenient but may highlight issues with bud density.
Despite underwhelming appearance, high resin content makes the strain great for extraction.


Likes
38
Share
@LittleBigTrees
Follow
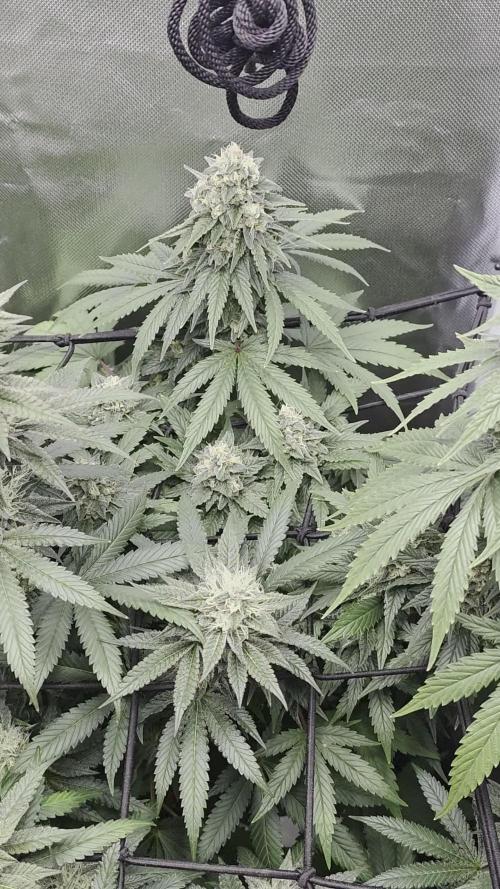
Some are swelling , one is smelling very different to the others .
I seem to have 6 phenos from small to tall and rounded buds to thin spear shaped buds.
I'm not sure which is my favourite yet but one has a very unique smell almost like pineapple and exodus cheese , it could be that one but I also like the bud formation on another,, we will see
Likes
2
Share
@Luke_Lee
Follow
———————————————
Woche 12/ Tag 80-86
Blütewoche 05/ Tag 30-36
Mars Hydro FC-E3000
Floragard Professional GrowMix
11L Stofftöpfe
Lichthöhe: 40cm
Lichtzyklus: 12/12;
PPFD: 808umol/m2/s
DLi: 35mol/m2/d
22° C - 60RH
2L pro Pflanze
BioBizz CalMag 1ml/1L
PH 6,5
Ventilator, Zu- und Abluft 24/0.
————————————————————
-Woche-12 / Blütewoche-05
•Pflanzen wurden bei Bedarf mit jeweils 2L Wasser mit CalMag pro Pflanze geheißen.