


Likes
Comments
Share

@Tower84
Follow
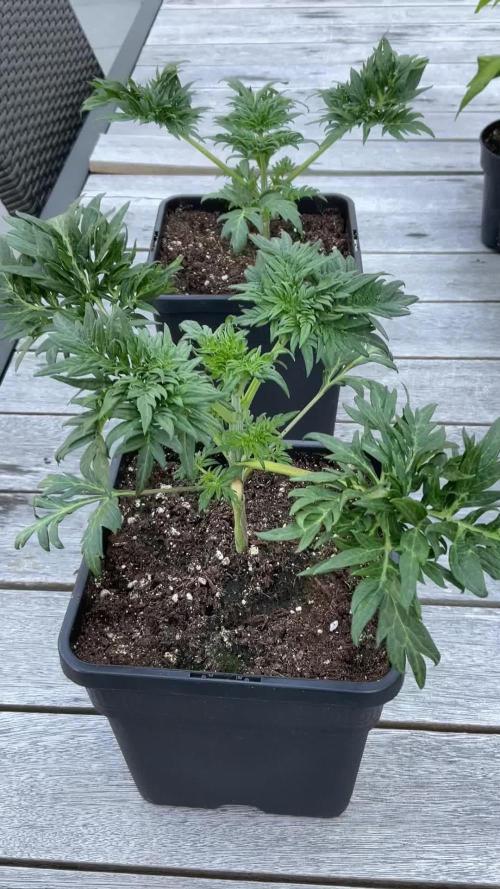
🇩🇪 Grow Report – Woche 3 (Mentha de Croco)
Die beiden Mentha de Croco von Terpyz entwickeln sich in Woche 3 weiterhin stabil und vital. Das Wachstum ist gleichmäßig, mit kräftiger Blattbildung und gesunder, sattgrüner Farbe.
In dieser Woche erfolgte erstmals eine leichte Düngung mit 2 ml/L Bio-Grow von Biobizz. Die Pflanzen haben die Nährstoffgabe gut aufgenommen, ohne Anzeichen von Überdüngung oder Stress. Das Wachstum wirkt seitdem etwas dynamischer.
Ein wichtiger Schritt beginnt heute: das Abhärten im Freien. Die Pflanzen werden schrittweise an die natürlichen Bedingungen wie Sonnenlicht, Wind und Temperaturschwankungen gewöhnt. Dies ist entscheidend, um sie optimal auf die Outdoor-Saison vorzubereiten und Stress beim späteren Umzug zu minimieren.
Der finale Umzug ist für Mitte Mai geplant. Dann werden die Pflanzen in jeweils 30-Liter-Stofftöpfe gesetzt, gefüllt mit Bio-Hanferde von Sonnenerde. Diese bietet eine ideale Grundlage für ein lebendiges Bodenleben und langfristige Nährstoffversorgung im Outdoor-Grow.
Fazit Woche 3:
Gesunde, kräftige Pflanzen mit gutem Start in die Nährstoffversorgung. Das Abhärten markiert einen wichtigen Übergang in Richtung Outdoor-Grow.
⸻
🇬🇧 Grow Report – Week 3 (Mentha de Croco)
The two Mentha de Croco plants from Terpyz continue to develop steadily in week 3. Growth is consistent, with strong leaf development and a healthy deep green color.
This week, they received their first feeding with 2 ml/L Bio-Grow from Biobizz. The plants responded very well, showing no signs of nutrient burn or stress. Growth appears slightly more vigorous since feeding.
A key transition starts today: hardening off outdoors. The plants are gradually exposed to natural elements such as sunlight, wind, and temperature fluctuations. This step is crucial to prepare them for outdoor conditions and reduce transplant shock later.
The final move outdoors is planned for mid-May, when they will be transplanted into 30-liter fabric pots filled with organic hemp soil from Sonnenerde. This soil provides an excellent foundation for a living soil ecosystem and long-term nutrient availability.
Conclusion Week 3:
Healthy and vigorous plants with a solid start to nutrient feeding. Hardening off marks an important transition toward the outdoor season.


Likes
Comments
Share

@Kannisho
Follow
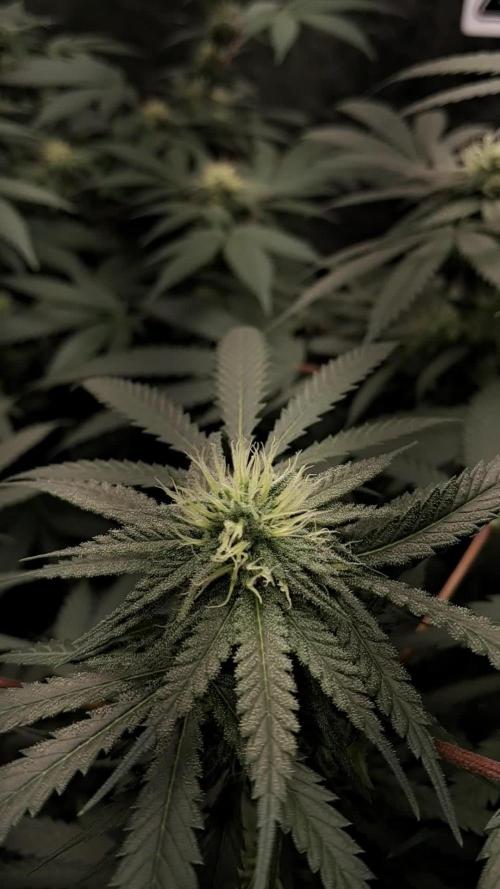
Results without automation; everything is done manually, from irrigation to the application of preventative measures


Likes
170
Share


@Master_weeda
Follow
Bonjour à tous les padawans et les maîtres jedis
Jour42 ma plante entre bien en floraison je pratique sur elle une defolliation pour permettre aux têtes de prendre la lumière
La floraison des plantes de cannabis
La plante de cannabis passe par différentes étapes de vie avant de parvenir à la récolte. Ces étapes sont : la germination, la pré-croissance, la croissance et la floraison.
Pour les autofloraisons il n'est pas nécessaire d'avoir de changer le cycle de lumière elle entre en floraison automatiquement voilà d'où elle tient son nom "d'autofloraison"
L'origine de l'auto-floraison vient de la sous-espèce "cannabis sativa ruderalis" , qui à l'origine produit de très faibles niveaux de THC. C'est en croisant cette variété de marijuana avec d'autres qui produisent des niveaux de THC plus élevés qu'à vu le jour ce magnifique compromis que sont les variétés auto-fleurissantes avec des taux de THC très satisfaisants. En parallèle, cela a permis d'améliorer la production de ces variétés, qui initialement étaient exceptionnellement basse.
Pour des résultats optimaux, en culture Outdoor (extérieur), je recommande que la germination des graines de marijuanaAuto-flo se fasse entre avril et août.
En culture Indoor(intérieur), la photopériode idéale que ce soit pour la croissance comme pour la floraison est de 20h de lumière. N'oubliez pas que ces graines ne sont pas tributaires de la photopériode pour passer en floraison.
Il est préférable d'utiliser des pots d'une capacité de 10 à 20L dès le début, étant donné que leur cycle de vie est réduit, les auto-flo n'ent pas besoin de plus de volume pour se développer. Vu sa petite taille (et la discrétion) elle fait l'objet d'un bon choix pour la culture de cannabis sur balcons.
La première variété de Lowryder auto-floraison a été créé à partir de cannabis indica sativa croisé avec des génétiques de cannabis sativa rudelaris par la banque de graines de marijuana "The Joint Doctor". Puis vinrent la White Dwarf de "Buddha Seeds", la Roadrunnerde "Dinafem", l' Auto Stoned d' "Autofem", la Speed Devil de "Sweet Seeds" , la Maxi Gom de "Grassomatic", la Flash, la Gnomo de Kannabiaet bien d'autres.
Jour42 defolliation (video)
Avant toute chose n'oublions pas de bien désinfecter ses outils et bien ce laver les mains.
Quesque la defolliation ?
LES CULTIVATEURS AMATEURS, PRENEZ GARDE, MAIS NE PRENEZ PAS PEUR
La défoliation consiste à retirer les feuilles des plants de cannabis en intérieur afin d'accroître le rendementfinal. Le cultivateur amateur doit faire preuve de vigilance lorsqu'il commence à appliquer cette technique de taille. Malgré le débat sans fin entre ceux qui prônent cette technique et ceux qui la dénigre, il n'y aucune raison pour qu'un amateur ne s'y essaie pas afin de voir si ça lui convient ou non.
COMMENT DÉFOLIER
Que vous tailliez les feuilles ou les branches des plants de cannabis, il vaut mieux utiliser un sécateur stérile qui est confortable en main. Arracher des feuilles à la main manque de finesse et engendre souvent par accident, l'arrachement des couches d'une tige en plus de la feuille. L'objectif principal de la défoliation est de permettre une meilleure pénétration de la lumière et de promouvoir la production de plus grosses têtes. Les feuilles éventails qui font de l'ombre doivent être retirées. Tailler la tige principale et/ou les pousses secondaires n'est pas de la défoliation.
La règle d'or lorsque vous donnez à vos plantes un rafraîchissement est de commencer avec les feuilles nourricières les plus grandes et les plus larges, en taillant du bas vers le haut. Il est important de retirer les feuilles stratégiquement et non pas au hasard. Pensez également qu'il vous faut limiter votre rafraîchissement à approximativement 10 à 20 % des feuilles totales de votre pied. Il est très facile de s'emporter durant la taille et de se retrouver avec des plantes chauves. Un excès de taille de feuilles empêchera la photosynthèse et paralysera vos plants.
QUAND FAUT-IL DÉFOLIER
Il est assez rare d'appliquer la défoliation comme seule technique pour obtenir un fort rendement. La taille des feuilles est généralement associée à d'autres méthodes de tailles et de palissage pour un meilleur rendement telles que le topping ou étêtage, le FIMming, le LST, le manifolding, le supercropping et le ScrOG. Les cultivateurs utilisant la méthode ScrOG auront besoin de retirer toutes les croissances inférieures ainsi que les feuilles et les tiges se trouvant sous le filet.
Les plants de cannabis peuvent être défoliés dès lors qu'ils sont passés de la phase de plantule vers la phase de croissance végétative. Cependant, il est recommandé aux cultivateurs amateurs de laisser aux plantes 1 à 2 semaines de croissance végétative avant de s'attaquer à la défoliation de celles-ci. De plus, certaines variétés sont plus sensibles à la taille que d'autres et de ce fait, seront plus stressées par la taille des feuilles. Surveillez minutieusement le comportement de vos plants après la taille. Une période de convalescence de minimum 3 à 7 jours avant de recommencer la défoliation est fortement recommandée pour éviter trop de stress aux plants. Les cultivateurs peuvent également défolier pendant la phase de floraison, ce qui permettra à l'énergie de la plante d'être concentrée vers la production de têtes tout en limitant l'ombre et l'excès d'humidité. Néanmoins, il est important de ne pas défolier trop tard sous peine de simplement blesser ses plants inutilement.
LES AVANTAGES DE LA DÉFOLIATION
Évidemment, l'avantage numéro un de la défoliation, c'est l'augmentation du potentiel de rendement de cette technique de taille pour tous types de cannabis allant de la photopériode aux variétés autofloraison. Ce n'est pas un secret que les fleurs qui reçoivent plus de lumières deviennent plus grandes et larges que celles dissimulées dans l'ombre des feuilles. De plus, retirer les feuilles intérieures des plants touffus aide à prévenir toutes menaces de moisissure. Les plants très feuillus avec un feuillage intérieur dense produiront une quantité importante de têtes pop-corn. Dans le pire des cas, les branches de têtes et les têtes qui sont denses succomberont au pourrissement.
Si vous observez des gouttes d'eau se former sur la surface des feuilles, il est grand temps de penser à faire de la défoliation. Libérer la zone inférieure et médiane des feuilles est un excellent moyen d'améliorer la circulation de l'air.
LES DÉSAVANTAGES DE LA DÉFOLIATION
Les plants de cannabis en intérieur bénéficient de la défoliation pour deux raisons. La première est parce qu'ils reçoivent la lumière d'une source stationnaire au-dessus d'eux, et la deuxième est parce que les conditions environnementales sont contrôlées par le cultivateur et non Mère Nature. Les plants d'extérieurs eux, n'y gagnent pas beaucoup, car les cas échéants se vérifient pour eux. Le soleil traverse le ciel, illuminant sur sa route, différentes portions de la plante de son lever à son coucher.
Les cultivateurs en extérieur n'ont pas besoin de manipuler les plantes afin qu'elles se développent en adoptant une structure plate puisque le soleil est infiniment plus puissant que n'importe quelle lampe de culture et qui plus est, il est toujours en mouvement. Tailler les feuilles des plants extérieurs les rend également plus vulnérables aux conditions humides et brise leurs barrières naturelles contres les nuisibles.
De nombreux cultivateurs d'intérieur peuvent, et malheureusement, c'est souvent le cas, réduire le rendement final à cause d'une défoliation faite au mauvais moment et/ou excessive. Tailler les plantules n'est pas conseillé et engendre souvent des plants nains. Scalper les plants matures est encore pire, et au lieu d'obtenir de longues branches de têtes, vous obtiendrez probablement encore moins de fleurs. De même, tailler des plants malades ou en mauvaise santé à n'importe quelle période de la croissance risque de paralyser la croissance plutôt que d'encourager la formation de fleurs denses.
Jour44 Arrosage une fois sur 2 topmax de biobizz
Jour46 arrosage avec de l'eau ph6.3 à laquelle j'ajoute 0.8g par litre d'eau de feeding enhancer greenhouse.
Jour47 léger arrosage.
Jour48 léger arrosage

Likes
34
Share


@AshBrand
Follow
12/8/21 - Wow! They are popping! The humidity is still high but we’ll get it under control.
12/9/21 - They look really good! Stretch is under control now. They are flowering hard right now. We ordered a dehumidifier as we don’t want any mold.
12/10/21 - Looking good. They are bulking up by the day. Still feeding as they get dry. We gave them a feeding today. See pics from today and yesterday.
12/11/21 - The ladies are showing off. Frost is starting to form! See today’s video. Dehumidifier will be here in a couple days.
12/12/21 - Looking good! We are very excited for the buds to be showing off so early. This week will be the last with Beastie Bloomz. Then we run Cha Ching until harvest.
12/13/21 - A little humid but looking great. Dehumidifier will be here tomorrow HOPEFULLY. We really need to dial back to 45%. See todays pics!
12/14/21 - The dehumidifier is supposed to be here today. We will set it to 45% and hopefully that calms down the humidity. Other than that the plants are looking amazing! We are heading to week 5 of flower tomorrow :)

Likes
10
Share


@RandomStreetMerchant
Follow
This week was good, the girls are bulking up and looking good. The twisted sister looks like she is coming back around.
Going to veg these girls out for a while see how thicc we can get ‘em.
Until next time growmeis, best of luck ✌️ 06/26/23

Likes
4
Share


@GoodTimesOrganics
Follow
Die Blue Dream hat sich zu einem wahren Monster entwickelt.
Der Sativa Einschlag drückt richtig durch, so langsam hört der Stretch aber auf.
Die Blütenansätze und Stigman sind richtig dick und breit, was ich zuvor bei noch keiner Sorte so stark wahrgenommen habe.
Die Interniodenabstände verkürzen sich nach oben nun wieder etwas.
Der Geruch ist bisher eher erdig, würzig, hazeig.
Ich bin sehr gespannt wie die weitere Entwicklung verläuft.
Likes
8
Share

@Organic473
Follow
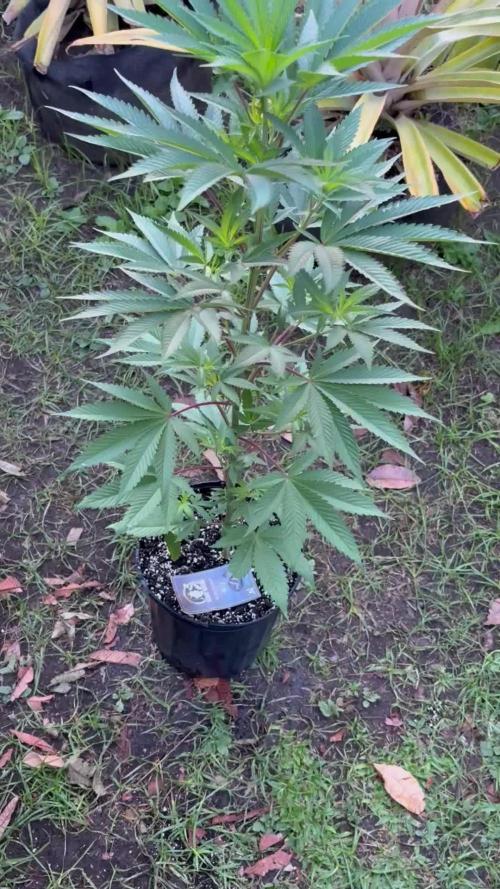
This girl is growing so healthy and lovely. I am just loving her every day so far no complaints. I may have to change the pot size soon.
Likes
229
Share


@OrganicNature420
Follow
Germination date 🌱 12/07/2021
Day 29 12/08/2021
Strain 🍁 SinCity seeds Frosted Biscotti
(Biscotti Sundae x Whitenightmare)
THC% • Unknown
💡 Mars Hydro FC4800
• Power draw 480W + 5%
• Max coverage 5 x 5
• LED 2070pcsSamsungLM30B1&Osram660nm
• Max Yield 2.5g / watt
• Noise level 0 DB
• Removable Driver +2m cable
• Daisy chain (multiple lights)
https://marshydroled.co.uk/products/mars-hydro-fc-4800-led-grow-light-samsunglm301b-commercial-greenhouse-medical-indoor-kit 🇬🇧
https://www.mars-hydro.com/buy-fc-4800-480w-4x4-energy-saving-full-spectrum-commercial-led-grow-light-mars-hydro-for-sale 🇺🇸
PROMO CODE • (ORG420) DISCOUNT 👍🏻 marshydroled.com
⛺ Mars Hydro 120 x 120 x 200cm
📤📥 AC infinity 6inch
💧 10lt dehumidifier
❄️ 3.1kw air con system
💉 Nutrients GreenBuzzLiquids
Organic Grow Liquid • 1-4ml until 2wk flower
Organic Bloom Liquid • 2-4ml flower stage
Organic More PK • 2-4ml +wk3 of flower
Organic Calmag • 1-2ml/lt whole grow
Fast Plants Spray • first 3days at night lights off
More Roots • 2-5ml veg +2wks flower
Fast Buds • 5ml +wk2 of veg until 1wk flower
Humic Acid Plus • 2-5ml whole grow
Growzyme • 2-5ml whole grow
Big Fruits • 2-5ml flower stage
Clean Fruits • 5ml flush 1wk
Ph powder
Root Gel
Living Organics
https://greenbuzzliquids.com/
PROMO CODE • organicnature420 15% off ✌️🏼
🥥 Growing Media • Coco Coir
Notes 📝
The Strain I'm most exited about ❤️ topped and now ready for 8week veg. Light and nutrients doing their thing, well happy now I'm seeing some decent progress. See you next week GD
Happy growing fam ❤️🌱🍁👍🏻

Processing
Likes
1
Share


@TaZmainMan
Follow
She was not suppose to grow that long..22 weeks..but due to the issues I had with the nutrients set me back a few weeks.. a really nice strain to grow i must say..I realized that i do not have enough watts for the grow box..and this affects my yealds.. Its not the best yeald in the world but its bud i didnt have..
Really not happy with the dry weight..but its oky i understand
Only real problems i had was my Ph levels that keeps dropping but that is normal i suppose..My light coverage isnt kind of bad cause i ended up with a lot of small nugs that clearly didnt get light.. well it's all about learning..im learning as i go along..every grow gets better and better..
at least this time I'm growing a strain I'm mad about..
the 48hours darkness at the end of the ripen stage just before harvest makes a huge difference! the buds doubled in size but it will lose the density will drying..
buds are on the rack buzy drying..hence i could not give a dry weight yet.
I'm alittle gown looking at the buds almost dry and they shrunk in size and arent as big as they looked..its alittle heart breaking cause i got only a few good sized bud and the rest is just this little tiny nugs the size of my half my pinky finger nail..😞some are slightly bigger than that..and then the top nugs which was the main colons ..they are about 6 good sized buds..its okay i learned from her and its not a waste cause she did give me some buds in the end..
now the curing starts..going to cure for a month more or less will see as we go along..
Super Cheese Thank you!0


Likes
31
Share


@LockDownGrow
Follow
Everything has gone really well up till now ,
She is start too show the beginning of pre flower , I wasn't expecting that for a couple of weeks so not sure if this is normal ? But she is growing fast and strong ,
I picked of a few select large leaves that where coving the side branches , but very minimal , mabey one or two leaves of each plant , and also pulled down the branches too help with light getting down into the center of the girl ,
Processing
Likes
7
Share


@Kushizlez
Follow
Days 35-42
(Day 36) Some minor problems starting to arise here. A few times this week it got up to 90+ degrees which I think may have caused a bit of heat stress in some of the plants. I’m seeing a bit of cupping/crinkles on some of the fan leaves and some of the new growth is looking pretty gnarled and twisted. I hear windburn can cause this too so I’m turning my fans down to low speed. This could also be a problem with humidity so I’m going to turn off my humidifier, dim the lights and raise them. During my last feeding I mulched in some worm castings but it seems like they’re keeping the soil/coco from drying out. Pots are still decently heavy and even the surface is still quite moist but they aren’t showing any major signs of overwatering. I figure it will only be a few weeks before the castings break down so I will just leave it.
A few of the plants are starting to show yellowing leaf tips which is probably some kind of micro nutrient lockout from my PH being slightly too high. It could also be from nute burn so I will water in 6.0 until I see some runoff. Although the most likely culprit is potassium excess. I’ve been feeding potassium almost as much as nitrogen so far. I know that can cause the yellowing of leaf tips by locking out trace minerals. It can also cause leaf problems like crinkling. Excess K can even cause water retention! Will water at 6.0 until run off next watering.
The lst is coming along nicely. It was a good idea to remove the first two sets of branches (not leaves). Now I have 4-6 perfectly even stems coming from each plant that I plan to top one more time each.
(Day 37) Today I’m going to vacuum, clean, wipe down and spray all my equipment in the tent. I’ve been letting the floor get quite dirty and I haven’t had the chance for a thorough clean since last round. I’m kind of surprised I haven’t seen any powdery mildew yet. I guess the prevention spray is working because the room has to be infected from my last crop.
(Day 40) I was reading that you can foliar spray whatever you are deficient in for an immediate uptake. I‘m going to try that with my current potassium excess since it locks out trace minerals. I’m going to foliar feed a bit of phytoplankton at 15ml/L and some MagnifiCal + VeloKelp from Remo nutrients both at 5ml/L. The cal mag is not organic but as long as it’s not going into the soil and doesn’t contain chlorine I’m fine with it. I’m also going to be changing the light cycle to 18/6 for the remainder of veg. This will be their first dark cycle so they can properly foliar feed. Edit: humidity shot up to 85% a few hours after foliar spray.
I went to top dress everything today and I mixed up the plants while doing so! So the ones I was unsure about I gave 1 extra tablespoon. I won’t top dress again for at least 10 days. Might give a light tea sometime next week. I also tilled the shit out of the top of each pot. It had a hard crusty layer on top that was keeping the medium from drying out properly. I’m not going to water again until everything is bone dry. Then I will water until slight runoff at 6.0 ph with some Dr. Marijane bacteria/root probiotic.
I’m starting too see a lot more of these abrasions on some of the bigger fan leaves. It almost looks like thrip damage but I’m 100% sure it’s not a pest above ground. It could be bulb mites, which I found in my worm castings but I can’t check until the roots are more established in their pots. The leaves themselves are cold and feel damp to the touch. I haven’t even seen a fungus gnat since I last fed. I’m hoping it’s related to the K excess and clears up with the troubleshooting.
(Day 41) Just ordered a wire cube rack to prop my plants up with and help evaporation/root warmth. Each cube is 11.8”x11.8”x11.8” and it comes with 16 cubes. So it will fit just perfectly in my 4x4. Depending on the size, I might order another one for the flower room where I would need 25 cubes.


Likes
68
Share


@cRypto666
Follow
Freunde der Sonne :) KURZE INFO DER LETZTE EINTRAG HIER IST IMMER DER AKTUELLLSTE NACH DATUM NACH UNTEN SOLLTEN UNTEN SCROLLEN UM ZU VORHIERIGEN EINTR'GE ZU GELANGEN : <3 WEEED
wollte dir ein text drücken :) hab mich vertippt... aö ich bin heute eine Bewustseinsstufe beim Grown aufgestiegen ! Endlich kann man jetzt Täglich meine Real Talk oder Reaktion ViD/PIC anschauen. Absofort werde ich meinen GARTEN anderts wahr nehme wer rein schaut kann Exklusive Tipps für seinen Garten gebrauchen. Gerne bin ich für Fragen offen und ich helfe wenn ich kann fals nicht findet sich in der Gruppe immer jemand.
DER GRUND IST DAMIT ICH NACHVOLLZIEHEN KANN WAS ICH FALSCH GEMACHT HABE BZW UM WISSEN ZU MANIFESTIRE UND GEWISSE GEDANKENVERBINDUNGEN GESACHFFEN SIND. IM GRUNDE MEIN GROWTAGBUCH ICH TEILE MEINE GEDANKEN MIT EUCH GLEICHGESINNTEN UND WÜNSCHE ALLEN EINE ERFOLGREICHEN GROW brO
cRypto666
2 minutes ago
cRypto666
<LIEBE> BRUDER ICH LADE DIE VIDEOS UND BILDER NOCH HOCH UND ICH BIN MIR EIGENTLICH SICHER ES KÖNNTE DIR GEFALLEN VIEL SPAß
AUF QEEN SEED GIBTS WIRKLICH GUTE BLOGS MIT TOURTORIALS FÜR NEULINGE/ANFÄNGER .
Konnte mir so mein Verständnis und Grundlage die fürs grown wichtig ist gut lernen und Aneignen ! WIRKLICH VIELE UND GUTE INFOS !!
https://www.royalqueenseeds.de/blog-cannabis-anbau-c3
https://www.royalqueenseeds.de/blog-die-10-grossten-fehler-von-cannabiszuchtern-n86
es ist soweit heute beginnt Woche 1 ... BEVOR WIR STARTEN, WICHTIG WASCH DIR GRÜNDLICH DIE HÄNDE UND BENUTZE GUMMIHANDSCHUE BEIM ARBEITEN! SEHR WICHTIG!
Ich freue mich das ich heute wieder das Gärtnern begonnen habe und eine Hällfte der Samen in der Erde sind. Kennt ihr das Gefühl der Vollkomenheit wenn man sich im Garten beschäftigt ? Für mich ist das Therapie und für euch?
Ich spiele mit dem Gedanken anstatt Samen zu growen mir einfach eine Mutterpflanze Anschaffe um mir meine Stecklinge zu ziehen ! Dafür brauch ich aber noch ein anderes Zelt und eine Lampe. Die Mütterpflanze kann dann erst mal wachsen und ich kann nebenbei noch mal ein Durchgang mit Autos schaffen bevor die Steckis fertig sind. Wenn es soweit ist gebe ich euch bescheid wenn ich Samen und Setup bei mir stehen.
So jetzt aufs eigentliche zurück. Ich habe heute erst mal mein Setup geprüft und so gut wie möglich desinfiziert. Es ist verdammt wichtig das nach jedem Durchgang sauber gemacht wird also zb Zeltwände, Boden, Topfe, Boxen, Wasserbehälter. Habe ich gemacht und habe meine ersten Samen in Anzucht Erde gesetzt, befeuchtet, markieren und in die Box. Wände und Deckel mit zersteuber befeuchten und ab unter die Lampe. WICHTIG MACH DIE ERDE NICHT SO NASS ! DAS GEFÄLLT IHNEN NICHT SONDERN HALTE SIE AM BESTEN FEUCHT IN DEM DU ABEND / MORGEN EIN BISCHEN WÄSSERST!
ICH STELLE DIE LAMPE AUF CA 40 cm zum Boden ein bzw der Box. Ein gewisser abstand muss sein um die Fläche komplett zu Beleuchten. Da meine Lampe dimmbar ist muss sie nicht ganz oben hängeng sondern Kann näher an die Pflanzen ran und Stelle den Dimmer auf 20 %. Das reicht anfangs in dem Stadium völlig aus, muss aber dann später angepasst bzw hoch geschraubt werden!
Lüfter I läuft 24/7 und sorgt für optimale Bedinungen! WICHTIG
LAMPE 20/4 HELL/DUNKEL (REGLER STEHT AUF 20 % LICHTLEISTUNG)
DANN HABEN WIR ES EIGENTLICH SCHON GESCHAFFT UND ALLES RICHTIG GEMACHT!
Ich versuche schon so viel wie möglich von meiem Wissen an euch weiter zugeben bzw auf Papier zubringen, ist aber NICHT IMMER ZU 100% Möglich, da es einfach zu viele Informationen sind !
Bei fragen einfach fragen und die Comiunity hilft sicher !!!
KOMMT ZEIT KOMMT RAT ... ich hab 2 Monate Infos eingeholt und Produkte verglichen !
Auf Queen Royal Seeds gibt es gute Anfänger Tipps sogar teilweise mit Video. Mir hat das sehr geholfen mein Grundwissen aufzubauen.
BEVOR IHR DAS GÄRTNERN ANFANGEN KÖNNTE MACHT DIR GEDANKEN WO DEINEN GARTEN STEHEN KANN.
#1 AM BESTEN IHR HABT EIN GARTENZIMMER DER NUR ZUM GÄRTNERN BENUTZT WIRD IST DIE BESTE LÖSUNG DA DU DEINE UMGEBUNG VIEL LEICHTER SAUBERHALTEN KANNST
#2 DU KANNST DEIN GARTEN AUCH INS WOHN. BZW SCHLAFZIMMER STELLEN WENN DU KEINE MÖGLICHKEIT HAST EIN GARTENZIMMER ZU MACHEN. DAS IST NICHT DIE PERFEKTE UMGEBUNG ABER WENN DU ABLUFT RAUSLEITEN KANNST DANN MACH ES ! DU KANNST ES AUCH IN DEN RAUM STRÖMEN LASSEN MUSST DIR ABER BEWUST SEIN DAS ES EVTL DAS SCHIMMELN IM RAUM ANFÄNGT! IST MIR SCHON PASSIERT ! LEITE SIE WENN MÖGLICH AM BESTEN RAUS !
ACHTE DAS DARUF DAS DEINE LUFTFEUCHTIGKEIT UND TEMP KONSTANT BLEIBEN UND ES NICHT EINMAL ZU WARM UND EINEMAL ZU KALT... IHR WISST SCHON SORGE FÜR EINEN KONSTANTE UMGEBUNG IN DEINEM GARTEN. DIE WAHL DER SAMEN IST AUCH WICHTIG DA ES SORTEN GIBT DIE EINE WARME UMGEBUNG EINE KONSTANTE ODER EINE EHER KALTE UMGEBUNG. AM BESTEN IHR PASST EURE SAMEN EURER UMGEBUNG AN HEIST DU WOHNST IN EINEN LAND WO ES EHER WARM IST ALSO 25-30 ° C dann WÄHLE AUCH EINE PASSENDE SORTE AUS!
MEHR GIBTS ERST MAL NICHT ! BIS ZUM NÄCHSTEN MAL!
Likes
8
Share


@Chanardo
Follow
They rise up! I I watered the substrate before plant the seeds. The water was dechlorinated pH controlled.

Likes
3
Share


@Ryno1990
Follow
Grapes n Cream fast flowering photo from Atlas seeds comming in on her first week of veg from seedling stage she popped up first out of the plants an shot straight up
Comming to the end of week 1 of veg the Grapes an Cream is growing good starting to pick up speed
Likes
8
Share


@Hiroots420
Follow
26/05/2021 (Day 71)
Se realizo un nuevo cambio de nutrientes y las plantas vienen mas felices que nunca, no se observa ni una carencia en las hojas y los parámetros se encuentran muy controlados.
29/05/2021 (Day 74)
Se agregó 20L de solución, las plantas vienen muy bien comenzándo el engorde de una manera muy optima.
El espacio de cultivo está repleto 100% en conjunto con los 600W en 8 chips de Citizen que logran llegar a todos los puntos de la carpa.
Likes
25
Share


@Ganjeiro420
Follow
Eai familia, sejam todos bem vindos a mais uma semana de cultivo dessa maravilha da FastBuds.
Nesta semana notei que as folhas de baixo da banana purple punch estavam amarelando e queimada nas pontas e laterais, então fiz uma rega com mais nutrientes e até agora as folhas que estão crescendo novas já estão com a cor bem melhor.
Também fiz uma amarra para controlar o tamanho, e ver se teria ramificações novas já que ainda não tenho um grow e o espaço da sapateira não e grande, até o momento está dando super certo, as meninas deram uma boa engrossada no caule e geraram vários novos galhos.
Acredito que na próxima semana já inicia a pré- floração então dei nutrientes pra elas já se prepararem pra iniciar o crescimento das flores.
Obrigado a todos que estão acompanhando até aqui espero trazer um resultado incrível!