
Likes
Comments
Share

@Xpie77
Follow
Kweekverslag: 4 x Spliff Seeds Gelato
Instellen
Zaden: 4 x Spliff Seeds Gelato (indica-dominante hybride, Sunset Sherbet × Thin Mint GSC-lijn)
Potten: 11 liter kunststof potten
Medium: Standaard potgrond (geen extra perliet of wijzigingen)
Tent: 120 × 120 × 200 cm (4 × 4 ft)
Verlichting: Bestva Pro 4000 LED (volledig spectrum, 3000K + 5000K + 660 nm + 730 nm IR) – hangt op ±45 cm boven de luifel
Lichtschema: Week 1-4 veg = 18/6, daarna flip naar 12/12
Temperatuur: 24-26 °C dag / 18-20 °C nacht
Vochtigheid: 55-65% veg → 50-55% bloei
Watergift: handmatig, pH 6,2-6,5, alleen water + Cal-Mag indien nodig
Week 4 Vegetatief (einde groeifase)
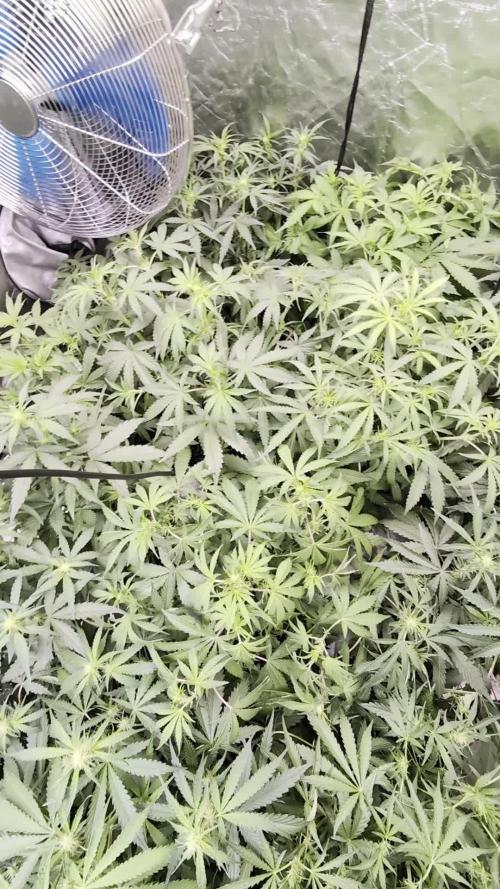
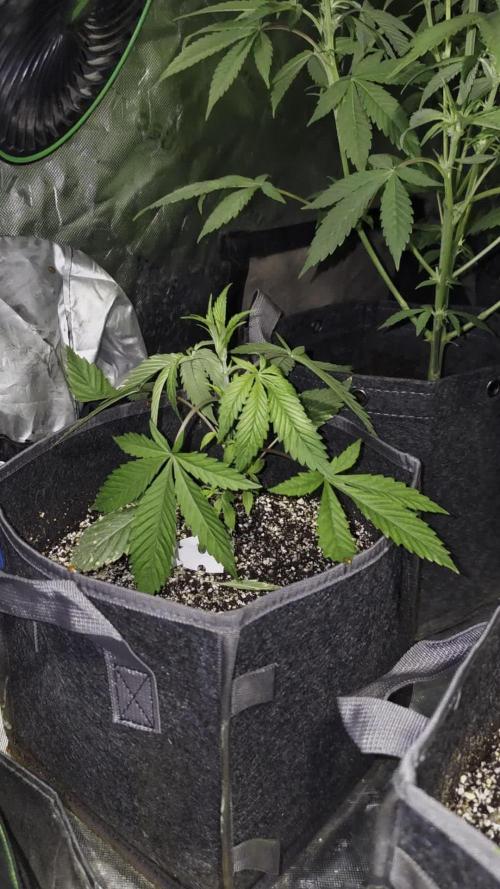
De 4 planten zijn supercompact en bossig – precies zoals je van Gelato had verwacht. Gemiddelde hoogte: 38-46 cm (plant 1 en 3 iets groter door betere hoek naar de LED).
Dikke, donkergroene waaiervormige bladeren met perfecte internode-afstand (±4-5 cm).
Goede vertakking vanaf de 3e knoop, al 6-8 zijtakken per plant.
Geen inspanning, geen tekortkomingen, geen gele randjes – de potgrond was perfect tot nu toe.
Luifel is mooi vlak, LED dekt de hele 120×120 perfect (geen hotspots).
Geur: nog bijna niks, alleen een heel licht aards/zoet ondertoontje als je de bladeren kneust.
Alles zag er top uit, dus ik heb op dag 28 van de groei direct geflipt naar 12/12. Geen training gedaan (geen LST/SCROG), pure bush-stijl.
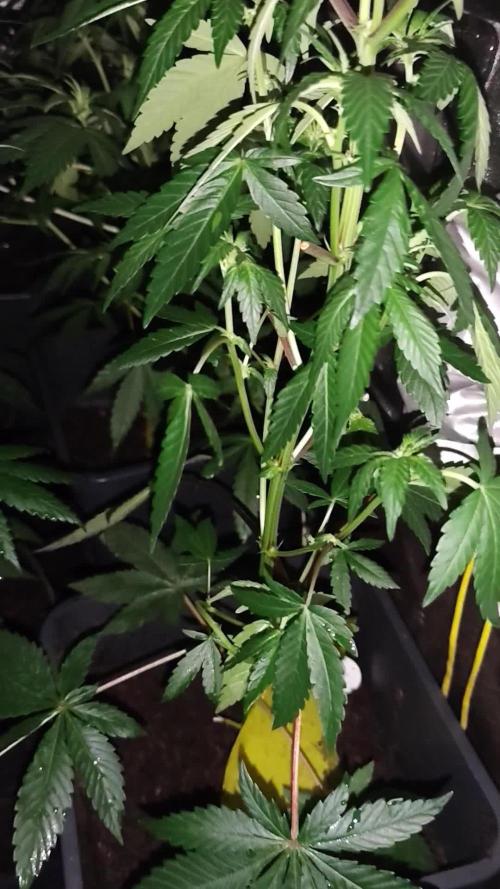
Overgang & Bloei in week 1
Direct na de flip begon de typische Gelato-stretch. In de eerste 7 dagen bloei zijn de planten ±10-15 % gegroeid (eindhoogte week 1: 45-55 cm).
Eerste witte pistillen overal zichtbaar vanaf dag 4-5, vooral op de hoofdcola en de verhoogde zijtakken.
Toppen wordt al wat dikker en begint licht te “swellen”.
Bladeren blijven donkergroen en gezond, geen klauwen van branden.
Geur: vanaf dag 6-7 ruik je het al duidelijk – zoet, romig, met een hint van bessen en een heel licht gasachtig/munt-achtergrondje. Typisch gelato!
Waterbehoefte iets essentieel (nu ±1,5-1,8 liter per pot om de 2-3 dagen).
LED nog steeds op 45 cm, lichtintensiteit perfect (geen bleken).
Algemene observaties & tips voor deze opstelling
4 planten in 120×120 met 11L potten is ideaal: genoeg ruimte voor de bossige Gelato-structuur zonder dat ze elkaar verstikken.
Bestva Pro 4000 presteert uitstekend in deze tent – gelijkmatige dekking, geen dode hoeken.
Potgrond houdt het prima tot week 3-4 bloei, daarna waarschijnlijk starten met licht PK-boost (Gelato is een zware feeder in bloei).
Verwachtte bloeitijd: 8-9 weken (56-63 dagen) volgens Spliff Seeds info. De uiteindelijke hoogte wordt waarschijnlijk 80-110 cm.
Opbrengstverwachting met deze opstelling: 450-650 gram droog totaal (realistisch voor 4 gezonde meisjes onder deze LED).
Tot nu toe een gemakkelijke, stressvrije kweek. De planten zien er gelukkig uit en de geur begint al lekker te worden. Ik hou het verder in de gaten en update

Processing
Likes
33
Share


@burnerac
Follow
Day 92: Going to try a week without nutrients. The slurry test was good. I am either over or underwatering. Cannot seem to get it correct this time. However, after last night's watering, she is a lot less droopy.
Day 93: no pictures. Added one gallon pH6.5 water with 2 tablespoons Herculean Harvest.
Day 94: nothing to report other than she is drinking rapidly and looking healthier.
Day 95: added one gallon pH6.5 water with 2 tablespoons Herculean Harvest. Almost no runoff.
Day 96: added one gallon of pH6.5 water with nutrients
Day 97: nothing to report. Trimmed some leaves that never survived the yellowing.
Day 98: nothing to report. Decided to let her dry another day.


Likes
17
Share


@HeartStrong_Garden
Follow
She is looking beast. She caught up to her sister but won't need to be topped. The leaves are not showing any discoloration on the Gaia green. Just add water...


Likes
9
Share


@karchutos
Follow
Por ahora todo va bien, la Mandarin parece un poco estancada en el crecimiento respecto a la Nl5.


Likes
11
Share


@Karl_Heinz420
Follow
Gießen - 💦 Week 6: P-K 7-5 Boost!
1,0 Liter je Lady / Tag
Düngen 1x pro Woche gem. angegebenen Schema. Die letzte Düngung 🌺🍁 anschließend lediglich Osmosewasser PH 6,5 mit 1,2 ml/l Calmag.
Sanlight Evo 3-60 100% (1000-1200 PPFD)
Temperatur: 23-25 grad Celsius
r.Lf.: 50-55%


Processing
Likes
2
Share


@eldruida_lamota
Follow
Esa familia, nuevo LST con misty gorilla autofloreciente, empezaremos de momento con 2/3 misty gorillas con este método de cultivo. Uno de los ejemplares me parece algo pequeño aun como para andar atando nada.
Añadi BETA SHARK , quite el producto de crecimiento, y aporte el producto de floración de la gama BLACK LINE de AgroBeta.
También quite el enraizante, ya que fácilmente consigo buenos cepellón es y con varias semanas de dosis son suficientes.
Ph controlado en 5.8 humedad entorno al 45%, la temperatura no sube nunca a los 27 grados , se queda siempre en 26 poco.
Se las ve con buen color , un tallo bastante manejable, fueron atados entre 2 y 3 nudos por planta con alambre forrado.
Espero que os gusten las fotos e imágenes ya que gracias a Zambezaseeds, marshydro y AgroBeta es posible este cultivo, un saludo fumetillas 💨💨💨💨.

Likes
6
Share


@BioGrowBayer
Follow
In der zweiten Blütewoche läuft alles ohne Probleme. Die Pflanzen zeigen weiterhin gesundes Wachstum und reagieren sehr gut auf die Bedingungen. Wir haben langsam begonnen, die Nährstoffzufuhr auf Blüte-Dünger umzustellen, um die Entwicklung optimal zu unterstützen. Gleichzeitig wurde die Lichtleistung schrittweise von 50 % auf 75 % erhöht, um den Pflanzen mehr Energie für die Blüte zu geben.
Zudem wurde eine leichte Entlaubung durchgeführt, um die Luftzirkulation zu verbessern und den Fokus der Pflanze auf die Blütenbildung zu lenken. Alles in allem verläuft die zweite Woche der Blütephase sehr vielversprechend.

Likes
36
Share


@Mr_und_Ms_Lue_Roots
Follow
Hallo und willkommen an alle Pflanzenliebhaber!
Es gab viel zu Korrigieren. Wie bekannt aus dem letzten Report, war das Wurzelwerk minimal. Daher lag unsere Priorität, darin diese schnellst möglich zum wachsen zu bringen und diese auch zu stärken. Ansonsten haben wir nach dem Umtopfen nach 6 Tagen angefangen mit einem mS-Wert von 0,8 zu düngen. Sie trinken wieder wirklich gut und augenscheinlich sind die neuen Wurzeln bald komplett unten angekommen.
Wir haben die Pflanzen heute entlaubt, damit sie wieder besser atmen können. Zudem bringt es auch wieder ein wenig Platz.
Insgesamt sind wir zufrieden und freuen uns auf die kommende Woche. Im Moment arbeiten sie gut mit und machen zur vorigen Woche farblich als auch gesundheitlich einen stabilen Eindruck.
Wir wünschen allen Gromies einen schönen Restsonntag und eine erfolgreiche Woche. LG

Likes
7
Share


@Cogollo_eu
Follow
**Encontrarás la traducción a español al final de la descripción**
From/Desde: 01/03/19 || To/Hasta: 07/03/19
From day/Desde día: 8 || To day/Hasta día: 14
You can find the Gorillas Diary here:
** Podéis encontrar el diario de las Gorilla aquí:**
https://growdiaries.com/diaries/25675-makingmoney-with-gorilla-mm-vs-gorilla
-----IMAGES & VIDEOS-----
Video 1: Timelaspe video covering 5 days, from Monday 4th night to Sunday 9th afternoon/night. One second Blackouts on video represents night times. I'm sorry for the dancing of colours specially first days, i will try to do it better next time. The background song is from the old awesome album "Deep Forest" of Deep Forest "Sweel Lullably" song (I think i'm going to use this song for almost all timelapse plant growing videos).
-----WEEK SUMMARY-----
I'm sorry about the delay updating this week, i traveled to Venice at the end of this week and that's why it's late and i have very few or non photos of the next week. I wish the almost 5 days timelapse video can cover the lack of images for the next week.
As you can see the Moneys are growing very equitative, the one that looked small last week is now of the same size as the other one. among the 4 plants shown in the group photos, only one has some kind of problem, and is not a Money maker :). As soon as i could perform a man-lining on any of the moneys i will.
LST STRUCTURE: To prevent breaking or making holes in the pot i designed this LST structure in blender and I printed it in 3D. They fit perfectly in the 8l RootPoch pots, so at time i didn't fixed them to the pots. If i see any of the plants lifting the structure i will just add weigh over it.
-----WATERING CALENDAR-----
06/03/19 - 1.250 ml with all week nutrients and 1 CO2 tablet over the soil @ 0.4~0.5 E.C. PH5.5 (I'm going to travel to Venice till Sunday so i watered well)
*****ESPAÑOL*****
-----IMÁGENES Y VÍDEOS-----
Vídeo 1: Vídeo TimeLapse que cubre 5 días, desde el lunes 4 por la noche hasta el domingo 9 por la tarde/noche. Los negros de 1 segundo que aparecen en el vídeo indican las noches. Siento mucho las variaciones de color entre los días, especialmente los primeros, la siguente vez intentare tener mejor color y más estable. La canción que suena de fondo es de un album antiguo maravilloso llamado "Deep Forest" de Deep Forest, la canción es "Sweet Lullably" y creo que la voy a usar en todos los timelapses de cultivo).
-----SUMARIO SEMANAL-----
Siento el retraso en el update de esta semana, me pilló el fin de la semana con un viaje que he hecho a Venecia y por esta razón llega tarde esta semana y de la siguiente tengo pocas fotos, espero cubrirlo bien con el vídeo timelapse que he hecho de casi 6 días
Como se puede apreciar, las Moneys están creciendo equitativamente, la que parecía pequeña la semana pasada, se ha puesto a la par con la otra. De entre las 4 plantas que aparecen en las fotos de grupo, sólo una tiene algún tipo de problema, y no es una de las Money. Tan pronto como pueda man-lining en una de las Moneys se lo haré, creo que va a ser en semana 4.
ESTRUCTURA LST: Para no agujerear los tiestos he diseñado esta estructura para LST con blender y la he impreso en 3D. Se ajusta a la perfección a los RootPoch de 8 Litros pro lo que de momento no la he fijado al tieso ni suelo mediante nada, si veo que alguna de las plantas la levanta, simplemente pondré peso sobre la estructura.
-----CALENDARIO DE RIEGO-----
06/03/19 - 1.250 ml con todos los nutrientes semanales y una pastilla de CO2 sobre la tierra @ 0.4~0.5 E.C. PH5.5 (Como voy a viajar unos días he regado bien)


Likes
16
Share


@Albeginner420
Follow
The gelato Is the strongest in the garden, She handled the transplant very well. I put her for flower under the lumatek attis 300W. I defoliated a bit to let the canopy spread, awesome structure. By now i use only water with adjusted pH because i put the organic pellet from RQS in the soil of the new fabric pot.
Likes
23
Share


@MaltaHerbman
Follow
Day 15 so start of 2nd week veg.
The Strawberry Gorilla auto looks is growing every day.
So far any problem waiting for her to grow a bit more before start training.
Day 18 FIM time.
Thanks for following my diary if you like i have instagram page too that trying to post photos and video every day.
Likes
Comments
Share


Likes
6
Share


@Discepolo
Follow
I am shocked😱...because...
Overwatering problem got more serious than last week on one bimba, that is not cooping well as others with water is getting.(I am on auto pot system)
I really think that forgetting to put the clay at the bottom of my vase on the airdome will give me some challenges.
Me and my bambine are ready for the fight!👊👊👊
We will not give up👽
Likes
35
Share


@ReinDeer
Follow
It is a day one of the 6th week. I watered the plants and started adding B’cuzz Silic Boost. Also made some beautiful photos under a white light and I am really happy with the plats progress. 👍
Two days after watering and spraying with the fresh water added with vita race the plants are super gorgeous and they are growing in size acchieving 60 cm in height. Buda are getting bushier as well. 😻
I am a little worried by the fact that some of the plants tend to curl their leaves down just before the light turns off. After six hours of night plants look healthy again. Could that be connected to the distance between te lamp and the plant which is diminishing as the plants grow? Thanks for suggestions😊
Likes
15
Share


@OrganikTek
Follow
Black Cream stretchig full on flowering. Shes polling up the net. Think i wont train here anymore.
Bomberry Glue Really its a diferent kind. Slow started and look at here now. Shes a beauty. Truly Ganja Leaves.
Wedding starting to flower. Stretshing good. Started Scrog on here.
Purple Couskush looking good. Like how the new branchs are so big for her but still stretching verticaly. Nice genetic nuace. Something to add to newer genetics.
Temps are getting up , vents are getting are dry and up VPD goes. trying some foliar to help.
Lets see what happens
Cheers Brotherhood


Likes
10
Share


@40Plug
Follow
Wow! Look at these amazing two plants. They both turned a bit purple.
The smell is insane.
Belive me or not but my entire room smells like a sweet ice cream restaurant. 😍
I had given this week only PH adjusted water and darkness for two days before harvest.
Going to dry for like 7-10 days and then curing for another month or so.
I will upload more pictures of the dried buds when the time comes
