
Likes
Comments
Share

@burnout
Follow
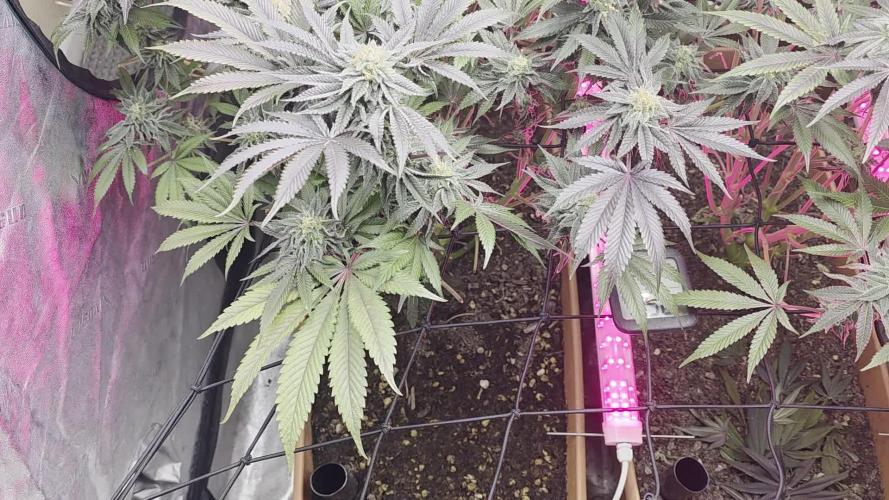
Flower day 49. Reduced light to 80%. Top watered one gallon each with half teaspoon recharge per gallon, stopping feed with build a bloom and ferment. Reservoir uptake has slowed down, added one gallon to each reservoir Peek at trichomes looks mostly cloudy. Will hopefully be harvesting in two weeks.


Processing
Likes
41
Share


@Enki_Weed
Follow
Our beautiful girls have plant louses 😱
So yesterday we made a brew of garlic and sprinkeld all of the plants, also the
ground of the growbox - after cleaning up everything.
So we hope this works.
Have anyone experience with the small green monsters?
We would be grateful for some suggestions.


Likes
4
Share


@Blesax_haze
Follow
Esta semana aumenté ml/L de Plagron, Subió la EC de 1100 a 2000 aprox, las plantas reaccionaron bien.
Processing
Likes
17
Share


@Gordy
Follow
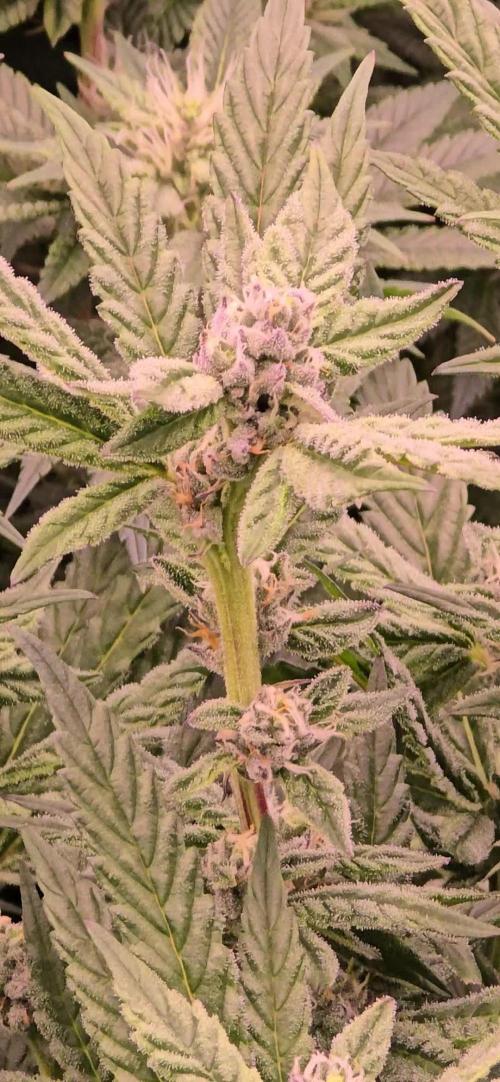
beginning of week 7 of flower:
This week was really tough for this plant. 2 times the power outlet seemed to have some issue. I think it’s a physical hardware issue inside the wall. I’ve ran the extension cord from another location in the room, and haven’t had any issues since.
Considering she only got about 5 hours of light in a 48 hour span, I feel she’s looking pretty good.
The smell of the plant is really getting strong. When I first open the tent there’s an almost overwhelming citrus smell in the air. I really enjoy it.

Likes
16
Share


@MyLittleGarden
Follow
Ernte
Die Pflanze wurde kurz nach der neunten Blütewoche geerntet, etwa drei Tage später, als die meisten Trichome milchig waren und vereinzelt schon bernsteinfarbene zu sehen waren. Ziel war ein eher euphorisches, klares High – und das wurde auch erreicht.
Die Trocknung lief über etwa zehn Tage bei Temperaturen zwischen 15 und 21 °C und einer Luftfeuchtigkeit von rund 55 bis 62 %. Die Bedingungen waren stabil, und die Buds konnten langsam und schonend trocknen.
Nach dem Trocknen wurden die Blüten manikürt und anschließend in Gläser mit Feuchtigkeitspacks gelegt, um das Curing zu starten. Die Buds waren zu diesem Zeitpunkt sehr klebrig, harzig und haben stark geglitzert, mit einem intensiven, süß-zitronigen Geruch.
Update nach 4 Wochen:
Trocknung & Curing
Nach der Ernte wurde die Amnesia Lemon insgesamt etwa 10 Tage lang langsam getrocknet. Die Temperaturen lagen dabei meist zwischen 15–21 °C bei einer Luftfeuchtigkeit von ungefähr 55–62 %. Durch die eher kühlen Bedingungen konnten die Blüten langsam und kontrolliert trocknen, ohne zu schnell auszuhärten.
Bereits während der Trocknung entwickelte sich ein sehr intensiver Geruch. Besonders auffällig waren starke Zitronen- und süßliche Terpennoten, kombiniert mit einer leicht würzigen Frische. Anfangs war noch ein leichter Heugeruch vorhanden, der sich im Verlauf des Curings jedoch deutlich abgebaut hat.
Nach dem Trocknen wurden die Buds manikürt und anschließend in Braungläser mit 58 % bzw. 62 % Feuchtigkeitspacks gelagert. Während der ersten Wochen des Curings veränderte sich das Aroma nochmals deutlich. Der Geruch wurde tiefer, runder und deutlich angenehmer. Beim Öffnen der Gläser kommt inzwischen ein extrem intensiver süß-zitroniger Duft entgegen, der sich sofort im Raum verteilt.
Die Blüten besitzen mittlerweile eine sehr gute Konsistenz: außen trocken, innen noch leicht elastisch und insgesamt sehr kompakt und harzig. Das Raucherlebnis wurde über die Wochen ebenfalls spürbar angenehmer und weicher.
Eine spätere Messung mit einem Purpl Pro bestätigte schließlich ein sehr gelungenes Endergebnis:
21 % THC
10,3 % Restfeuchtigkeit
0,4 AW Wasseraktivität
Besonders positiv hervorgehoben wurden dabei die optimale Trocknung sowie der intensive Geruch des Samples.
Insgesamt ein sehr erfolgreiches Endergebnis mit starkem Aroma, angenehmem Rauchverhalten und einer klaren, kopflastigen entspannten Wirkung. 😋

Likes
4
Share


@WuTangVibez
Follow
This Week i let them just continue to grow out of the LST. Last Day of the Week i cut down all the lower branches and defuliated the leaves.
First Week of Flower and the Plant shows some nice female Flower-pistols.
This Week i started with the Flower Feeding, i gave her about 4 tsp Seabird Guano as Topdress Feeding, it got a NPK of 7-4-5 so not idial for Flower but i guess Perfect for Streching-phase.
Please Let me Know if you do Lollipop your Autoflowers ?? i was pretty unsure if i should do it but i was afraid that if i didn't do it it would cause problems cause of the ventilation.
Hope you like the Grow so far !
Likes
27
Share


@KingSalomonsWeed
Follow
6.12. Day 77 of life 39 of flower of max 56.
My plan with Christmas weed is in danger.
Oh boy. I hate Ripen.
New Light turn. 20/4. And lifted up to 40 cm.
7.12......
8.12. FUCK ME. FUCK ME TWICE. HOTTEST GIRL IN MY TENT....
Forgivenes for that words.
10.12. Main¹ and Main ² chopped.
Yes i know 1 Main 1xMain Main.
All the same, but i Like Main¹... 😛
Time to dry her out.
12.12. Day 45 of flower! Ready. Uff thats fast. In 7 days is chop. The buds re dense. Not stonehard, but dense.
13.12. The earth is moist.

Likes
7
Share


@CannabisAprendiz
Follow
Esta cosecha fue muy buena con excelentes resultados de flores muy compactas y demasiado resinosas , la genética en sí es muy resinosa con olor muy característico , con sabores terrosos muy marcados .


Likes
98
Share


@DogDoctorOfficial
Follow
I love growing its a big passion of mine , and the fact that GD exists makes everything so much better, one can interact with others and enjoy and learn from each others. Thank you all growers love and keep them green <3 <3 <3

Likes
16
Share


@DonKrika
Follow
I still have problems with high levels of humidity, usually around 65% during the night and 55% during the day, I ended up removing more leaves to try to reduce the amount of humidity in the air.
I can see that the buds grew since last week, I was expecting the buds to be a bit bigger this week, but I'm happy with the current size, but I'm happy with the amount of trichomes present.
DAY 96
PH - 5.93
Solution Temp - 19
PPM-2000
Watering Volume per plant - 4L
DAY 103 - Water
PH - 6
Solution Temp - 18
PPM-690
Watering Volume per plant - 4L

Likes
3
Share


@Halsk8
Follow
This is week 13 and the cookies is still maturing I have harvested the top half because they were ready I've still got half a plant to go. I've never had any purple on my buds it seems to be happing to both plants in there so I'm not sure if it's the slightly colder temps at night can't wait to cut the rest down very pleased of how this one has gone should hit a good Oz and a half maybey two these buds are my fattest yet
Likes
3
Share


@Silverback_Guerilla
Follow
6/13:
I harvested both plants today. I did a cursory wet-trim and washed their buds, and then hung them to dry.
I'm guessing the ugly one will weigh in at about 80g, and the smaller, pretty one, will weigh in at about 65-70g.
The plants ended up being the biggest in my garden, but were a little slower than some of the other strains to get into flower. The buds never swelled up very big, but they're very dense and smell wonderful. The aromas really bring back memories from the last time I grew NL back in the early 90's. Looking forward to giving it a try!👍
I'll update in another week or so with the smoke report and my final thoughts..
9/16:
Initially, it had not much smell or flavor, but after leaving it alone for a few months, it improved quite a bit. Still not my favorite, but very good bud all the same.
Plant A: 83g
Plant B: 75g
Potency: 6/10
Yield: 6/10
Aroma: 7/10
Flavor: 7/10
Density: 8/10
Bag-appeal: 8/10
Tolerance to abuse: 9/10

Likes
6
Share


@Kendoda
Follow
I’m flipping 12/12 this evening.
I had a little tip burn on a couple of leaves of the Fullgas. These were in the central area of the light so I just eased off a little on the light intensity and haven’t noticed any issue since. It’s also a little dark atm so will hold off adding the bio grow until next week.
Update **
Ive upped the light power by 10% again and watered in 4ml of Alg a mic in 2L of water.


Likes
10
Share


@CanadianFillmore
Follow
Gotta get the Glueberry OG to the finish line! Flushing has begun, she's incredibly sticky, buds are very dense and heavy, branches bending and twisting like crazy! Smells like glue/fuel and she's heavy on OG Kush growth characteristics, in comparison to my previous OG kush grows. Only a few amber trichomes, she's 60-70% cloudy.
Thanks for watching! 👽🌳


Likes
6
Share

@GREENPHOENIX6262
Follow
11/03 - 2x2 (6 clones) 4x4 (11 clones) - 4x4 trimmed and ready for flip this week - 2x2 being trimmed this week and flipped same time as the 4x4 - Only clean water and carbo flush feeds for this week. Drip line emitter added to the 2x2 with a 5 gallon res - each pot has 2 lines.
11/07 - Heavy water flush - Prep for trim & flip - heavy defol - dropping net - clean water feeds till next week - both tents will be flipped at the same time.
11/09 - 4x4 - 2x2 clones running efficiently - Hard defol in the 4x4 - Hard defol for 2x2 coming - flipping both tents on Wed - Hard flush out this week - running high humidity for the next 2 or 3 weeks.
Processing
Likes
26
Share


@OutForReal
Follow
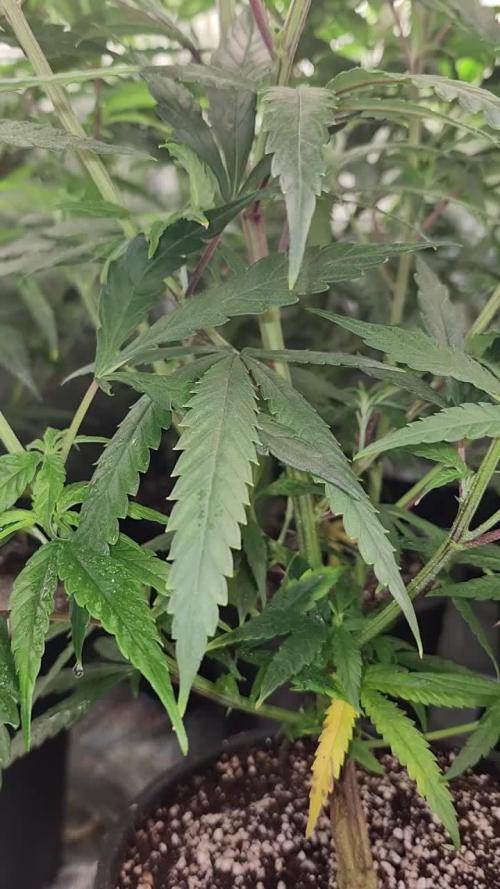
Day 31 -Well first please excuse my english . She'doing well so far. Still stretching , and not a tiny one as she took 2 cm each days till day 28. She got an open structure like a little christmas three with a moderate distance
between the nods.
I had 1/4 tps of my bloom powder (6 - 21 - 31) direct into the soil 3 days ago with a little burning issue (almost invisible for now), my ph was also too low as it was 6.3 so i'll correct my water ph to 6.5 and no more nuts add till week 6.
She's smelling good at that stage but quite difficult to describe so i'll try to do it when i will be mote potent ( week 7 to 8 i guess)
If you haves some question i'll be glade to answer , good grow y'all

Likes
20
Share

@ThatsmyGrow
Follow
Einfach eine super Woche
Ich bin einfach wieder komplett überzeugt davon autoflower indoor anzubauen, dank fastbuds gibt's so geile Sorten.
Ich will am ende alle mal gegrowed haben