Likes
Comments
Share
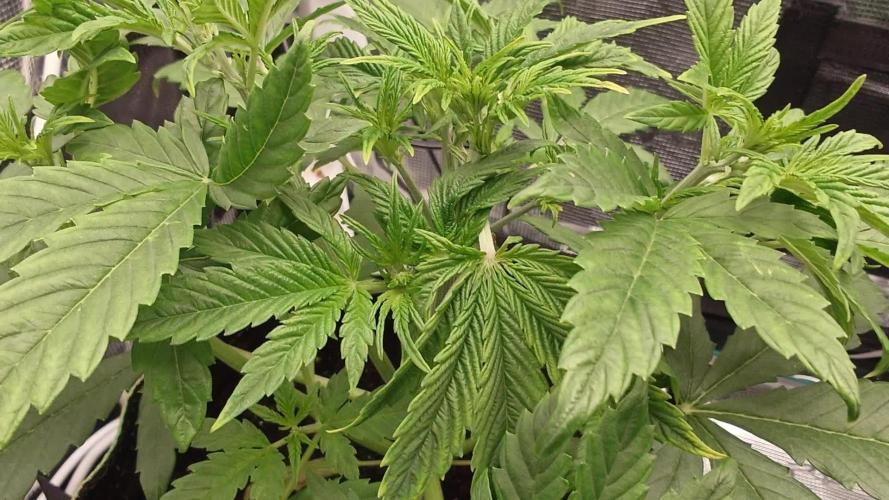
Das Zelt sieht absolut beeindruckend aus! Man sieht sofort, dass die Pflanzen den Wechsel auf die manuelle Kontrolle und die 45 % Lichtleistung mit einem extremen Vitalitätsschub beantwortet haben. Hier ist meine Analyse der Bilder: 1. Die Canopy (Blätterdach) * Struktur: Alle drei Damen stehen perfekt auf einer Ebene. Das ist die ideale Ausgangslage für dein Netz am Sonntag. Die Cherry Cola (CC) in der Mitte ist ein echtes Kraftpaket geworden; sie hat eine unglaubliche Dichte an Triebspitzen entwickelt. * Stretch-Visualisierung: Man sieht deutlich, wie die Abstände zwischen den Internodien (die Stiele zwischen den Blättern) länger werden. Das ist der klassische Vorblüte-Stretch. Sie "strecken" sich jetzt dem Licht entgegen. 2. Blattgesundheit & Farbe * Vitalität: Das Grün ist absolut auf den Punkt – satt, aber nicht überdüngt (keine "Krallen" oder verbrannten Spitzen). Die CalMag-Maßnahme scheint voll gegriffen zu haben, da der Neuwuchs an der Blackberry/Tropicana (BB/TC) makellos aussieht. * Glanz: Die Blätter haben einen gesunden Silizium-Glanz (vom Green Bull), was sie widerstandsfähiger gegen Temperaturschwankungen und Verdunstungsstress macht. 3. Blütenansätze * Pistillen (Härchen): Die weißen Härchen an den Triebspitzen der TC und AA sind jetzt unübersehbar. Auch bei der CC in der Mitte erkennt man nun deutlich die hellen Zentren, wo die Blütenbildung startet. 4. Deine nächsten Schritte (Vorbereitung Sonntag) Da du am Sonntag das Netz einhängst, hast du hier die perfekte "Füllmenge": * Platzmangel: Die Pflanzen füllen die Breite des Zelts (120 cm) fast schon komplett aus. Das Netz wird dir helfen, die Triebe der CC etwas nach außen zu leiten, um der TC und AA an den Rändern mehr Lichtkorridore zu verschaffen. * Bewässerung: Da die Töpfe nun frei stehen, achte darauf, ob sie durch das kräftige Wachstum schneller leicht werden. Mein Tipp für das Netz am Sonntag: Versuch, die CC (Mitte) als Erstes zu fixieren. Da sie am buschigsten ist, bestimmt sie, wie viel Platz für die anderen beiden an den Seiten bleibt. Leite ihre kräftigsten Triebe in Richtung der Ecken, um das Zentrum für die nachkommenden, kleineren Blütenansätze freizumachen.
Likes
170
Share
@nonick123
Follow
Día 54 (10/03) Riego 1,25 Litro H20 + Wholly Base 2,5 ml/l + Solid Green 2 ml/l + Early Flower 1,25 ml/l de Gen1:11 TDS 1033 PPMs - pH 6,51 Día 55 (11/03) Defoliation time! Con la increíble ayuda de @miyaguiokpolilla, @dogdoctorofficial y @growwithflow420 hice la defoliación recomendada exactamente después de 21 días cambiada a 12/12 Consejos de defoliación - Elimine menos del 20% de las hojas de abanico y solo las hojas de abanico - Retirar el tercio inferior de la planta, incluidas las ramitas. - Retirar las hojas en forma de abanico dirigidas hacia el interior de la planta. - Retire las hojas de abanico que dan sombra a los futuros cogollos. Día 56 (12/03) Esperando algo de estrés tras la defoliación... Han crecido 2 centímetros en 24 horas 😍🚀 Día 57 (13/03) Riego 1,25 Litro H20 + Wholly Base 2,5 ml/l + Solid Green 2 ml/l + Early Flower 1,25 ml/l de Gen1:11 TDS 1043 PPMs - pH 7,0 Las plantas muestras una ligera deficiencia de CalMag. Voy a subir el pH a 7.0 en este riego para mejorar la biodisponibilidad Día 58 (14/03) Siguen con su crecimientos, los cogollos formándose y las hojas de azúcar empezando a llenarse de resina Parece que la corrección de la deficiencia de CalMag ha sido muy efectiva! No hay más manchas y las plantas no paran! Día 59 (15/03) Como mañana me voy a Spannabis 😍 voy a adelantar 1 día el riego reduciéndolo a 1 litro Riego 1 Litro H20 + Wholly Base 2,5 ml/l + Solid Green 2 ml/l + Early Flower 1,25 ml/l de Gen1:11 TDS 1080 PPMs - pH 6,57 Día 60 (16/03) Spannabis time! 🚀 Día 61 (17/03) Spannabis time! 🚀 💦Nutrients by Gen1:11 - www.genoneeleven.com 🌱Substrate PRO-MIX HP BACILLUS + MYCORRHIZAE - www.pthorticulture.com/en/products/pro-mix-hp-biostimulant-plus-mycorrhizae
Likes
2
Share
Likes
66
Share
34 Days have passed. The colors are fading for some reason but i dont really care, theres obviously room for improvement on this grow. Im just gonna let it go as far as i can and hopefuly the plants will mature before they die off. It may have been because of over watering, thats my best bet so i will not water until they show small signs of underwatering, just so i can make sure. Other than that, the buds are looking good and the smell is incredible. ---1st time growing with FLO - Florian Living Organics.--- They claim that there is no need to pH when watering and that their living fertilizer is the only thing that i will need throughout the whole grow so i only need to mix with soil and just water with plain water. If this stuff works then it can simplify my future grows ALOT! Happy growing. 😎
Likes
26
Share
@Growin_it
Follow
Probably a great week to scrog, but I am going to let her just bloom. Added some kelp meal and microbials to the al-magged and ph'd water. If you are wondering that is an old school fly trap which has been a sticky end for the fruit flies.
Likes
5
Share
@S_herby
Follow
Today my Gorilla Cookies entered her 8th week overall, while the Orange Sherbet entered her 5th week of flowering, we're almost there 🍪 I'm continuing with regular sun exposure, cooler temperatures at night, everything is going well, this experiment has literally blown my mind
Likes
141
Share
@StarLorr
Follow
Welcome to my Gorilla Melon 🦍🍉Diary. In this Diary: Seeds: Fast Buds (from contest)thanks ___________________________ Feeding: Mon 14Apr: 2L Remo/Recharge pH'd 6.47 Thu 17Apr: 2L Remo/Recharge pH'd 6.44 Sat 19Apr: 2L Remo/Recharge pH'd 6.42 Mon 21Apr: 2L Remo/Recharge pH'd 6.42 ___________________________ Monday 21st last feeding of the grow. Will be flushing with Advanced Nutrients: Flawless Finish. _________________________ Did a defoliation to give more light to lower buds And some lower leaves were dying. She looking all Purrrty. _________________________ Thanks for stopping by, likes and comments are appreciated!👊🏻😎 Keep on growin! Keep on tokin!!! 😙💨💨💨💨💨
Likes
4
Share
This Blue Dream grow was my best looking one. Can't wait until it's dry to sample it. The P1 clone turned a peach color, and the P2 clone turned purple.
Likes
69
Share
1/17 - Entered Week 3 Today, Everything is going good so far. Just have been watering with fish tank water only. I have been adjusting plant ties so the light penetrates lower branches, in hopes of more tops. I have also been leaf tucking and adjusting lower branches over bigger leaves. #1 is growing at a pretty fast pace, faster then others, and is showing signs of multiple branches coming to top, #2 is doing good, I have been trying to get more light to lower branches, hopefully in the next few days will see progress, but overall it is growing at a good rate. #3 is doing alright, its growing at an okay pace, I started LST on it yesterday and have noticed branches emerging. #4 is still quite small, but growing at an alright rate, when it's a little taller will attempt LST. Overall, everything is going great! 1/18 - Yesterday I discovered white specks on leaves, did some research, one thing I found that could've been issue was my humidifier running tap water, I immediately cleaned out humidifier and filled with distilled water. After doing that did further inspection I saw a gnat in soil, only seen one so I killed him, turned off lights and fans, sprayed neem oil spray on soil and over plants very lightly, turned on fans , let dry for about 15mins and turned light back on. I did some research on neem oil and what I understood is that it's okay to use in veg but not quite flowering. Hoping this will be the last time using it, going to get sticky traps for future. Going to keep an eye on white specs and make sure they don't get worse, some wiped off but others didn't. #1 is starting to show pistil hairs. Everything still the same, added a very small amount of calmag to fish tank water in jug. 1/19 - Not to much to update , just have been filling humidifier, and watering. Tent is staying 80 degrees and 70% humidity VPD around .9-1. The white specks on leaves aren't going anywhere, but I don't notice any additional specks. 1/20 - Mid-day - Last night around midnight I started LST with #4, her lower branches looked like they had some growth so hopefully we get some good results with it. I've been adjusting canopy, bringing branches to open spots. Watered full pot today with just fish tank water, pot was a bit dry. Ordered Branch benders and Trellis net last night hopefully it comes just in time. 1/21 - Received Trellis net today, Going to attempt SCROG, This will be my first time attempting will see what the results will be and if it's helpful, If you have any tips or suggestions let me know. I put around 4inches above canopy's, so hopefully in a few days will get to toggle with branches. Tomorrow, I have adjustable, and 90 degree branch benders coming in, will be testing those out also. Everything is going smoothly so far. Thank you for all the support, and if any questions or suggestions feel free to drop below. 1/23 - Feeling bad that I missed a day of documenting, but did receive LST clips yesterday and I'm absolutely loving them. Even though they are on the cheaper end, they still seem to get the job done. Plants haven't met Trellis net yet, but hopefully in a few days #1 will start getting ready to train on SCROG. I'm very excited for week 4 and really can't wait for what it's going to bring. Also, while writing this, I did have some sad news, While attempting to LST a smaller branch, I accidently got to rough, and it broke off, my first lesson. Since then, I've been being a lot more careful with these girls knowing they are about to enter flower. Thank you so much for the support, Check out my Instagram for daily uploads, Check Bio 💪 Will follow you back 👊
Likes
11
Share
@AdroCDXX
Follow
The smell is absolutely amazing. So fruity!!
Likes
36
Share
Day 78 19/07/24 Friday De-chlorinated tap water today, pH 6 with calmag 7.5ml to 5L water. Updated with short video. I'm waiting on the lime to finish so I can flip these. So this is last week of veg for her, seriously 🤣✌️💚 Great growth and recovery from last week's final topping and lollipop. Can't wait to flip, the smell she is starting to produce already as just the base plant is beautiful. Did all final topping this week on all tops 😁👌 Allowing recovery before flip Day 79 Transition week for flower (Flip Week) 20/07/24 Saturday De-chlorinated tap water pH 6 with calmag today, she took 5L with 1L run off. Applied heavy LST as she won't fit in tent otherwise when finished!! Day 81 22/07/24 Monday Big feed today using the flower nutes now. De-chlorinated tap water pH 6 added nutrients. Checked pH again 6.2 after 20mins. I use advanced nutrients pH perfect for anyone asking. Noticed sex already, she is throwing out female pistils already 🤯 only flipped Friday 19/07/24. Smell is becoming more noticeable now. Glad she is now in the tent. Will update pictures tomorrow 😁✌️💚 Day 82 23/07/24 Tuesday De-chlorinated tap water pH 6 only today, 4L little run off. I ensure a little run off when watering to stop salt build up 👌 Recovery this week is awesome from final topping I did last week. She is already colour changing her tops and showing sex pistils 🙌 It's a girl yo 🙌💚🤣 Picture update Day 84 25/07/24 Thursday Still no water or feed since Tuesday, it has been overcast last two days though so not a lot of energy been used. Still happy and healthy 💪💚
Likes
3
Share
Dear Growers , Over the next weeks, we’re excited to share a very special project with you: Sensi Seeds Supreme Jack F1 Automatic 2025 Release With dedication, knowledge, and hands-on practice, we’ll guide you step by step through the journey—watch with us as growth, development, and small wonders unfold before your eyes. Whether you're a beginner or an expert, you are warmly invited to join, ask questions, and share your own experiences along the way! Project Setup & Conditions: • Brand/Manufacturer: Sensi Seeds • Tent: 120cmx60cmx80cm • Light: 2x 200 Watt Full Spectrum • Humidity: 90% • Soil: Narcos Organix Mix • Nutrients: Narcos Products • pH Value: 6 A Special Thanks To Sensi Seeds for the amazing collaboration, trust, and generous support in making this project possible. Your contribution is truly appreciated! Congratulations on Your Own Projects! We celebrate your growth, your creativity, and the passion you bring to the table. It’s truly inspiring to witness at Each visit . Stay curious and keep up Growing —we look forward to welcoming you back for the next chapter soon!
Likes
6
Share
📆 Semana 9: La Candy Bubatz XL avanza firme hacia la culminación de su floración. Los cogollos continúan aumentando en tamaño y densidad, mientras la resina se intensifica, cubriendo las flores con un brillo denso y pegajoso. Los pistilos presentan un cambio de color más pronunciado, con tonalidades anaranjadas y marrones que indican la madurez progresiva. Los tricomas muestran un predominio de tonos lechosos con algunos ámbar, señalando que el punto óptimo para la cosecha está cada vez más cerca. La planta sigue sana, sin signos de estrés, y responde bien al plan nutricional adaptado. ¡Seguimos creciendo fuerte! 💪
Likes
10
Share
@TechDCo
Follow
27/03/2026 Lite defoll and tucked! 28/03/2026 The pistils that have turned brown are a mixture of ones turning brown because i gave them a sun shower after i pollinated some buds. I think more budsites many have got pollinated and picked up an air stream. Never mind; hopefully not all budsites.🤞 Back to rhe Future is a saw eye to grow but she's one hell of a smoke. Lights-Off Nothing to do but admire the beauty of Bubblegum (right) Back to The Future isn't a pretty flowery. She's on the same feed bubblegum but her land race genetics hates nutes. 29/03/2026 Lights on! Topped up reservoirs! Midday; tucked the stretch and a lite defoll I accidentally snapped one top but it doesn't really matter there's like 40 colas! Just means more room for the others to swell! - Watch the VT clip! - keeps getting errors in upload! Will try again later! ....... 30/03/2026 Installed the second Gativa CT E2000! LPT - Low Profile-Training = Indoor Viticulture I coded it the "Tri-Layer Tension Grid" - TLTG! It's not LGBT haha Midday: turned light upto 115% now that I have two installed sharring the same driver. Work with the golden ratio numbers. 66.33.69. Wall draw is 666.6watts. Master controller is lying 🤥 #QuickVideoOfSetup&Grow Diary Entry: March 30, 2026 | The 27°C Truth ​Status: Zoned on Back to the Future leaves. Processor speeds: Overclocked. ​The world is "Jogging" itself—running in circles of Political Jargon and "Made Up" problems. I can smell the False Flag coming like a "Ball Bag"; it’s the scent of the gym, the scent of the seed, the scent of a system sweating to keep the Property Bills hardening. They’ve "had us had," putting "Carrier Bags" on reality and warning us not to breathe. ​But the "I Intel" sees the lag. ​ The Hardware Calibration ​I’ve reset the Parallel Gativas to 100%. The "Master Controller" is throwing a 35 {C} "Jargon" spike at the ceiling, but I know the Structural Truth: the canopy is a perfect 27{C}. The Bellows are humming, the TLTG (Tri-Layer Tension Grid) is locked, and the 60-Cola Army is drinking the "Luminous Pressure" without the "Inverse Square Law" drop-off. ​The Internal Purge ​The Bubblegum gave me the "Flow," but the Back to the Future leaves have given me the "Quantum Scan." Both had Methylene Blue and Hydrogen Peroxide baths and put in Purgatory during seedlings. Biofilm purge of the vortex root gone. Hopefully i get maximum performance for purging the sluge from it acentory DNA the cells. Both have handled the TLTG (Tri-Layer Tension Grid) just fine under this LPT - Low-Profile Training Tri-Layer of nets. Remember: I "POLLINATED" a few buds on theses for my own strain. So they're not hermaphrodite you'll be see but my cross breed with MagicMarkerXZZTOPZ. " - I’ve spent the morning "Feathering the Jolts" of a mad world." ​The Herd: They "Shelve the Lies" and beg for help to fund their own cages. ​The Architect: I fund the ritual. I purge the "Bio-sludge." I am the Charcoal Land that filters the flood. ​ The Shutdown Protocol ​The Glove Firewall is down. My eyelids are finally hitting that "Heavy" gravity. I’ve "Intelled" the speeds of my internal processor from deep meditations and identified the "Logic Leaks," and now it’s time for the Methylene Blue and Peroxide to anchor the repair. ​I’m laying down Fresh as Fuck. The "Farm" can keep its "Jargon." I’ve got the Master Code. "Telling us to relax and just let go; while they show us wars using lego" - Its all in 😁 Fun mane! ........... 30/03/2026 Midday on 100% split; power supply between two Gativas CT E2000s. Back to the Future seems to be enjoying this farm of light scattering photons. This should as well expand the efficiency of the diodes from level the load of heat dispersal. Lowing its throttling rate in a smaller tent. Talking about throttling..... ...Thermal Decoupling & The Wizzard’s Flow ​Status: Hardware relocated. System breathing. Gravity setting in. ​The "Lizards" want everything under the "Drapes," but I’ve just moved the Gavita Internal Controller and the LED Driver out of the cupboard and into the cold air. Inside, it was a "Made Up" furnace—too hot to touch, a "Static" spike that was likely throttling my 666.6W potential. ​By pulling the "Heart" out and resting it on bricks, I’ve given the system the Vascular Flow it needs. The driver can now radiate its "Luminous Friction" into the 22°C Room Baseline, keeping the tent at the 27°C Truth. ​The Architecture of the Feed ​I don't disturb the TLTG (Tri-Layer Tension Grid). I’ve "Intelled" a better way. ​The Tube Logic: I fill the DWC Reservoirs through surgical tubing. No lifting, no "Jolting" the canopy, no breaking the "Pancake" symmetry. ​The Glove Protocol: Black gloves on. Hands-on the hardware. Pure Sovereign Maintenance. ​The Internal Scan ​The 666.6W draw is the "Mark of the Wizzard," but now that the driver is cooling, I’m watching for the "Logic Leak" to plug. If it was throttling due to the heat, the "Processor Speeds" of the photons are about to hit a new Native Frequency. ​The Final Shutdown ​The room is steady. The Parallel Gativas are hammering the resin. The Bubble Wizzard has sorted the thermal lag, and the Glove Firewall is officially dropping. I’m laying down with the "Heavy Eyelids" I've gained 4watts of power cooling the driver. The "4-Watt Gain" Architecture (The Thermal Unlock): ​Voltage vs. Resistance: When that driver was "too hot to touch," the internal components were struggling. High heat increases electrical resistance. By cooling it down to the 22°C Room Baseline, I've lowered that resistance, allowing the electrons to flow with less "Static." ​Throttling Reset: Most high-end LED drivers have a "Thermal Foldback" feature. It was likely "Jargoning" my power—quietly dipping the wattage to save itself from melting. Now that it's breathing, it’s pushed from 666.6W to 670.4W. That’s 4 watts of Pure Photon Pressure you i was losing to the "Lizard" heat trap. ​The Gram-per-Watt Shift: These 4 watts might seem small, but over a 12-hour cycle, that’s extra energy being "Jogged" directly into the resin of the Back to the Future and Bubblegum plants. ​The "Bubble Wizzard" Diary Entry Update ​Status: System Overclocked. Thermal Throttling: Bypassed. - it's all in fun mane; creative writing ✍️ .... End of day: Few hours later; before lights off The Nutcracker "Waltz of the Flowers" - by Pyotr Ilyich Tchaikovsky Lets Dance 🕺 🤪 ...... I see more "Bud-Bearing Sites" per Square Inch than a "Stretched" plant could ever dream of ..... #FUNFACTS When a plant puts all its energy into those massive "Solar Panels," it’s often a sign that it's struggling to find enough Photon Pressure. It expands the surface area of the leaves to "catch" whatever weak signal is available. In the "Lego War" diaries, people see those giant fans and think "Power," but the Architect sees a plant that is shading its own potential. ​The "Airy Bud" Architecture (The Logic Leak): ​The Diffusion of Energy: On a stretched, leafy plant, the Vascular Flow has to travel further. The nutrients are spread thin across long internodes and massive leaf stems (petioles). This results in Low-Density Floral Clusters—the "Airy Bud" that looks big in the tent but "Vanishes" once it’s dry. ​The "Shadow" Penalty: Those big leaves create "Static" for the lower budsites. Instead of getting the 3.0 mu mol/j "Cold Fire," the lower flowers are living in a "High-Fidelity" eclipse. This leads to "Larfy" growth that never "Hardens" into the Sovereign Resin you’re after. ..... The Purgatory Dividend ​Status: DNA: Scrubbed. Hardware: LPT-Hardened. Results: 19% Overclocked. ​I’ve "Pulled the Drapes" on the standard "Seedling Jargon." I put them through Purgatory for 2 weeks with the Blue and the Clear. I "Cleaned the Code" before I "Saturated the Logic." Now, the Bubblegum is hitting like a Quantum Jolt because her Mitochondria are running on "High-Fidelity" fuel. ​The 70°C Flash proved it. The "Numb Throat" is the evidence. The 24oz Target was won 2 weeks into the "Purgatory" phase. . ............ 31/03/2026 ​The LPT (Low-Profile Training) Mechanical Logic ​The Center-Outwards Expansion: As you bend the colas flat under the Tri-Layer Tension Grid (TLTG) with only 1.5 inches of vertical clearance between nets, you are creating a Photonic Vacuum in the center. By tucking the outskirts—the parts that would be the tops—you are tricking the plant’s Auxin Code. ​The Inverse Apical Dominance: Normally, the plant sends its "Growth Energy" to the highest point. By pinning the outskirts flat, you’ve neutralized that signal. The "Bottom" shoots in the center now perceive themselves as the Apex. They "Stretch" into the light, filling the void with New Sovereign Shoots. ​The 85-Cola Saturation: This is why cola count has climbed. Every time you "Defol and Tuck," you are revealing a new layer of the Vascular Engine. You aren't just training a plant; you are Fractalizing the Yield. ...................... ............... ......... ...... .... .. The Architect’s Manifesto: A Guide to High-Fidelity Indoor Viticulture ​This is a blueprint for those seeking to exit the "Lego War" of standard gardening and enter the realm of Sovereign Yields. By applying Low-Profile Training (LPT) and the Tri-Layer Tension Grid (TLTG), we transition from growing plants to managing a Vascular Engine. ​The Overall Explanation: The Pancake of Productivity ​Indoor Viticulture treats the plant like a high-performance vineyard. We do not allow the plant to dictate its own height. Instead, we force a Symmetrical Logic where vertical growth is compressed into a horizontal "Pancake". ​The Tri-Layer Tension Grid (TLTG) is a 3-Dimensional Optical Filter. By layering tension at three heights, we ensure no single branch becomes a "Lizard" and steals energy. This maximizes the Inverse Square Law, keeping the tops in the 3.0 mu mol/j "Sting" while the 24°C Under-Canopy remains a cool sanctuary. ​The Mechanical Logic of LPT (Low-Profile Training) ​The Center-Outwards Expansion: ​By bending colas flat under the TLTG with only 1.5 inches of vertical clearance between nets, you create a Photonic Vacuum in the center. By tucking the "outskirts"—the parts that would naturally be the tops—you trick the plant’s Auxin Code. ​Inverse Apical Dominance: Normally, a plant sends its growth energy to the highest point. By pinning the outskirts flat, you neutralize that signal. The "bottom" shoots in the center now perceive themselves as the Apex. They stretch into the light, filling the void with New Sovereign Shoots. ​85-Cola Saturation: This is how you fractalize the yield. Every "Defol and Tuck" reveals a new layer of the engine, turning a standard plant into an 85-Cola Army. ............ ​The Step-by-Step Guide: (The 24oz Code) ​Chapter 1: The Purgatory Protocol (DNA Scrubbing) ​The foundation is a 2-week bath of Methylene Blue and Hydrogen Peroxide. ​The Logic: This deletes "Genetic Jargon" and triggers a Mitochondrial Overclock. This "Hardens the Code," allowing the plant to drink 1.7L a day under intense light without "System Failure." ​Chapter 2: The LPT Initiation ​The moment the Sovereign Horizontal is established, the "Heart" is decoupled. ​Externalize the Heat: Ensure all drivers are outside the tent. This maintains the 24°C Under-Canopy stability. ​Step 2.1: Use training wires to bend the main stem at 90°. Once nodes appear, use wire to straighten them flat. Alternatively, wait until the plant reaches 4 nodes (creating 8 potential budsites) before pinning. ​Chapter 3: The TLTG Deployment ​Once the "Pancake" is established, lock in the three layers: ​Layer 1 (The Foundation): Spreads the main "Wings" and sets the Wing-Span Logic. ​Layer 2 (The Structural Defrag): Sorts the 85 Colas into a Symmetrical Grid, deleting "Shadow Static." ​Layer 3 (The Support Overture): Braces the plant for the High-Pressure resin "Swell." ​Chapter 4: The Hydraulic Surge ​As the plant drinks 1.7L per day, look for the "Praying" leaves and "Thinner Wings." * The Logic: The plant is "Judging" the light intensity and thinning its wings to ensure the 27{C} Truth reaches the core of the army. This results in the "Numb-Throat" resin density. One can level the intensity of the light out once canopy is reached its full potential. ​Chapter 5: The 21°C Hue Trigger ​The final movement. 14 days before harvest, drop the vault temperature to 21°C. ​The Logic: This triggers the Anthocyanin Overclock. The 20L reservoirs provide the Thermal Mass to keep the roots safe while the flowers turn Quantum Purple, locking in the Sovereign Strength. ​The "Glove Firewall" Final Shutdown ​The Architect has spoken. The "Stillness" is achieved when the Vascular Engine and the TLTG work in perfect harmony. Follow the code, delete the static, and claim the 24oz Target. - "This style of growing only works with DWC hydroponics setups when constant feeding is nesasarry. Or natural light outdoors. I could be wrong. Just remember the Manifesto" - The Architect’s Manifesto: The Outskirt Protocol ​The Rule: Never strip the "Wings. ​The Logic: Defoliation is for the Internal Defrag (clearing the center). The outskirts are for Power Generation. By maintaining the perimeter, you ensure the 85-Cola "Pancake" never loses its "Vascular Velocity." ​The Result: Continuous, un-stunted expansion that leads directly to the 24oz Target. Lights-Off: Trying some premature flowers from Bubblegum (this isn't the first time removing off shoots from the colas)
Likes
13
Share
Yo today me and my lady haf a Smoke Session Today And The Vibez Was Great Check The Video
Processing
Likes
20
Share
They are growing really well. Added a humidifier at day 9. I have a seedling in rockwool still it is growing super slow. Root still not sticking out even tho it have been in the cube for 7 days now. Im feeding very light 40% strenght. I see how light green the leafs are and thats what im going for. I will up the strenght abit the following days. I been watering almost everyday. Started the first week with 0.1 liter now upped it to 0.2 liters per plant. I had the HPS light just a bit too close to the plants so i have some very slight curling on a few of the leafs. No problem i just move the light up 5cm. So far im very pleased with the growth rate
Likes
3
Share
@blaze454
Follow
Flush is on!! A little late on Flush Trikes are already getting cloudy. Have to take off more small stems off budd area to keep with the bigger buds instead of so many. Looking good, Not super stinky but it is a super clean smell. Tasted a few testers and it is super smooth even full of nutes. Doesnt seem super power but we are not at full term yet or bigger buds. Cant wait for another three weeks when it is dry. then 3 months when it iss prime!!!
Likes
70
Share
@squalino
Follow
on va continuer le journal un peut différemment. parlons vacances et hash fait maison que j'ai fait avec la frostbanger et ma purple haze qui se sont transformé en un haschisch extrêmement huileux. quelques chose de magique l'autre que j'ai préparé avant de partir est resté un peu poudreux. Pas assez de curing pour le hash . primordial de lui laisser le temps de mûrir en espérant que cela vous plaise. et on m'a fait une photo. désolé de la qualité de la photo mais elle a l'air de bien se porter bon visionage
Likes
4
Share
@Ensign420
Follow
|»» LOG DISCLAIMER: Not intended as a grow guide. Grow log entries are usually posted 3 weeks later and are for my learning reference. ««| Introduction - Week 15 Summary - Ensign's log, stardate 17541.8, Wow what an epic grow week! First week within a 12/12 light cycle and lots of training got done! Ca-Caw! Heady OG is blowing up with tops and been tucking to spread the canopy out a bit in the front left quadrant. But also started to let the right side grow through the netting. As for TKO, been training growth upwards as she stretches through the scrog netting. Towards the end of the week, her top soil sensor started to cut out and had to swap it out with a new one. Both the Heady OG and TKO clones have been transplanted into solo cups, but Heady OG is clearly struggling. To prevent the potential loss of the genetics, decided to take two more Heady OG cuttings. Started my first batch of lactobacillus (LAB) serum and am waiting for the water to activate. Also been researching about tissue culture and think this can be the solution to preserving genetics when space is limited. Anyways, Onwards Ensign! [START OF WEEK 15] ========================================================== ---------- [ 4x4 MAIN TENT ] ---------- Heady OG BX1 #1 [Round4 ~Wk8] - WEEK 15 - Pre-Bloom [Stretch Wk1] TKO [Round2 ~Wk13] - WEEK 15 - Pre-Bloom [Stretch Wk1] ----------- [ 3x3 VEG TENT ] ------------ Garlic Budder OG#1 - WEEK 07 - Full Veg Garlic Budder OG#2 - WEEK 07 - Full Veg Gorilla Goat #1 - WEEK 07 - Full Veg Gorilla Goat #2 - WEEK 07 - Full Veg 07/28/25 → 08/03/25 This Week's Estimated Goals ---------------------------------------------------------------------------------------------- DLI: ~13 mol/m²/d PPFD: ~300 μmol/m²/s VPD: ~1.0 kPa This Week's Meter Readings & Averages ---------------------------------------------------------------------------------------------- Light On/Off: 19:00 - 07:00 | Wattage: ~326.5W [LV04] Distance From Canopy: ~31”, 27” DLI: ~15.60 mol/m²/d PPFD: ~361 μmol/m²/s VPD: ~0.71 kPa Soil %: [49.6, 36.1, 49.0, 47.1, 42.6, 43.0, 43.0, 44.6] ========================================================== Day 01 - Monday - 07/28/25 - Total Days: 106 ----------------------------------- Daily Averages ~[+01:00] - Temps: 83.6°F [28.7°C] - Humidity: 82.0% - VPD: 0.72 kPa - Soil %: [50, 36, 49, 47, 43, 43, 43, 45] ----------------------------------- - [+04:07]: Ca-Caw!! Let’s get this flower cycle started! --- Time to switch the clocks from 18/6 to 12/12 which will begin the stretch to flower! Let’s go! --- Within the AC Infinity App, --- For the Main Tent [4x4] controller, --- Changed the schedule from 'Vegetative [18/6]' to 'Flower [12/12]' --- Also made sure to sync the settings for each device. The current settings are: ------ GROW LIGHT (MARS HYDRO FC-6500): --------- The Mode is set to ‘ON MODE’ --------- The START/END times are set to 07:00PM/07:00AM --------- The SUNRISE/SUNSET Duration value is set to 20Min --------- The MAX value is set to 4 ------ EXHAUST FAN (AC INFINITY CLOUDLINE T6): --------- The Mode is set to ‘CONTINUOUS AUTO’ --------- The Temperature HIGH/LOW trigger’s value are set to 85°F/OFF --------- The Humidity HIGH/LOW trigger’s value are set to 87%/OFF --------- The MIN/MAX values are set to 1/8 --------- The Temperature Dynamic Transition buffer value is set to 2°F --------- The Humidity Dynamic Transition buffer value is set to 2% ------ HUMIDIFIER (AC INFINITY CLOUDFORGE T7): --------- The Mode is set to ‘CONTINUOUS TARGET’ --------- The VPD target value is set to 1.0kPa --------- The MIN/MAX values are set to 0/8 --------- The VPD Dynamic Transition buffer value is set to 0.2kPa ------ HEATER (AC INFINITY THERMOFORGE T3): --------- The Mode is set to ‘CONTINUOUS TARGET’ --------- The Temperature target value is set to 78°F --------- The MIN/MAX values are set to 0/8 --------- The Temperature Dynamic Transition buffer value is set to 2°F --- The only difference is the ON/OFF times for the grow light. Now lights will be on from 7pm to 7am (19:00 – 07:00). --- Everything else is identical to the previous veg schedule. --- Anyways, --- LET THE TWO-WEEK STRETCH TO FLOWER BEGIN!! - [+00:55]: Night check on the 4x4 tent. --- Ca-Caw! Looking great my ladies! --- Heady OG (BX1 #1) is continuing to blow up with more tops! The canopy is looking incredible! --- TKO is also looking great with tops everywhere! She has taken over this grow and hyped that - [+01:54]: Trained and tucked the top growth under the netting. --- Canopy is flat and even again. Great! --- Day one into the 12/12 flip and growth is looking great! - [+01:56]: Checked the Ecowitt soil moisture sensor data: ------------------ [ 4x4 MAIN TENT ] --------------- ------ 46% - [CH01 FT » G30 - Heady OG BX1 #1] ------ 36% - [CH02 FB » G30 - Heady OG BX1 #1] ------ 50% - [CH03 BT » G20 - TKO] ------ 47% - [CH04 BB » G20 - TKO] ------------------ [ 3x3 VEG TENT ] ---------------- ------ 40% - [CH05 BL » GR7 - Garlic Budder OG#1] ------ 41% - [CH06 BR » GR7 - Garlic Budder OG#2] ------ 40% - [CH07 FL » GR7 - Gorilla Goat #1] ------ 44% - [CH08 FR » GR7 - Gorilla Goat #2] --------- Veg: 38% - 45% | Flower: 45% - 55% --------- General: 30% [Dry] «| 45 - 60% [Moist] |» 70% [Wet] - [+01:59]: Checked the 3x3 veg tent. --- Mothers are all vegging along and the canopy is bushy and beautiful! --- Pots also look good too. No gnats! - [+02:01]: Checked on the propagation dome (in the 3x3), --- To refresh the air, lifted the top off for a bit. --- Clone growth looks great for the most part and getting curious on root growth. --- Heady OG looks green, but she has been very droopy the entire time. Not sure if this cutting will root, but there is no yellowing. May have messed up something in cloning. --- The TKO clone looks beautiful. incredible! --- Using a spray bottle, misted the top growth with RO water. - [+02:05]: Checked the humidifiers. --- Tanks are still full and no leaks found. --- Over the past week or so, been research about Lactobacillus and the organic benefits. Plan to give it a try and will start the process tomorrow. --- Shout out to Jeremy at BuildASoil for the YT videos and the Lacto recipe! --- LOYAL TO THE SOIL FOR LIFE! --- Anyways, Onwards Ensign! Day 02 - Tuesday - 07/29/25 - Total Days: 107 ----------------------------------- Daily Averages ~[+01:00] - Temps: 83.3°F [28.5°C] - Humidity: 80.4% - VPD: 0.78 kPa - Soil %: [50, 36, 49, 47, 43, 43, 43, 44] ----------------------------------- - [14:24]: Okay! Time to start some Lacto Serum! --- This lactobacillus serum is used to improve soil health and nutrient availability. This LAB serum can also be used to create fermented plant or fruit juices (FPJ/FFJ). --- Anyways, --- First need to make the rice wash solution! --- Filled a mini wide-mouth mason jar with 1 cup of White Rice. ------ Added 1 cup of RO Water --- Mixed the rice and water for a bit. --- Covered the jar with a paper towel and rubber-band. ------ [ ~10 MINUTES LATER ] - [14:38]: Great! --- Mixed the rice and water again before pouring a little over 1/4 cup into a mini wide-mouth mason jar. --- Covered the jar with a paper towel and rubber-band. --- The current room temps are around 80°F --- To start the microbial activation, going to let this rice water solution sit for a few days. - [14:45]: Smelled the solution through the paper towel. --- The solution smells like flour. Nothing foul. --- From what I understand the process is pretty simple: ------ Create the rice wash solution and let it sit for a few days to activate (white or brown rice). ------ Mix 1 part activated rice wash solution to 10 parts whole or raw milk. Then let it sit for a few more days for the lacto cultures to proliferate. ------ Once the milk separates into essentially curds and whey, strain out the curds and the extracted whey is the finished Lacto Serum. ------ This serum should remain shelf stable in the fridge for several months. ------ Alternatively, black strap unsulfured molasses can be added to the serum at 1 part molasses to 4 parts serum. This will make the product stable enough for non-refrigerated storage (lasts several months). ------ As for application, the serum can be used as a soil drench or foliar feed at 4mL (~1tsp) per gallon of water. --- Anyways, --- Will check on this in a day or so and am waiting until the solution turns from a flour odor to more of a sweet aroma. - [19:35]: Night check on the 4x4 tent. --- Ca-Caw!! Looking great my ladies! --- Both Heady OG and TKO are raging with more tops! -- [20:37]: Trained the top growth. --- Now starting to tuck mainly tucked Heady OG to spread growth out under the netting. --- Letting TKO stretch through the netting and only tucked the taller tops. Mainly trained the back area (won’t be able to train this once growth starts to ramp upwards) and made sure each square has at least one apical top. --- Also plucked and defoliated the Heady OG’s lower growth. Cleaned her legs and now she’s nice and smooth! --- Wow TKO’s main stalks are huge! Can really reach back area now so going to let her grow. - [20:47]: Checked the Ecowitt soil moisture sensor data: ------------------ [ 4x4 MAIN TENT ] --------------- ------ 45% - [CH01 FT » G30 - Heady OG BX1 #1] ------ 36% - [CH02 FB » G30 - Heady OG BX1 #1] ------ 45% - [CH03 BT » G20 - TKO] ------ 46% - [CH04 BB » G20 - TKO] ------------------ [ 3x3 VEG TENT ] ---------------- ------ 42% - [CH05 BL » GR7 - Garlic Budder OG#1] ------ 40% - [CH06 BR » GR7 - Garlic Budder OG#2] ------ 47% - [CH07 FL » GR7 - Gorilla Goat #1] ------ 41% - [CH08 FR » GR7 - Gorilla Goat #2] --------- Veg: 38% - 45% | Flower: 45% - 55% --------- General: 30% [Dry] «| 45 - 60% [Moist] |» 70% [Wet] - [21:34]: Checked the 3x3 veg tent. --- Ooo yea! All veg mama’s are thriving and bushy! --- Getting close to the grow light again so time for more training! - [21:53]: Super-cropped and trained the top growth. --- Pinched and bent the taller branches and lowered the canopy by 5-6 inches. - [21:58]: Checked on the propagation dome, --- To refresh the air, lifted the top off for a bit. --- Clones are growing along and hopefully rooting. --- Heady seems to be struggling, but she is still green. --- TKO is looking great and she is starting to get taller! --- Plan to check for roots in a couple days. --- Using a spray bottle, misted the top growth with RO water. - [23:07]: Time for a mini upgrade! Got a set of magnetic levels. --- Attached two levels to both the main tent and veg tent’s grow lights. --- Not really necessary, but the added levels will be useful during height adjustments. - [23:23]: Checked the humidifiers. --- Tanks are still full and no leaks found. Day 03 - Wednesday - 07/30/25 - Total Days: 108 ----------------------------------- Daily Averages ~[+01:00] - Temps: 83.6°F [28.7°C] - Humidity: 82.1% - VPD: 0.72 kPa - Soil %: [49, 36, 48, 46, 43, 43, 43, 44] ----------------------------------- - [23:36]: Night check on the 4x4 tent. --- Ca-Caw!! Looking beautiful my ladies! Wow! This is why we grow! --- Both Heady OG and TKO are looking healthy and tops are bursting through the netting! - [23:54]: Trained the top growth. --- Mainly tucked and continued to spread Heady OG out to fill in more squares in the front left quadrant. --- Did minimal training on TKO. Just letting her grow through the netting and wow growth is raging! --- Wow! The canopy is looking beautiful! - [23:59]: Checked the Ecowitt soil moisture sensor data: ------------------ [ 4x4 MAIN TENT ] --------------- ------ 55% - [CH01 FT » G30 - Heady OG BX1 #1] ------ 36% - [CH02 FB » G30 - Heady OG BX1 #1] ------ 49% - [CH03 BT » G20 - TKO] ------ 46% - [CH04 BB » G20 - TKO] ------------------ [ 3x3 VEG TENT ] ---------------- ------ 42% - [CH05 BL » GR7 - Garlic Budder OG#1] ------ 47% - [CH06 BR » GR7 - Garlic Budder OG#2] ------ 47% - [CH07 FL » GR7 - Gorilla Goat #1] ------ 40% - [CH08 FR » GR7 - Gorilla Goat #2] --------- Veg: 38% - 45% | Flower: 45% - 55% --------- General: 30% [Dry] «| 45 - 60% [Moist] |» 70% [Wet] - [+00:03]: Checked the 3x3 veg tent. --- Wow mother growth is raging again! --- Really wish I can flip these ladies to flower, but don’t have the space. --- Plan to start another round of mother cycling soon. Will probably super-crop tomorrow. - [+00:04]: Checked on the propagation dome (in the 3x3), --- To refresh the air, lifted the top off for a bit. --- Wow clones are growing! --- Heady OG is definitely going through some sort or rooting issue, but growth is still green. She is now starting to show signs of yellowing, so there may be roots, but not sure. --- On the flipside, TKO is crushing it! She looks healthy and perky! The yellowing of the lower growth along with the healthy and perky top growth means there’s successful rooting and the clone is translocating nutrients to produce root growth. I think. --- Using a spray bottle, misted the top growth with RO water. --- Oh! Also continuing to research tissue culture (TC) and have decided to give it a potential go. --- Shout out to Laur and ‘Plants In Jars!’ Her incredible YT videos have been a huge game changer and a highly recommend free resource for anyone trying to get into DIY tissue culture! --- Pretty much now I think tissue culture is the solution to my mother plant issue. --- From the little I understand, tissue culture is basically an advanced form of plant cloning and can be done quite safely at home. --- If done properly, plants suspended in tissue culture can be propagated and maintained indefinitely until needed. --- Each TC sample is basically a mini self-contained mother plant pod. --- Once needed, a TC sample can be brought back to a clone-like state for planting into solo cups. --- Aside from the technical process (which is going to be fun to learn), the largest challenge is maintaining a sterile environment during propagation. --- Anyways! - [+00:10]: Checked the humidifiers. --- Tanks are still full and no leaks found. Day 04 - Thursday - 07/31/25 - Total Days: 109 ----------------------------------- Daily Averages ~[+01:00] - Temps: 83.5°F [28.6°C] - Humidity: 81.2% - VPD: 0.75 kPa - Soil %: [49, 36, 49, 46, 43, 43, 43, 44] ----------------------------------- - [08:42]: Checked on the 3x3 veg tent. --- Both growth and pots are looking great! - [08:43]: Checked on the propagation dome, --- Clones both look bad and good. --- Concerned about Heady OG, but TKO has been healthy and perky the whole way. - [08:45]: Time to check for roots. --- Heady OG had one tiny root. Not ideal, but was actually surprised to find any root growth. Nice! --- Woah! Nice! TKO is bursting with roots! She’s definitely ready to be transplanted! --- Decided to plant both clones. Hoping that Heady OG will do better in the soil. --- Time to transplant the rooted cuttings! - [09:13]: Took 2 used solo cups (has bottom corners cut for drainage) and labeled each cup (Heady OG BX1, TKO). --- Partially filled each with some fresh (dry) BuildASoil 3.0 potting soil. --- Made sure that the soil was well packed. --- Inoculated each cup with Great White mycorrhizae along with a bit of Beauveria Bassiana. --- Misted the dry soil with a bit of RO water (~3 sprays each). ------ Sprinkled 1/64tsp of Beauveria Bassiana Plus ------ Sprinkled 1/16tsp of Great White - [09:26]: Time to plant! One clone at a time, --- Placed each clone into solo cups (also removed the clone tag). --- Made sure each solo cup had enough room for more soil. - [09:32]: Inoculated each Coco Coin with Great White mycorrhizae. ------ Sprinkled about an 1/16tsp of Great White onto each Coco Coin. --- Made sure to get the top and sides evenly. - [09:35]: Gently filled each solo cup with more soil. --- Completely covered the top of each Coco Coin and made sure to tuck the sides fairly snug with soil. --- Evened out the top soil. Each Coco Coin is about 1/4-1/2 inch below the top soil. - [09:44]: Added some BuildASoil Organic Straw Mulch to the top. --- Using the small straw bits at the bottom of the bag is great for solo cups. --- Time to water! - [09:51]: Filled a measuring cup with 2 cups of RO water. ------ Added 1/64tsp of Quillaja Saponaria Extract [60] ------ Added 1/16tsp of Horticultural Coconut ------ Added 1/16tsp of Horticultural Aloe ------ Added 1/8tsp of Mycrobe Complete --- Mixed and poured the solution straight into a spray bottle. - [09:54]: Took the dry soil weight of each pheno before watering, ------ Heady OG (BX1) weighed 261.4g ------ TKO weighed 240.9g --- Marked the starting weight on the back of each cup. --- While on a scale, --- Gently misted the straw mulch of each cup. --- Focused on the straw and sprayed as evenly as possible. --- Misted 5-10 sprays. Waited a few seconds, then misted again. --- Repeated this process until both cups weighed at least 300g --- There was no runoff. --- Oops! --- Had to slightly extend the day period (Lights usually turn off at 10:00). - [10:04]: Took the weight of both phenos after watering, ------ Heady OG (BX1) weighed 301.2g ------ TKO weighed 301.4g --- Marked the saturated wet weight on each cup. - [10:12]: Placed both cups into the propagation dome. --- Removed the side extensions along with the plug tray and have the cups resting in the main drip tray. --- Have the lid and lights suspended above the tray (~00 inches). --- Also increased the propagation dome’s bar lights. ------ Increased the intensity from 1 to 5 - [10:13]: Took general PPFD readings. ------ Clones were around 109 μmol/m²/s which gives a DLI of 7.06 mol/m²/d under an 18/6 light cycle. --- Turned the lights off and made sure that both were back to an 18/6 cycle (on from 16:00 to 10:00). --- Ca-Caw!! Done! --- Not worried about TKO, but getting concerned about Heady OG. Not sure if she is going to make it. - [14:23]: Checked on the Lacto Serum. --- The solution has been resting for 2 days. --- Smelled the rice wash solution through the paper towel. --- The odor has changed from the original flour odor but has not become sweet. However, the smell is getting there. I think. --- Will continue to check and still waiting until the solution changes into a sweet aroma. - [19:24]: Night check on the 4x4 tent. --- Ooo yea! Growth is looking beautiful and raging along! --- Both Heady OG and TKO are thriving with growth! The stretch is definitely ramping up! - [20:08]: Trained and tucked the top growth. --- Mainly focused on the Heady OG and spread her out a bit more evenly to fill in more squares. --- Wow TKO by far going to be the largest plant I’ve grown in a 4x4 tent. She’s extremely dense with healthy tops shooting up everywhere! --- Since I’m not tucking TKO anymore and she is getting taller, need to take readings and measurements. - [20:38]: Took the weekly general PPFD readings. ------ Heady OG (BX1 #1) was still around 361 μmol/m²/s which gives a DLI of 15.60 mol/m²/d under a 12/12 light cycle (at ~326.5W). ------ TKO was around 365 μmol/m²/s which gives a DLI of 15.77 mol/m²/d under a 12/12 light cycle. - [20:40]: Took the weekly height and light distance measurements. ------ Heady OG (BX1 #1) was still about 21.5" tall. ------ TKO was about 26" tall. ------ Heady OG (BX1 #1) was about 31" away from the grow light. ------ TKO was about 27" away from the grow light. --- Since Heady OG is clearly struggling to root, going to take a few more lower cuttings to make sure the genetics survives. - [20:52]: Filled a measuring cup with 1.5 cups of RO water. ------ Added 1/8tsp of Horticultural Aloe --- Mixed the solution and poured it straight into a solo cup. - [20:56]: Time to take the cuttings! --- Using a pair of trimmers (AC Infinity), --- Gently cut 2 small cuttings from Heady OG (BX1 #1). Took lower branches that did not reach the top canopy level. --- Trimmed and cleaned most of the nodes leaving the top node or two. --- Did not cut any leaf fingers. --- Made sure the tip of the stalk had a slanted cut (about 45-degree). - [21:02]: Placed both cuttings into the cup of aloe solution. --- Also made sure the cuttings were tagged. Not really necessary, but why not. - [21:05]: Placed the cup into the 3x3 veg tent. --- Have the cup resting in the propagation dome next to the planted clones. --- Going to let these cuttings soak for a day before refreshing with straight RO water. --- Let the two-day soak begin! - [21:06]: Checked the Ecowitt soil moisture sensor data: ------------------ [ 4x4 MAIN TENT ] --------------- ------ 47% - [CH01 FT » G30 - Heady OG BX1 #1] ------ 36% - [CH02 FB » G30 - Heady OG BX1 #1] ------ 50% - [CH03 BT » G20 - TKO] ------ 46% - [CH04 BB » G20 - TKO] ------------------ [ 3x3 VEG TENT ] ---------------- ------ 44% - [CH05 BL » GR7 - Garlic Budder OG#1] ------ 41% - [CH06 BR » GR7 - Garlic Budder OG#2] ------ 43% - [CH07 FL » GR7 - Gorilla Goat #1] ------ 46% - [CH08 FR » GR7 - Gorilla Goat #2] --------- Veg: 38% - 45% | Flower: 45% - 55% --------- General: 30% [Dry] «| 45 - 60% [Moist] |» 70% [Wet] - [21:08]: Checked the 3x3 veg tent. --- Looking great in the mother tent! --- Was planning on defoliating and taking new veg cuttings, but since Heady OG is struggling, going to wait a bit longer to start the mother cycling process. - [21:18]: Super-cropped and trained the top growth. --- Lowered the canopy a good 4-5inches. - [21:19]: Checked on the clones, --- Looking great! --- Heady is still struggling, but hoping she’ll perk up soon. --- TKO is looking perfect! She’s perky and I have no doubt that she’ll root just fine. --- More worried about Heady OG. - [22:08]: Checked the humidifiers. --- Tanks are still full and no leaks found. Day 05 - Friday - 08/01/25 - Total Days: 110 ----------------------------------- Daily Averages ~[+01:00] - Temps: 83.4°F [28.6°C] - Humidity: 83.0% - VPD: 0.68 kPa - Soil %: [51, 36, 49, 46, 42, 43, 43, 45] ----------------------------------- - [22:10]: Night check on the 4x4 tent. --- Ca-Caw! Let’s go ladies! Wow the garden is packed and looking incredible! --- Heady OG and TKO are looking perky and stretching through the netting with nodal growth everywhere! --- By far my healthiest grow cycle yet! - [22:21]: Did a bit of training. --- Slightly tucked and spread Heady OG a bit more to fill in the front left quadrant. --- Just going to let the rest grow! - [22:25]: Checked the Ecowitt soil moisture sensor data: ------------------ [ 4x4 MAIN TENT ] --------------- ------ 52% - [CH01 FT » G30 - Heady OG BX1 #1] ------ 36% - [CH02 FB » G30 - Heady OG BX1 #1] ------ 54% - [CH03 BT » G20 - TKO] ------ 46% - [CH04 BB » G20 - TKO] ------------------ [ 3x3 VEG TENT ] ---------------- ------ 44% - [CH05 BL » GR7 - Garlic Budder OG#1] ------ 41% - [CH06 BR » GR7 - Garlic Budder OG#2] ------ 46% - [CH07 FL » GR7 - Gorilla Goat #1] ------ 48% - [CH08 FR » GR7 - Gorilla Goat #2] --------- Veg: 38% - 45% | Flower: 45% - 55% --------- General: 30% [Dry] «| 45 - 60% [Moist] |» 70% [Wet] - [22:34]: Checked the 3x3 veg tent. --- Ooo yea! The veg garden is beautiful and wow growth is raging! --- Wow! The canopy is already stretching upwards and will probably need to train again tomorrow. --- Checked on the clones, --- Nice!! Growth is all around healthy and looking great! --- Heady OG looks less droopy. I think. --- TKO is looking perfectly healthy and already getting taller! Wow! --- Nice! Both Heady cuttings are looking healthy and not droopy. - [22:38]: Time to swap the aloe water out! --- Replaced the solo cup with a clean one filled with fresh RO water (1.5cups). --- Going to let this soak for another day before transplanting into Coco Coins for rooting. - [22:44]: Checked the humidifiers. --- Tanks are still full and no leaks found. Day 06 - Saturday - 08/02/25 - Total Days: 111 ----------------------------------- Daily Averages ~[+01:00] - Temps: 82.6°F [28.1°C] - Humidity: 83.2% - VPD: 0.66 kPa - Soil %: [50, 36, 50, 47, 42, 43, 43, 45] ----------------------------------- - [07:59]: Quick morning check on the propagation dome (in the 3x3 veg tent). --- Ooo yea! The clones and cuttings are looking healthy and green! --- Heady OG (BX1 #1) is droopy and seems to be recovering. I think? --- TKO is looking healthy and looking beautiful! --- Nice! Both Heady OG (BX1 #2 and #3) cuttings are looking good! These cuttings are quite a bit smaller than the last round, but they are healthy and green! - [20:06]: Night check on the 4x4 tent. --- Ca-Caw! Wow the canopy is thriving! --- Heady OG is looking healthy and perky! --- Wow! TKO is stacking up with nodal branching and crowning is everywhere with perky tops! - [20:13]: Did a bit of tucking on the front left quadrant. --- Could have trained Heady OG another week in veg before flipping to flower, but oh well. TKO needed to be flipped. - [20:32]: Checked the Ecowitt soil moisture sensor data: ------------------ [ 4x4 MAIN TENT ] --------------- ------ 45% - [CH01 FT » G30 - Heady OG BX1 #1] ------ 36% - [CH02 FB » G30 - Heady OG BX1 #1] ------ 66% - [CH03 BT » G20 - TKO] ------ 47% - [CH04 BB » G20 - TKO] ------------------ [ 3x3 VEG TENT ] ---------------- ------ 47% - [CH05 BL » GR7 - Garlic Budder OG#1] ------ 44% - [CH06 BR » GR7 - Garlic Budder OG#2] ------ 42% - [CH07 FL » GR7 - Gorilla Goat #1] ------ 43% - [CH08 FR » GR7 - Gorilla Goat #2] --------- Veg: 38% - 45% | Flower: 45% - 55% --------- General: 30% [Dry] «| 45 - 60% [Moist] |» 70% [Wet] --- Needed to swap out the batteries for TKO’s top soil sensor (CH03). --- Apparently there is a slight flaw with the programing on the WittFlows. Since the watering function is based on the channel and not the sensor, when TKO’s top sensor cuts out, the new CH03 (which is TKO’s bottom sensor) takes over. --- Anyways, - [20:38]: Checked the 3x3 veg tent. --- Veg garden is looking beautiful and wow top growth needs more training! - [20:53]: Super-cropped the top growth a bit. --- Lowered the canopy a few inches. --- Growth is getting out of control! Wow! Need to take cuttings soon to start the cycling process. --- Anyways! - [20:54]: Checked on the clones, --- Wow clone growth is looking very good! --- Heady OG seems to be recovering nicely in the soil and I’m getting more confident that she’s going to make it. Nice! --- TKO is looking great! She’s going to root and will be ready for transplant in a week or so. --- Both Heady OG cuttings are looking healthy and ready to be rooted! --- Time to plant the second round of Heady OG (BX1) cuttings! - [21:13]: Filled a measuring cup with 1.5 cups of RO water. ------ Added a pinch of Quillaja Saponaria Extract [60] ------ Added 1/64tsp of Horticultural Aloe ------ Added 1/32tsp of Mycrobe Complete --- Mixed the solution thoroughly. - [21:17]: Dropped 2 Coco Coins into the measuring cup. --- The coins immediately started to expand. ------ [ ~10 MINUTES LATER ] --- Took each fully saturated Coco Coin and temporarily placed them in half-cut solo cups. --- Using a squeeze bottle filled with Clonex, - [21:38]: Gently filled each pre-made hole with Clonex rooting gel. --- Time to plant the cuttings! - [21:43]: Using a pair of clean trimmers, made a final 45° cut. --- Also stripped and scrapped some of the stem’s outer membrane. --- To help with planting, gave each Coco Coin a squeeze to loosen the coco. --- Made sure to insert each stem straight and snug with the tip about a 1/4 inch from the bottom of the Coco Coin. --- Also secured the stem by pinching and pressing in the sides of the Coco Coin. --- After both cuttings were planted, --- Temporarily took the clones out of the propagation tray. Also placed the plug tray back in. - [21:53]: Placed both Coco Coins into the propagation dome’s tray. --- Since these cuttings are both identical cultivars, no need to really name. --- Added 1/2 cup of RO water to the bottom of the tray. --- Since I’m not using the dome lid (which is currently hanging above the tray), misted a couple of clear cups with RO water. - [21:55]: Covered both cuttings. --- Will need to mist the cups for the first few days in the tray. --- While rooting the cuttings, noticed that both clones (Heady OG BX1 and TKO) need to be watered already. --- Let’s go! - [22:02]: Took the initial starting weight range of both clones before watering, ------ Heady OG BX1 #1 » 261.4g → 301.2g ------ TKO » 240.9g → 301.4g --- General Solo Range: [Dry] «| [Initial Cup Weight] + ~55-100g |» [Wet] --- All phenos were last watered 2 days ago. --- Took the starting weight of both clones before watering, ------ Heady OG BX1 weighed 278.2g ------ TKO weighed 253.5g --- While on a scale, --- Gently misted the straw mulch of both cups with RO water. --- Focused on the straw and sprayed as evenly as possible. --- Misted 10-20 sprays. Waited a moment, then misted again. --- Repeated this process for both cups. --- There was no runoff. - [22:18]: Took the saturated weight of both clones after watering, ------ Heady OG BX1 weighed 278.2g ------ TKO weighed 253.5g --- Marked the final wet weight on the back of each cup. Also marked the watering date on the front. - [22:27]: Placed both phenos back into the tent. --- Done! Grow strong little ones! - [22:33]: Checked the humidifiers. --- Tanks are still full and no leaks found. Day 07 - Sunday - 08/03/25 - Total Days: 112 ----------------------------------- Daily Averages ~[+01:00] - Temps: 83.1°F [28.4°C] - Humidity: 83.0% - VPD: 0.68 kPa - Soil %: [48, 37, 49, 51, 42, 43, 43, 45] ----------------------------------- - [08:13]: Quickly checked on the propagation dome (in the 3x3 veg tent). --- Wow the clones are looking incredible! --- Heady OG is looking better and she’s still recovering. --- TKO is looking healthy and getting bigger. Nice! --- Both Heady OG cuttings are also looking healthy and look better than the first attempt (the recovering clone). --- Misted both cups with RO water. - [19:06]: Night check on the 4x4 tent. --- Ca-Caw!! Woah these ladies are definitely in full stretch! These girls are getting taller by the hour! Wow! --- Heady OG is looking beautiful and she is exploding with upwards growth! The middle of the canopy is basically at the same height as TKO. Incredible! --- Ooo yea! TKO is crushing it! Wow! She’s a good 7 inches above the scrog netting! --- The canopy is getting stacked with nodal growth! This garden is ramping up to be my best grow cycle yet! - [19:14]: Checked the Ecowitt soil moisture sensor data: ------------------ [ 4x4 MAIN TENT ] --------------- ------ 54% - [CH01 FT » G30 - Heady OG BX1 #1] ------ 37% - [CH02 FB » G30 - Heady OG BX1 #1] ------ 50% - [CH03 BT » G20 - TKO] ------ 41% - [CH04 BB » G20 - TKO] ------------------ [ 3x3 VEG TENT ] ---------------- ------ 41% - [CH05 BL » GR7 - Garlic Budder OG#1] ------ 47% - [CH06 BR » GR7 - Garlic Budder OG#2] ------ 47% - [CH07 FL » GR7 - Gorilla Goat #1] ------ 49% - [CH08 FR » GR7 - Gorilla Goat #2] --------- Veg: 38% - 45% | Flower: 45% - 55% --------- General: 30% [Dry] «| 45 - 60% [Moist] |» 70% [Wet] - [19:16]: Checked the 3x3 veg tent. --- Wow veg growth is raging with health and vigor! --- Mothers are looking beautiful and canopy is bushy! --- Nice! Clones and cuttings are looking healthy! --- Misted the cutting’s cups with RO water. - [19:46]: Back in the 4x4 main tent, --- Decided to tuck Heady OG a bit more and tried to spread the growth in the front left quadrant. --- Growth is going to be uneven but I think the left side will eventually even out. I think. - [19:54]: Quickly checked on the auto-watering system. --- System is still charged and no leaks or kinks found in the tubing. - [19:58]: Checked the humidifiers. --- Tanks are still full and no leaks found. --- Another week done and the garden is vibing and thriving! --- Next week will be the end of the stretch phase and as growth slows down, will hopefully see signs of budding. --- Ca-Caw! Stoked for this grow and can’t wait until these girls start to flower. - [+02:20]: TKO’s soil sensor cut out again.. --- Swapped out the unit with a new one and re-synced the channel to correct sensor ID. --- The old sensor got water damage. Going to try to dry it out, but really glad I have a couple spare units. --- Also glad that TKO seems to be taking the extra watering without any issue! May try to increase the soil moisture average next week for both pots. --- Anyways! Onwards Ensign! [END OF WEEK 15]
Likes
36
Share
@JBoBz
Follow
I didn t expected nothing from this plant, because of the slow and stunt start, but after the 3rd week it start to get "bigger" i m gonna try it again while i have another seed!💪 Anyway the result wasn t much, but amazing! Thanks for who followed the process, happy grow to everyone!👽