


Processing
Likes
Comments
Share


@Bloom_Room_By_Jared
Follow
3/22: I’m really just loving her structure she’s perfect. Can’t wait till I get my Optic 4 XL’s this upcoming week and see what that does to her, I’m starting to see the 1st hairs since flipping....it sucks ordering something and then have to wait a month and a 1/2 For something because it’s extremely back ordered.
3/25: As I keep saying I’m really digging her structure I’m not gonna be really doing much with her until harvest she’s a beast she’s the biggest medicine plant I’ve grown thus far. I finally got the notification of my Optic 4XLs being shipped so now I can get the real growing on and get rid of this cheap Chinese blurple.

Likes
8
Share


@dillande3
Follow
Hello! Day 28 Lemon Haze, looking good, I did first topping and started LST training, Light 50% 12-14 inch distance hope its ok only for this week and next week i ll turn it in to 100% reason for this i have small seedling there same zone, pls correct me if i am doing it wrong thanks GD community. I also got some white Dots , about this i ll ask a grow qus. Thanks

Processing
Likes
4
Share


@Barcelona_Farmers710
Follow
Mientras yo me divertía en la spannabis las niñas se ponian cada vez mas resinosas farmers!! Solo basta ver la shining haze para darse cuenta que el mammoth p es brutal!!👌🏻

Likes
16
Share


@Prop207
Follow
30 grow
20 Micro
10 bloom
15 cm
15 sb
Heavy growth, robust stems, great plant all around so far, considering it emerged from its shell with a snapped stem

Likes
11
Share


@Skunkiest_bender39
Follow
Lampe 80% power und nur noch 20cm platz, muss wohl nachbinden…
Die krumbles haben einen Weg, sieht mir nach generellem Defizit aus aber vor allem wenig CalMag, oder war schon zu viel und ein lockout könnte durch Zugabe von CalMag provoziert werden. Wir werden sehen. Blätter sehen mies aus Blüten wachsen super, Harzproduktion geht weiter, Geruch wird immer stärker. Mycrene und Limonene liegen in der Luft;). Die Zake stinken extrem nach rohrzucker-hopfen leicht bitter, die krumbles sind beide sehr süs die b2 hat einen mehr als intensiven citrus Duft. Die Zake sind alle sehr unterschiedlich, nur der Geruch ähnelt. Z1 110cm , z2 95cm z3 85cm. Musste sie unterfüttern. Buds an jeglichen wichstyp angepasst. Hatte Glück 3 phänos zu treffen sativa lastig, ausgeglichen, indica lastig. Hoffe die Damen haben genau so viel Spaß wie ich :D


Likes
3
Share


Likes
12
Share


@M420_GROWS
Follow
+5cm, I think reached her final height.
Smell is very strong and delicious.
There were a lot of leaves to trimm in this week. Getting difficult to trimm colas without touching young flowers - going to reduce defoliation.
Will continue to feed flowering mix, but still plan to switch to final parts mix very soon.
Spraying maybe every second day once a day now, keeping RH between 40%-60%.
Appreciate growing this one - very strong plant with delicious smell😍
[Setup]
- Tent: Sticky Experts 1m x 0.5m
- Light: 2 x Sanlight Q3W at 100% = 240W
- Pot: Nutriculture Oxypot Single filled with 10L solution

Likes
4
Share


@Earthsower
Follow
In the last two weeks she has been flushed with phd balanced water 💦. Her bracts seemed to have fully swelled her ratio of trichomes was well over 30% amber she was beginning to fade so that’s when I decided she can’t go any further. She is emitting a deep dank musky toffee aroma the Double kush cake feminised bracts give off a tinted silver look. A true AfghanI kush appearance. The Double kush cake feminised finished at a height of approximately 62cm

Likes
2
Share


@Munchiesfrommars
Follow
One of the best Green House Seeds strains !
Absolutely in love with Auto Kalashnikova !
Super strain !
Likes
Comments
Share

@DogDoctorOfficial
Follow
🌱 Week 3 | Purple Haze Photo | Folder 6B | A Different Personality Emerges
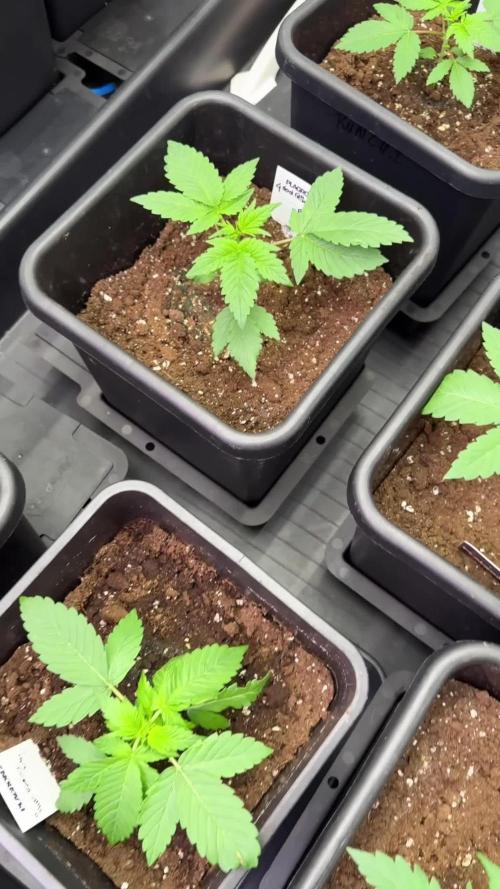
Although Purple Haze 6B shares the same genetics, environment, nutrition, and cultivation method as her sister, she is already beginning to express her own unique growth pattern. This is precisely why each phenotype in Project Blue receives its own individual diary. Every plant has a story worth documenting, and comparing them side by side allows us to appreciate the subtle differences that make growing from seed such an exciting experience.
Like every plant in this project, Purple Haze 6B is being cultivated using the 12/12 From Seed technique. From germination onward, the plants receive a flowering photoperiod, encouraging compact growth while allowing each phenotype to naturally develop its own architecture before flowering fully takes over. It’s an unconventional approach, but one that consistently produces healthy, manageable plants while showcasing each phenotype’s individuality.
During this third week the plant settled comfortably into her new container and responded with a noticeable burst of vegetative growth. Looking back at the first photographs and comparing them to the final images of the week, the improvement is impressive. The canopy has expanded considerably, secondary branches are becoming increasingly active, and the plant is building the framework that will eventually support her flowers.
Growing Environment
As with every diary in this project, environmental stability remains one of the highest priorities.
Throughout the week the conditions remained consistent:
* Temperature: 27°C (lights on)
* Night Temperature: 25°C
* Relative Humidity: 55%
* Root Zone Temperature: 21°C
* Nutrient Solution Temperature: 20°C
* pH: 6.0
* EC: 1.3
* CO₂: approximately 666 ppm
* Photoperiod: 12 Hours On / 12 Hours Off
* Average PPFD: 600–700
Keeping these parameters stable allows the plants to focus their energy on producing healthy roots, vigorous stems, and continuous vegetative growth rather than constantly adapting to environmental changes.
Feeding Program
Purple Haze 6B continues receiving the complete Plagron Terra feeding schedule:
* Terra Grow — 1.8 ml/L
* Power Roots — 1 ml/L
* Pure Zym — 1 ml/L
* Sugar Royal — 1 ml/L
At this stage I’m not chasing explosive growth. My objective is to establish an exceptionally healthy root system, maintain balanced nutrition, and encourage strong structural development before flowering begins in earnest.
Healthy foundations almost always produce healthier harvests.
A Bushier Growth Pattern
One characteristic that immediately stands out in this phenotype is her naturally bushy structure.
Rather than stretching vertically, she appears determined to produce numerous secondary shoots from every node. The lateral branches are developing rapidly and are already beginning to compete with the main stem for dominance, creating what should become a beautifully even canopy in the weeks ahead.
The fan leaves remain broad and healthy, showing excellent turgor with a rich green colour that suggests the feeding program is well balanced. New growth emerges bright green before gradually darkening as each leaf matures—a normal sign of vigorous development.
The stem is thickening steadily and every new internode is adding more potential flowering sites.
Gentle Canopy Management
As with the rest of the Project Blue plants, no aggressive training has been necessary.
Instead, I’ve continued using simple leaf tucking throughout the week.
Rather than removing healthy foliage, I gently reposition the larger fan leaves beneath neighboring branches, allowing more light to reach the developing side shoots hidden below.
This simple technique offers several advantages:
* Improves light penetration.
* Encourages stronger lateral branch development.
* Maintains maximum photosynthetic capacity.
* Eliminates unnecessary recovery time associated with defoliation.
At this stage every healthy fan leaf is an energy factory. My philosophy is to preserve as many of them as possible while simply helping the plant organize its own canopy.
Sometimes the simplest techniques deliver the best long-term results.
Looking Forward
Purple Haze 6B is developing into a wonderfully compact, vigorous phenotype with excellent branching and impressive canopy density. Every day she seems to produce another layer of healthy growth, and the structure she’s building now should provide an outstanding foundation for flowering.
It will be fascinating to compare her with Purple Haze 6A over the coming weeks. Although they started from the same seed line and have received identical treatment, they’re already beginning to reveal their individual personalities—one slightly more symmetrical, the other naturally bushier and eager to fill every available space.
Those subtle differences are one of the greatest joys of phenotype hunting, and documenting each one separately ensures that none of those unique traits are lost along the journey.
A huge thank you to Plagron, Zamnesia, GrowDiaries, and everyone following along with Project Blue. Mr. Baggy wandered through for another inspection this week and confidently declared that this young lady has absolutely no intention of growing quietly in the corner. Judging by her vigorous branching, I have a feeling he’s right.
Growers Love 🌱🛍️

Likes
5
Share


@SurSideCrew
Follow
Baklava de The Plug Seeds es un cruce de Wedding Cake X Gelato. Hay varios Phenos (3) el mejor para mi gusto es bastante púrpura y de gran rendimiento. Soporta bien altas cargas de fertilizante como además las altas temperaturas de verano. Con el frío tiende a cambiar el color a negro/purpura con tonos de verde lima y rojizos cobres. Terpenos que recuerdan a una bolleria o panadería, toques dulces, mantequilla, frutos secos, canela, miel y el pheno Gelato sale mas a crema dulce terrosa. Hay un pheno que es bastante mas Kush y Gassy! Altos contenidos en THC y muy buenos resultados para hacer extracciones.




Likes
7
Share


@DazeDreamer420
Follow
Really starting to fatten up. Was originally going to harvest along with the StrawberryBanana but she's looking like shes going to need a few more weeks. Looking back to 2 weeks ago it's night and day.
Going to wait until I see more red hairs develop. Still mostly long and white so I think it needs more time despite the 7 week flowering time they say.
last week I decided to hold back flushing for a week now I think I'm going to hold back another week I don't want to cut this plant short.

Likes
10
Share


@StickyFingah420
Follow
Ganadora del primer lugar en la categoría autofloreciente de la copa Litoral de Los Poetas en Chile.🏆🥇
Definitivamente en mi top 5 de preferencias ⭐️⭐️⭐️⭐️⭐️
Una genética muy estable, ya que es segunda vez que germino de estas semillas y se expresa exactamente el mismo fenotipo; tonalidades hermosas y caractericas, frutos muy apretados y macizos cubiertos de una capa de tricomas lo que le da una visual espectacular.
El aroma en frasco es una mezcla de frutilla ácida y tierra con un fondo dulce 🤤 es realmente exquisito. En la fumada se repiten gran parte de los aromas pero menos dulce y más cremoso y especioso, detodas formas es un humo genial que querrás fumar todo el día..


Likes
3
Share


@Farmerbry71
Follow
Day 80 for this AK auto she Is big and fat buds with a sweet smell to her I would say she will go till day dy 95- 100 before she gets harvest

Likes
11
Share

@BushDoctor740
Follow
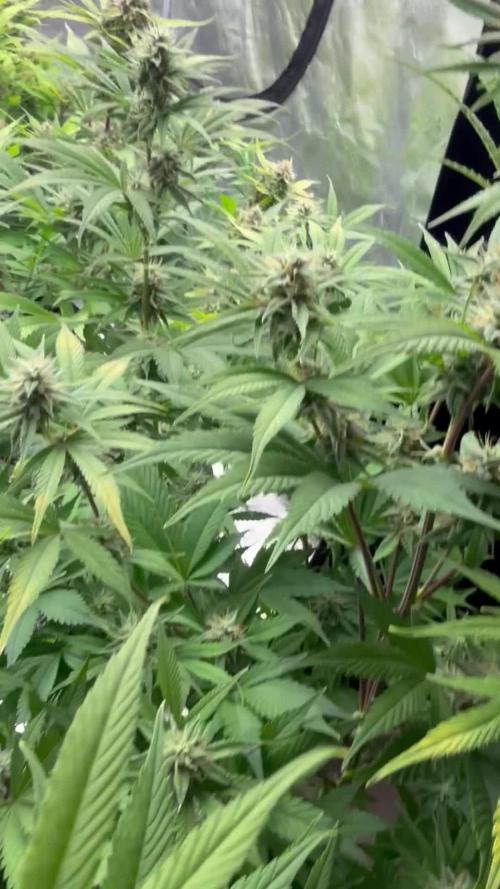
Really moving along well and she is getting sticky and smells amazing.Her pistols are turning a bright orange and with heavy frost she finish out in prob a few weeks.Light intensity set at 80 percent power and I have backed off the nutrients
Likes
45
Share


@tresplantes
Follow
Back from vcation after two weeks the Ladys Look beautyful and Full of Color
Today i will water them the last time on day 62 of flower and cut in the next 4-5 days
The zake should be a week faster than the other two but that isnt the case
The buds on all Ladys are dense and the smell is amazing cant wait to Test em out rauch

Likes
8
Share


@TrueNorth
Follow
-Strain: Auto Gelato - Fast Buds
-Tent: 5x5 Gorilla Grow Tent
-Lights: Budget LED Grow Lights 2 x 250 Watt
LED Full Spec/Red Spec mixed boards
-Light Cycle: 18/6
-Soil: Fox Farm
-Air Circulation: AC Infinity Cloudline T6 Inline Duct Fan
WECLOME BACK GROWMIES! Week 12 here with our AUTO GELATO by Fast Buds!
February, 09, 2020 (DAY 78) - YOO GROWMIES! Welcome to week 12 of our AUTO GELATO! week 6 of flower to be exact! ISNT SHE FROSTY! holy moly look at this thing, can almost go skiing lol! nothing but frost, she is starting to thicken up on the buds, i havent defoliated too much on this one because there is just too much frost all over those leaves.
February 12, 2020 (DAY 81) - WHAT UPPPPP!!!! here we are folks another update. i didnt even know there were purples in the gelato auto to be honest, but the purples are getting so VIBRANT!!!!! think she is getting flushed starting this weekend. this will be the last feed then its onto that FLAWLESS FINISH by ADVANCED NUTRIENTS. hopefully im making the right choice......maybe another week wouldnt hurt....
Likes
5
Share


@CannaBossBizz
Follow
Yesterday i took off some Leafs down there.
Looks Like a Bouquet now 😄
She's responding great to the Training i have her. I'm pretty exited how she'll do in the Future weeks 🤙🏽