Check the winners The Grow Awards 2026 🏆 


Likes
Comments
Share
@SolitudeCorners
Follow
Overall Development
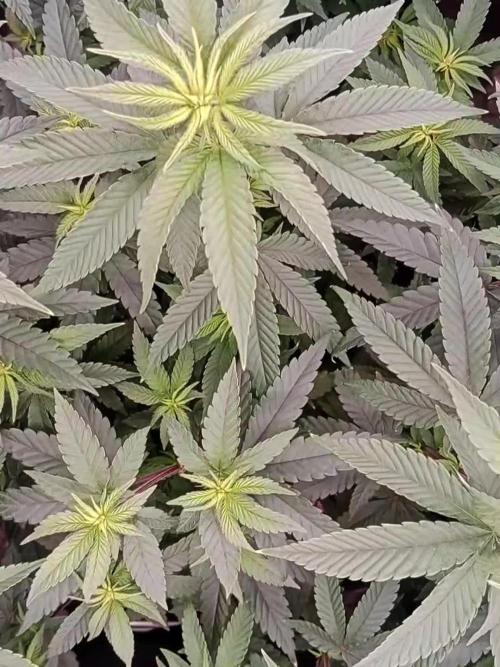
Week 4 marks the transition into mid-flower. Stretch has mostly stopped, and the plants are now directing energy into bud formation. The canopy remains uneven, with some taller, thinner phenotypes and others more compact and structured.
Bud sites are clearly established across all main branches. Flower stacking is progressing steadily, and early cluster formation is visible on the tops.
Plant Health & Observations
• Significant yellowing on older fan leaves, especially mid-to-lower canopy.
• Some plants appear pale green overall, indicating high nutrient demand during bulk transition.
• One or two phenotypes remain darker green and structurally stronger.
• Lower interior growth is lighter and less vigorous.
• Selective removal of old yellow leaves was continued to improve airflow and light penetration.
Despite visible leaf fade, bud development continues actively.
Bud Development
• Flower clusters are expanding and beginning to connect along the stems.
• Pistil production is strong and consistent.
• Buds are not yet dense but are clearly transitioning into the bulk phase.
• Resin production is beginning to increase.
This week represents the start of the main swelling period.
Environmental Adjustments
• Temperature reduced slightly (~1°C) to stabilize the flowering environment.
• Airflow maintained across canopy level.
• Canopy density moderately thinned to prevent moisture buildup.
• Light coverage remains strong across the upper layer.
Current Focus (Entering Week 5)
• Support nutrient demand during bulk phase.
• Prevent excessive early leaf loss.
• Maintain stable humidity to protect developing flowers.
• Monitor weaker phenotypes closely for further decline or nutrient imbalance.
Overall, the crop is entering the critical mid-flower stage. The next two weeks will determine final bud density and structure.

Likes
207
Share
@DogDoctorOfficial
Follow
And just like that the time for a new home came out and up they went 😇💚🙏 so far all going as it should , today i gave them some microbial help 😉 thank you Aptus for helping a lot on this department 🙏🙏🙏
As for the LED department I’m currently with the Viparspectra at a distance of 120cm from canopy @50% power and its giving me a 252 Ppfd, i will keep it like this fow a day or so and then i will increase power and with it Ppfd 😉 but for now less is more as they say 😇🙏
And like this the week as passed and they are growing beautifully 😇💚🌱 time lapse for the first week is now uploaded , enjoy 💚💚💚
And with enormous honor and pleasure that i start collaborating with Zamnezia and Viparspectra
For this run i will have the pleasure of growing some Runtz genetics from Zamnezia seeds that they wore kind enough to send me for test and review 🙏🙏🙏💚💚💚🙏🙏🙏 and for the testing and reviewing i was blessed with the VIPARSPECTRA model P2000💚💚💚🙏🙏🙏 they wore amazing and send me this LED light for me to do some testing and some reviews. Special thanks to Zamnezia and to Viparspectra for this opportunity, lets make magic together 💚💚💚🙏🙏🙏
All i grow is medicine for myself, for me and for my best friend with is me 😆 nothing to sell, so don’t even ask 😅💚💚💚
All info and full product details can be find in can find @
https://viparspectra.eu/collections/grow-lights DISCOUNT CODE - DOGDOCTOR
https://www.zamnesia.com DISCOUNT CODE - GROWITGD
More info and updates @
https://growdiaries.com/grower/dogdoctor
https://instagram.com/dogdoctorofficial
https://youtube.com/channel/UCR7ta4DKLFMg2xxTMr2cpIg
💚💚💚Growers love to you all 💚💚💚

Likes
10
Share
@DawgHaus
Follow
Week before Harvest 💪💪
Leaves yellowing up nicely 🔥
Smells lemony/earthy in the grow area.
Happy with everything so far.

Likes
24
Share
@AutoCrazy
Follow
Week 11
Week 4 of Flower
This lady is pretty happy right now. She did get a bit of tip burn this week but nothing too serious. This plant really stretched out. Even more so than her tent mate the Mimosa EVO. There are loads of bud site now so the fun has truly begun. I am excited for the weeks ahead.
Cooler internals:
5.9pH
650ppm
67F solution temperature
Onward 😎🍻


Likes
38
Share
@ScouseCityLX
Follow
First time taking clones. Took 6 and 6/6 rooted. Put 5 in the grow tent and eventually took one out to make space for the dehumidifier.

Likes
8
Share
@Hiroots420
Follow
27/04/2021 (Day 42)
Todo viene muy bien, las plantas están comiendo con muchas ganas y consumen unos 15L de solución diario.
La preflora está comenzando!
Ya se puede observar como van estirando y mostrando bastantes pelos!
Los Citizen x 8 están trabajando a un 80% rondado los 500W.
28/04/2021 (Day 43)
Se realizo un nuevo cambio de solución, las plantas ya están tirando pelos y los leds están al 80%, se observo un gran crecimiento radicular y las paredes del tallo son increíblemente gruesas y duras.
03/05/2021 (Day 48)
Las plantas vienen con un crecimiento optimo pero la flora se está tardando demasiado en hacerse presente, se estima que es debido al estrés que tuvo en semana 3 de vege produjo un retraso de algunos días.
Esta semana se incorpora Safe Roots al sistema con la finalidad de que deje la solución lo mas limpia posible.
También se realizaron bastantes defoliaciones ya que no existía penetracion de luz teniendo en cuenta el tamaño que están ocupando (85% del espacio de cultivo a 30/35 cm de altura)

Likes
8
Share
@MrsHinduGod
Follow
wow look at dat!!! da plant leaves are getting lighter in da color!!! so i added a tablespoon of da homemade worm castings to da top of da soil!!! i used a spray bottle with water to work it into dat soil!!! castings are very very good and should give a little boost to da plant!!! da plant is getting top water 2 days and butt chugging 5 days per da week!!!


Likes
55
Share
@Organic_LarF
Follow
High GD community
Week 16,
Zuchinis all around, tomatoes getting ready on a daily. Cucumbers are getting almost mature proportions. Everything going well.
Terra preta
Location: center perma garden
Surface: 125cm x 105cm
Depth: 115cm
The hole was dug out over 3 days, it were very sunny days. 😅
Theres mostly loamsand with a small sandloam bottom that was very hard. The sand was also very compressed and hard. The top layer is this grey dusty soil of about 40cm deep.
At the bottom theres pure sand thats soft, easy drainable.
First step is to fill up the entire bottom with fine chopped wood, progressively using bigger pieces of wood. I try to use some hardwood like oak to for its extra K (potassium = pot ash). A bit of charcoal to.
This will take the entire first day, bcs it needs to have a minimal ticknes of pure ashes of around 5cm. Otherwise, after compressing it with the upcoming layers, the ash-line would almost disappear. Not all the wood needs to be burned entirely. Its a first layer with lots of N and K. Bones can be used to in the fire making the NPK complete. But it can be added also as a separated layer. I dont have that much bone material because my 2 dogs, or eating, or burry them somewere.
Little warning at the end, be aware of your local laws applied to open fires. 😅😉
After a good burn ive got between 8 and 12cm of ashes in total over the entire surface.
A small layer of soil (5cm) is put on top of that. Theres no need to harden out that layer, pressure will to the work and the layers will compress over time into ideal circumstances.
On to the next layer!!
Next is a layer of the compost, but the part that isnt allready decomposed. Its green/brown/yellow of color. And a bit of everything, grass, weeds, leafs and some thin branches.
Another layer soil to cover that up.
Now i formed a thin layer of chopped(10mm) wood(beech), just enough to make a thin,almost 1 piece high, layer. On to this i added a complete wheelbarrel of compost(black) with small pieces of still not completly decomposed materials. Lots of worms here.
On that, you guessed it, an other layer of soil. I try to have both types of soil in that mix, the almost pure sand and the more grey type.
Next, back to the beech. This time the rest of the bag follows. Theres a good layer of around 3cm deep. On this ive layed down some new small woodsticks to make a small fire again. Starting at the center and adding some last branches i found. It turned out really smoky!!
Half way the burn ive opend the core of the fire, trying to spread the small pieces of char over the complete surface. After that, i added for the first time some water here.
And an other layer of soil again, this is just covering up each time. Max 5cm!!
Now we are at the upper half of the pit. Still 50cm to go.
Now ive added some compost again, the green/brown/yellow one, with on top of that, a 15 liter bucket with compressed bokashi fermentated kitchen leftovers. Making a layer out of that and some fresh bokashi juice with 10 liters of water to drain those benificial bacteria into to compost layer just underneath it. This layer is almost 20cm tick.
Again, yeah, soil, 5cm.
Ive bought some blond peat to at to to toplayers. Last 25 to 30cm of soil, is a mix of the peat(20%) and the two other types of soil. First ill do tiny layers of each, last 10cm i try to mix it.
And to finish the job, ive took some 100% reused and composed soil with some perlite in it from past use.
I havent watered a lot, but the meteo predicts a good amount of water in the upcoming days.
The soil that stayed and didnt get back to its original place, ive used to make a new top layer on the rest of the mini field.
I havent used clay because it was hard to find or just to expensive. Beside the peat(250l), i didnt buy anything. So its labor intensive, but real cheap. If you dont get a sanction by the community ofcours! 😅😅😅
Feel free to comment and give your toughts.
🙏🌿🌿🌿🙏
Thats it for this week boys and girls,
Thanks for reading and passing by and 💚💚💚👏👏👏👍👍👍 for Marshydro leds. Quality/price top!
Grow safe buds and feel free to check out my other ladies doing fine thanks!
🙏🌿🌿🌿🙏
Weedseedsexpress!!!! 👏👏👏
LarfxWSE for discount at weedseedsexpress!!! 15% off!!!
Zamnesia!!! 👽👽👽
Add OrganicLarF as a code when buying your own MarsHydro LED light and get a nice reduction!!!👽🚀🛸
Likes
148
Share
@BioBuds
Follow
Greetings my dear Jungletamers,
So a major surprise came when @MarsHydroLED contacted us and asked if would like to try out their new SP 3000 light. Being a fan of Mars Hydro for years, we of course accepted their offer. We are totally in love with this light. I was when I saw it in another grower's setup and was in awe of its output and results.
So with much pride and thankfulness for the presents the Universe bestowed on us, in the form of MarsHydroLEDS offer and the bountiful harvest of the last grow, (which I am thoroughly enjoying btw, such a great weed to have grown ourselves) we start out on a new adventure that we can't wait to share with you.
With many lessons learned from the previous grow, a mighty producing strain in the form of Expert Seeds Gorilla Glue #4, a.k.a Expert Gorilla's and a tweaked super soil mixture, we are setting out to hopefully get over a gram per watt, preferably 1.5.
The Setup
A 4.5 (140 cm) x 2(70) x 6.2 (200) grow tent, giving me a .98 m2 workspace. This space is customized to my needs.
A standing fan will provide airflow through the whole grow, a top fan will help guide cooler air past my lights onto the grow.
3 56 ltr pots will be the home for the plants when they are 2 weeks old, up to then in smaller jars.
The Light
The leading role and star of the show will be played by the Mars Hydro SP-3000, so kindly provided by MarsHydroLED, which we will test and review here and I might say, endorse.
I'm very careful with who I endorse and support these days, but a company with that many wins in design, I'm talking ever since their first range came out in 2009 these guys have been raising the bar for the whole industry, I did not hesitate to support this leading brand.
If you want to compete with these guys, you better bring some quality AND affordable pricing. Why do I endorse the SP-3000 without ANY hesitation?
It is seriously THE BEST light on the market in this price range and size group. It has an enormously effective output in U/Mol and with 30% less energy waste comparing to older LED lights.
Prove me wrong!
And with a company holding a considerable market share selling thousands of units every month, competing on price and quality, one would think that customer service would suffer. Of course, also Mars Hydro is not perfect, but check the sheer amount of people that not only praise the light but also the service received, should the light somehow not perform up to par. It is this dedication to their customer base that made this company have a fanbase... Yes, a fanbase with a website and a wiki.
So if you are looking to buy new lights, check out the END OF SUMMER OFFER at the Mars-Hydro Global Store on Aliexpress:
https://marshydroled.aliexpress.com/ 👈 Check their offers but also their score, they ship from a warehouse near you so you don't have the extra import fees!! Cut out the middleman and have a deal on these lights!!
At the moment I write this in August 2021, the lights are 408,20 euro when sent from Germany to the rest of Europe, that's 40 euro cheaper than the other Mars outlets, BUT EVEN 60 euros cheaper than ordering at a grow store!!
The Strain:
Experts Seeds - Expert Gorilla feminized regular.
Don’t let the name fool you because Expert Gorilla is suitable for growers of any skill level. However, you do need to be an experienced smoker because Expert Gorilla is one of the most potent strains on the market.
Lineage: Chem Sis x Chocolate Diesel x Sour Dubb
Popularity: Extremely Popular
Flavor/Aroma Profile: Chocolate, Earthy, Fuel
Yield: 400 g/m2
Stress Tolerance: High resistance to disease
Potency: 24% THC
Flowering time: 58 - 63 days
The Soil:
Those who saw my Monstercropped Gelato #33 grow (you should see it if you didn't, I'm so proud of that grow), know about my super soil and organic nutrients/ permaculture tea combo that starred in my previous diary.
Because of the great results, we are going to use the same recipe, adjusted some more with some new ingredients that will complete the mix and give an even more sustained super soil buffer.
20% Atami Bi-grow (very similar to ocean forest)
20% Atami worm castings
20% Atami Coco Coir
10% Hydrocorn
10% Peat powder
1 cup Fossil seaweed chalk
1 cup bonemeal
1 cup bloodmeal
1 cup Microlife
3-4 teaspoons of epsom salt
3 cups of activated biochar (activated with our own permaculture tea)
I just made layers, starting with hydro corn on the bottom to aid airflow/run-off. On this I started layering the coco coir, Bi-grow, peat, castings, and amendments in a way that the more mature the plants get, the more phosphorous and less nitrogen they will find. Every time I made three layers, I would mix them by hand. This way we simulate natural soil, which consists of humic layers, composting plant waste, fungal and microbial life, and nutrients from fossilized sources.
The Nutrients
I will start with just adding 6.4 PH water, although this soil should buffer ph itself and regulate, after 4 weeks, I'll slowly be adding:
- Biobizz Grow
- Plagron Alga Grow
- Biobizz CalMag
- Biobizz Flower
- Plagron Alga Flower
- Biobizz Topmax
- Melasses
The Tea
Some of you might remember the permaculture tea from my previous grow, I have a short video in my harvest page showing how we make it), it will star again in this grow.
- (Rain)water
- Comfrey (whole plants)
- Dandelion leaves
- Roots and leaves from the earlier grow
- Minor periwinkle (Finca minor) is a plant we have in our garden, it contains an alkaloid that is associated with increased brain function but also is a light toxin for wee beasties and other unwanted guests like gnats (who hate it).
- When flowering I add some wood ash to this mix
Thank you for checking in on one of my grows again! Thanks for all the love on my previous grow, check it out if you haven't seen it!!
Hug
Bud

Likes
54
Share
@GarciasGarden
Follow
Well as always This week has brought some amazing growth and all that stickiness and dankiness is finally coming in !!! The Kosher Kush #2 (very front) is definitely a little bit ahead in bud development the smell on this plant is remarkably similar to the CANDYLAND strain it has a very sweet/ OG KUSH smell to it .. best words to descrine it would be a sweet sterling silver kush smell lol!
The WASHING MACHINE’s are also starting to get their smell and you can just feel how sticky the nugs are going to be already makes your fingers stick together.. the smell off of this one is remarkably similar to Girl Scout cookies!! And you can already see the zombie look of the buds !
And finally the BLUEBERRY is smelling fantastic like a walk through a field of berries and strawberries and orange hairs are already popping out ! I had to do some HST to her but she came back by the next light cycle !
Well anyways guys im super excited for this harvest I know this is going to be some beautiful smoke 🌸🌹
~ GARCIAS’S GARDEN
P.s. CHECK OUT THE VIDEO ABOVE


Likes
9
Share
@Bread_n_Buds
Follow
This is another strain that is going full force and in both technical/free versions, we are talking about the Zookies Automatic by Zamnesia.
Remember that we are growing a plant worked with the techniques indicated and another left to grow without pruning to preserve its speed; in the previous/next diary you will find the other plant of the same variety.
In this diary we find a plant worked with a precise and punctual Main Lining: We have a topping at the third internode, an accompaniment of the growing branches towards the third internode and then toppiong again, everything lowered well with our metal arches. I saw the side branches go very high and I topped again to have more branches at the end, everything very clean underneath.
Comparison is the salt of the experience, so the plant in the other diary will be treated very differently, go and see it to make a comparison.
We started the Plagron fertilization program, we are in 100% organic configuration, the soil is made up of recycled Promix + 1/3 fresh soil + 10% Perlite + RQS Mycorrhizae Mix (4 g in the mix, 1 g under the small fiber pot).
In the middle of the week the pre-flowering started so I decided to start the program for this phase: 1 ml/l of Power Roots - 1 ml/l of Pure Zym - 1 ml/l of Sugar Royal - 1 ml/l of Power Buds - 4 ml/l of Alga Bloom
Remember the Green Sensation from the 3rd/4th week of flowering depending on the flowering speed or how you see the calyxes composing, when the calyx is in the swelling phase it is used.
We sprayed 5 ml/l of Vita Race foliar fertilizer once a week.
-------------------------------------------------
https://plagron.com/it
We always have the excellent RQS mycorrhizae running through the soil.
https://www.zamnesia.io/it/5778-mix-micorrhiza-easy-roots.html
Is a top strain of the last few years very high level of thc ---- https://www.zamnesia.io/it/11174-zamnesia-seeds-zookies-auto.html
Brief description of Zamnesia // The result of the cross between Animal Cookies, GG#4 and ruderalis, this compact variety produces top quality buds, maintaining all the charm of a modern US hybrid. Thanks to the hard work of the Zamnesia genetics team, Zookies Automatic is easy to grow, fast flowering and exceptionally vigorous. Regardless of whether you grow indoors, outdoors or in a greenhouse, if you are looking for a stable autoflowering strain that is quick to harvest, Zookies Automatic is definitely the one for you.
Like all Zamnesia autoflowers, Zookies Auto promises rapid harvests of top-quality bud with minimal effort. And she delivers on that promise. After germination, Zookies Automatic plants grow vigorously for around 3–4 weeks. At the end of the pre-flowering phase, plants typically reach a height of between 90–110cm, depending on the size of the pot.
The whole world of cultivation and much more is on Zamnesia: just take a look at the site and you will find "all the best that nature has to offer" in various shapes and colors.
---------------
www.zamnesia.com
Likes
3
Share
@Reefera
Follow
Worst start to week dwc had ran out of water not long hourn or two but no water and decent heat they dried out and flopped at top managed to save but taking while to get back to good health
Plant too close to light some stems tanned red slight increase in distance moved fan from plant getting wind burns on low leaves overall seems ok need to flatten stems
Likes
12
Share
@TurkeyGravy
Follow
Day 17, everything looks good, maybe a little light burn on the largest one. Please check out my video with full audio! Let me know what you guys think. Open to all tips and suggestions!

Processing
Likes
21
Share
@LittleBigTrees
Follow
Defoliated some leaves to let light in, chopped one down early as I run out of bud 🙄 it's good for less than 4 weeks flowering.
Have them rice water starch again this week in with there food.
A layer of frost is slowly forming 😎 hopefully they will fatten up nice and frost up really good to 🤞
Likes
8
Share
@pzwags420
Follow
The Blumats are pretty much dialed in after a few days. I used 5ml of flying skull Z7 enzyme in my 5 gal reservoir to keep the reservoir clean. I also have been ph correcting the reservoir every morning to 5.8-6.0. The first day of week 4 I hand watered in Nutrients mix until runoff(about half gal). I removed the large fan leaves on all three plants, then I tied Down all my Mains to keep them horizontal. I applied another half gal of Nutrients mix on the 4th day of week 4. On the 6th day of week 4 I experienced a runaway with my Blumats because I changed the settings too much at once and flooded my grow box. I used a shop vac to suck up all the runoff. I refilled my reservoir, added enzymes and lowered the ph to 6.0. I then dialed in the blumats based on Blumats instructions and will only adjust in micro adjustments this time to avoid another runaway 😬 Luckily running in Coco Coir having the girls over saturated wasn't the worst thing and the roots are sucking up a lot of the extra moisture in the medium happily 😀
Likes
Comments
Share
@RavenWoodsAlchemy
Follow
Lots of prebuds. It hasn't been as thirsty this week. Last week it wanted about a half gallon daily.
This is the tallest of the 5 plants that I am growing. I have 3 Amnesia Lemon, a Laughing Buddha, and an Acapulco Gold in the same tent. I am limited to growing 5 plants at a time due to state laws. The other two plants are about half the height. The tall plant next to it on the right is the Acapulco Gold.

Likes
16
Share
@bsplayerone
Follow
Week 2 started off rough as the hot sun and lack of water caused her to fall over. I watered her last night and she’s back up today. Another week of just sun and water. It’s a rainy week so got some humidity in the air
Likes
18
Share
@TheGreenLeopard
Follow
Thai chocolate the winner in this diary - hands down. Gréât coloring, nice structure and there’s a great color off the fan leaves - really a beauty and will be worth the xtra couple weeks flowering. Try PEV seeds out. They are really under rated

