


Likes
Comments
Share

@LegacyGrow
Follow
Englischversion below
Deutsch:
Tag 16 Veg:
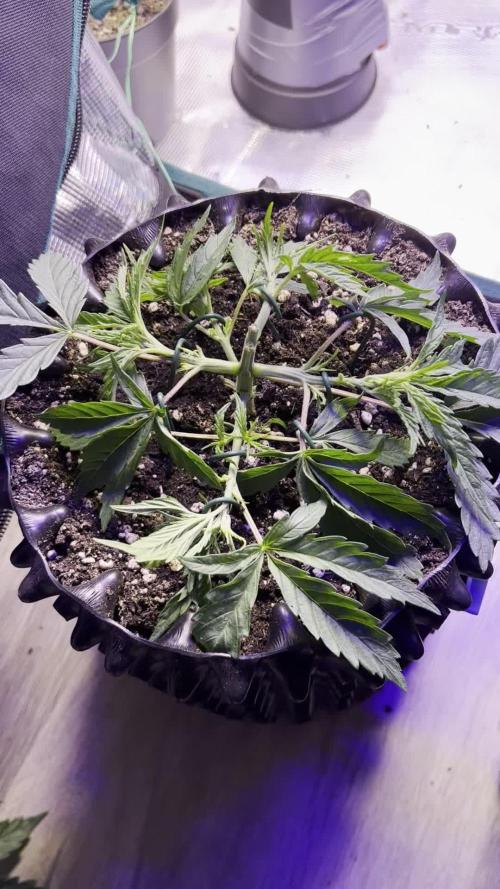
LST und Topping sind die Schritte die jetzt anstehen. LST muss täglich wenn nicht sogar mehrfach täglich ausgeführt und kontrolliert werden, um zu gewährleisten, dass die gewünschte Pflanzenstruktur erstellt wird. Wie auf den Bildern zu sehen ist, hat die Dame vorne links weniger Triebe. Beim Training hat sich einer bereits verabschiedet (Durch Unachtsamkeit) und ein Trieb entwickelte sich einfach nicht und wurde entfernt. Beim LST versuche in jeden Trieb in eine eigene Richtung zu biegen und dann senkrecht zum Boden auszurichten.
Ich warte noch 2 Tage bis zum nächsten Topping - zum einen, damit der Stress auf die Pflanze verteilt wird, zum anderen weil der Wachstum einiger Triebe der schwächeren Pflanzen noch nicht so weit sind.
der VPD liegt zwischen 0.44 und 0.68 - für die frühe Wachstumsphase ideal - das ist auch am Wachstum der Pflanzen zu erkennen.
Tag 17 Veg:
Heute früh wurde zum 2ten Mal, diesmal an der ersten entstandenen Nodie, getoppt. Nur bei den Obeneren Trieben wurde gewartet, da diese noch zu jung waren. Warum habe ich trotzdem die unteren Triebe getoppt? - Erstmal macht es sinn den hohen Stress auf ein paar Tage zu verteilen, außerdem möchte ich eine Gewisse Struktur erreichen. Vor und nach der überliebenden Nodie sind Erdanker gesetzt um die Triebe in Position zu halten.
Tag 19 Veg:
Heute gibt es wieder ca. 1-1,2L Flüssigkeit mit 6,3 PH und 1ml Cal-Mag für jede Dame. Dabei wird das Wasser in 125ml Schüben nach und nach verabreicht, bis ein leichter Drain von ca. 100ml zu erkennen ist.
Tag 20 Veg:
Dem Wachstum der Pflanzen ist zu entnehmen, dass sie das letze Topping verarbeitet haben. Die neuen Seitentriebe legen nach und nach zu. Hier ist es wichtig, für eine Gute Struktur, regelmäßig mit LST zu intervenieren. Auf den Bildern von Heute sind die Pflanzten vor und nach dem LST zu sehen. Auch einige Blätter, die die Triebe bedecken, wurden entfernt. Die ganze Energie soll in den Wachstum der Triebe geleitete werden.
----------------------------------------------------------------------------------------------------------------------------------------------
Day 16 – Vegetative Phase:
LST and topping are the next steps to be carried out. LST needs to be performed and monitored daily, if not several times a day, to ensure that the desired plant structure is achieved. As can be seen in the images, the plant at the front left has fewer shoots. During training, one shoot was lost due to inattention, and another shoot failed to develop properly and was therefore removed. During LST, the goal is to bend each shoot into its own direction and then orient it horizontally to the ground.
I am waiting another two days before the next topping. This is done partly to distribute stress more evenly across the plants, and partly because the growth of some shoots on the weaker plants is not yet sufficiently advanced.
VPD is currently between 0.44 and 0.68, which is ideal for the early growth phase. This is also reflected in the visible growth of the plants.
Day 17 – Vegetative Phase:
Early this morning, topping was performed for the second time, this time at the first newly formed node. Only the upper shoots were left untouched, as they were still too young.
Why were the lower shoots topped anyway? First, it makes sense to distribute the high level of stress over several days. In addition, a specific plant structure is intended to be achieved.
Before and after the remaining node, ground anchors were placed to keep the shoots in position.
Day 19 – Vegetative Phase:
Today, approximately 1–1.2 L of liquid was applied to each plant, adjusted to a pH of 6.3 and supplemented with 1 ml/L Cal-Mag. The water was administered gradually in 125 ml increments until a slight runoff of about 100 ml was observed.
Day 20 – Vegetative Phase:
Based on the plants’ growth, it is evident that they have recovered from the last topping. The new side shoots are progressively gaining vigor. At this stage, regular intervention with LST is essential to establish and maintain a well-structured plant architecture. In today’s images, the plants are shown before and after LST. In addition, several leaves covering the shoots were removed so that energy is directed entirely toward shoot growth.


Likes
2
Share


@Hydrokomahfarms
Follow
Very easy first grow very happy with results best weed I ever smoked and I can only get better from here so I'm excited to keep seeing more and more progress

Processing
Likes
19
Share


@Ferenc
Follow
Hi there ! So from today 600W LED is placed in with 18 hours on and 6 hours off light schedule. Ventilation works at the same time as the lamp does. Watering: It will happen with 25 ml a day so 2× 12.5 ml water per plant. Fertilization starts on Tuesday, Thursday, Saturday. LST is also done as it can be seen. They don't look good this way but they just need to grow and get stronger it helps to yield more with the side branches. I will use FIM as well when they are ready I think at week 4 or 5. Day 18: OMG, I just realized I think I placed too close the lamp so I can see signs of burn of the plants. I mean some leaves get crispy in the edges. It is a brand new lamp and it was I think too close. I changed up higher. Hope it will be okay. Today was very hot outside so temperature went up as well even when the ventilation is on I saw it was 30 degrees. Too much. I opened the tent to have better air circulation and the temperature went down. Day 19: A bit hurts that I burnt them no nice but I also know that is is not a big problem. It will be gone as quickly as they grow. Anyways all fine part from this small beauty damage. Day 20: Now it clearly can be seen the damage that the LED lamp made because of me. Not nice, but it won't affect the growth. Well, I want to remove those leaves when the plants get matured to be nice. Next week I think I can do it. Everything else okay. Day 22: Haha I just actually removed the damaged leaves and now they look so pretty and healthy. I did not even have to wait until next week. All good nice girls there !!!!!


Likes
24
Share


@MadeInGermany
Follow
Hey everyone 😃.
Today it continues with the
Flowering day 49
Today the tent was cleaned, the humidifier refilled, and the health of the plant checked.
Flowering day 50
Today she was watered with 1.2 l (see fertilizer table), and checked for her health.
Flowering day 51
Today fresh oamose water was poured into the tanks and the plant was sprayed.
Flowering day 52
Today was a pure control day where all the technology was checked.
Flowering day 53
Today the room was cleaned, the tent cleaned and the humidifier filled.
For this purpose it was poured with 1 liter today.
Flowering day 54
Today was again a pure control day :-).
Flowering day 55
Once again the plant was checked for health and sprayed.
The tent was also cleaned.
I wish you all a lot of fun with the update, stay healthy 🙏🏻 and let it grow 🍀
You can buy this Strain at
https://www.amsterdamgenetics.com/product/kosher-tangie-kush/
You can buy this Nutrients at
https://greenbuzzliquids.com/
Type:
Kosher Tangie Kush
☝️🏼
Genetics:
Kosher Kush
X
Tangie
👍
Vega lamp:
2 x Todogrow Led
Quantum Board 100 W
💡
Bloom Lamp :
2 x Todogrow Led
Cxb 3590 COB 3500 K 205W
💡💡☝️🏼
Soil :
Canna Coco Professional +
☝️🏼
Fertilizer:
Green Buzz Liquids :
Organic Grow Liquid
Organic Bloom Liquid
Organic more PK
More Roots
Fast Buds
Humic Acid Plus
Growzyme Big Fruits
Clean Fruits
Cal / Mag
Organic Ph - Pulver
☝️🏼🌱
Water:
Osmosis water mixed with normal water (24 hours stale that the chlorine evaporates) to 0.2 - 0.4 EC. Add Cal / Mag 2 ml per l water every 2 waterings . Ph with Organic Ph - Pulver to 5.8 .


Likes
58
Share

@MadeInGermany
Follow
Hi everyone ☺️.
Today the New Aeroponic Diary begins, as before with the wonderful variety Gelato from Zamnesia .
This time I planned to leave the full 8 cuttings instead of 3 as in the last run.
For test purposes I would like to give a very short vegi time this time.
To be precise, I would like to switch them to flowering a few days after rooting.
Since the growth is extremely extreme on Aero, I think that a few days will be enough to get 8 little trees 😋.
Of course everything is documented and uploaded.
Today the cuttings were cut, brushed with clone gel and placed in the aero system 😃.
Of course, the entire system was cleaned very time-consuming with disinfectant after the last run, and all seals, pumps, etc. were checked for their function, so that the new run could start today 👌👍.
As with the last Aero grow, the Canna Aqua range 😊 serves as nutrients.
I wish you lots of fun when you start the diary, stay healthy 🙏🏻 and let it grow 🍀👌
You can buy This Strain at :
www.Zamnesia.com
☝️🏼☝️🏼☝️🏼☝️🏼☝️🏼☝️🏼
Strain
Gelato clone from mother (Zamnesia )
☝️
Genetics: Wedding Cake x Gelato x Gelato 33
👍
Vega lamp: 2 x Todogrow LED CXB3590 COB 55 W
1 x Sanlight S2W 62 W
💡
Flower lamp : 2 x Todogrow LED CXB3590 COB 55 W
1 x Sanlight S2W 62 W
💡 ☝️
Grow Aero System : Growtool 0.8
☝️
Fertilizer:
Canna Aqua Vega A + B , Canna Aqua Flores A + B , Rizotonic, Cannazym, CANNA Boost, Pk 13/14, Canna Cal / Mag, Canna Ph - Grow, Canna Ph-Bloom
☝️🌱
Water:
Osmosis water mixed with normal water (24 hours stale that the chlorine evaporates) to 0.2 EG. Add Cal / Mag to 0.4 Ec Ph with ph- to 5.2 - 5.8
💦 💧

Processing
Likes
2
Share


@MephodMan
Follow
Tap root issues - too long in jiffy block
Still working on dialling in VPD

Processing
Likes
10
Share


@LittleManGrow
Follow
Might have some hermies, I plucked anything that might have looked like a sack forming haven't seen anymore show up. One of the Skunk #1s is 35 inches the other hasn't done as well and is very stumpy. A. Lemon is a happy camper, 35 inches, but is the one showing hermie. Zkittlez is a good size. Got a new tent for Christmas 48x24x84 so I have sufficient height going forward.


Likes
88
Share


@No_Clout
Follow
New grow , New seeds just been put in water for 24hr then they will be put in paper towel for another 24hr before being planted straight into coco with some mykos an inch or two under.
I will update in 48hr.
16/07/18 - all three seeds germed fine all with 1cm+ tails and planted in 80/20 coco/perlite mix with some mykos mixed in and a layer of it 1-2 inch down from where seeds were planted.
I watered them each with 600ml roughly before planting and will update when they break through.
18/07/18 - 48hrs since seeds where planted and can see first set of true leaves already, I’ve got a steady 60-70% humidity and staying at 24 degrees Celsius. I’m going to spray them tonight with some ph’ed water with a tiny bit of rhizo.


Likes
10
Share


@RivenWaters
Follow
One week removed from the greenhouse. Plants are recovering from heat stress and 4 are flowering

Likes
17
Share


@Italian_Cannabis_Top_Strain
Follow
E' DAVVERO INCREDIBILE!!! COME IO ABBIA AVUTO TALENTO PUR ESSENDO ALLE PRIME ARMI.... QUASI MEZZO CHILO .. IMPRESSIONANTE ANCORA NON CI VOGLIO CREDERE!!! TUTTO QUESTO GRAZIE ALLA MIA PASSIONE... E COSTANZA ... HO ADOTTATO IL TOPPING DALLA TERZA SETTIMANA E DA LI GIA HO NOTATO CHE IL RACCOLTO E LA PRODUZIONE AUMENTAVA... DOPODICHÉ HO ADOTTATO UMA MIA TECNICA SIMILE AL LST E ALLO SCROG.... PRATICAMENTE HO PIEGATO IN GIU TUTTI I RAMI UNO PER UNO CON DEI FILI COME LO SCROG MA SENZA RETE...A MANO ..CON DEI FILI.. COSI CHE LE CIME AVREBBERO POTUTO PRENDERE LUCE IN TUTTI GLI ANGOLI POSSIBILI E COSÌ È STATO SIGNORI E SIGNORE DA LÌ HO NOTATO CHE IL RACCOLTO TRIPLICAVA!! NON HO DAVVERO PAROLE SONO ULTRA SODDISFATTO VEDREMO IL PESO DA ASCIUTTE ASCIUTTE
Likes
12
Share


@Kirsten
Follow
26.12.24:
I have noticed light stress on my plants. I had moved the lights further away and increased the light intensity to 70%. Unfortunately that created some issues. Namely severe palour of the leaves.
To try and rectify the situation, I've dimmed the lights to about 30%, staying at the same distance, about 30 inches away. I measured the par levels, after I did this. They should a reading of anywhere between 40 and 150, at the canopy of the plants. They are all different sizes. This seems to have improved the colouring on all plants.
After this evenings watering, I will monitor recovery and increase lighting intensity again slowly. I am also using the light cycle of 21/3, so the plants have many hours more light to absorb, than for example 12/12 or 18/6.
29.12.24:
So I finally gave LST a shot, it's probably a bit too late, however I really want to get the most of the triploid pheno, and I went a little crazy and LST'd all plants except 2, as they're too small.
I did that late last night, this afternoon I was amazed to see the plants turn their leaves back to the light source. I'm glad I overcame my fear of trying it. I'm very excited to see them adapt and progress! 😁 there are videos above with before and after of my LST process.
I am pleased with the progress, considering all of my mistakes!
Thanks for checking out my diary 🍃 ✌️
Likes
4
Share


@Birthdaycakeuk
Follow
Week 3 started off well. Gave my plants nutrients for the first time. Lowered the water dose compared to last week and noticed more growth so sticking to less is more until the flower stage. The temperature has been consistent. This week also allowed me to top my plants. And I have seen the new stems coming out the plant. I’ve added a co2 bag hoping to see some difference. I did add a second fan in to just keep the leaves wafting but it reduced the temp so I took it out

Likes
5
Share

@DogDoctorOfficial
Follow
🌱 Amnesia Skunk — Grow Recap (from seed to now)
Strain: Amnesia Skunk
Auto-Flower: 12/12 from seed
Current age: Week 7 from seed
Flowering reference: Week 3 of flower (by morphology, not calendar)
How we got here
• From day one, this run was intentional: 12/12 from seed, no veg phase.
• Plants established quickly with strong root development and steady internodal spacing.
• Early structure showed vigorous lateral branching, typical of Amnesia-leaning genetics.
• Transition into flower was smooth — no stall, no stress signals.
• By early flower, canopy density increased fast, especially in a full 8×8 room (~27 plants).
This is where room logic started to matter more than single-plant logic.
⸻
🌡️ Environment Snapshot (current)
• Day temp: ~28 °C
• RH: ~65%
• EC: ~2.4
• pH: ~6.5
• Height: ~40–80 cm
• Lighting: LED (multi-layer canopy + under-canopy)
On paper?
Some growers panic at 28 °C in flower.
In practice?
This is where understanding beats numbers.
⸻
🍃 LED, Leaf Temperature & VPD (the part most skip)
Under LED lighting, room temperature ≠ what the plant feels.
Unlike HPS, LEDs:
• Don’t dump infrared heat
• Keep leaf surface temperature 2–4 °C cooler than ambient
So when:
• Room temp ≈ 28 °C
• Leaf temp ≈ 24–26 °C
• RH ≈ 65%
👉 Leaf VPD lands right in the comfort zone for early–mid flower.
And the plants confirm it:
• Deep, relaxed green
• No tacoing
• No stress-praying
• Strong internodes
• Uniform nutrient uptake across phenotypes
That’s real data.
We’re not ignoring numbers —
we’re letting plant behavior be the final authority.
Stability fixing something that isn’t broken.
⸻
✂️ Defoliation — why it was heavier this week
Let’s be very clear:
This was not aesthetic defoliation.
This was functional, room-driven defoliation.
Context matters
• 🏠 8×8 room
• 🌱 ~27 plants
• 🌬️ Airflow, humidity pockets, and light penetration scale very differently at this density
A single plant might not ask for it —
but the room did.
Why we defoliated
• Improve airflow through a dense canopy
• Reduce micro-humidity pockets
• Let photons travel into the canopy, not just hit the top
• Reset apical dominance
• Refocus energy toward flowering sites
Yes — it was heavier than initially planned.
But:
• Genetics are strong
• Roots are dialed
• Feed is stable
• Plants are healthy
Healthy plants recover fast.
Stressed plants don’t.
We also:
• Found a few minor under-canopy light burns
• Nothing serious
• Removed affected leaves
• Cleaned structure
The girls responded immediately — posture, color, and turgor all stayed on point.
⸻
🌸 Where we are now (Week 3 flower)
• Clear flower initiation
• Sites are stacking evenly
• Stretch is slowing
• Structure is set
• Energy is shifting from leaf production → flower development
This is exactly where we want to be.
⸻
🔮 What to expect next (and what not to)
Expect:
• Calyx stacking to accelerate
• Stretch to finish over the next 7–10 days
• Flowers to start defining their final architecture
• Strong recovery response from defoliation
Don’t expect:
• Explosive bulk yet (that comes later)
• Resin maturity at this stage
• Any need for drastic changes
From here on:
• Stability
• Observation
• Small, intentional adjustments only if the plants ask
⸻
🙏 Final words
Thank you to everybody:
• Lovers ❤️
• Haters 😉
• New followers
• OGs
• The GD platform
• The GD community
• The ones who ask questions
• And the silent ones who just watch and learn
Everyone is welcome here.
This week was defoliation week, and the girls told us clearly what they needed — so we listened.
Plants are looking outstanding, and this Amnesia Skunk run is right where it should be.
More updates coming soon —
this room has a lot to say 🌱✨
📡 Please stay tuned they can try and take us down but we never quit https://www.youtube.com/@DOGDOGTHEDOCTOR NEW
🙏 Thank you for your patience and continued support.
FOR DISCOUNT CODES AND MORE JUST FOLLOW THE LINK https://website.beacons.ai/dogdoctorofficial
📲 Don’t forget to Subscribe and follow me on Instagram and YouTube @DogDoctorOfficial for exclusive content, real-time updates, and behind-the-scenes magic. We’ve got so much more coming, including transplanting and all the amazing techniques that go along with it. You won’t want to miss it.
GrowDiaries Journal: https://growdiaries.com/grower/dogdoctorofficial
Instagram: https://www.instagram.com/dogdoctorofficial/
YouTube: https://www.youtube.com/@dogdoctorofficial Deleted by Youtube
Vimeo : https://vimeo.com/dogdoctorofficial Under construction stay tuned ⸻
Explore the Gear that Powers My Grow
If you’re curious about the tech I’m using, check out these links:
🔆 Lighting & Environmental Control
• Future of Grow — Advanced LED lighting technology
https://www.futureofgrow.com/
DISCOUNT CODE: DOG20
• Lumiflora — Under-canopy LED lighting
https://lumiflorade.com/
• TrollMaster — Environmental controllers and automation gear (past collaboration)
⸻
Genetics
• Zamnesia Seeds — Genetics used in this project
https://www.zamnesia.com/
⸻
🌱 Soil, Substrates, Boosters & Root Support
• Plagron — Substrates, bio mixes, and supportive products
https://plagron.com/en/
⸻
🎒 Storage, Curing & Preservation
• Grove Bags — Curing and storage solutions
https://grovebags.com/
⸻
📸 Photography Equipment & Tools
(Not sponsors, but part of my creative toolkit)
• Sony A6700
• Sony full-frame macro lens + few more
• Stacking photography workflow - learning
• iPhone (for behind-the-scenes shots)
We’ve got much more coming as we move through the grow cycles. Trust me, you won’t want to miss the next steps, let’s push the boundaries of indoor horticulture together!
As always, this is shared for educational purposes, aiming to spread understanding and appreciation for this plant. Let’s celebrate it responsibly and continue to learn and grow together.
With true love comes happiness. Always believe in yourself, and always do things expecting nothing and with an open heart. Be a giver, and the universe will give back in ways you could never imagine.
💚 Growers love to all 💚
📸 P.S. – The Eye Behind the Lens
All photos in this diary (for now — except for the ones showing the camera, which I took with an iPhone) are taken with a Sony A6700 paired with a Sony full-frame macro lens and a few more.
Photography is part of the story — it’s how we share the fine textures, the glow, and the quiet details that words can’t always capture.
I’ve also started experimenting with photo stacking — a technique where multiple images, each taken at a slightly different focus point, are layered together to create one perfectly sharp image from front to back.
It’s not digital enhancement or AI; it’s pure photography — a way to reveal the plant’s beauty in microscopic depth, from trichome to petal.
You’ll even see a few shots of "ghost me" capturing the shots — camera, lens, setup — because every grow deserves not just to be cultivated, but documented like art.
FOR DISCOUNT CODES AND MORE JUST FOLLOW THE LINK https://website.beacons.ai/dogdoctorofficial
NEW DISCORD - Official Server Invite Link : https://discord.gg/ksjAkA5T74
Processing
Likes
10
Share


@GrowerGaz
Follow
This week I have adjusted the ties on all the my plants , some defoliation and lst.
I have given them a KNF foliar feed with Fish Amino Acid , Lactobacillus and WCA .
Lumatek is now at 100%.
Likes
7
Share


@Smokeitup091191
Follow
This week has gone well once again no problems at all just keeping the feed going in and watching them fatten up day by day.
Smell is orange, cream and gas
Thc is more difinitive now looking good 😊

Likes
101
Share


@DreamIT
Follow
🌴🌞 TROPICAL FUEL BY EXOTIC SEEDS 🌞🌴
____________________________________________________________________________________
🏝️ 26.3 ...
🏝️ 27.3 some more details today but it's still early for serious photos
🏝️ 28.3
🏝️ 29.3
🏝️ 30.3
🏝️ 31.3
🏝️ 1.4
____________________________________________________________________________________
📜 A look at the details of what I'm growing 📜
🌴🌞Tropical Fuel by Exotic Seed🌞🌴
⚧ Gender
▪️ Feminised
➰ Genes
▪️ 70% Indica / 30% Sativa
🎄 Genetics
▪️ Tropicana Cookies F2 “C cut” x Tropicana Cookies F2 #5
🚜Harvest
▪️ 400 - 500 g / m²
🌷Flowering
▪️ 56 - 64 days
✨THC
▪️ 20.0 - 24.0%
✅CBD
▪️ 1.0%
🏡Room Type
▪️ Indoor
🌄Room Type
▪️ Outdoor
🕋Room Type
▪️ Greenhouse
🎂Release Year
▪️ 2020
____________________________________________________________________________________
📷🥇 Follow the best photos on Instagram 🥇📷
https://www.instagram.com/dreamit420/
🔻🔻Leave a comment with your opinions if you pass by here🔻🔻
🤟🤗💚Thanks and Enjoy growth 💚🤗🤟


Likes
13
Share


