Likes
Comments
Share
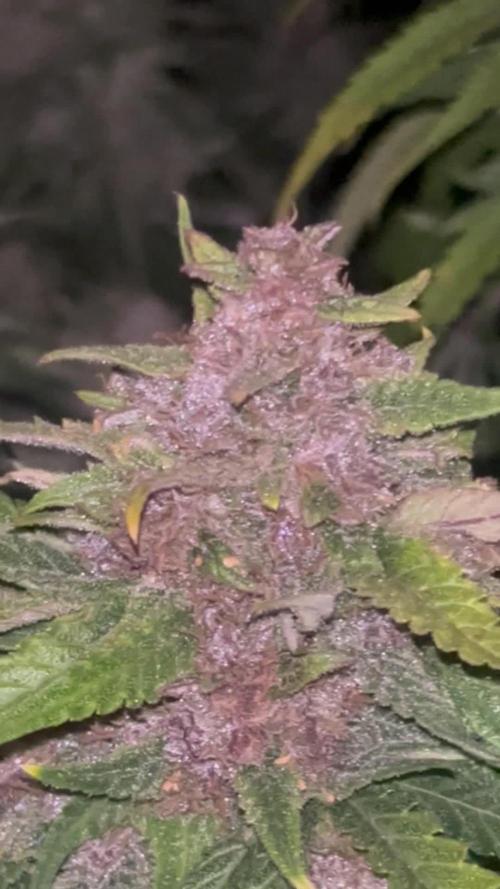
I welcome everyone who came in for the first time or has long been following my blueberries. the girl blossoms and smells and already showers herself with trichomes. two days ago I used iron chelate on a sheet to stimulate photosynthesis and also, due to phosphorus deficiency, introduced dry water-soluble fertilizer NPK 10/54/10
Likes
9
Share
Day 72 - 07/01/20 This one was the only survivor of my 4 x RQS diary. my blueberry auto, jack herer auto and GG auto didnt sprout but the diesel did and here is her harvest! I added some nice photos of the plant and the yield was 325g wet weight. Should be over an ounce once its dried. Update - Dry weight was 30g although much of the bud is small :) Ive been curing for a few days and its insane how the flavour and burn changes throughout curing :) Update - Day 78 - 13/01/20 The sweet diesel smell and taste is coming through. buds are becoming more and more enjoyable to smoke as days go by. :) il post a few pictures later tonight! Added the photos of some buds and a video so you can all have an opinion on how my buds turned out visually. let me know in the comments :) Il do a few more curing updates to let you know how the second week of curing goes! Day 86 - 21/01/20 I finally finished the NYCD after about 2 weeks of curing. It smokes fairly well and is definitely the best thing ive grown so far :) Buds developed quality and a sweet earthy diesel flavour/aroma over the 2 weeks of curing. one major improvement i would make is to source high quality soil as i really struggled to flush this properly. even still without lab quality conditions ive never felt so depression free since ive been taking this medicine regularly. to finish up i will say that I liked the NYCD diesel taste but i still preferred sour diesel. The plant grew to a reasonable height around 60cm and produced an ounce of average bud. and I might not have won any GD competitions, but im still a winner! :'D Lucky for us I just started an Sour Diesel Auto from fastbuds so you can check that out to see what i thought of it compared to this one :)
Likes
93
Share
@Natrona
Follow
FBA2502 Plants 1-6 Week 7 May 11– 17 FLOWER 3 Nutrients : Micro 25 ml Gro 10 ml Bloom 30ml CalMag 30 ml Recharge 10ml Green sensation 16.5ml Power buds 7.5 ml 5/11 PH 6.56, PPM 1560, temp 69 2ltr each 5/12 PH 6.31, PPM 1120, temp 68 1 ltr each 5/14 PH 6.66, PPM 1280, temp 70 1 ltr each 5/15 PH 6.66, PPM 850, temp 72 1 ltr each 5/11 Defoliation, feed, pics & videos I made 4 gallons, used 3 to water then poured the runoff back into the rest in the bucket. The next feeding, I added a gallon of tap water to residual and ph to 6,31 temp 69 & PPm 1120. Did the same on 5/14 and 15 using up the remainder of the feed solution. I must monitor and control the tent environment manually. For the past month, the humidifier has been an issue putting out way too much humidity; often leaving water in the bottom of the tent. In addition, the temperatures are also out of control. I added an AC last week to keep the temperature below 80. I finally determined the exhaust vent is also broken and has been for some time. I have been giving good reviews on the AC infinity system. However, during the time I’ve owned this tent (2 yrs), I had to replace the lights twice, fans, humidifier and now the vent twice also. Everything but the tent containment has been replaced. AC infinity does stand by their products, but they are in California, and it takes at least 2 weeks to receive the replacement. This is extremely frustrating at the critical transition to flower for my equipment to fail again. For the time being until a replacement arrives, I pulled the 4” exhaust vent from my 3x3 and hooked it up. I have the AC pushing air in and the exhaust pulling air out. This should create a neutral pressure tent environment-neither positive nor negative. I do have 3 circulating fans in the tent to move air around the plants. It looks like growth spurts have slowed and plant height has been reached. Now is the time for buds to fatten and frost up. All of them (6) are short remaining less than 3 ft. They range from 15 to 31 inches. The tallest #4 &5 and #6 have very light leaves and appear nutrient deficient compared to the shorter phenotypes. Pictures taken later in the week show fading on a few the older leaves. All are receiving the same solution and are in the same soil blend. Moving the gals in and out of the tent for their glamor shots, I bent one limb and snapped another. The bent one I taped with a splint and the snapped one I medicated manuka honey and wired it back to the main stalk. Leaves look like sativa leaning. I hope FBA2502-2 is a good daytime. I’m getting excited to see what develops in the next month or so. News Break: I’ve been informed that 2502 is FastBuds New Frostbanger and is indica for nighttime. I’m disappointed that I didn’t get a sativa to test because I really need a daytime strain. The 2 Blue Cheese plants I just grew are also nighttime. Upon opening the tent, a faint odor was detected, and some stickiness was observed during the process of defoliation. Pictures of the puffy buds even show differences. #4 &5 buds hairs are different from the others being crinklier and the others are straighter. Some like #2 &5 are showing frost on the leaves. Wow at the beginning of flower to have that much frost. They are living up to the new strain’s name. I’ve noticed that when I water, sometimes water shoots out of the side holes I the air pots. I will pack the soil firmly into the sides for future runs. Measurements: #1 15” #2 20” #3 17” #4 30” #5 31” #6 24” Your likes and comments are appreciated. Thanks for stopping by. Growers love 💚🌿 💫Natrona💫
Likes
2
Share
@CalGonJim
Follow
8/3 12:36AM MONDAY FULL RETARD MODE ACTIVATED 8/3 10AM " They look solid for where they are. **Quick visual read:** - **Right plant (front)** — strongest of the three. Good color, solid node spacing, leaves are filling out nicely, no obvious stress. This one is handling the current feed best. - **Back plant (Mendo Frost)** — clean and upright, healthy light-to-medium green. Looking very consistent. - **Left plant (front)** — a bit behind the other two in size and leaf development. Color is still good, but it’s the lagging phenotype of the three. Common with mixed RF3 packs — you’ll often get one that starts slower. None of them are showing tip burn, clawing, or dark “overfed” green, which means your decision to keep the EC at 0.93 while adding the light amino dose was correct. They’re not hungry yet either (no pale yellowing or slow growth signs), so jumping straight to 1.1 without aminos today is a clean next step. At this stage (early veg, still small pots/coco), staying in the 0.9–1.2 range is ideal for RF3s and Mendo Frost. They’re still building structure and roots more than bulk. Once the stronger two start putting on more rapid growth and the internodes begin tightening a bit, you can ease toward the higher end of that range. One small observation: the left plant’s lower leaves look a touch softer/less turgid than the others. Keep an eye on whether that improves after the next watering. If it stays lagging while the other two take off, you can always give it a slightly lighter feed or just let it catch up at its own pace — mixed packs almost always have one slower starter. Overall they look healthy and on track. The amino experiment didn’t push them over. You’re dialed in right now."" 8/5 12:16AM. 8/3 Grandpa from the Lost Boys Mode activated 8/7 3:41am 👍 Yes, 400 mg each of L-proline and L-phenylalanine in a gallon of water is a low, one-time dose that should have only a minor effect on EC. Rough concentration 1 US gallon ≈ 3.785 L ~400 mg of each → roughly 105–106 mg/L per amino acid (total ~210–212 mg/L). Proline molecular weight is ~115 g/mol, so this is about 0.9 mM. Phenylalanine is higher MW (~165 g/mol), so closer to 0.6 mM. These are in the range commonly discussed for plant use (often 0.5–2 mM or a few hundred mg per gallon for proline as a stress aid). Effect on EC Amino acids do contribute some conductivity because they can ionize (especially depending on pH), but far less than mineral fertilizer salts at the same mass. At this low concentration the rise is usually modest—often in the 0.1–0.3 mS/cm ballpark or less, depending on your starting water, existing nutrients, and meter. In practice, many growers add pure L-amino acids at similar or higher rates without big EC swings. The big EC jumps seen in some studies come from much higher doses of mixed commercial amino products. Measure your solution EC (and pH) before and after dissolving them so you know exactly what happened in your mix. If you’re already running a target EC for the autos, you can simply account for the small bump or dilute slightly if needed. Will it help / any downside? L-Proline: Plants accumulate it under stress (heat, drought, salinity, osmotic stress). Exogenous proline is often used to support osmotic adjustment and stress tolerance. A single modest dose is unlikely to hurt and may give a small buffer if the plants are dealing with any environmental stress. L-Phenylalanine: Precursor in the phenylpropanoid pathway (leads toward flavonoids, lignin precursors, and various secondary metabolites). Some research and grower use explores it for supporting secondary metabolism; effects are more variable and usually not dramatic from one application. Because this is a one-time introduction at a conservative rate, risk of imbalance or toxicity is low for autoflowers and your other plants. Amino acids are generally well-tolerated when kept moderate; the main caveats with higher or repeated doses are possible effects on nitrogen metabolism or nutrient uptake patterns, and the fact that they can feed microbes if the solution sits too long. Practical notes These are pure L-forms from the labels (BulkSupplements and Nutricost), which is what you want. Dissolve fully, check pH/EC, and use reasonably soon. For coco or other soilless media, just include it in a normal feed or water event. No need to change your overall regimen for a single application. Keep an eye on the plants for a few days after (normal advice with any new input). If everything looks happy, you’re good. You’re not wrong for trying a light one-off addition of these two. It’s a reasonable, low-risk experiment at the dose you used. Measuring the actual EC change will give you the clearest answer for your specific water and nutrient base..👍 8/7 11:54 PM Classic Stock Car Race Replays by My Journey 4K.... distracted by classic cars again
Likes
13
Share
Likes
19
Share
Likes
13
Share
JOANNE'S CBD / ROYAL QUEEN SEEDS WEEK #10 OVERALL WEEK #9 VEG This week this lady has really started to grow. It's just due to space that she the only photo I got going right now that I'm not training she was also the smallest plant to start the grow. However I think I'm going to top her one time to keep her about the same height as the rest of the plants growing right now. Stay Growing!!! Thank you for stopping by and taking a look it's much appreciated!!! Thank you ROYAL QUEEN SEEDS!!! JOANNE'S CBD / ROYAL QUEEN SEEDS
Likes
14
Share
@Phurlax
Follow
Day 70: watering 2 gal with 2 drops of tiger bloom bc im pretty sure my soil is dry of nutes. Day 72: flushed 2 gal of water Day 74: a few amber trichomes would like some more. Watering 1 gallon if ice water for the last watering Day 76: checking trichomes daily leafs have some amber buds dont
Likes
2
Share
@Ensign420
Follow
|»» LOG DISCLAIMER: Not intended as a grow guide. Grow log entries are usually posted 3-4 weeks later and are for my learning reference. ««| Introduction - Week 16 Summary - Ensign's log, stardate 17717.2, Another week in the garden.. In the main tent, nothing but general checkups for the most part. Chill Out OG seems to have stopped stretching by the end of the week and buds have already started to swell up. The rest of the phenos in the tent have been showing clear signs of flowering, but are also still stretching. Towards the end of the week, had to supper crop Heady OG. As for the veg tent, been keeping up with solo cup waterings. Also re-amended the 7-gallon pots and reduced them down to 3-gallons. Also took more mother clone cuttings which were planted into Coco Coins and are now rooting in the propagation tray. I usually try to keep everything in these logs strictly for growing, but I recently lost my Father... Peace and good memories Dad. The grow continues on in your memory and for your legacy. Onwards to next week.. [START OF WEEK 16] ========================================================== ---------- [ 3x3 VEG TENT - GR3 ] ---------- Heady OG BX1 #1 - WEEK 08 - Full Veg Dry Soil - WEEK 00 - EMPTY Chill Out OG #3 - WEEK 05 - Full Veg Chill Out OG #2 - WEEK 01 - Full Veg ---------- [ 4x4 MAIN TENT - GR30 ] ---------- Chill Out OG #2 - WEEK 16 - Full Bloom Wk2 TKO #2-2 - WEEK 10 - Full Bloom Wk2 Heady OG BX1 #1 - WEEK 12 - Full Bloom Wk2 02/16/26 → 02/22/26 [WEEK 16] This Week's Estimated Goals ---------------------------------------------------------------------------------------------- DLI: ~16 mol/m²/d PPFD: ~375 μmol/m²/s VPD: ~1.2 kPa This Week's Meter Readings & Averages ---------------------------------------------------------------------------------------------- Light On/Off: 16:00 - 10:00 | Wattage: ~386.3W [LV05] Distance From Canopy: ~[21”, 3.5”, 9”] Plant Height: ~[31”, 48.5”, 43”] Max Plant Height: ~52” [Lamp-to-Soil Distance] DLI: ~19.83 mol/m²/d PPFD: ~459 μmol/m²/s VPD: ~0.76 kPa Soil %: ~[47.6, 49.3, 45.4, 51.4, 50.3, 60.9, 50.3, 60.0, 46.4, 68.6] ========================================================== Day 01 - Monday - 02/16/26 - Total Days: 103 ----------------------------------- Daily Averages ~[+01:00] - Temps: 79.5°F [26.4°C] - Humidity: 76.7% - VPD: 0.80 kPa - Soil %: [48, 47, 43, 53, 50, 62, 49, 60, 42, 67] ----------------------------------- - [21:05]: Night check on the 4x4 tent. --- Garden is looking healthy and perky. --- Buds are starting swell. --- With the exception of Chill Out OG #2, vertical growth is still stretching. --- Under canopy looks good. - [21:09]: Checked on the BluMat soil moisture sensors: ------ Chill Out OG #2 » 40mbars ------ Heady OG BX1 #1 » 117mbars ------ TKO #2 » 51mbars --------- Watering Range: [Too Wet] ~25mbars «| [Ideal Target] ~40-80mbars |» ~125mbars [Too Dry] --------- BluMat Max Values: [10mbars «||» 750mbars] --- Decided to make a slight adjustment to Heady OG’s watering carrot. --- Using the provided allen key, increased the water moisture by turning the BluMat’s tension cap slightly counter-clockwise. - [21:15]: Checked the Ecowitt soil moisture sensor data: ------------------ [ 3x3 VEG TENT – GR7 / GR3 ] ---------------- ------ 52% - [CH01 » M1 » VBL – TKO #2] ------ 45% - [CH02 » M2 » VBR – Gorilla Goat #1] ------ 43% - [CH03 » M3 » VFL – Chill Out OG #3] ------ 53% - [CH04 » M4 » VFR – Chill Out OG #2] ----------------- [ 4x4 MAIN TENT – GR30 ] --------------- ------ 51% - [CH05 » P1 » FLT – Chill Out OG #2] ------ 62% - [CH06 » P1 » FLB – Chill Out OG #2] ------ 50% - [CH07 » P2 » BLT – TKO #2-2] ------ 60% - [CH08 » P2 » BLB – TKO #2-2] ------ 42% - [CH09 » P3 » FRT – Heady OG BX1 #1] ------ 67% - [CH10 » P3 » FRB – Heady OG BX1 #1] --------- Veg: ~38%-45% | Flower: ~45%-55% --------- General: ~30% [Dry] «| ~45-60% [Moist] |» ~70% [Wet] - [21:22]: Checked the 3x3 veg tent. --- Growth looks good with no issues. --- No need to water the clones. --- Propagation cutting also look good. Day 02 - Tuesday - 02/17/26 - Total Days: 104 ----------------------------------- Daily Averages ~[+01:00] - Temps: 79.1°F [26.2°C] - Humidity: 76.9% - VPD: 0.78 kPa - Soil %: [48, 47, 43, 53, 50, 62, 49, 60, 39, 65] ----------------------------------- - [21:08]: Night check on the 4x4 tent. --- Garden is looking green and healthy. --- Top growth is getting quite tall. --- Under canopy is looking great. - [21:15]: Checked the Ecowitt soil moisture sensor data: ------------------ [ 3x3 VEG TENT – GR7 / GR3 ] ---------------- ------ 54% - [CH01 » M1 » VBL – TKO #2] ------ 48% - [CH02 » M2 » VBR – Gorilla Goat #1] ------ 43% - [CH03 » M3 » VFL – Chill Out OG #3] ------ 53% - [CH04 » M4 » VFR – Chill Out OG #2] ----------------- [ 4x4 MAIN TENT – GR30 ] --------------- ------ 51% - [CH05 » P1 » FLT – Chill Out OG #2] ------ 62% - [CH06 » P1 » FLB – Chill Out OG #2] ------ 49% - [CH07 » P2 » BLT – TKO #2-2] ------ 60% - [CH08 » P2 » BLB – TKO #2-2] ------ 38% - [CH09 » P3 » FRT – Heady OG BX1 #1] ------ 64% - [CH10 » P3 » FRB – Heady OG BX1 #1] --------- Veg: ~38%-45% | Flower: ~45%-55% --------- General: ~30% [Dry] «| ~45-60% [Moist] |» ~70% [Wet] - [21:22]: Checked the 3x3 veg tent. --- Veg garden looks healthy. No need to water. --- Propagation cuttings also look good. --- Misted the top growth with RO water. - [21:46]: Checked the humidifiers. --- Tanks are still full and no leaks found. Day 03 - Wednesday - 02/18/26 - Total Days: 105 ----------------------------------- Daily Averages ~[+01:00] - Temps: 79.3°F [26.3°C] - Humidity: 74.6% - VPD: 0.86 kPa - Soil %: [46, 45, 43, 51, 51, 62, 50, 60, 49, 70] ----------------------------------- - [16:20]: Evening check on the 3x3 veg tent. --- Veg garden is looking healthy and green. - [16:25]: Time to further reconfigure the veg tent to 3-gallon pots. --- Cleared out the solo cups. --- Going to also take Heady OG and TKO cuttings. - [16:37]: Filled a measuring cup with 1.5 cups of RO water. ------ Added 1/8tsp of Horticultural Aloe --- Mixed the solution and poured it straight into a clear solo cup. --- Made sure each PVC tube on the rig had the correct names marked. --- Placed the rig into the cup just above the aloe solution. --- Okay! Time to take the cuttings! --- Using a pair of clean trimmers, - [17:00]: Cut several clonal cuttings from each mother plant. --- Only need one cutting to root, but to ensure successful rooting, took multiple cuttings of each cultivar. --- Made sure to trim most of the branches leaving a top node or two. --- Did not cut any leaf fingers and made sure to cut the tip of the stalk (about 45-degree) before placing each cutting into the cup of aloe solution. --- Set the cup aside. - [17:12]: Culled both TKO #2 and Gorilla Goat OG#1 --- Chopped and mulched the trimmings in an empty 5-gallon bucket. --- Okay! Time to mix up the top dress for the main tent! --- Considering the plants are just at the end of the stretch phase, going to top dress for bloom. - [17:16]: Took the 5-gallon bucket with the fresh veg trimmings and added: ------ 9 cups of BuildASoil Worm Castings ------ 2 cups of Craft Blend ------ 1 cup of Gnarly Barley [Freshly Milled From Whole] ------ 1/2 cup of: --------- Ocean Blend [& Trace Minerals] --------- Premium Insect Frass [Black Soldier Fly] --------- Kashi Blend --- Mixed the amendments and set the bucket aside for later. - [17:42]: Time to re-amend both 7-gallon pots and reduce them down to 3-gallon pots. --- Took a spare 20-gallon fabric pot along with a drip tray and set them on the floor. --- Then one at a time, took each 7-gallon pot and removed the straw mulch along with Ecowitt soil sensor. Also removed the stump. --- Mulched the straw and stump by mixing them to the 5-gallon mulch bucket. - [18:24]: Dumped the soil into a spare 20-gallon fabric pot. --- Once both pots were added, - [19:00]: Mixed the soil evenly making sure to break up the large clumps. --- Also removed the larger roots and mixed them to the 5-gallon mulch bucket. - [19:37]: Wiped the veg tent's floor with RO water and paper towels. --- Also re-arranged the 3-gallon pots in the tent. - [19:39]: Adding six more 3-gallon pots to the veg tent so going to re-amending the soil. --- Using similar amounts of amendments, but also adding in a bit of mustard. ------ 9 cups of BuildASoil Worm Castings ------ 2 cups of Craft Blend ------ 1 cup of Gnarly Barley [Freshly Milled From Whole] ------ 1/2 cup of: --------- Ocean Blend [& Trace Minerals] --------- Premium Insect Frass [Black Soldier Fly] --------- Milled Mustard Seed Meal --------- Kashi Blend --- Mixed the amendments in evenly making sure to incorporate everything into the soil. - [20:17]: One at a time, --- Took a 3-gallon Grassroots Fabric Pot and filled it with the re-amended soil. --- Did not fill the pot all the way. Tried to leave enough room for a solo cup or two of soil. --- Since these pots are not going to be used yet, also not adding any straw mulch. --- Placed the pot into the vet tent. --- Repeated this process for the remaining pots. - [22:36]: Done! --- Also placed the solo clones back along with the mother cuttings (in aloe solution) into the veg tent. --- Have the cups resting (on drip trays) on top of unused 3-gallon pots. --- The Gorilla Goat #1 cuttings in the propagation tray look good. --- Did not mist the top growth. - [23:14]: Removed the remaining two Ecowitt WittFlow units. --- Also checked the reservoirs and no leaks detected. --- Plan to eventually install a PSI gauge to ensure that the gravity feed is within the 1-3 PSI requirement for running BluMats. --- Anyways, - [23:42]: Checked the 4x4 tent. --- The garden is looking green and perky. --- The mid canopy (between the two nettings) is getting full. --- Glad the under canopy is still clean and airflow seems pretty good. - [23:56]: Checked on the BluMat soil moisture sensors: ------ Chill Out OG #2 » 38mbars ------ Heady OG BX1 #1 » 33mbars ------ TKO #2 » 33mbars --------- Watering Range: [Too Wet] ~25mbars «| [Ideal Target] ~40-80mbars |» ~125mbars [Too Dry] --------- BluMat Max Values: [10mbars «||» 750mbars] - [+00:05]: Checked the humidifiers. --- Tanks are still full and no leaks found. Day 04 - Thursday - 02/19/26 - Total Days: 106 ----------------------------------- Daily Averages ~[+01:00] - Temps: 77.7°F [25.4°C] - Humidity: 76.0% - VPD: 0.77 kPa - Soil %: [47, 53, 46, 51, 51, 61, 50, 60, 49, 71] ----------------------------------- - [16:41]: Evening check on the 3x3 veg tent. --- Veg garden is looking good and healthy. - [16:44]: Swapped the aloe water out for the veg cuttings. --- Filled a clear cup with fresh RO water (1.5cups). --- Gently lifted the PVC rig out of the cup of aloe water and set it gently into the RO cup. --- Will let these soak for another day before transplanting into Coco Coins for rooting. --- Two clones also need watering. - [16:56]: Here are the starting initial watering ranges: ------ TKO #2-1 » 290.7g → 340.5g ------ Gorilla Goat #1-1 » 287.0g → 325.2g --------- General Weight Range: [Dry] ~275g «| [Dryback] ~300g |» ~325g-400g [Wet] --- Both cups were last watered 8 days ago. --- Took the starting weight of both clones before watering, ------ TKO #2-1 » 291.9g ------ Gorilla Goat #1-1 » 296.8g --- While on a scale, --- Evenly misted the top of both cups with RO water. --- Did not spray the top growth. --- Misted 10-20 sprays. Waited a moment, then misted again. --- Repeated this process until both cups weighted at least 300g. --- There was no runoff. - [17:12]: Took the saturated weight of both cups after watering, ------ TKO #2-1 » 355.5g ------ Gorilla Goat #1-1 » 355.8g --- Updated the wet weight and watering dates for both cups. --- Placed both cups back into the tent. --- Propagation tray cuttings are looking good. No need to spray the top growth. - [18:44]: Checked the Ecowitt soil moisture sensor data: ------------------ [ 3x3 VEG TENT – GR3 ] ---------------- ------ 50% - [CH01 » M1 » VBL – Heady OG BX1 #1] ------ 52% - [CH02 » M2 » VBR – Dry Soil] ------ 51% - [CH03 » M3 » VFL – Chill Out OG #3] ------ 50% - [CH04 » M4 » VFR – Chill Out OG #2] ----------------- [ 4x4 MAIN TENT – GR30 ] --------------- ------ 50% - [CH05 » P1 » FLT – Chill Out OG #2] ------ 61% - [CH06 » P1 » FLB – Chill Out OG #2] ------ 50% - [CH07 » P2 » BLT – TKO #2-2] ------ 60% - [CH08 » P2 » BLB – TKO #2-2] ------ 50% - [CH09 » P3 » FRT – Heady OG BX1 #1] ------ 71% - [CH10 » P3 » FRB – Heady OG BX1 #1] --------- Veg: ~38%-45% | Flower: ~45%-55% --------- General: ~30% [Dry] «| ~45-60% [Moist] |» ~70% [Wet] --- Also updated the veg tent’s soil sensor names a bit. - [19:10]: Checked the 4x4 tent. --- Garden is looking good and growth is green. --- The under canopy is looking nice and clean as well. - [19:19]: Checked on the BluMat soil moisture sensors: ------ Chill Out OG #2 » 49mbars ------ Heady OG BX1 #1 » 37mbars ------ TKO #2 » 47mbars --------- Watering Range: [Too Wet] ~25mbars «| [Ideal Target] ~40-80mbars |» ~125mbars [Too Dry] --------- BluMat Max Values: [10mbars «||» 750mbars] - [19:57]: Checked on the mulch bucket, --- Hmm. --- The mixture felt warmer than room temps (which was around 80-85°F). --- Took the top dressing’s temperature using a digital thermometer. ------ Soil Temp: 124°F --- Woah that’s hot! Just beyond mesophilic compost and was almost turning thermophilic. --- While gloves, mixed the top dressing and could feel the warmth. Surprisingly the center was really warm in temperature. --- Did not expect the top dressing to start warming up, but it makes sense since the bucket contains greens and browns (trimmings and straw) along with a compost (worm castings). The dry amendments also helped to activate the biology in the mixture. --- Pretty cool! --- Well. Was planning on top dressing, but going to wait for the top dressing to cool down which could be several days. - [20:04]: Checked the humidifiers. --- Tanks are still full and no leaks found. Day 05 - Friday - 02/20/26 - Total Days: 107 ----------------------------------- Daily Averages ~[+01:00] - Temps: 77.0°F [25.0°C] - Humidity: 76.9% - VPD: 0.72 kPa - Soil %: [49, 52, 48, 50, 50, 60, 50, 60, 49, 69] ----------------------------------- - [21:01]: Night check on the 4x4 tent. --- Wow growth is looking great. --- All phenos are still stretching and buds sites are forming nicely. - [21:09]: Checked on the BluMat soil moisture sensors: ------ Chill Out OG #2 » 34mbars ------ Heady OG BX1 #1 » 40mbars ------ TKO #2 » 52mbars --------- Watering Range: [Too Wet] ~25mbars «| [Ideal Target] ~40-80mbars |» ~125mbars [Too Dry] --------- BluMat Max Values: [10mbars «||» 750mbars] - [21:20]: Checked the Ecowitt soil moisture sensor data: ------------------ [ 3x3 VEG TENT – GR3 ] ---------------- ------ 48% - [CH01 » M1 » VBL – Heady OG BX1 #1] ------ 51% - [CH02 » M2 » VBR – Dry Soil] ------ 48% - [CH03 » M3 » VFL – Chill Out OG #3] ------ 50% - [CH04 » M4 » VFR – Chill Out OG #2] ----------------- [ 4x4 MAIN TENT – GR30 ] --------------- ------ 52% - [CH05 » P1 » FLT – Chill Out OG #2] ------ 60% - [CH06 » P1 » FLB – Chill Out OG #2] ------ 50% - [CH07 » P2 » BLT – TKO #2-2] ------ 60% - [CH08 » P2 » BLB – TKO #2-2] ------ 49% - [CH09 » P3 » FRT – Heady OG BX1 #1] ------ 70% - [CH10 » P3 » FRB – Heady OG BX1 #1] --------- Veg: ~38%-45% | Flower: ~45%-55% --------- General: ~30% [Dry] «| ~45-60% [Moist] |» ~70% [Wet] - [21:23]: Checked the 3x3 veg tent. --- Veg garden looks good. --- Two clones need watering. - [21:37]: Here are the starting initial watering ranges: ------ Garlic Budder OG#1-1 » 299.1g → 340.6g ------ Garlic Budder OG#1-2 » 279.2g → 340.3g --------- General Weight Range: [Dry] ~275g «| [Dryback] ~300g |» ~325g-400g [Wet] --- Both cups were last watered 6-7 days ago. --- Took the starting weight of both clones before watering, ------ Garlic Budder OG#1-1 » 294.3g ------ Garlic Budder OG#1-2 » 295.9g --- While on a scale, --- Evenly misted the top of both cups with RO water. --- Did not spray the top growth. --- Misted 10-20 sprays. Waited a moment, then misted again. --- Repeated this process until both cups weighted at least 300g. --- There was no runoff. - [21:59]: Took the saturated weight of both cups after watering, ------ TKO #2-1 » 360.3g ------ Gorilla Goat #1-1 » 360.8g --- Updated the wet weight and watering dates for both cups. --- Placed both cups back into the tent. - [22:08]: Time to transplant the Heady OG and TKO cuttings into Coco Coins for rooting. --- Filled a measuring cup with 1.5 cups of RO water. ------ Added a pinch of Quillaja Saponaria Extract [60] ------ Added 1/64tsp of Horticultural Aloe ------ Added 1/32tsp of Mycrobe Complete --- Mixed the solution thoroughly. - [22:19]: Dropped 4 Coco Coins into the measuring cup. --- The coins immediately started to expand. ------ [» ~5 MINUTES LATER «] --- Placed each fully saturated Coco Coin into half-cut solo cups. - [22:30]: Using a squeeze bottle filled with Clonex, --- Gently filled each pre-made hole with Clonex rooting gel. - [22:33]: Time to plant the cuttings. --- Using a pair of clean trimmers, made a final 45° cut. --- Also stripped and scrapped some of the stem’s outer membrane. --- To help with planting, gave each Coco Coin a squeeze to loosen the coco. --- Made sure to insert each stem straight and snug with the tip about a 1/4 inch from the bottom of the Coco Coin. --- Also secured the stem by pinching and pressing in the top of the Coco Coin. --- Once each cutting was planted, - [22:54]: Placed each Coco Coin into the propagation dome’s tray. --- Made sure to keep each cutting properly tagged. --- Did not spray the top growth with any water. --- As far as PPFD, --- At the lowest light intensity (and raised ~14 above the tray), the PPFD is around 42 μmol/m²/s which gives a DLI of 2.72 mol/m²/d under an 18/6 light cycle --- As for the extra cuttings, culled and mulched them. - [23:02]: Checked the humidifiers. --- Tanks are still full and no leaks found. Day 06 - Saturday - 02/21/26 - Total Days: 108 ----------------------------------- Daily Averages ~[+01:00] - Temps: 76.6°F [24.8°C] - Humidity: 76.8% - VPD: 0.72 kPa - Soil %: [48, 51, 48, 51, 50, 60, 52, 60, 48, 69] ----------------------------------- - [19:01]: Night check on the 4x4 tent. --- Garden is looking healthy and green. --- Chill Out OG #2 seems to have stopped stretching and is now focused on bud development. --- In contrast, Heady OG BX1 #1 along with TKO#2 are still stretching tall. --- Heady OG is getting too tall. --- Gently super-cropped by pinching and bending the taller branches. --- Only trained Heady OG and lowered the canopy a good 7-8 inches. - [19:35]: Checked the Ecowitt soil moisture sensor data: ------------------ [ 3x3 VEG TENT – GR3 ] ---------------- ------ 49% - [CH01 » M1 » VBL – Heady OG BX1 #1] ------ 50% - [CH02 » M2 » VBR – Dry Soil] ------ 49% - [CH03 » M3 » VFL – Chill Out OG #3] ------ 51% - [CH04 » M4 » VFR – Chill Out OG #2] ----------------- [ 4x4 MAIN TENT – GR30 ] --------------- ------ 50% - [CH05 » P1 » FLT – Chill Out OG #2] ------ 59% - [CH06 » P1 » FLB – Chill Out OG #2] ------ 52% - [CH07 » P2 » BLT – TKO #2-2] ------ 60% - [CH08 » P2 » BLB – TKO #2-2] ------ 50% - [CH09 » P3 » FRT – Heady OG BX1 #1] ------ 70% - [CH10 » P3 » FRB – Heady OG BX1 #1] --------- Veg: ~38%-45% | Flower: ~45%-55% --------- General: ~30% [Dry] «| ~45-60% [Moist] |» ~70% [Wet] - [19:39]: Checked the 3x3 veg tent. --- Veg garden is looking good and no need to water. Nice. --- Propagation cuttings look good as well. - [19:47]: Checked the humidifiers. --- Tanks are still full and no leaks found. - [20:03]: Time for another grow board wipe. --- Wiped and reset the grow board for the next 5-weeks. Day 07 - Sunday - 02/22/26 - Total Days: 109 ----------------------------------- Daily Averages ~[+01:00] - Temps: 77.0°F [25.0°C] - Humidity: 77.9% - VPD: 0.69 kPa - Soil %: [47, 50, 47, 51, 50, 59, 52, 60, 49, 69] ----------------------------------- - [19:33]: Night check on the 4x4 tent. --- Wow the garden looks healthy. --- Canopy seems to have recovered and is still stretching upwards. - [19:38]: Checked on the BluMat soil moisture sensors: ------ Chill Out OG #2 » 51mbars ------ Heady OG BX1 #1 » 39mbars ------ TKO #2 » 42mbars --------- Watering Range: [Too Wet] ~25mbars «| [Ideal Target] ~40-80mbars |» ~125mbars [Too Dry] --------- BluMat Max Values: [10mbars «||» 750mbars] - [20:06]: Took the weekly general PPFD readings. ------ Chill Out OG #2 was around 459 μmol/m²/s which gives a DLI of 19.83 mol/m²/d under an 12/12 light cycle. ------ Heady OG BX1 #1 was around 1053 μmol/m²/s which gives a DLI of 45.49 mol/m²/d under an 12/2 light cycle. ------ TKO #2 was around 682 μmol/m²/s which gives a DLI of 29.46 mol/m²/d under an 12/12 light cycle. --------- Grow Light Intensity: LV5 @ ~386.3W - [20:11]: Took the weekly height and light distance measurements. ------ Chill Out OG #2 was about 21" away from the grow light. ------ Heady OG BX1 #1 was about 3.5" away from the grow light. ------ TKO #2 was about 9" away from the grow light. --------- Max Plant Height: ~52" [Distance From Grow Light To Top Soil] ------ Chill Out OG #2 was about 31" tall. ------ Heady OG BX1 #1 was about 48.5" tall. ------ TKO #2 was about 43" tall. - [20:13]: Hmm. --- Over the past grows, the FC-6500’s LEDs have been burning out. --- Currently lost the center bars, but growth is still looking good. - [20:17]: Checked the Ecowitt soil moisture sensor data: ------------------ [ 3x3 VEG TENT – GR3 ] ---------------- ------ 47% - [CH01 » M1 » VBL – Heady OG BX1 #1] ------ 50% - [CH02 » M2 » VBR – Dry Soil] ------ 48% - [CH03 » M3 » VFL – Chill Out OG #3] ------ 51% - [CH04 » M4 » VFR – Chill Out OG #2] ----------------- [ 4x4 MAIN TENT – GR30 ] --------------- ------ 50% - [CH05 » P1 » FLT – Chill Out OG #2] ------ 59% - [CH06 » P1 » FLB – Chill Out OG #2] ------ 52% - [CH07 » P2 » BLT – TKO #2-2] ------ 61% - [CH08 » P2 » BLB – TKO #2-2] ------ 50% - [CH09 » P3 » FRT – Heady OG BX1 #1] ------ 70% - [CH10 » P3 » FRB – Heady OG BX1 #1] --------- Veg: ~38%-45% | Flower: ~45%-55% --------- General: ~30% [Dry] «| ~45-60% [Moist] |» ~70% [Wet] - [20:25]: Checked the 3x3 veg tent. --- Veg garden is looking good. --- A TKO clone need watering. - [20:34]: Here is the starting initial watering range: ------ TKO #2-1 » 290.7g → 340.5g --------- General Weight Range: [Dry] ~275g «| [Dryback] ~300g |» ~325g-400g [Wet] --- Been 7 days since the last watering. --- Took the starting weight before watering, ------ TKO #2-1 » 298.7g --- While on a scale, --- Evenly misted the top of the cup with RO water. --- Did not spray the top growth. --- Misted 10-20 sprays. Waited a moment, then misted again. --- Repeated this process until the cup weighted at least 300g. --- There was no runoff. - [20:56]: Took the saturated weight after watering, ------ TKO #2-1 » 360.4g --- Updated the wet weight and watering date. --- Placed the cup back into the tent. --- The propagation cuttings in the tray are looking good. - [21:20]: Checked the humidifiers. --- Tanks are still full and no leaks found. --- Another grow week done. --- Onwards to the next. [END OF WEEK 16]
Likes
184
Share
#seedsman420growoff and #SeedsmanSeeds 📆 Week 5, 25-31 May 2024 25-27 May - Observed and let the plant grow. 28 May - Defoliated plant. 29 May - Placed scrog ring on trellis system, bent top of plant over 90 degrees, adjusted and spread branches (see pictures). 30-31 May - Observed and let the plant grow. 📑 I’m very pleased with the way this plant has responded to the nutrient schedule so far. Now it is time to see how she will do with training. I like using a version of the scrog method most because it gives me the greatest space for bud growth overall. My experiences have taught me that under these lights there is about 15-18” worth of quality vertical bud potential. Anything below that line is only draining on the plant, and not receiving adeqate DLI. So I dont need to focus on a tall plant - rather a wide one. Now that she is under a scrog the DLI has a significant canopy increase. What I’ve done with this plant is cut all side shoots off the main branches up to the scrog. She will grow for another week to allow all for growth to develop just above that and then be flipped to flower. I’ve never grown this plant before, but assumeing she can double her size during pre-flower, I’ll have plenty of room in my grow tent. The Trellis System: is made with 1/2” (12.7mm) white, SharkBite PEX, 1/2” pex clamps, small screws/nuts #6-32 x 3/8 in (to hold clamps opposite each other, this is what holds the structure together, side bars, rings, scrog), 1/2” pex straight coupling connectors (to connect rings, and extensions), nylon tape and nylon cord. The frame design is independant from the bucket and can be put on anytime before or after the start of the grow. It simply snaps together (nothing needs to be crimpted), the rings stay in tact with coupling and tape, the netting is strung once for the most part, I prefere 2” squares, and held in place by clamps. The size of the rings depends on the size of your pot, the bottom and top ring are measured seperately. The scrog ring is determined by the size of the tent or desired spread. It takes 5 side bars evenly spaced apart and snapped on the bottom ring 1st to hold the frame sturdy in place, their length should start flat from the bottom to about 8” above the top of the bucket. Place the pot into the bottom ring with 5 side bars already attached, lift up the bars, then put on and attach the top ring, this prevents it from moving. Both are then placed on a 12” Bonsai turn table for easy access and observation of the plant. The final scrog is placed on when the desired height is close to being achieved, then maneuvered down over the plant. A simple design that allows you to easily adjust the netting (place extenders on side bars faceing in opposite direction for additional height) and opens many other possabilities for training. See pictures for an example. 🍶 25 May nutrient solution changed 🍽️ 25 May feeding schedule updated 💧 Using reverse osmosis water with EC/TDS at 0 🐉 Nutrient Solution EC 2.3 at 73 degree F 🔆 Light power at 60%, DLI 30-35 canopy coverage at 18hrs 😤 Using General Hydroponics, HGC728040, Dual Diaphragm Air Pump, 320 GPH That is it for this week. Thanks for the look, read and stopping by.
Likes
2
Share
@YAMA47
Follow
Bien..ya corto el Stretch.. estiramiento a princ de flora..miden 70-80cm ..se estan llenando de tricomas.baje lampara a 50cm del dosel. Fertilize c Tricomas-namaste y con Flora Booster-namaste...en unos dias hago lavado de raices..y luego regare solo c agua c detox..p limpiar raices.¡
Likes
8
Share
It looks like this one is mutant I don’t know the other seed i popped looks the same
Likes
1
Share
@Genji
Follow
Woche 6 startet wie gewohnt ohne Probleme. Die Buds werden dicker und schwerer. RLF pendelt aktuell zwischen 45-52%, Temperaturen schwanken etwas mehr von 18-26°C. Noch halten die Buds sich von alleine aber ich denke zum Ende der Woche könnten sie Stützen gebrauchen. Der Geruch im Zelt ist extrem. Sie stinkt so stark, das ich das Zelt nicht lange offen lassen kann.😎 Die Masse der Blüten ist auch ziemlich gut. Wird bestimmt heftig.
Likes
38
Share
I am excited to try out this new gorilla cookies from fastbuds. I originally started this setup to compete in the solo cup challenge, but I needed something that will be minimal maintainence and doesn't require hand watering. So this is what I ended up with. I will not be entering since I know it will bring controversy, but I am going to follow the rules and treat this grow as if I am competing. I didn't want to use regular solo cups because last time I had a lot of algae growing in the root zone when I harvested. I opted to use a black light proof cup. These cups were 27 oz originally so I filled them with 16 oz of water, marked the level, then cut them down to 16 oz. I set the drain pipes about an inch from the bottom so they have a little reserve if I have pump or power issues. I know people will see the drains as a way for roots to grow out of the cup but in reality I have to keep the entire pipe free of roots or it will clog and overflow. So I am actually losing a little volume due to this. I filled the bottom inch or so of the cups with river gravel to stop the perlite from washing into the reservoir. I am running a 5 gallon reservoir with a small air pump and the plants will be getting irritated 24 hours a day from an aquarium power head pump. I set the system up to be totally self contained and easily portable. It was all built from things I had laying around other than 97¢ for the cups. I will be keeping the feed simple as always feeding maxigro and maxibloom with a couple flower boosters.
Likes
19
Share
@DrLaggis
Follow
🌱 Start: 17.07. 🌱 Hello everyone! This is my very first grow and I'm thrilled to share every step with you! 🎉 I'd appreciate any tips you might have to help me achieve the best results! 😊 Equipment: I've geared up with an Indoor Grow Kit from MarsHydro along with some BioBizz supplements to ensure my plants get the best care. 🌿 🌼 Seeds: I opted for Fast Buds seeds after hearing great things about them. They were delivered super fast—just two days! I’m particularly excited to test the Grapefruit strain. 🚀 I've begun soaking the seeds and setting up my space. Eagerly awaiting the transition to the next stage in a day or two! 🌱 📅 Update: 19.07. My Grapefruit seeds sprouted 1-2 cm within just 1.5 days! 🌱 It’s often recommended that autoflowers be planted directly into their final home, so I'm following that advice. I'm working on improving the air circulation in my tent to ensure the best environment for growth. 🌬️ I'm currently using 0.2L cups with big holes over the sprouts to maintain higher humidity during their initial two weeks. 💧 🎉 UPDATE 22.07. - THEY ARE ALIVE 🎉 My Grapefruit sprouted on 20.07., and I'm overjoyed to soon share photos and a video of my little green buddy! 📸🎥 PS: My plant enjoys 2 hours of chill jazz music every day! HAHA 🎷🎶
Likes
9
Share
The start of cultivation was not at all favorable at temperatures below 10 degrees then came a storm that caused cracks and tears in the leaves ... The leaves were very dirty from clay and perlite, so I tried to wash them all with a paper tissue. The weather was not at all kind, so I added Advanced Nutrients- B52 vitamins and Rhino Skin to strengthen the stem and leaf I often meet different animals on my way through the forest, today I met a newly born young fallow deer
Likes
5
Share
@HoddZ
Follow
Looking great 🤙🏻 scrog net added and lifted
Likes
2
Share
She’s starting to smell sooo creamy these terps are insane, showing amazing colours, including still a strong green to the leaf with some purple I’m going to use a proper camera soon to check trics and so show you lot proper photos because my cracked phone doesn’t do it justice😍😍 MY FIRST ORGANIC
Likes
Comments
Share
@Ninjabuds
Follow
Dank little plant small nugs thou maybe it will swell up some in the last couple days