Check the winners The Grow Awards 2026 🏆
Likes
Comments
Share
@SamDo
Follow
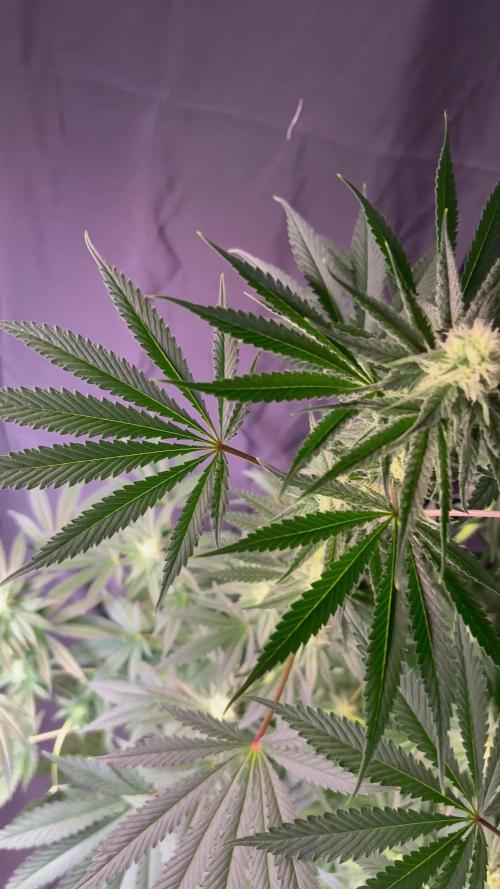
Week 26 – Flowering Week 4 Pineapple Upside-Down continues its flowering phase smoothly this week. No major events to report, which is exactly what we want at this stage. Flower development is clearly accelerating, with a noticeable floral explosion across the canopy. Some bud sites are already showing solid volume, and aroma production is now very present. Foliage quality remains poor and is no longer a focus. At this point, energy is clearly redirected toward flower production, and the plant confirms it visually. 
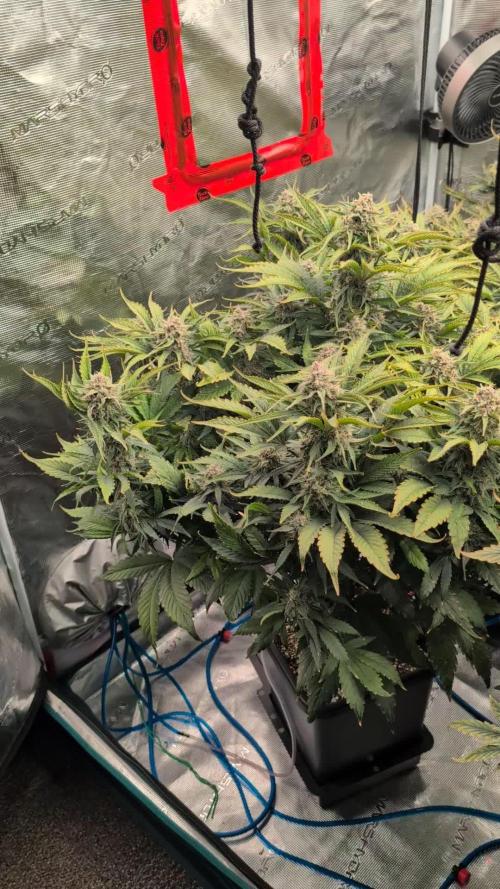
Lighting has been adjusted to sit in a productive range: approximately 650–750 PPFD under the canopy and 800–850 PPFD on the main apexes, putting the average comfortably between 700 and 800 PPFD. Environmental control is a priority. Day temperature sits around 27°C, with relative humidity pushed to 70–75% to maintain a VPD between 0.9 and 1.0. This balance is critical during weeks 3 to 5 of flower. A fresh nutrient solution was mixed at the start of the week. Final EC is set at 2.3, slightly higher than last week, mainly driven by an increased PK input. Base nutrients (Bloom A & B) remain unchanged at 2 ml/L. Additives include PK at 2 ml/L, CalMag at 2 ml/L, Cleanse at 1 ml/L, and Balance used to buffer the base water. pH is adjusted to 6.2 and allowed to naturally drift between 6.2 and 5.7. A light defoliation was performed, along with removal of small lower shoots to prioritize apex development. Structural work is now finished — from here on, the goal is full stability and uninterrupted flowering. See you next week!
Processing
Likes
68
Share
@Joni2017
Follow
Day 54, defoliation of the lower parts😎🌼 she continues to grow very healthy 🙌 size 63 cm👏🏻👏🏻 temperature 26º C ☀️, humidity 65% 💧 watering 750 ml alternating one day with nutrients and another without nutrients with osmotized water 💦💦 Session 45 min. of binaural sounds for growth and healing 🎼 and music 😉👍
Likes
4
Share
A couple of weeks to finish line. Lovely trichomes all around the buds. The smell reminds me this strain's parent, Super Lemon Haze. It's awesome! Really happy with this grow 😊
Processing
Likes
32
Share
Day 57:. I am in love with these ladies !!. Their growth had been excellent this week. I went in hard with a defol and clearing out of smaller growth to get the girls spread for flipping soon. They recovered overnight and all sat praying to the Mars gods the next morning. I gave all the pots a top dress of ecothrive charge to work it's way in. The colour and vitality on all of these plants is spot on. They are putting a good size on every couple of days so I dont think I will get much longer before I have to flip them. I am excited to see how they perform in flower now my room is on point now too. Be safe and well folks.
Likes
4
Share
We're seeing some amber trics already..going to pull her very soon, we really need the space....
Likes
7
Share
Likes
Comments
Share
comenzamos con la primera semana de vegetación de estas muchachas, hasta ahora todo bien con el proceso, trato que reciban su buena dosis de humedad gracias al Humidificador humipro 4 litros de Garden HighPro. cualquier consulta o recomendación por favor háganmela saber en los comentarios. Saludos!!
Likes
2
Share
Increased Buddy to 1mm p/l. Really impressed with these nutrients so far, there's been no problems or defeciences the entire grow. All plants look happy, healthy and green. This plant is on the left of the timelapses.
Likes
1
Share
@Dr_4NdY
Follow
Very nice skunky flavor mellow effect not for strong smokers Good daily Would not grow again but happy it was my first run Just found the 2 latest videos of the harvest + the trim
Likes
11
Share
@ShinWeed
Follow
Vorwort: Die Bilder dieser Woche sind leider nichts Besonderes geworden. Hab vergessen während des Gießens vergessen zu knipsen, und die Aufnahmen danach sind sehr schwach. Trotzdem dokumentiere ich sie, was wichtig ist. 🌿 Tag 29-35 - Lichtflut, Höhenflüge und erste süße Düfte Ich, Banana Purple Punch, bin diese Woche förmlich explodiert. Jeden Morgen war ich ein Stück höher, als hätte mich über Nacht jemand heimlich auseinandergezogen. Das Licht bei 100 Prozent hat mich wachgeküsst und irgendwie konnte ich dann nicht mehr aufhören. Meine Triebe arbeiten hart, meine Energien schießen überall hin. Ich weiß, der Gärtner schaut schon kritisch nach oben. Vielleicht beruhige ich mich bald. Vielleicht auch erst später. 🍌 Ich, Purple Haze, strecke mich nur so weit, wie es Sinn ergibt. Nicht zu viel, nicht zu wenig. Meine Höhe passt, meine Breite trägt mich gut. Keine Rennen, keine Dramen, nur ein ruhiger Übergang. Die Energie fühlt sich stabil an, ausgeglichen. Genau mein Ding. Wir beiden Lemon Cherry Cookies erleben gerade zwei völlig verschiedene Wochen. Ich, die Schnellere, fühle mich wie auf einem Marathonstartpunkt. Die Blüten schieben kräftig, weiß und deutlich. Mein Inneres summt, als hätte ich endlich begriffen, wohin die Reise geht. Licht, Wasser und Raum greifen perfekt ineinander. Und ich, die Gemütlichere, nehme das alles Schritt für Schritt. Warum rennen, wenn man auch sauber arbeiten kann? Meine Spitzen zeigen Blüte, aber ganz kontrolliert. Ich schaue mir alles erst einmal an und wähle meinen eigenen Rhythmus. 🍋🍒 Tag 34: Die ersten Düfte werden spürbar, zart und frisch. Tag 35: 4 Liter Wasser. Der Boden dankt es, wir auch. Die Woche war hell, laut und voller Bewegung. Jede von uns reagiert anders, jede setzt ihren eigenen Akzent. Die Blüte hat angefangen zu sprechen, noch leise, aber unverkennbar.
Likes
260
Share
🐒 🍌 🌴🐒 🍌 🌴🐒 🍌 🌴🐒 🍌 🌴🐒 🍌 🌴🐒 🍌 🌴🐒 🍌 🌴 Welcome to week 6!! 😘 DAY 38 Watered with pH-ed water + humics + fastbuds + growzyme + bigfruits + vitalize 💧 DAY 40 Foliar spray with Nutrispray 💦 DAY 42 Watered with 1ml grow + 3ml bloom + 2ml roots + 3ml humic + 4ml growzyme + 3ml calmag + living organics topdressing 💧 FLOWERINGGGGG!!! 🌺 🌻 No joke, they all pre-flowered (all 4 strains) 4 days after receiving the valerian extract for the first time (also the much younger Donkey!!). You can get the Fastbuds from Green Buzz, it contains valerian extract. 💚 🌹 Thanks, my growmies for visiting and reading and commenting, I love reading your comments! Mwah! 😘 Thank you, @Kannabia, for sponsoring this grow, aaaaand for the amazing gift pack! 😍 I hope to make you proud! 🧡 Special shouts out to my fantastic sponsor @GreenBuzzNutrients! Thank you for trusting me with your awesome products, I'm a longtime fan! 💚 🙏 Green + juicy growmie hugs to my Greenbuzzers!! 😘 Grower Love everybody!!!11 💚 💚💚💚💚💚💚💚 Wishes do come true, they just take a lot of time sometimes.. ✨ If you wish to try Green Buzz Nutrients, there's a 25% discount code hidden down there in the week comment somewhere.. 😎 __________________________________________________________________ https://www.kannabia.com/en/feminized-cannabis-seeds/monkey-grease Monkey Grease At Kannabia Seeds we have put all our effort into bringing out our own feminized Monkey Grease, a cross between Monkey Grease x White Widow, focusing above all on giving it its own personality in flavor and aroma (frankly unmistakable). Its own personality At Kannabia Seeds we have put all our effort into bringing out our own feminized Monkey Grease, a cross between Monkey Grease x White Widow, focusing above all on giving it its own personality in flavor and aroma (frankly unmistakable) and, of course, in Highly demanded characteristics, such as high resistance to diseases and pests, and adaptability to all types of growing conditions, making it close and easy to grow to the widest possible range of growers. The result is a really powerful and versatile indica-sativa marijuana seed, with a powerful relaxing effect, ideal for those moments when you want to disconnect from the madding crowd. Cultivation of Monkey Grease Which cultivation method would be most appropriate for this variety? Good question… and one that is easy to answer. Its versatility and adaptability make it a true all-rounder, with remarkably uniform results, whether you choose SOG, SCROG, hydroponics or guerrilla growing. Moreover, we invite you to experiment and play, varying the techniques from moment to moment, and to draw your own conclusions. We are convinced that in all cases, apart from minor variations, the results will always be optimal, giving remarkable yields and in a short time. Attention should be paid to its high bud production, which can be fat, dense and heavy, although its sturdy branches are able to bear heavy loads without major problems. If you are a fan of extractions, our Monkey Grease is also optimal, given its high production of caramelised resin. If it is already amazingly productive indoors, this variety excels on its own merits outdoors, where it can easily reach 200 cm in height, and can reach between 700 and 800 grams per plant. It is therefore an easy and grateful plant, which demands little from its gardeners, making do with simple basic care, and with little or no propensity to develop diseases or mildew, or to attract pests (despite its striking aroma!). Taste and effect of Monkey Grease Our Monkey Grease stands out first and foremost because of its powerful, strong smell, which is hard to camouflage. A penetrating aroma that unfolds, in a balanced way, on the palate in the form of a wide range of spicy and sweet flavours, reminiscent of wild honey, nougat and cinnamon, and distant notes of milk chocolate. A delicious treat to be savoured calmly, without haste, as a preamble to its pleasant effect: extremely relaxing and narcotic, powerful, ideal for meditation and moments of introspection and meditation. Don’t be in a hurry with Monkey Grease. It can be your perfect ally to treat those stress and anxiety problems, but for that you must let yourself go, surrender to its charms, especially if you are inexperienced. ________________________________________________________ Setup: 60x60x180 cm Zelsius Greenception GC4 128W 4 Cluster OSRAM + CREE LEDs (380, 455, 630, 660, 720, 760nm) 6400k (cold-white to cover the basic load during the growth) 2100k (warm-white to cover the basic load during the blossom) The module groups can be switched individual as follows: ⬤ Module I: growth 1x 32 watt ⬤ Module II: full spectrum: 2x32 watt ⬤ Module III: Bloom: 1x 32 watt ⬤ Module I is optimized for the growth phase. A relatively high amount of blue and white support a dense growth. ⬤ Module II suits for the growth as well as blooming phase. Optimal plant light full spectrum. ⬤ Module III is optimized for the bloom. A high portion of red and an additional infrared push. Green Buzz Nutrients https://greenbuzzliquids.com/ ❗ Use code GD42025 for generous 25% discount (for orders of minimum 75€) 💚 Plagron Growmix Carbon Active Granulate 240cm³/h tab water pH 8 - EC 0,25 with Calmag to 0,5 Advanced Hydroponics pH minus Grow + Bloom to pH 6.5 💧 🐒 🍌 🌴🐒 🍌 🌴🐒 🍌 🌴🐒 🍌 🌴🐒 🍌 🌴🐒 🍌 🌴🐒 🍌 🌴
Processing
Likes
2
Share
Hey what’s up fellow growers I made a mistake and deleted my dairy for these clones so I just put em all in one This is week 6-8 since I had these clones All pictures is from beginning to recent I’m growing four different strains Sherbertlato , Peanbutter Breath x Cookies , Wedding Cake , & Gorilla Cookies I have them in a 4x4 diy tent under a 1200w Aglex LED & a 600w FSg tek LED budget light I only water ph at 6.6 with cal-mag since I received them I’ve transplanted twice from solo cups to 1 gallon to 5 gallon grow bags inside of a mixture of fox farm ocean forest and roots organics 707 soil I still have the wedding cake and sherbetlato in 1 gallon grow bags til they grow taller then their going in 5 gallon before flower Today is April 5th I just watered and cut some clones then placed them under an diy scrog net Once the cuttings roots I’m going to flip the Gorilla Cookies and Peanutbutter Breath x Cookies into flower I must say although this is my first grow I think I’m doing an okay job with these clones a lot better than I did with my auto flower grow I learned to watch and time my watering and feeding and I’m still learning a grower I know where I got my clones said I’m catching on fast tho n keeping my environment clean and air good not getting any bugs specially without any expensive equipment So stay tuned Im only getting better specially with the advise and techniques
Likes
13
Share
Dear Growers , Welcome to Veg Week 3 Day 19-28 of WeedSeeds Express Future #1 Auto Whether you're a beginner or an expert, you are warmly invited to join, ask questions, and share your own experiences along the way! Project Setup & Conditions: • Brand/Manufacturer: WeedSeeds Express • Tent: 222cmx150cmx150cm • Light: 2x 720 Watt Full Spectrum • Humidity: 50% • Soil: Narcos Organix Mix • Nutrients: Narcos Products • pH Value: 6 Get Your Epic WeedSeedsExpress Genetics or Explore the whole seeds/headshop or Merchandise from This Amazing Breeder and one of the best EU Stores. Just Take a look with some time in your pockets with this link [https://weedseedsexpress.com/?a_aid=GGD] If you want Germinitation results like mine , check out Kannabia Seeds with my link [https://www.kannabia.com/de?ref=61966] and grab the germination device or theyre amazing strains . Trust me – it’s worth it for sure ! Congratulations on Your Own Projects! We celebrate your growth, your creativity, and the passion you bring to the table. It’s truly inspiring to witness at Each visit . Stay curious and keep up Growing —we look forward to welcoming you back for the next chapter soon!
Likes
5
Share
@Drtomb
Follow
I finally had a chance to try out the Skullcap solo cup that I grew out after finding it was female. This plant is very crystally and has a dark purple look from the leaves. Ill definitely need to maintain a 10*F temp swing from day to night temps. Everything is moving along nicely on the screen and new sump pump is working great. Changing res everytime i go through a full add back of fresh water, which should be in the next 2-3days.
Likes
77
Share
So I finally got there in the end, here we have 3 x sherbert mimosa and 2 x gelato cake. Classing this as week 1 as I repotted today so this is what I'm using. Light = bloomplus bp2500 Exhaust is a ac infinity 6inch with digital controller Inkbird humidity controller with a ram 5l humidifier. Veg only! Soil= biobizz light mix Nutes= biobizz roots 1 week using the 10 week schedule at half dose this run. Ph= 6.4 Room humidity is 70% Temp is 28°c Happy growing guys 💪💚 Grown under the bloomplus bp2500 The 4 smaller ones are in light mix And the middle one is in all mix hence its got nute burn. I have fed them 4ml of biobizz roots to a litre of water. I made a 2l bottle to share between them at this point. Tomorrow I will start them with the following biobizz nutes as follows. 2ml per litre of fish shite 2ml per litre of bio heaven 2ml per litre of acti Vera 2ml per litre cal mag I mix the cal mag on its own and feed separately. Happy growing guys 💚💜 Last pics of this weeks progress just put on, what a growth spert in 6 days 😁💚💜
Likes
170
Share
Bonjour à tous les padawans et les maîtres jedis Jour42 ma plante entre bien en floraison je pratique sur elle une defolliation pour permettre aux têtes de prendre la lumière La floraison des plantes de cannabis La plante de cannabis passe par différentes étapes de vie avant de parvenir à la récolte. Ces étapes sont : la germination, la pré-croissance, la croissance et la floraison. Pour les autofloraisons il n'est pas nécessaire d'avoir de changer le cycle de lumière elle entre en floraison automatiquement voilà d'où elle tient son nom "d'autofloraison" L'origine de l'auto-floraison vient de la sous-espèce "cannabis sativa ruderalis" , qui à l'origine produit de très faibles niveaux de THC. C'est en croisant cette variété de marijuana avec d'autres qui produisent des niveaux de THC plus élevés qu'à vu le jour ce magnifique compromis que sont les variétés auto-fleurissantes avec des taux de THC très satisfaisants. En parallèle, cela a permis d'améliorer la production de ces variétés, qui initialement étaient exceptionnellement basse. Pour des résultats optimaux, en culture Outdoor (extérieur), je recommande que la germination des graines de marijuanaAuto-flo se fasse entre avril et août. En culture Indoor(intérieur), la photopériode idéale que ce soit pour la croissance comme pour la floraison est de 20h de lumière. N'oubliez pas que ces graines ne sont pas tributaires de la photopériode pour passer en floraison. Il est préférable d'utiliser des pots d'une capacité de 10 à 20L dès le début, étant donné que leur cycle de vie est réduit, les auto-flo n'ent pas besoin de plus de volume pour se développer. Vu sa petite taille (et la discrétion) elle fait l'objet d'un bon choix pour la culture de cannabis sur balcons. La première variété de Lowryder auto-floraison a été créé à partir de cannabis indica sativa croisé avec des génétiques de cannabis sativa rudelaris par la banque de graines de marijuana "The Joint Doctor". Puis vinrent la White Dwarf de "Buddha Seeds", la Roadrunnerde "Dinafem", l' Auto Stoned d' "Autofem", la Speed Devil de "Sweet Seeds" , la Maxi Gom de "Grassomatic", la Flash, la Gnomo de Kannabiaet bien d'autres. Jour42 defolliation (video) Avant toute chose n'oublions pas de bien désinfecter ses outils et bien ce laver les mains. Quesque la defolliation ? LES CULTIVATEURS AMATEURS, PRENEZ GARDE, MAIS NE PRENEZ PAS PEUR La défoliation consiste à retirer les feuilles des plants de cannabis en intérieur afin d'accroître le rendementfinal. Le cultivateur amateur doit faire preuve de vigilance lorsqu'il commence à appliquer cette technique de taille. Malgré le débat sans fin entre ceux qui prônent cette technique et ceux qui la dénigre, il n'y aucune raison pour qu'un amateur ne s'y essaie pas afin de voir si ça lui convient ou non. COMMENT DÉFOLIER Que vous tailliez les feuilles ou les branches des plants de cannabis, il vaut mieux utiliser un sécateur stérile qui est confortable en main. Arracher des feuilles à la main manque de finesse et engendre souvent par accident, l'arrachement des couches d'une tige en plus de la feuille. L'objectif principal de la défoliation est de permettre une meilleure pénétration de la lumière et de promouvoir la production de plus grosses têtes. Les feuilles éventails qui font de l'ombre doivent être retirées. Tailler la tige principale et/ou les pousses secondaires n'est pas de la défoliation. La règle d'or lorsque vous donnez à vos plantes un rafraîchissement est de commencer avec les feuilles nourricières les plus grandes et les plus larges, en taillant du bas vers le haut. Il est important de retirer les feuilles stratégiquement et non pas au hasard. Pensez également qu'il vous faut limiter votre rafraîchissement à approximativement 10 à 20 % des feuilles totales de votre pied. Il est très facile de s'emporter durant la taille et de se retrouver avec des plantes chauves. Un excès de taille de feuilles empêchera la photosynthèse et paralysera vos plants. QUAND FAUT-IL DÉFOLIER Il est assez rare d'appliquer la défoliation comme seule technique pour obtenir un fort rendement. La taille des feuilles est généralement associée à d'autres méthodes de tailles et de palissage pour un meilleur rendement telles que le topping ou étêtage, le FIMming, le LST, le manifolding, le supercropping et le ScrOG. Les cultivateurs utilisant la méthode ScrOG auront besoin de retirer toutes les croissances inférieures ainsi que les feuilles et les tiges se trouvant sous le filet. Les plants de cannabis peuvent être défoliés dès lors qu'ils sont passés de la phase de plantule vers la phase de croissance végétative. Cependant, il est recommandé aux cultivateurs amateurs de laisser aux plantes 1 à 2 semaines de croissance végétative avant de s'attaquer à la défoliation de celles-ci. De plus, certaines variétés sont plus sensibles à la taille que d'autres et de ce fait, seront plus stressées par la taille des feuilles. Surveillez minutieusement le comportement de vos plants après la taille. Une période de convalescence de minimum 3 à 7 jours avant de recommencer la défoliation est fortement recommandée pour éviter trop de stress aux plants. Les cultivateurs peuvent également défolier pendant la phase de floraison, ce qui permettra à l'énergie de la plante d'être concentrée vers la production de têtes tout en limitant l'ombre et l'excès d'humidité. Néanmoins, il est important de ne pas défolier trop tard sous peine de simplement blesser ses plants inutilement. LES AVANTAGES DE LA DÉFOLIATION Évidemment, l'avantage numéro un de la défoliation, c'est l'augmentation du potentiel de rendement de cette technique de taille pour tous types de cannabis allant de la photopériode aux variétés autofloraison. Ce n'est pas un secret que les fleurs qui reçoivent plus de lumières deviennent plus grandes et larges que celles dissimulées dans l'ombre des feuilles. De plus, retirer les feuilles intérieures des plants touffus aide à prévenir toutes menaces de moisissure. Les plants très feuillus avec un feuillage intérieur dense produiront une quantité importante de têtes pop-corn. Dans le pire des cas, les branches de têtes et les têtes qui sont denses succomberont au pourrissement. Si vous observez des gouttes d'eau se former sur la surface des feuilles, il est grand temps de penser à faire de la défoliation. Libérer la zone inférieure et médiane des feuilles est un excellent moyen d'améliorer la circulation de l'air. LES DÉSAVANTAGES DE LA DÉFOLIATION Les plants de cannabis en intérieur bénéficient de la défoliation pour deux raisons. La première est parce qu'ils reçoivent la lumière d'une source stationnaire au-dessus d'eux, et la deuxième est parce que les conditions environnementales sont contrôlées par le cultivateur et non Mère Nature. Les plants d'extérieurs eux, n'y gagnent pas beaucoup, car les cas échéants se vérifient pour eux. Le soleil traverse le ciel, illuminant sur sa route, différentes portions de la plante de son lever à son coucher. Les cultivateurs en extérieur n'ont pas besoin de manipuler les plantes afin qu'elles se développent en adoptant une structure plate puisque le soleil est infiniment plus puissant que n'importe quelle lampe de culture et qui plus est, il est toujours en mouvement. Tailler les feuilles des plants extérieurs les rend également plus vulnérables aux conditions humides et brise leurs barrières naturelles contres les nuisibles. De nombreux cultivateurs d'intérieur peuvent, et malheureusement, c'est souvent le cas, réduire le rendement final à cause d'une défoliation faite au mauvais moment et/ou excessive. Tailler les plantules n'est pas conseillé et engendre souvent des plants nains. Scalper les plants matures est encore pire, et au lieu d'obtenir de longues branches de têtes, vous obtiendrez probablement encore moins de fleurs. De même, tailler des plants malades ou en mauvaise santé à n'importe quelle période de la croissance risque de paralyser la croissance plutôt que d'encourager la formation de fleurs denses. Jour44 Arrosage une fois sur 2 topmax de biobizz Jour46 arrosage avec de l'eau ph6.3 à laquelle j'ajoute 0.8g par litre d'eau de feeding enhancer greenhouse. Jour47 léger arrosage. Jour48 léger arrosage
Likes
Comments
Share
The plant moved back to high light of Sanlight, I felt it was in need of that in this phase. The smell is starting to get stronger but mild still. Lime with sweet undertones of Cannabis classic! I am personally not a big fan of Lime, but I'm eager to see this plant it's last week's.
Processing
Likes
24
Share
**Encontrarás la traducción a español al final de la descripción** From/Desde: 22/07/19 || To/Hasta: 28/07/19 From day/Desde día: 0 || To day/Hasta día: 6 -----IMAGES & VIDEOS----- Video 1: I timelapsed the born time to seedling. I'm testing a new software for iOS that worths it's cost, it's called "SkyFlow", it has also the free version that can be used without paying. -----WEEK SUMMARY----- Hi buddies, i'm very happy to welcome you to my new Spliff Seeds AK single plant grow. In this grow I'm going to try to obtain a plant with 8 main colas, it's going to be more toppings + LST than a Man-Lining. Let's see where i reach with it ;). The first week was as expected, buried the seed on Monday night in a small pot (i'm not sure if it's 0.3 l, but +/-), it be came to seedling on Thursday afternoon and grown till Sunday as it should be. Equipment used ----------------- HLG 100 v2 (100w with samsung full spectrum Led's), also known as "Quantum Boards" DR60 growing tent (60x60 cm) 19,5 l AirPot Small static vent 10w Soil from Bio-Bizz (Light-mix) i will use a small layer of Hard-mix in the bottom of the AirPot on transplant -----WATERING CALENDAR----- 22/07/19 - 200 ml with all week nutrients @ 0.7 E.C. PH5.8 *****ESPAÑOL***** -----IMÁGENES Y VÍDEOS----- Vídeo 1: He capturado en timelapse el momento del nacimiento a plántula. Para ello he probado un nuevo software para iOS que vale su peso en oro, se llama "SkyFlow", también tiene versión gratuita que se se puede usar sin pagar. -----SUMARIO SEMANAL----- Hola compañeros, estoy feliz de presentaros mi nuevo diario de una planta AK del banco Spliff Seeds. En este cultivo voy a intentar conseguir una planta con 8 colas principales, será más a base de toppings y LST que un man-lining en si. Veamos hasta donde llego con ella ;). La primera semana fué como se esperaba, planté la semilla el Lunes por la noche en un tiesto pequeño (no se si es exactamente de 0,3 l pero +ó-), se hizo plántula el Jueves por la tarde y creció hasta el Domingo como debía. Equipmo usado ----------------- HLG 100 v2 (100w con LED's samsung de espectro completo), también se las cono ce como "Quantum Boards" Tienda de cultivo (60x60 cm) AirPot de 19,5 l Ventilador estático pequeño de 10w Sustrato BioBizz (Light-mix) usaré una pequeña capa de hard-mix en el fondo del AirPot cuando transplante -----CALENDARIO DE RIEGO----- 22/07/19 - 200 ml con todos los nutrientes semanales @ 0.7 E.C. PH5.8
Likes
21
Share
@Bluemels
Follow
Nach der anfänglichen euphorie die Cookie Gelato wächst sehr schnell , kommt jetzt mal wieder die Erkenntnis das es in die Waagerechte immer viel langsamer voran geht. Aber sie wird immer kräftiger und drückt ordentlich das Netz hoch. Ein beherzter Low Stress ist also sehr zu empfehlen bei dieser Variationen. An Tag 47 habe die Gute ordentlich entlaubt und unnötige Zweige entfernt.