


Likes
Comments
Share


@Organic473
Follow
Transplanted her/him who knows to a 10 Gallon pot. I will veg her for another week or more the flower.

Processing
Likes
14
Share


@SunshineBud
Follow
OMG too, I have been keeping my go pro doing time lapse photos in the tent, I made a video with first 26days in 3 minutes Check it out!
Wow, growth is beginning to light a fire in my gut, feels good man! Although, I'm starting to get curious about plant #3.
For the past few days, this girl (3), has been not growing in girth or height. Although she seems fuller and healthier.. Gonna wait her out!
OH Another thing, A great big SHOUT OUT to Sacred Geometry and Astarte for giving me great advice on my stem issue with plant 2.
I went ahead and chose SG's for my answer simply because I felt topping the pot was the right call. Oh but be aware, that my plant
heights all went down due to topping off the pots with more soil... But I feel more comfortable about that plant now. Also I heeded
SG's advice on Fox Farm Nutrients and halved the recommendations this week.
All right, on to my daily log entries. These can all be found in the pics above, but I feel like it makes my comments more beefy....
12/17 Humidifier ran out of H2O, trimmed first leaves & suckers off Plant 3. I know she's little but I hate her having to work harder for those terrible nutrient suckin leaves
12/18 Rinsed all plants w/ PH Balanced H2O & watered lightly around stem. Sat Back and enjoyed growth. Man, 4 is kick ass! Put in CO2 cannisteter @6:07P
12/19 Trimmed last two weird leaves off plant 3, only left 2 pairs up top hopefully enough... just wanted to get it focused. Topped $4 too, left 3 nodes
12/20 Fed w/ 1.5 tsp/ga Big Bloom / Big Grow, 1/8 tsp/ ga Clean Kelp topped pots w/Dirt (SO SG!) so heights went down Did not top #3's pot too short. Rinsed plants w/ PH Balanced H2O TDS @ 1154 PPM PH out 4.35.
12/21 Topped plant 1, removed bad leaves, P2 pinched baby suckers.
(I realize now I'm not really topping, I'm more just trimming suckers)
12/22 CO2 juices on P1 leaves caused almost holes thru it Dropped light to 19 1/2" f/ #3
12/23 Measured plants, shook up CO2 cannister #4 Power Growth! #3 seems to be fuller but no measurement changes!
Well there ya have it folks, thanks for stopping by and saying hey I do appreciate it!!
Cya Next Wednesday!
edit: I just watched video again and realized the two little dots on screen everyday are power lights on plugs breaking out electrical tape now!

Likes
7
Share


@HegauHillsFarmers_M11
Follow
Tag 1 - Beginn der 1 Woche.
Die Pflanze wurde bisher nur mit Wasser besprüht und die Erde angefeuchtet.


Likes
142
Share


@PapaNugs
Follow
Super excited for this run. I'm always on the search for new quality genetics and fruity terps. This time I chose Elev8. I watched an interview with them and decided to try. They start all their genetics with high quality clone cuts. Pretty interesting and if you ask me that's how I'd do it if I was gonna to something like that.
Water for 36 hours then in the solo cup. 80% filled with my mix and the top 20% is just coco/perlite. 5/6 popped up. We begin!

Likes
9
Share


@Ronin716
Follow
Loved it!! Relatively easy going!! Couple off moments but not worth getting into but the smell!!! It’s not super strong where you smell it throughout the house when you burp the jars but she has a very (what I could only reference as sour, sweet and lemony, almost like that lemon pledge your mom use to clean the house with) smell but I love it!!!
Likes
18
Share


@Coughy
Follow
DAY 62
1 day early of start of new week, just waiting for some more ambers, nearly ready🎉
Still running RO only, 40 PPM.
Still keeping it pH’d, it likes to drop slowly still. However, I don’t get why pH is important during flush tho. Not like I need to keep nutrients available for plant to suck up... 🤷♂️
I’ve been considering drilling some holes into the base of the main stem as to simulate the stalk-splitting technique. Maybe it’ll help speed things up...
I’ll check trichs again tonight when lights kick on and make an executive decision and post updated pictures if it’s a go ahead.
Day 63
I split me some stalks! Uploaded a video of the procedure.
Day 64
This phenotype is developing purple leaves?
Photos uploaded.
Day 65
Harvesting...
Day 66
More Harvesting...
Day 67
Taking clones, moving veg plants to bloom tent. This grow is drying.

Likes
248
Share


@Ju_Bps
Follow
Hello my friends 👨🌾👩🌾,
The Banana Purple Punch 🍌🍌🍌💜💜💜🥊🥊🥊looking good, flip started🔥
This mid week the first pistils are poped.
I've continued to give 250ml each 2 day, since start week I give 500 ml/plants each 3 days.
And started fertilizer
I've given
200 ml water + rhizo
500 ml water + rhizo + canna tera
500 ml water + cannazym
PH@6
I've set up my new jewelry today 🔥🔥🔥🔥, this fc3000 look very nice.
Lamp @50% and 50 cm of the canope.
Next week, will be first blooming week 🌲🌲
See you next week and have a good week end my friends 🔥👨🌾👩🌾
Thank to Mars Hydro and @marshydrococo2 for sponsoring the FC3000 ❤️❤️, as well as @Fast_Buds for sponsoring the Seeds ❤️❤️
If you want a litle discount on your Mars Hydro order, add this coupon to your cart,
"Ju_Bps"
Thanks community for follow, likes, comments, always a pleasure 👩🌾👨🌾❤️🌲
Mars Hydro - FC3000
https://www.mars-hydro.com/fc-3000-samsung-lm301b-led-grow-light
42 Fast Buds - BANANA PURPLE PUNCH🍌🌲
https://2fast4buds.com/seeds/banana-purple-punch-auto
Likes
12
Share


@zirpp
Follow
I repottet the plant from 5 to 11 liters at day 8.
I tried to provide as little stress as possible, by cutting out the bottom of the 5 liter pot, placing it in the 11 liters and then filliung up with earth.
Once it were stable, i removed the rest of the 5 liter pot. Sadly i did not have enough coco, so about 30% of the mix is organic soil.
I also changed the light hours to accommodate heat.
Experienced underwatering on day 12, so i fed 1 liter of nutrient solution and then fed ph 6 water till it came out the bottom of the pot.
Upped watering from day 13 to one 0.33 ml nute feeding in the morning, and a 0.33 ml ph water in the evening
Likes
8
Share


@Professor_Daank
Follow
SPREADSHEET: Jack's vs. Advanced:
https://docs.google.com/spreadsheets/d/1HtHnZOxMHtBK5DFQjpBun2lbhDxYVhI7lJaq4W6xbyk/edit?usp=sharing
-----------------
This week's recipe:
Jack's Hydro 5-12-26 @ 3.6g
Epsom Salt @ 1.2g
Calcium Nitrate 15.5-0-0 @ 2.4g
Fish Sh!t - 6ml
B-52 - 8ml
Rhino Skin - 8ml
Voodoo Juice - 8ml
Rapid Start - 1ml
-----------------
9/28:
Well, Jacks is amazing. EC solid. pH solid. Colors are great. Leaves are bouncy.
So far, Jack's is very impressive and I see no reason why it can't slay it like Advanced does. Much cheaper and the results, again, so far... are just wow.

Likes
8
Share


@GigglePickle
Follow
Leaves are filling out more after the defoliation. Some plants are showing difficulties from the cold root zones. No nug growth shown yet.
Likes
18
Share


@PakkaFarm
Follow
Start rinsing day 71 💧🚿
Light 35 cm day 72 💡
Trichomes pics last day for my girl 🍊🤩😭
Processing
Likes
52
Share


@CBD_Sweden
Follow
Strain Name: Stilton Special F1
Genetic heritage - Sour Livers F3 x Northern Cheese Haze F3
Strain behaviour - Stilton grows well from the off, and develops into a stout but branchy specimine that leads to a fine yield of awesome flowers. She's not too stretchy but also is sizeable enough with good growth, to train and shape to your liking. Flowers develop pretty fast and grow to a good size, it may to advised to clear out some undergrowth and if needs be a very gentle defoliation mid-way through the grow, although leaf tucking may suffice well enough.The end product is of top shelf quality and she doesn't lack in yield either.Give your garden, nose, and body a treat and be sure to indulge in a slice of Stilton this year, You won't regret it.
Size - 50 - 70 cm
Structure - Medium height but bushy
Flower Density - 9/10
Indica/Sativa - 65/35
Cycle Time - 65 to 70 days from sprout
Yield - 90 to 140 grams as a single plant
Best Method for overall high yield - 9-12 per 1,2m x 1,2m sq in 10-15 Liter pots (Soil)
Aroma - Very strong, Cheesey/fruity/sour/spicey/ with a dash of coffee.
Taste - Dank berries
Effect - Good hybrid powerful but balanced effect
Medicinal Benefits - TBA
Best Grown - Indoor/Greenhouse
Cannabinoids - TBA
Extract information - Ideal extract candidate - High in resin, oil and terps.
--------------------------------------------------------------------------------------------------
2017-10-09. Late update. Week 7, day 1. Girl is 37 cm tall.
-------------------------------------------------------------------------
2017-10-13. Day 3. Added pics.

Likes
142
Share

@GreenHobbit
Follow
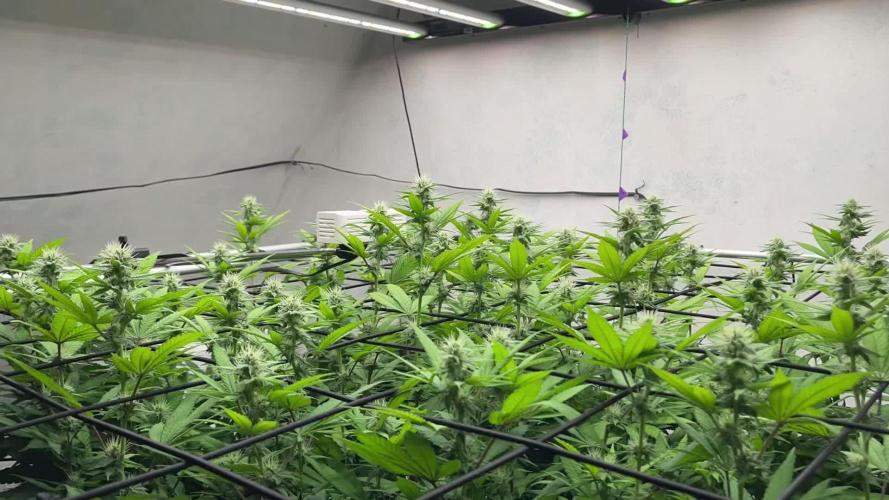
Woche 19 – Blütewoche 4
Diese Woche war weniger spektakulär als die letzten – zumindest wenn man meinen Zeitraffer fragt. 😅
Der Stretch scheint nun endgültig abgeschlossen zu sein. Im Vergleich zu den vergangenen Wochen bewegt sich das Blätterdach kaum noch nach oben. Stattdessen beginnt die Laughing Buddha sichtbar damit, ihre Energie in die Blüten zu stecken.
Die einzelnen Budsites werden kompakter, die Blütenstände verbinden sich zunehmend entlang der Triebe und die Harzproduktion nimmt ordentlich Fahrt auf. Gerade auf den Sugar Leaves ist mittlerweile schon eine schöne Schicht Trichome zu sehen. Für Blütewoche 4 kann ich mich über die Entwicklung der Buds definitiv nicht beschweren.
Ganz zufrieden war ich diese Woche trotzdem nicht.
Das Sorgenkind: die Blattfarbe
Bereits in der letzten Zeit wurde das Laub zunehmend heller. Einige ältere Fächer zeigen inzwischen deutliche Chlorosen und teilweise kleine braune bzw. nekrotische Stellen.
Anfangs hatte ich vor allem die Nährstoffversorgung im Verdacht. Rückblickend habe ich aber wahrscheinlich selbst einen Teil zu dem Problem beigetragen.
Also wurde diese Woche nicht einfach blind weitergedüngt, sondern erstmal genauer hingeschaut.
Ich habe meinen pH-Pen neu kalibriert und anschließend Wasser und Erde überprüft. Mein Leitungswasser liegt ungefähr bei pH 7,7 und ist ziemlich hart. Zusätzlich habe ich eine Bodenprobe angesetzt, um besser einschätzen zu können, was tatsächlich im Substrat passiert.
Auch beim Enhancer musste ich feststellen, dass ich ihn bisher nicht ganz so eingesetzt hatte, wie ursprünglich vorgesehen. Dazu kamen zeitweise ziemlich hohe Lichtintensitäten und durch die heißen Tage teilweise entsprechend hohe VPD-Werte.
Kurz gesagt: Wahrscheinlich war es nicht der eine große Fehler, sondern mehrere kleine Faktoren gleichzeitig.
Und ja – auch solche Sachen gehören für mich in ein Grow-Tagebuch. Fehler passieren. Entscheidend ist, sie zu erkennen und daraus zu lernen.
Mäh sin hier ja nit bi Wünsch dir Watt. 🤣
💡 Licht & Klima
Bei der Beleuchtung habe ich diese Woche ebenfalls nachjustiert.
Die Gorilla hängt jetzt ungefähr 50 cm über dem Canopy und läuft bei 91 %. Am Sensor kommen damit rund 890 PPFD an.
Damit bin ich wieder ziemlich genau in dem Bereich, den ich für die weitere Blüte haben möchte, ohne der Buddha unnötig noch mehr Stress aufzudrücken.
Die heißen Augusttage haben die Klimaanlage ordentlich beschäftigt. Zeitweise ging die Temperatur deutlich nach oben und damit auch der VPD. An den gemäßigteren Tagen ließ sich das Klima dagegen wesentlich besser kontrollieren.
Fütterung & Bewässerung
Zum Übergang in BW4 bekam die Buddha wie geplant ihren Green House Feeding BioBloom Topdress. Anschließend wurde mit Enhancer gegossen.
Danach hieß es erstmal: beobachten.
Ich möchte jetzt nicht den Fehler machen, wegen der hellen Blätter ständig weitere Änderungen vorzunehmen. Bereits geschädigte Blätter werden ohnehin nicht plötzlich wieder dunkelgrün. Viel interessanter ist, ob sich das Schadbild weiter ausbreitet oder nach den vorgenommenen Änderungen stabilisiert.
Auch die beiden Bodensensoren waren diese Woche wieder ziemlich hilfreich. Man sieht mittlerweile sehr schön, wie schnell die Pflanze ihren 45 Liter Topf leerzieht. Am heutigen Gießtag konnte man anschließend sogar unmittelbar verfolgen, wie die Bodenfeuchtigkeit nach oben sprang und sich das Wasser anschließend im Substrat verteilte.
🌸 Blütenentwicklung
Und während ich mir über irgendwelche gelben Blätter den Kopf zerbreche, scheint die Buddha selbst davon relativ wenig beeindruckt zu sein. 😅
Die Blütenentwicklung läuft weiter.
Viele Tops tragen mittlerweile klar ausgebildete Colas, die Buds werden zunehmend dichter und vor allem die Harzproduktion gefällt mir ausgesprochen gut. Gleichzeitig stehen noch Unmengen frischer weißer Pistillen heraus.
Da ist also noch sehr, sehr viel Luft nach oben.
Der Unterschied zwischen Pflanzen- und Blütenbild ist momentan fast schon absurd: Einige Fächer sehen aus, als wollten sie mir unbedingt mitteilen, dass etwas nicht stimmt – und direkt daneben sitzt ein komplett bereifter Bud und sagt:
„Keine Ahnung, was dein Problem ist.“ 🤣
🎥 Zeitraffer der Woche
Nach dem Stretch der letzten Wochen hatte ich diesmal mit einem spektakulären Zeitraffer gerechnet.
Tja.
Absolut unspektakulär. 🤣
Aber beim direkten Vergleich zwischen Anfang und Ende erkennt man trotzdem die entscheidende Veränderung: Die Höhe bleibt nahezu konstant, während die Blüten langsam an Volumen gewinnen.
Und eigentlich ist genau das die beste Nachricht dieser Woche.
Der Bau des Gerüsts ist beendet.
Jetzt darf sie fett werden. 😏🌳
📋 Fazit Blütewoche 4
Keine perfekte Woche – aber wahrscheinlich eine ziemlich wichtige.
Ich habe beim Licht nachjustiert, meine Wasser-/Bodensituation genauer untersucht, die Düngung aufgefrischt und dabei auch ein paar eigene Fehler bzw. mögliche Fehlentscheidungen gefunden.
Jetzt werde ich nicht hektisch weiter korrigieren, sondern der Pflanze erstmal Zeit geben zu reagieren.
Denn trotz der auffälligen Blattfarbe macht die Laughing Buddha genau das, was sie momentan machen soll:
Sie baut Blüten. Und davon verdammt viele. 😍
Auf in Blütewoche 5.


Likes
8
Share


@Buck5050
Follow
This is a cross I am testing. I am using a "hempy bucket" style grow. It is a drain to waste system that uses 80% perlite and 20% vermiculite as the grow medium. I will use these solo cups for the first couple weeks and up pot from there. I like to keep my growing simple and fairly inexpensive, I will use General Hydroponics for the entire grow except for the cal-mag. My intentions are to use the 10 week standard feed schedule made for these nutrients unless I run into some major issues.


Processing
Likes
12
Share


@Lennys_Laboratory
Follow
I started with 1L of tap water left uncovered 24hrs for evaporation of chlorides.
I then added formulex alongside Regen (drop for drop) until e.c. reads 0.4, and then Ph to 6.3.
Coming along nicely nothing to majot to comment on :)

Likes
8
Share


@eldruida_lamota
Follow
Que pasa familia, vamos con la quinta semana de floración de estas Monster Maker feminizadas de Sweetseeds.
Vamos al lío, las plantas se trasplantaron a macetas de 7 litros.
El ph se controla en 6.5, la temperatura la tenemos entre 24/21 grados y la humedad ronda el 50%.
El ciclo de crecimiento puse 12h de luz, el foco está al 100% de potencia.
Tengo visitantes, trips que combatiremos con control biológico.
Me gustaría estar más encima este cultivo pero la salud me está impidiendo un poco este 100% con el proyecto.
- os dejo por aquí un CÓDIGO: Eldruida
Descuento para la tienda de MARS HYDRO.
https://www.mars-hydro.com
Hasta aquí todo, Buenos humos 💨💨💨

Likes
19
Share


@DrLaggis
Follow
HELLO GROWING FRIENDS - Please look at my Aftermovie Growvideo, which cost me about 4 hours to create. hope you like it!
Day 72: The Finale 🌿🌟
It’s finally time. My very first grow is coming to an end—at least the cultivation phase. The plant is now ready for harvest, and I can’t believe how incredible this journey has been. I never expected to enjoy the whole process so much—from nurturing the plants to watching them grow and evolve. I’m absolutely hooked and can’t wait to dive into the next steps: harvesting, drying, curing, and of course, starting a new grow soon with fresh ideas and experiments!
While it may not be the largest yield, the quality of the buds speaks for itself. The time, love, and care I’ve put into this grow is visible, and I’m pretty proud of the results. I’ll admit, I was a bit impatient at times (which I think every first-timer can relate to 😅), but the experience was priceless.
Here are a few interesting highlights from my trimming and harvest process:
1️⃣ Dark Phase Before Harvest
Two days before harvest, I put the plant in complete darkness to encourage resin production. I'm not sure if it really made a difference, but it was worth trying!
2️⃣ Wet Trim vs. Dry Trim
I decided to go for a wet trim because the buds were really dense, and I wanted to avoid any risk of mold. I’ve read that wet trimming can speed up drying and may slightly impact the quality, but this is part of the learning experience. Next time, I’ll try a dry trim for comparison!
3️⃣ Yield Update
Wet, the total came in at 209 grams from my plant. Trimming took around three hours, and it was actually a lot of fun, despite the time commitment.
4️⃣ Curing Plan
The buds are now hanging in the tent for about 8 days. Once dried, they’ll go into jars with Boveda Packs (62% humidity) for another 3 weeks of curing. I'll update the smoke report once they’re fully cured, but I’ve already had a sample of the same strain from a friend, and I can say it’s pretty amazing.
Final Thoughts on My Grow 🌱✨
As mentioned earlier, this grow has been an absolutely incredible experience, and it has definitely set me on a path to jump right into my next grow. There were ups and downs along the way, such as over-pruning, which I believe stressed the plants a bit. Additionally, I think they could have benefited from an extra week to mature. We also faced many temperature fluctuations this summer, which impacted the plants due to external weather conditions.
I’m really pleased with the quality of the buds. The quantity is okay—I can’t fully gauge it yet—but I’m sure there’s more potential to unlock. I’ve gained valuable experience in what worked well and what didn’t. Overall, the countless lessons learned during this grow far outweigh the few mistakes made. I’m incredibly proud of my first results!
As this long journey comes to an end, I want to thank everyone who followed along. I hope you enjoyed all the content. In that spirit, happy growing, and see you next time! 🌟