
Likes
Comments
Share

@Kumba1190
Follow
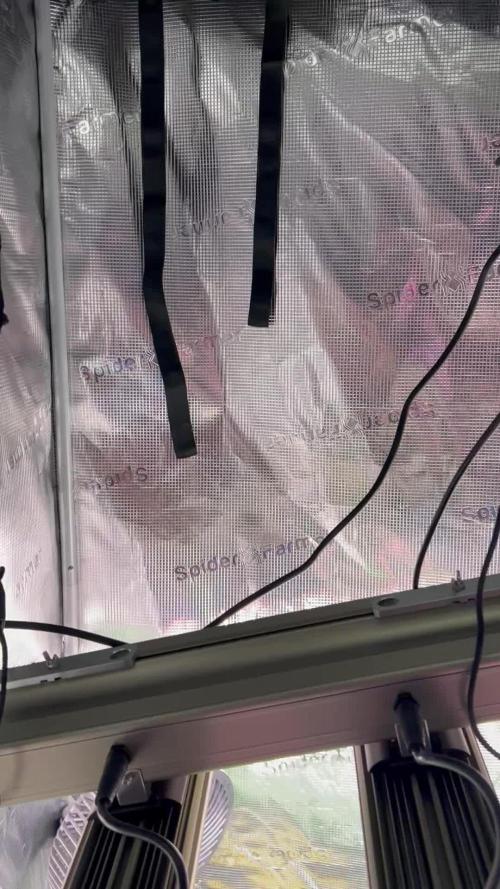
Blüte würde eingeleitet.
Der Stretch beginnt.
KPA Wert= 1,3
PPFD Wert= 600

Likes
13
Share


@tresplantes
Follow
They looking Fire all over smell is amazing
Bluezy has not the bud Strukture im looking for and does Not Look Like the biggest yielder but man the smell is Crazy like really Crazy chemical sour blueberry light bleaching on one bud
Dante’s Inferno buds are Rock Hard and slowly reaching the size of soft drink cans, and the node spacing is insane golfballs all the way down
The smell is like a tropical runtz super sweet fruitmix
Tomb raider has just amazing plant structure amazing bud Structure is a trych Monster and the smell goes towards sweet sour gelato Kinda direction

Processing
Likes
6
Share


@NiBaMeCa420
Follow
Time goed fast and this plant is growing beautifull buds that grow bigger day by day and i can't wait for this one to be done.
four days ago i started adding the flower booster to the mix to get the buds nice and thick
the development of the flowers is going great we have one plant with a very long stem and that one is turning into a big main cola pretty fast and the smaller nuggets are developing really nice
although not all the plants look that good the flowers that they produce are perfect and i thing this is going to be my best yield from under this light i can't wait to find out i grew Spliff seeds in the past and got a great yield of those plants and it looks very promising
besides adding the booster to the mix i did some defoliation last week this was the last time untill harvest to not overstress the plant
That is all for now
check out the pictures and the video
Cheers,
Nibameca


Likes
15
Share


@Papabro2k
Follow
This one was a please watching grow I never did much training and she never got so much attention in the back turned out great ! So much frost thanks 😊

Likes
13
Share


@Hyperbunny
Follow
das sind die bilder der letzten ca. 2 wochen… ab jetzt gibts passende infos zu den bildern ;)


Likes
27
Share


@WestOzzie
Follow
She's grown about 20cm this week,branches are starting to stretch out,same watering cycle,definitely females hairs from top four branch nodes showing more now..she is booming along,looking healthy and cant wait till she pops out some sticky buds to stare at
Likes
4
Share


@pzwags420
Follow
gsc is about a week away from harvest blueberry will be shortly after and og kush plus blueberry muffin are a little longer still, they were slow to start flowering.


Likes
53
Share


@guerilla
Follow
Start of 6th week and very close to chop!
Reduced ppm..
VERY fast flowering!

Likes
33
Share


@Prof_Weed
Follow
hohe Temperaturen und hoheLuftfeuchtigkeit.
Ist immerhin 11 cm gewachsen und supergesund.
Hier und da mal paar Blätter und Mini Blüten entfernt und ein wenig Super Cropping..
Pre Flowering hat eingesetzt.
Die Orange Bud wird eventuell 60 cm hoch,mehr aber nicht

Likes
246
Share


@Qutro
Follow
Hi there fellow cultivators,
Here we go with flowering week 9 in our garden of chill. This week the focus was on let the girls shine and show off their lovely colours.
They were able to give the most beautiful experience in this mature phase in terms of appearance.🍁🌱
I feel lucky every day when I open the tent and marvel at one of nature's most beautiful creature.🙏💚 I will miss growing in the next few months very bad.
This week just watered with PH-d de chlorinated tap water.
Day 60:
One lady is going in to a darkness with the Shogun warrior.
Flowering Day 62:
This Girls are pretty much ready to harvest, i am letting them mature for a few days and in to 48 hours dark before harvest. On day 65 i am gonna make the chop chop.⚔️
The smell is very strong in the whole house if I open the tent even a little.😎
Is completely unreal and I am so very excited to sample each pheno.
See you in a while with the harvest report!
Peace 🏻

Likes
12
Share


@Northern_Ent
Follow
Sep 17: field plant looks awesome and I hope it can finish in time.
Sep 19: first round from grow area plants 400 g wet.
Likes
26
Share

@Antifame
Follow
The grand finale is just around the corner. Terpenes fill the room, and the carbon filter is working overtime to keep the situation under control.
I can feel it - the harvest is near! 😎
Each cola smells a little different: sometimes it’s overripe fruit, sometimes gasoline, sometimes candied almonds.
I have never encountered a plant with so many facets before. I am incredibly curious to see what the final product will be like. 😍


Likes
98
Share


@Tropicannibis_Todd
Follow
💩Holy Crap We Are Back At It And Loving It💩
Growmies we are at DAY 28 and she's just killing💀it👌
👉We are in the Preflower stretch 👈
So Shit , I gave them just a tad to much nutes on the last feeding 👈 But I have since fixed it
So I'm starting to pull her over and do some low stress training 🙃 and some defolation 😳
Lights being readjusted and chart updated .........👍rain water to be used entire growth👈 Changed To Bloom 8-20-30
👉I used NutriNPK for nutrients for my grows and welcome anyone to give them a try .👈
👉 www.nutrinpk.com 👈
NutriNPK Cal MAG 14-0-14
NutriNPK Grow 28-14-14
NutriNPK Bloom 8-20-30
NutriNPK Bloom Booster 0-52-34
I GOT MULTIPLE DIARIES ON THE GO 😱 please check them out 😎
👉THANKS FOR TAKING THE TIME TO GO OVER MY DIARIES 👈


Likes
42
Share


@MadeInGermany
Follow
Flowering day 49
since the time change to
12/12 h.
Hey everyone 😃.
Both phenotypes are developing very well 😊.
The buds swell more and more and their smell is getting better and better 😍.
This week it was watered twice with 1.1 l per plant each time.
Next week I'll check the trichomes to find out when to flush 👍.
Until then, I wish you lots of fun with the update. Stay healthy 🙏🏻 and let it grow 🍀🍀
You can buy this Strain at :
https://sweetseeds.es/de/cream-caramel/
Type:
Cream Caramel
☝️🏼
Genetics:
Blue Black
x
Maple Leaf Indica
x
White Rhino
👍
Vega lamp:
2 x Todogrow Led
Quantum Board 100 W
💡
Bloom Lamp :
2 x Todogrow Led
Cxb 3590 COB 3500 K 205W
💡💡☝️🏼
Soil :
Canna Coco Professional +
☝️🏼
Fertilizer:
Green House Powder Feeding
☝️🏼🌱
Water:
Osmosis water mixed with normal water (24 hours stale that the chlorine evaporates) to 0.2 EC. Add Cal / Mag to 0.4 Ec Ph with Organic Ph - to 5.5 - 5.8 .
Likes
6
Share


@Chubbs
Follow
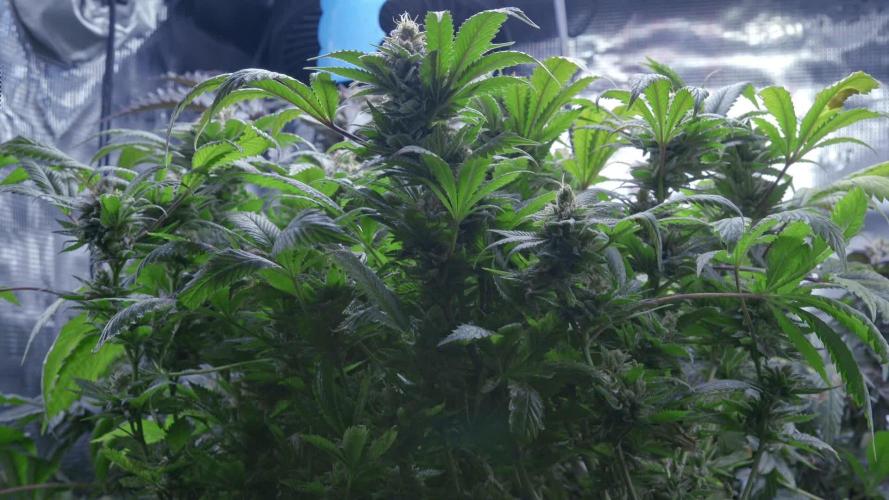
These girls are in full flower now. Each day is a blessing as you can see the pistols and flowers developing daily. They smell like a fresh open can of 7up. Absolutely wild. I'm excited for the upcoming week's. Happy Growing.
Likes
24
Share


@m0use
Follow
***Sponsored Grow*** = Medic || https://medicgrow.com || Grow = ***Sponsored Grow***
This week was fun, realized I was giving my plants close to 60DLI vs 40DLI so I lowered the lights back down to 80% they should be within the range of 38-42DLI depending on specs, I lack a tools to monitor this in house so have to go off of specs and calculations I have from manufacture and other people who reviewed the lights online. main big one is 2.8 vs 2.2 effectivity on the diodes. Noted that the white dandruff coming out the runoff was indeed spring tails. looks like they have made a home in my medium and I don't care. must be eating all the dead shit. Still ph'ing my water up to combat the acidic whatever in the pots. maybe this is from the spring tails or bacteria in there. good thing is they eat mold and other nastiness in the soil. I do think I messed up quite a bit on this grow, I am hoping the next one will be better. First time using liquid feed vs dry soil amendments. This emerald triangle seeds plant is dong well it seems to loose its pistils asap and then just gets bulky, I did check for seeds and saw nothing or any nanners as my first guess was maybe its getting pollinated. growing progress. I keep getting different smells off of it depending on the day and the last time I watered. Will know its true profile when I can chop and cure. Guessing this will be about 2-4 weeks out.
Till next week.
***Sponsored Grow***
Official Website:
https://medicgrow.com/
+
https://www.emeraldtriangleseeds.co.uk/
Facebook:
https://www.facebook.com/medicgrowled
+
https://www.facebook.com/OriginalETS/
Twitter:
https://twitter.com/medicgrow
+
https://twitter.com/emeraldseeds
Instagram:
https://www.instagram.com/medicgrow420/
+
https://www.instagram.com/emeraldtriangleseeds/
YouTube:
https://www.youtube.com/channel/UCNmiY4F9z94u-8eGj7R1CSQ
Growdiaries:
https://growdiaries.com/grower/medicgrowled
https://growdiaries.com/grow-lights/medic-grow
+
https://growdiaries.com/grower/emeraldtriangleseeds
https://growdiaries.com/seedbank/emerald-triangle-seeds
