


Likes
51
Share


@Bones_1986
Follow
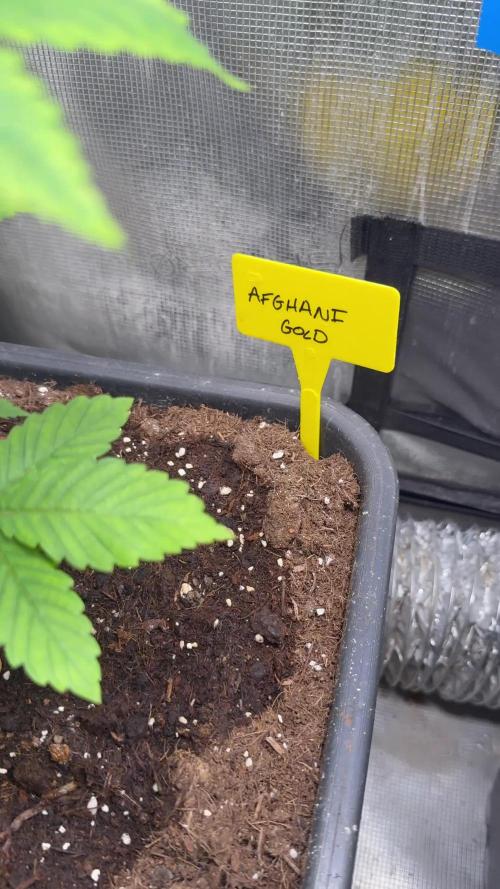
Looking like i have a magnesium deficiency as show in the leaf pic.
I'm Gonna increase the cal-mag.
Day 37 : Pots were dry so fed 2.5 liners to the 5 gallon pot and 1.5 liters to the 3 gallon.
Upped the cal-mag.
Introduced Big Bud & PK Boost

Processing
Likes
15
Share


@CanadianFillmore
Follow
Welcome to my second grow of the Do-si-dos strain. This girl was veg'd for 14 week in a small pot while my first grow of this strain is in the flowering room. She didn't gain much more in size, despite the extra veg time, probably due to lower levels of nutes and the smaller pot size. Still she's looking good after moving her to the big pot and giving her a trim.
Thanks for checking out my grows!


Likes
17
Share


@CampaCavallo
Follow
Ragazzi è stata una vera soddisfazione di aver avuto l'opportunità di provare una genetica di SSSC 💜
Li ringraziamo tantissimo per l'opportunità che ci hanno dato e ci rivedremo molto presto con un'altra delle loro favolose genetiche... molto probabilmente una della fioritura rapida!
Coming soon on CampaCavallo 🏆 💚👍🏻

Likes
76
Share


@Canna96
Follow
Absolutely LOVE this strain. She has only been curing for a little over a week but I had to try her. She is one of the 3 most potent strains I have ever consumed, tastes like grapes on the inhale, and then on the exhale it tastes like a classic chemdawg, piney and gassey. You will feel the effects by the time you finish exhaling. I lover her so much I am going to run her back after I take a little break to travel. The only thing I regret with this grow is that I used much too small of a final container. No fault of the genetics, it was all me. I will run her back in a 12.5 gallon container and see what happens. My goal is to run 2 photoperieods every year, and get a Kilogram off each plant. Might be somewhat ambitious but I enjoy challenging myself and improving. I cannot wait to squeeze this lady, but I want to give her a few more weeks in the jars first. I will post some videos down the line. If anyone wants a quick pound or two of some potent ass indica leaning flower, this is your girl. I honestly don't know how I could even bring myself to grow another autoflower after smoking this lady.....She blows every auto I ever grew out of the water.

Likes
37
Share


@Kirsten
Follow
30.8.24:
The plants are still developing very slowly.
I may top dress with Ecothrive Life Cycle again, as it's taking longer than expected. So they can probably benefit from that.
I overwatered all plants, there was run off. I watered 2 days in a row. There weren't any visual signs that this affected the plants. I'm not going to water, until the soil is dry enough to mix in the ammendments.
I'm sill using the Xpert Nutrients Bloom Booster, I have noticed that FBP1 and FBP3 have gotten more sizeable since using this product. It's hard to tell on my FBP2 as the buds are already huge.
I have continued to defoliate today.
I also moved the plants around to maximise light exposure.
The branches on FBP3 and FBP1, were looking flimsy. So I tied a few more branches with string, to keep them from breaking and taking up so much room.
1.9.24:
So today I added Ecothrive Life Cycle, Diatomaceous earth, also went ahead and added the Bat guano.
I watered it in with 2 Tbs of Black strap molasses in 1 ltr of water, to each plant. Each plant also got 1ltr of water with 3ml of Ecothrive Flourish. Additionally I used 2ml of Xpert Nutrients Bloom Booster in 1ltr of water.
I've noticed that there are new pistils are growing out of the top buds. I think it may be light and or heat stress. It's up to 30°C, at some points. The humidity is pretty stable at 40-50%.
I've lowered the light intensity slightly, and am now using 2 fans on low settings. To try to get the heat to lower.
2.9.24:
I've decided that stakes are necessary to FBP1 and FBP3. So have made some 70" tall.
I also finally got round to cleaning out the bottom of the tent. It was a mess, so I disinfected it with F10. I didn't get any anywhere near the plants.
The plants top soil had dried up overnight, I'm assuming the dehumidifier has something to do with it! It is is a great piece of kit.
I watered each plant with 1ltr of dechlorinated water, PH'd to 6.0. Each 1ltr had 1 ml of Ecothrive Flourish.
I don't want the microbial ammendments, to dry out and ruin it. So I'm thinking about watering just once a day, only 1 ltr per 5 gallon pot.
Additionally my companion plant, Rosemary has some either; webbing or Mould on it, so I took it out of the tent, and will treat soil
In that pot with a neem oil drench, and see what happens. I need to repot it, my mint plant in the tent also has exploded and needs repotting.
3.9.24:
I've watered again, as the water is getting drank by my dehumidifier. Couldn't live without it though!
I added 3ltrs of water to each plant included was;-
3ml per litre of Ecothrive Flourish,
2ml Xpert Nutrients Bloom Booster.
Dechlorinated to 6.2.
Still haven't managed to add the extra plant stakes yet.
4.9.24
Today all the top soil was dry, and with my dehumidifier so close, I've added another 2ltrs of water each with;-
2ml of Xpert Nutrients Bloom Booster
2ml of Ecothrive Flourish
2ml of cal-mag.
PH'd to 6.0.
Had to add additional stakes in to FBP2 (my best pheno)! As the flowers are soo heavy, it's crazy actually. I've been using 6% silica, since the beginning.
I am checking the trichomes daily through the jewellers loupe. They do actually still look clear / glassy. I'm glad I did top dress this week, as it looks like we're going to be going for a long while yet. 2-4 weeks.
Ps. If I've made mistakes in this update, I'm 9/10 faded on my Royal Critical. 😅
5.9.24
I watered with 2 ltrs of water per plant PH'd to 6.0. For each litre, I added 1ml of Ecothrive Flourish and 2ml of Xpert Nutrients Bloom Booster.
I accidentally bent a branch on FBP3. I have taped it together tightly with duct tape.
I also added more stakes to FBP2 as the flowers are getting super heavy, which is an awesome thing, as I was prepared for staking, and tying. Can't wait to taste these when they're ready to harvest! 🤤
Ps.
I'm thinking of making up a new 5 or 10 gallon pot with a super-soil mix, I did that for this run, but now I know more about ammendments, hopefully it will be better this time. I'm going to leave the soil mix as per the instructions to cook / dry, before planting this time.
Will update again 🙂

Likes
11
Share

@eldruida_lamota
Follow
Que pasa familia, vamos con la sexta semana de floración de estas GG4 autofloreciente de MSNL.
Vamos al lío, comentar, que me dieron gato por liebre, porque esto tiene pinta de rudelaris que tira pa atrás… ya están como quien dice madurando.
El ph se controla en 6.0 , la temperatura la tenemos entre 25/21 grados y la humedad ronda el 50%.
El ciclo de floración puse 12 horas de luz, el foco está al 100% de potencia.
Esta semana ya les quité la alimentación a esta genética, me imagino que en unos días les daré machete.
- os dejo por aquí un CÓDIGO: Eldruida
Descuento para la tienda de MARS HYDRO.
https://www.mars-hydro.com
Hasta aquí todo, Buenos humos 💨💨💨

Processing
Likes
31
Share


@Thee_HoffGuyy
Follow
Well it was another awesome week for the Kush Fromage!👍Day 49 of Flower and she is putting on some weight. The branches are starting so sag down a little bit😊. Her trichomes are starting to ripen up quite a bit and are about 60-65% cloudy. Looks like she will be done right around the breeders estimated time of ~63 days of Flower and could be harvested a tad bit earlier if wanted, but I am in no rush. I am feeding her the same nutes as last week with the exception of the addition of some unsulphured blackstrap molasses. The smell is starting to change a little bit with a pungent cheese like smell starting to come out Overall just one wicked plant😵 it has it all smell look and serious resin production!! I really can't wait to try the smoke! Thanks for checking out the diary Happy Growing an Plentiful Harvests Everyone🙏
Likes
8
Share


@nanaboham
Follow
So the objective here is to get to harvest as quickly as possibly - Basically got a cheap humidifier and filled it with ph'd water with very little nutrient. Running this as a Fogponics once the roots starts coming out the net pot and then move to standard dwc with air pump during veg and flower. Let see if this speeds things up

Likes
21
Share


@Dapper_Buds
Follow
What’s going on lady’s an gentleman. we got the Moab strains going on W/1 in living soil. They where planted into the root riot cube an treated with neem oil to kill off the fungus gnats, they are thriving now. An getting bigger as the day goes. They will be trans planted into the auto pot system at end of this week. Into the 2x4. Under the double UFL3000 mounted on custom frame. Pumping 402w from the wall. Currently both the girls are in the veg/solo cup cabinet under the UF2000 100w light. Currently 60% rh and temps running 79 lights on. Thanks for viewing an happy growing!

Likes
3
Share


@LittleBigTrees
Follow
I've been feeding and pulled a few fan leaves.
They are all different heights and getting really tall despite only being in two litre pots.
The tallest pheno is already showing red buds.

Likes
24
Share


@Homestickycannabis
Follow
Doing great, flushed her today with 5 gal of ph'd water and started a new feeding schedule as seen above I will alternate watering and feeding. One week water one week feed. I'll keep this gradually increasing the strength of nutes. As far as everything as a whole couldn't be better. Looking forward to her bounty.


Likes
1
Share


@Sjake72
Follow
Changing and cleaning resevoirs this week will update with new nute ratios soon looks like the plant affeced by whatever it was is bouncing back nicely i think this is my first grow so comments and tips are very welcome i wont be doing any training this time as its the first grow and i had a few problems early on and didnt want to slow things down more then already were

Likes
6
Share
@eldruida_lamota
Follow
Que pasa familia, vamos con la cuarta semana de floración de estas Drizl Pickl feminizadas de Seedstockers.
Vamos al lío ,se trasplantaron en macetas de 7 litros definitivamente.
El ph se controla en 6.0 , la temperatura la tenemos entre 24/20 grados y la humedad ronda el 50%.
El ciclo de floración puse 12h de luz, el foco está al 80% de potencia.
De momento van creciendo a buen ritmo y tienen un buen color.
La flor coge forma y se empieza a. Llenar de tricomas.
Agradecer Agrobeta por el envío del kit gold series para esta temporada, son unos jefes 🙏
- os dejo por aquí un CÓDIGO: Eldruida
Descuento para la tienda de MARS HYDRO.
https://www.mars-hydro.com
Hasta aquí todo, Buenos humos 💨💨💨
Likes
20
Share


@Robin87
Follow
So, like i said the 🍋🍒🍪 all ready for ✂️, it’s been a pleasure to grow these, will deffo be growing these again, maybe just after Xmas!🤔, now to dry them and cure them with the attention they deserve… gorilla cookies looking💥 won’t be long at all untill there ready, maybe 2 weeks max.. untill next time!👊🏻
Likes
8
Share


@dank604
Follow
Well the trichomes clouded up fast! Maybe I didnt notice them initially but majority were cloudy with some amber so I gave it the chop on the night of Day 80. Will update with dried weight soon. Very exciting times for a first time grower!
Processing
Likes
29
Share


@Lennys_Laboratory
Follow
Feed Started With Tap Water Left Overnight For Chlorine/Chlorides To Evaporate.
Next Day.
Starting EC of our water is 0.10-0.15.
I added 1ML of Regenaroot Per Litre. Then Used Canna Terra Flores Until EC measured 0.7.
I then used the mighty bloom enhancer by the ml until my EC measured 1.3
Always Give A Little Sprinkle Of Great White Into The Mix
Finally i PH'd the mix to 6.2. Made sure the feed was of adequate temp (21c) and continued to feed.
😎

Likes
51
Share


@kansasscott725
Follow
Well, this is it. Wish I had bigger buds. Everything was moving in the right direction until the end. I switched the Mars Hydro 3000 out with two HLG 300s, so I could maintain the PAR just under 1000, but perhaps it wasn't enough.
G13 is definitely not ready, and could benefit for a couple more weeks, but like a store liquidation, THEY ALL MUST GO NOW
All in all, Learned a lot. No seeds, reveg, or signs of mold, so hopefully I'll make up for quantity with quality.
Only Dry Time will Tell...

