
Likes
Comments
Share


@Jwjoh
Follow
This was an interesting harvest. Everything was going great and the buds/trichomes were still piling on, when suddenly almost overnight plant "C" shifted to about 20% amber trichomes. So I harvested it, and because the other plant wasn't ready yet I decided to try water curing the first one for 7 days. Then at the end of the 7 days, I figured I'd hack down plant "D" and dry them both on the racks in the tent at the same time before moving into jars.
The water curing was a huge success! After the first day, the water was cloudy with a slight green tinge. Second day was about the same. Then the water was just a little cloudy each change, no green tinge. Compare it to the diary I just opened around water re-curing some cannabis I bought from the government store, where the water is diarrhea brown :O On day 7 of my water cure, the water was perfectly clear so I decided to hack down plant "D" and get them both drying on racks in the tent together.
While water-curing plant "C", I had its trim sitting in a bowl in the freezer. When I hacked down plant "D", I put its trim in the same bowl. After my typical wet-trimming, I hung up Plant "C"'s water-cured buds on the top rack, plant "D"'s buds on the 2nd rack for an old fashioned cure, and random trim from both plants spread out on the bottom 2 racks.
The water-cured buds dried within about 24 hours and went into a jar with a 58% humidipack. The buds are SUPER dense and potent! Nice clean high, doesn't kill my throat. The downside is that the taste is really weak and not that great. But everything has pros and cons. Almost no trichome loss in the bucket during the water curing as well -- I was really worried about that!
The other buds dried in about 36 hours and went into a jar with a 58% humidipack, where I burped it many times a day for a week. The smell and flavour are much more potent than the water-cured bud and it's a little harsher on my throat, but otherwise I'm not sure there's a detectable difference.
However, you can SEE there's a sharp visual difference between the water-cured buds and the jar-cured :) Of course the jar-cured will mature more with time as well.
Once the trim was completely dry, I put it in a bag in the deep freezer and dropped it to about -20. I didn't need to use a grinder this way -- I could just mash it all up in the bag with extreme ease! Sifted it through the kief screen, and pressed down 17 grams of lazy-man's hash!
After processing the trim through the kief screen, I decarbed in the oven at 200F for 1 hour (this converts THC-A into THC or something to that effect -- if you don't do this, the edibles won't get you very high). I put the trim into a big mason jar and back into the freezer along with my bottle of Everclear. Once they dropped somewhere down around -20, I poured in the Everclear, put the lid on, and shook as hard as I could, as often as I could, for 5 minutes or so. I noticed that as I shook it around, the contents inside would alternate between solid and liquid which was kinda cool :) Shake it one way and it freezes, shake it the other way and it thaws... or something to that effect, anyway. I was able to use a double-coffee-filter to extract about 2 cups of dragon tincture!
I threw everything in the coffee filter out -- next time I'm going to do a better job of it as there's a little pile of trichomes that forms at the bottom of the filter which I could put to use. Once I get that down next harvest, I'll have around 99% efficiency milking every last drop out of my harvests!
White chocolate is so yummy, as are candy canes... I wanted to combine the two to make some edibles. Looking around for candy cane crush, I decided to check out Amazon. They had the same candy cane crush I was looking at from popular stores, for only a couple dollars more, so I figured sure why not have it delivered. I was planning to get some white Baker's chocolate, but on checkout of the candy cane crush I got a deal for adding on white chocolate Lindt bars for $1.25 a piece LOL! So I bought 10 of those.
When the Amazon package arrived, I slowly boiled down 1/2 cup of my dragon tincture in a pot, then used a double-boiler setup to melt down 4 of the Lindt bars in the same pot. Once it was mixed well with the hash oil, I set it aside to cool for about 3 minutes before stirring in 1/8 cup of candy cane crush (plus I ended up adding maybe like a tablespoon more), pouring into a pan lined with parchment paper, and putting in the freezer for 30 minutes.
So now I have a nice big chunk of white chocolate candy cane crunch stuff where a piece the size of my thumb gets me super high for like 8+ hours; 17 grams of lazy-man's hash; and 88 grams of bud :) And still enough dragon tincture left over to make 3 more rounds of edibles -- not sure what I'll make next!
From now on I'm going to water cure a large portion of all my buds -- not just the ones I grow myself, but ones I buy from the Gummint too!

Likes
18
Share


@NMGDOC
Follow
Don't pay attention to the small pots. I'm gonna do another diarie for them because they are in another week.
Now the regulation of humidity is great, i think that the plants do their own job regulating the humidity.
I'm in love with the @TodoGrowLed led, so easy to install. Here we are in summer and the temperatures dont exceed 27-28 C° inside. I put some ice pack inside the indoor and the temperatures were between 20-26 :)
In this week im gonna use neem oil with potassium soap, just for prevention.
Im newy, don't judge me jaja i don't know if the distance between the knots it's ok (also, i don't know if that is the right word in english jaja)


Likes
14
Share


Likes
9
Share


@MG2009
Follow
12/16/2021
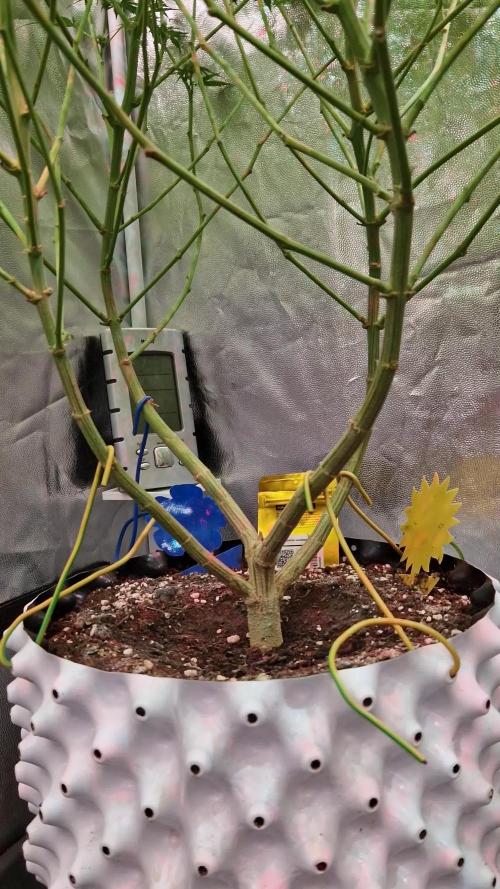
Recovery is a success! A little raggedy but putting on decent growth in last couple day's.
Also need to decide if I top or mainline the two tops? Going to feed her today and see how she grows this week then decide what action is appropriate.
She actually has 4 tops! Three are more developed but if you look closely there is 4. I kind of want to let it grow, although it may cause a split later on😕 . So still thinking on it.
Likes
8
Share


Likes
25
Share


@SybDarret
Follow
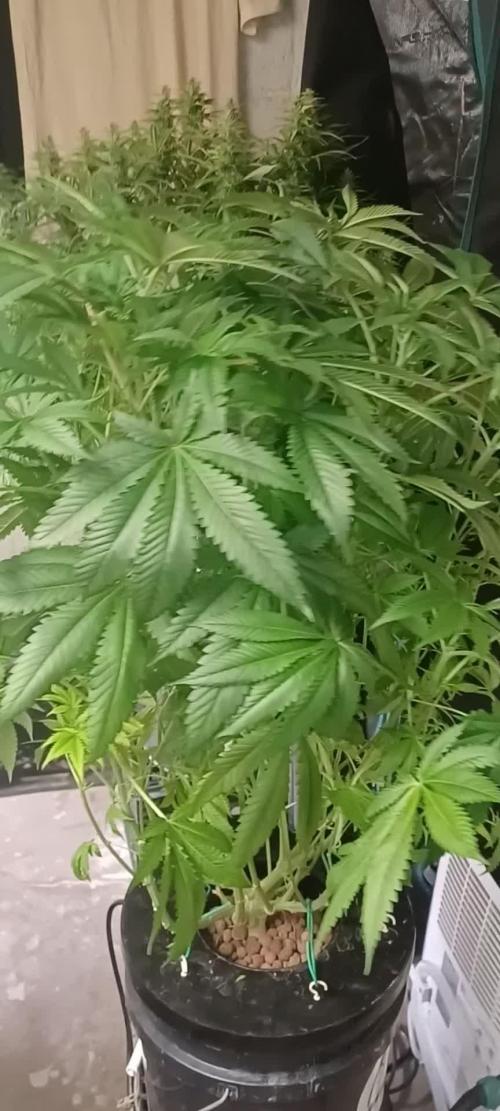
They are 46 and 60.5 cm
Both of them look pretty, each one is different from the other but they are beautiful 😍
Taller keeps beeing full of pistils, and the smallers that have green buds almost without pistils now is developing some kind of purple color on her leaves.
They have a strong sweet and critric smell, the strongest among my plants.
Watered yesterday with nutrients, i'm not sure if keep feeding them or not. I guess if i give them one more week (maybe cut them on feb 11) their colas may gain some weight, specially lower buds.
Added a video of each plant, i hope you enjoy 😺
Likes
11
Share

@Roberts
Follow
Fast version B is doing good. I will have her in the flowering room next update. Everything is doing good. Thank you SSSC, Dutch Passion, Athena, and Medic Grow. 🤜🏻🤛🏻🌱🌱🌱
Thank you grow diaries community for the 👇likes👇, follows, comments, and subscriptions on my YouTube channel👇.
❄️🌱🍻 Happy Growing 🌱🌱🌱
https://youtube.com/channel/UCAhN7yRzWLpcaRHhMIQ7X4g.
Likes
5
Share


@Johngrowbr
Follow
First week of pre flowering, just changed the schedule of the lights and the photoperiod

Likes
22
Share

@TrickzGrowz
Follow
Die Blüten werden langsam dicker. Die Dame wird immer durstiger. Sie ist schon echt klebrig und man kann wirklich Lemonen und Mamdarinen Terpene wahrnehmen.


Likes
2
Share


@CannaIGrow
Follow
I did not top this girl, yet. Her top lowers started catching up to the top so I didn’t want to stop her yet lol. But all in all she’s looking healthy.
Likes
6
Share


@colla69
Follow
Still going strong, no problems at all.. This is a time of struggle I want do to something but the only thing to do is being patient.
Trichomes are still clear, smell is starting to become stronger, and they are already sticky as fuck :)
UPDATE:
Day 60 [f39]
some leaves are starting to yellow.. but it should be OK by now. I will start with Nitrogen deprivation in a couple of days.


Likes
Comments
Share


@Skinnytalls420
Follow
Day 40-03/09/22 looking good growing very well starting to see trichomes already!!
Likes
6
Share


@Mr_Prawn
Follow
Algunas plantas empiezan a tener hojas amrillas, son 3-4, son siempre las de la derecha de la pareja easy2grow, aplico cannaflush 4ml/L 10 litros en depósito, lo beben en 2 dias. El dia 16 cambio el tanque a solución nutritiva.

Likes
78
Share


@Hou_Stone
Follow
My 4 plants are still there, with the banana as a smile 🍌😁
I continue the defoliation, I wonder if I'm not doing a little too much sometimes.. We will soon see the result
🌗Switching to flowering this week, I reduced the length of the day by 1 hour each day until reaching 12 hours night time / 12 hours daylight on the 33rd day!🌞
🌺On the 33rd day I apply a layer of organic nutrients mixed with a little soil that I add to the top of each pot.
I added 35 grams of BioBloom to each of my pots🌺
(Pot of 7 Liters / 2 gallons)
------------------------------------------------------------
💧Watering
I water all my pots the same day but with more or less water.
Simply by lifting them;
A light pot is a dry pot and will need more water,
A heavy pot is a wet pot and will need less water.
On average I water each pot with:
Day 29 : 0.5 L
Day 33 : 1 L with 0.8 grams of bio enhancer/L
I use tap water, adjust the ph to around 6 and water
------------------------------------------------------------
🔥❄️Temperature of the week :
Day : 19-23°C (Humidity : 65-80%)
Night : 14-17°C (Humidity : 75-85%)
Outside the tent it is around 16°C with 70% humidity
The humidity is a little too high, I hope it will drop a little 🙏
------------------------------------------------------------
🚀Equipment of the week ⭐️ :
Light FC3000 Mars hydro. power 95% at 50cm
Extractor 6 inch Mars Hydro. power 1/10. ON 24/24h
2 fans to circulate the air inside the tent. Each on for 30 minutes then off for 1 hour. this rhythm repeats itself in a loop
I'm removing my heat mat this week.
------------------------------------------------------------
📜Links :
🌱Banana Krumble seeds : 👇
https://shop.greenhouseseeds.nl/feminised-cannabis-seeds/usa-genetics/banana-krumble/
Mars Hydro : 5% off with my discount code "houstone5" 💪
https://www.mars-hydro.com/?acc=hou-stone
👨🚀My Instagram❤️️:
https://www.instagram.com/hou_stone420/
------------------------------------------------------------
Thanks for your visit😀💚
Processing
Likes
6
Share


@Weedzoks
Follow
La plante a fortement jauni cette semaine et des taches sont apparues
Flo 23: Arrosage eau
Flo 24: Pulvérisation de 3ml de Vita Race

Likes
22
Share


@ZinosBest
Follow
The LST method was pretty succesful for the first time. Almost all of my plants reacting how I wanted to them. Only one of them developed a bit slower and that resulted a bit shorter plant-size but thats I think problem of lack of light power. Maybe the next round upgrade will results better plant sizes.
Everything is going to the plan.
Some defoliation and tiny budsights have to removed. Kinda like lollipopping.
Likes
8
Share


@Lickey
Follow
Starting week 4. Tangerine Dream drinking more than the others (as usual). Definitely over potted but 3 gal is all I had.

Likes
4
Share


@Based_Buds
Follow
The plant is growing at a great rate, unfortunately there are still no signs of flower growth. Trying to remain patient, going to give it a few more weeks and if there’s nothing growing I’m going to pull it.