


Likes
Comments
Share


Likes
19
Share

@TrickzGrowz
Follow
Servus Moin!
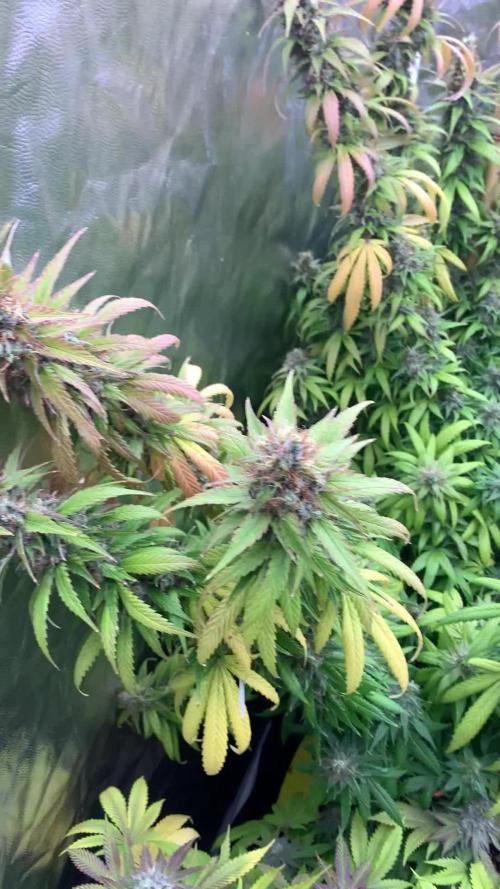
Die Chemical Candy ist bis jetzt am wenigsten gestretcht. Sie ist schon voll dabei, Blüten zu entwickeln.


Likes
17
Share


@Sativa_Juice_Grows
Follow
So had some problems.
I took to long to raise my lights
and i paid the price
i flushed and 6.14 on the runoff
so i think my meter is broken
im also adding calmag too because
from what ive been reading i should have
used it sooner.
You live and you learn though
Some crunchy leaves but not
as bad as my other plant
The bud sites are doing awesome though
still growing and the leaves are gaining
more and more thc.
She seems like shes still taking water and
maturing so im not too worried.
If anyone can give any advice to help
me fix this it would be greatly appreciated

Likes
12
Share


@ChitownCannaChica
Follow
This lady is a true Beaty! Full bush plant that is always praying to the light and easy to keep happy. This is my front runner and she was flipped yesterday! They have 60 days to finish!!! ✌️🏻💚

Likes
9
Share


@papexa
Follow
all was ok in this stage, using an automatic temperature regulator made by myself

Likes
24
Share


@Zegr8
Follow
I’m feeding megacrop A+B full bloom +epsom+silica. Not much else to do.
I expect the plant to be ready in 20 days, more or less.
Last week I raised the light a little since I found damage on top leaves.
I think I’ll change pot next growth. I’ve calculated that a bonsai style pot, bigger and shallower than my actual one, would contain at least 3 times the volume of medium.
Day 64 - Damage is spreading on all small top leaves, I guess these were not frying because of lights. A full dose of megacrop it’s probably too much for a plant watered with a dripping system, I’ll keep than in mind for my next crop.
Day 65 - Plant is drinking like crazy, yesterday it consumed much more than usual, almost 9 liters. I’m going refill the reservoir today with megacrop AB+epsom at 2/3 of the suggested dose.

Likes
25
Share


@XperencdGmanXG
Follow
finally they are in flower! Yay final foliar spray applied. They are still smelling like chocolate and peanut butter. Did not get 1 drop of rain this week. It is getting so frustrating plants are 1/4 what they should be this year.


Likes
3
Share


@Xabii
Follow
Had to do a root wash, had root rot due to the roots not following the stream and growing in a circle, the angle was not high enough and the water inlet probably to close to the Netcup.
Also ORP was really low the last couple weeks, probably didn't help either.
My grows are always experiments and I am trying to improve my setups again and again to maximize more and more but out of 10 new things only 1 or 2 work.
If you ain't trying tho you never win :)
More details coming soon as in the other Diaries.
Values are average of the day.
DATE - EC(us/cm)
20250423 1845
20250424 1749
20250425 1774
20250426 1843
20250427 1893
20250428 1961
20250429 1995
DATE - PH
20250423 6.11
20250424 6.12
20250425 6.09
20250426 6.00
20250427 6.00
20250428 5.99
20250429 5.99
DATE - ORP (mV)
20250423 156
20250424 143
20250425 250
20250426 316
20250427 294
20250428 283
20250429 272
DATE - °C - RH% (Tent Temp/RH)
20250423 22.4 57
20250424 21.6 59
20250425 22.7 55
20250426 24.0 51
20250427 25.0 43
20250428 26.1 43
20250429 26.1 38
DATE - °C (Reservoir)
20250423 20.1
20250424 19.5
20250425 19.3
20250426 19.5
20250427 20.0
20250428 20.7
20250429 20.6
DATE - CF
20250423 18.45
20250424 17.49
20250425 17.74
20250426 18.43
20250427 18.93
20250428 19.61
20250429 19.95


Likes
28
Share


@SooSan
Follow
Dans l'ordre :
Blueberry
Dutch Passion
Blueberry
00 Seed
Blueberry
PEV Seed
Blueberry
Bulk Seed
Animal Cookies x Blue Monkey
Exotic Seed
Red Hot Cookies
Sweet Seed
DoSiDos x Purple Punch
PEV Seed
Purple Shot
Exotic Seed


Likes
17
Share


@BLAZED
Follow
Week 7 (13-3 to 19-3)
13-3
Temperature: 24.2 degrees (lights on) 18.5 degrees (lights off)
Humidity: 65% (highest) 52% (lowest)
14-3
Temperature: 28.2 degrees (lights on) 19.5 degrees (lights off)
Humidity: 57% (highest) 44% (lowest)
Today i refilled the reservoir with 15L feed (1L + 0.2 ml Silica + 1 gr Calcium + 0.7 gr Grow) EC: 1.3 PH: 6
One wavemaker already broke on me, luckily i bought 2 so i replaced it with a working one.
15-3
Temperature: 28.5 degrees (lights on) 21.1 degrees (lights off)
Humidity: 60% (highest) 46% (lowest)
16-3
Temperature: 28.2 degrees (lights on) 19.7 degrees (lights off)
Humidity: 59% (highest) 45% (lowest)
No pictures.
Adjusted the distance of the light to 40/50 cm (depending on hight of some tops)
17-3
Temperature: 27.8 degrees (lights on) 19.7 degrees (lights off)
Humidity: 62% (highest) 44% (lowest)
18-3
Temperature: 28.1 degrees (lights on) 20.4 degrees (lights off)
Humidity: 62% (highest) 44% (lowest)
Today i cleaned the reservoir and added 15L. (1L + 0.2 ml Silica + 0.5 ml CalMag + 0.46 gr Grow) EC: 0.9 PH: 6
19-3
Temperature: 28.2 degrees (lights on) 19.9 degrees (lights off)
Humidity: 69% (highest) 43% (lowest)
No pictures.
Today i installed a new SCROG net, this one is much better then the one i used before.

Likes
28
Share


@Roberts
Follow
The smaller Potter or extra Gorilla Glue from AMS is doing okay. Still battling a magnesium deficiency I have not stop. This time was from ph dropping. I was unable to care for them for a few days right. They got too dry, and salts cause ph to fall. I tend to feed heavy, but stay well irrigated. She is still growing decent with the Spider Farmer G3000 light. She should be back on track now again. Plus she is now in a bigger Potter. Still small, but bigger. Hopefully she can keep up some with the other Gorilla Glue in there in size enough to not get beat out in light. Thinking ahead for flowering. Everything looks good to go now. Thank you Spider Farmer, and Amsterdam Marijuana Seeds. 🤜🤛🌱🌱🌱
Www.amsterdammarijuanaseeds.com
Thank you grow diaries community for the 👇likes👇, follows, comments, and subscriptions on my YouTube channel👇. ❄️🌱🍻
Happy Growing 🌱🌱🌱
https://youtube.com/channel/UCAhN7yRzWLpcaRHhMIQ7X4g
Spider Farmer G300w: https://amzn.to/3S2zvsd
Spider Farmer 10X20 Heat Mat Kit - https://amz.fun/lsa0J
Spider Farmer Amazon Store: https://www.amazon.com/spiderfarmer
Spider Farmer Official Site: https://spider-farmer.com
Discount code: saveurcash

Likes
62
Share


@MeaCulpa
Follow
I get the first place among complete idiots!
EVERYTHING IS FULL OF SEEDS!!!
I completely freaked out and didn't even understand it. Apparently no lady had a hermaphrodite. No “yellow penis” or “scrotums.” I taped up my window and all the indicator lights for plugs, etc. The whole thing in a separate room. So how does it work? A good friend enlightened me. I slept at a colleague's house about 2 weeks ago. He also grows. Messy tent. Because he doesn't pay for electricity. And the tent was open all day long. Another friend told me that his whole grow was full of seeds. The idiot didn't even tape off his indicator light in the tent. Fat red irritating light all the time. This means the sperm is happily distributed around the apartment all day long. That's how I brought the plague into my house.
If I understood that correctly.
I'm really mad at him. He is not aware of any guilt. I can't eat as much as I want to vomit.
So I harvested them to stop the seeds from growing and maybe be able to smoke some. Accordingly, there are no trichome photos. It's too early anyway.
And now you can laugh your ass off and throw balls at me.

Likes
223
Share


@Tropicannibis_Todd
Follow
💩Holy Crap We Are Back💩
Well i took the summer off to do some outdoor but thats all done so , we are back indoors and at it again 😁
So super happy to be trying these ones out , can't wait😝 ..... decided to do a multi diary for a change ..👍
Seed soaked for 24 then placed in a tub with paper towels , once it cracked and rooted , placed into its main pot 👌
Lights being readjusted and chart updated .........👍rain water to be used entire growth👈
👉I used NutriNPK for nutrients for my grows and welcome anyone to give them a try .👈
👉 www.nutrinpk.com 👈
NutriNPK Cal MAG 14-0-14
NutriNPK Grow 28-14-14
NutriNPK Bloom 8-20-30
NutriNPK Bloom Booster 0-52-34
I GOT MULTIPLE DIARIES ON THE GO 😱 please check them out 😎
👉THANKS FOR TAKING THE TIME TO GO OVER MY DIARIES 👈
Likes
49
Share


@masterofsmeagol
Follow
6/1 I'm anxious to get my plants in their final homes. Another 90 degree day today and then it will be cooling off with some showers. I plan to take advantage and utilize that to make the transition. I have some small burns on a couple plants bit considering the weather we've had its nothing. Temperature swings 50 degrees. I hope these girls do OK outside. I was tired and stoned last night and I accidently topped a plant I had already FIMed. Oh well. Transplants soon. Supports screwed in after the heat. Plants have been handling this weather like a champ. Big thick healthy stalks.
UPDATE PUT THE PLANTS IN AROUND 730. Cutting down on light hours I'm poverty close to where we are. It was 95 today. Plants have suprisingly little burning. My fan was taken so they go without that tonight too. In the next few days it's going to cool down and that's when I'll transplant. Only thing left before transplant is sanitizing trellis and supports. Easy peezy. Especially if it's supposed to be in the 50s. And people dent climate change lol. I'm hoping that all this adversity makes my flower a higher quality. I'm glad to have the quantity to pick the best phenos for the BIG POTS. Im trying to stay excited but it's just so dumb hot. Oh well. If the plants can do it so can I. I'm planning to give them some kelp me kelp you next watering and may start some light organic nutes.
6/2 Phone doesn't like uploading my videos. Broke record high temp yesterday 95 and tomorrow we will break the record low 50. Plants withstood the heat well and are doing great. Transplant soon. They were a little light but I held off on the water. Plan on it tomorrow. May transplant tomorrow. I have several videos that haven't uploaded. I thought they did but I was wrong. Oh well.
UPDATE: Forgot to water. Some were light and others could've held off. Did the half a powerade bottle ahain. A litt ke less on the heavier ones. However I'm looking to transplant into final homes tonight and into this weekend. I sanitized a fifty and a forty so my bags and two pots are sanitized. Cage is sanitized and ready and pallets are sanktized and in place. The 40 and 60 fit PERFECT in the small space left from the pallets. Plus the plants always lean the opposite direction so things should go smooth. Only thingvleft is sanitizing stakes, bamboo, plastic garden stakes and all the other plastic training stuff. I'll just soak it while I transplant. Gotta mix the soil first too though.
UPDATE. Heat went higher than expected and hit 90. I figured I'd go back around three and screw in suppirt stakes and begin getting everything ready for transplant (i.e. supports, mix soil, sanitize trellis) before I transplanted tomorrow MORNING was what I had planned. Unfortunately we got a huge thunderstorm with a shot ton of rain and it's gonna continue throughout the night. I think this is God's way of telling me to take a break. I can get up early and get those support stakes screwed in. Then when I get back from the wife's doctor's I can do the transplants. I'm trying to break the labor up into manageable chunks. Looking at my other diaries I can see that my plantscare fine in their three gallon homes. It'd a little disheartening seeing such big clones that I started so much earlier on the other diaries. However I always was fighting SOMETHING (usually more than one thing) and last year was a shit show. At least this year I stay away from anyone else's cannabis any clones and I'm extremely cautious. I've seen my cousin out perform me multiple times with healthy plants like this I'm excited to see how it goes. I really needed the break anyway but tomorrow morning the stakes will be in. Hopefully they'll be outside.
6/3 Broke the record for low days after breaking record for highs. I saw it 94 yesterday and the day before. On the way to my grow at 6am it was 44 degrees and it's not warming up much. Fifties at best. Rainy. I left the door closed. The big door on the otherside got opened as the other end of the garage neededcto he used. If the rain let's up I'm going to set up the grade stakes so I can transplant in the morning and throughout the day. I think I'm going to light dep a couple of them and leave them in the 3's. We'll see.
UPDATE: At 12:30 the temp today was 44. Yesterday it was 94. I can't believe this. Plants are doing great though and are in the garage under lights for the day. The BIG door was open part of the day. Didn't take any pictures (or even enter the grow area) as I sanitized the last 40 gallon pot and a bunch of grade stakes. I drilled the grade stakes to the pallets in the front. The first row is done. Just need to sanitize the plastic trellis itself and finish attaching the other grade stakes. I don't need the fill trellis up by transplant. I just need the bags to not knock over and have SOME support. I'll be back over there either to tonight to put more supports in or tomorrow when I actually plan to start transplanting. I'm getting excited. After dealing witb the stiff that I sanitized I didn't dare go fuck with my plants so I looked through the window. I'll finish sanitizing the net tomorrow. These plants look great. I'm wondering if doing the two diagonal I poles with zipties actually works. It would save me some kone for sure. I'll definitely update in the morning.
6/4 It's warmed up to a balmy 44 degrees. My plantsxare in the garage still. Weather sucks this whole week but after this heavy rain it should be perfect weather to transplant these girls. A little to chilly but it will warm up and I need to get this shit done. I'm trying to do to much at once. I need to just out dirt in bags and get them outside. I'm glad I waited until after this craziness. Breaking temp records for high one day then breaking it for low the next can't be good for the plants. I'll update what gets done today. I may mix soil or I might wait until tomorrow. It will let up some then. Plants still look fabulous 👌
6/5 50 degrees still raining like hell. Rain until Friday. Plants are inside under the onecworking light. Lots of indirect light through the massive windows though. I'm planning on mixing soil today and tomorrow and getting bags and pots half filled. Just trying to break the labor up into manageable pieces. It's probably a good thing I didn't put them in their huge containers before all this rain.
UPDATE: MIXED SOIL 1/3 of each (FOX FARM OCEAN FOREST, HAPPY FROG, AND ROOTS ORGANIC 707). I prepared I believe 11 containers for transplant. I need to sanitize two more containers and I'm good. I got a lot done. Might go back over. Set up extra cams too. I'm excited. Talked to my commercial buddy amd he motivated me. No reason my plants can't handle this shit. I've just had massive personal shit going on. Friday is the next GOOD day but these girls might go out earlier. I'm checking the forecast. I'll sanitize the other containers in the morning and fill them.
6/5 Today is usually my watering day but shit still seems heavy so I'm going to hold off. Despite that i need to transplant. I think they're wet enough. I could do it today. Plants are looking good and weather takes a better turn Friday. It's not raining hard though. It's just sprinkle right now. I may transplant some today depending on how things go. I'll keep the diary updated.
UPDATE: I went back over with the intent to just mix soil and let it acclimate. I decided to try to transplant one. I grabbed a 10th planet and started to go. I had done a bunch of manual labor already so i wasn't thinking. Of course the fucker was dry and didn't wanna come out ofcthe pot and the root ball pretty much decintigrated in my hand so I'm not sure how that will go. Tried again with the Blueberry Cheese Cake. I thought the roots just might not have been rootbound abdcthat could've been the case. After having another rough transplant I recognized I was tired, all the hard stuff is done and it's gonna keep raining until Friday. I wanted to transplant three and put them outside but with the wind and rain and the difficult transplant I let them sit under the light in the garage in indirect light. I had the doors open for a while. Should be open now but i don't want to have to go back over and shut it. Plus I'm not to keen on getting water on my light. Let's hope for a better day tomorrow. This was the only thing I had going good. Phrple punches are still behind. I've decided I'm oing to light dep ttwo of the plants in the 3 gallon pots. The two shittiest or smallest plants (probably purple punch will be light deped.
WENT BACK OVER AT FIVE AND IT APPEARS EVERYTHING IS ALRIGHT. WILL HAVE CHECK IN MORNING. Vid won't upload. Tried multiple times. I'll try again tomm.
6/6 Waiting for a doctor's appointment when I should be transplanting buy whatever. Everything is looking really good. Despite me disint9grating the rootball in my hands the two transplants look great! When I get back I'm planning to get some more work done. It's still lightly raining off and on but the door is up. I'm lettingvthe soil mix acclimate a little bit too. Hard labor is mostly done. Now the intricate part. Wish me luck. Not sure if it will be today bit I'm hoping.
WENT BACK OVER CAUSE IT WASNT RAINING BUT AS SOON AS I WAS CLOSE IT STARTED POURING SO THE PLANTS ARE UNDER THE ONE WORKING 150HPS AND THE AMBIENT LIGHTING FROM THE WINDOWS. TOMORROW IS TRANSPLANT DAY. I WONT HAVE A VEHICKE SO IT WILL BE TRICKY BUT IM GONNA MAKE IT HAPPEN. Opened doors at 530. Video still didn't upload
6/7 Still raining. It's off and on and a nice rain though. It's 53 degrees at noon. I transplanted two 10th planet's into 20 gallon pots. I transplanted these two a little differently. I put the bags in there final spot I side my cage andctransplanted in the misting rain. The first one came out and seemed to be heavier on the bottom and broke off. I tend to "throw" them in the hole before they collapse. With my anxiety I suck at transplanting. Plus these plants haven't filled the 3 gallon pots with roots yet but i want hem in their final homes and its time to go outside. I transplanted the other two plants indoors and let them have days in the garage with the door open and the light on then protection from the elements at night. I've been doing this for awhile. They would all be outside if the weather wasn't so shitty. This rain is supposed to stop. I'm curious as to what will be the fate of the two plantsci transplanted and left outside. I'm praying and hoping for the best. I also put my back tarp up so I have a wind break between rhe buildings. I stopped working because I didn't want to fuck anything up. Anxiety disorders suck. TOOK A BUNCH OF VIDS BUT THEY WONT UPLOAD. GOES FROM 9% TO 65% BUT ALWA7S TURNS RED "FILE FAILED TO LOAD". I'LL KEEP THE DIARY UPDATED. ESPECIALLY IF I GO BACK OVER. WAS ABLE TO LOAD A COUPLE VIDEOS. I GUESS ITS NOT AS BAD AS I THOUGHT. AT LEAST I HOPE. WENT BACK OVER AT 3 AND CHECKED THINGS OUT. THE TWO REXENT TRANSPLANTS I LEFT OUTSIDE SEEMED TO BE IMPROVING. DESPITE THE FACT I DUMPED A SHIT TON OF SOIL ALL OVER ONE OF THEM. IT SNAPPED A LITTLE BRANCH CLOSEST TO THE SURFACE. ITS STUFF I'LL REMOVE ANYWAY BUT STILL. IM REALLY CROSSING MY FINGWRS AND PRAYING THESE GIROS WILL MAKE IT. With everything i have going on tjis is my respite.IM GOING TO TRY TO SEE WHAT I CAN ACCOmplish TOMORROW. SOME OF THE PURPLE PUNCHES ARENT READY FOR TRANSPLANTING THOUGH. I ALSO ADDED TEO TARPS TO THE CAGECTO COVER THE WIND TOWER BETWEEN THE TWO BUILDINGS. THIS IS GOING TO BE A GOOD YEAR! Shut the door at seven. For some reason the two 10th planet's I transplanted (that fell all over the plant and I thought mightve broke it) look awesome lol. Despite the ridiculous pouring rain. It's going to let up soon and we are do fir some good weather. I'm trying to get everything (that isn't getting light depoed) into the cage. Four transplanted. Ten (I mean 8 more) to go.

Likes
126
Share


@nonick123
Follow
Día 83 (08/04) Riego 1,25 Litro H20 + Wholly Base 2,5 ml/l + Solid Green 1,5 ml/l + Big Bloom 1 ml/l de Gen1:11
TDS 1000 PPMs - pH 6,2
Día 84 (09/04) Velocidad de crucero ON... Las plantas se acercan a su fecha de cosecha teorica (49 días en floracion = 13/04/2024)
Muestran ligeros signos de senescencia, pero siguen creciendo las flores, el consumo de agua no baja... 😍💥
Día 85 (10/04) Riego 0,5 Litro H20 sin nutrientes. TDS 225 PPMs - pH 6,6
Día 86 (11/04) Riego 1,25 Litro H20 + Wholly Base 2,5 ml/l + Solid Green 1,5 ml/l + Big Bloom 1 ml/l de Gen1:11
TDS 1000 PPMs - pH 6,2
Día 87 (12/04) Empezamos a revisar el color de los tricomas y se encuentran en su mayoría trasparentes con alguno turbio. Va a necesitar unos días más para madurar
Día 88 (13/04) Riego 0,5 Litro H20 sin nutrientes. TDS 225 PPMs - pH 6,6
Se abre la ventana de la cosecha! 😍 Justo hoy cumplen 7 semanas (49 días) en floración
Día 89 (14/04) Riego 1,25 Litro H20 + Wholly Base 2,5 ml/l + Solid Green 1,5 ml/l + Big Bloom 1 ml/l de Gen1:11
TDS 1000 PPMs - pH 6,2
💦Nutrients by Gen1:11 - www.genoneeleven.com
🌱Substrate PRO-MIX HP BACILLUS + MYCORRHIZAE - www.pthorticulture.com/en/products/pro-mix-hp-biostimulant-plus-mycorrhizae
Likes
6
Share


@Weedzoks
Follow
Hi,
La sénescence se fait naturellement du fait d’une légère carence en N, j’ai quand même ajouté du Power Clean pour l’accélérer et améliorer encore plus le goût et l’odeur.
Les couleurs violettes se propagent petit à petit vers le bas de la #2, et très légèrement sur la #1, comme des reflets.
La puissance du panneau LED a été abaissé sur 55%
La floraison est prévu pour 7-8 semaines et pourtant j’en suis à 10, sûrement du à la carence post stretch qui a ralentit la floraison et réduit le rendement ; J’ai observé les trichromes le 28/10, ils sont presque tous laiteux et les premiers ambrés arrivent doucement..
A la semaine prochaine 👋
Likes
37
Share


@DogDoctorOfficial
Follow
🌱 Week 2: Mutant Magic in Full Swing! 🌱
Hey Grow Fam! Another week, another step forward in the adventure with these Mentha de Croco beauties. Week 2 has been nothing short of fascinating—the variety in leaf shapes is absolutely mesmerizing. These tiny mutants are already showing their unique personality, and I’m loving every second of watching them grow! 🌿✨
Tent Conditions: Consistency is Key
The setup remains the same as last week, keeping these little ones in the perfect environment to thrive:
• Temperature: Stable, warm conditions for steady growth.
• Humidity: Maintaining high RH ensures they’re still enjoying tropical vibes as their root systems develop.
• Lighting: The Future of Grow (FOG) LED at 200 PPFD continues to deliver just the right amount of light to keep the plants growing compact and strong.
Nutrition: Introducing the Organic-Mineral Boost 🌿
This week, I started feeding the plants with the incredible Aptus Holland organic-mineral line. It’s been a game-changer, and here’s why I love it:
What’s Organic-Mineral Nutrition?
• Combines the benefits of organic matter (microbial health and soil vitality) with the efficiency of mineral nutrients (direct uptake by plants).
• Supports balanced, steady growth while boosting plant resilience.
This Week’s Feeding Schedule:
• Regulator (0.15 ml/L): A silica-based product that strengthens plant structure and helps regulate stress, ensuring the plants stay strong and sturdy.
• CalMag Boost (0.25 ml/L): Calcium and magnesium are essential for cell wall development and chlorophyll production, supporting lush, vibrant growth.
• All-in-One Liquid (1 ml/L): A comprehensive blend that delivers all the essential nutrients in one easy feed, perfect for these little mutants finding their stride.
• Start Booster (0.25 ml/L): Packed with root-stimulating microbes and nutrients, this product ensures strong root development and prepares the plants for explosive growth in the coming weeks.
Why Aptus?
I’ve been a huge fan of Aptus Holland because their line truly focuses on building strong, healthy plants from the ground up. The results speak for themselves—happy plants, explosive growth, and vibrant health at every stage. true believer here and way before being sponsored by them .
Mutant Leaf Love: Celebrating the Unique 🌿
The highlight of this week has to be the unique leaf patterns these plants are developing. Each one seems to have its own story to tell—serrated edges, funky symmetry, and a whole spectrum of textures. They’re tiny but mighty, and it’s so exciting to see the potential of these genetics from Terpyz Mutant Genetics come to life.
Mutants always bring surprises, and it’s a beautiful reminder that diversity is what makes this journey so rewarding.
Reflections & Tips for Fellow Growers 💡
💚 Feed Lightly, Grow Strong: For young plants, keep your feed gentle to avoid overloading them. Start slow and adjust as they grow.
🌱 Celebrate Differences: Each plant will grow at its own pace, and unique traits are part of the magic. Patience is key!
💧 Stay Consistent: The foundation you build in these early weeks sets the tone for the entire grow. Stable conditions = happy plants.
Shoutouts & Grower’s Love 💚
Big thank you to @Terpyz Genetics for these funky mutant seeds, @Aptus Holland for their stellar nutrition lineup, @Future of Grow for the lighting that keeps these beauties thriving, @Pro Mix Soil for the best one i have encountered so far and @Grow Diaries for being an amazing platform to share this journey.
And a HUGE shoutout to all of you—followers, growers, or just curious passersby! Your love, support, and shared passion for growing make this experience truly special.
Stay tuned for more mutant magic in Week 3. Let’s grow, let’s grow, let’s grow! 🌟
Genetics - Mentha De Croco
https://terpyz.eu/products/menta-de-croco-fern-type?_pos=1&_sid=e9237cbcb&_ss=r
DogDoctorOfficial Discount Codes @ terpyz.eu - DOCTOR 15% off
Nutrition - @aptusholland
https://aptus-holland.com/
Led Power @ F.O.G. Future Of Grow
https://www.thefuturofgrow.com/en/online-store/BLACK-SERIES-600-p489093171
Controls @ TrolMaster
https://www.trolmaster.eu/tent-x
As always thank you all for stopping by, for the love and for it all , this journey of mine wold just not be the same without you guys, the love and support is very much appreciloved and i fell honored with you all in my life
With true love comes happiness Always believe in your self and always do things expecting nothing and with an open heart , be a giver and the universe will give back to you in ways you could not even imagine so
Growers Love To you All 💚

Likes
29
Share


@BioGrowKing
Follow
Letzte Woche & auch hier Spüle ich seit 2-3 Tagen die Erde mit klarem Wasser durch :)