
Likes
Comments
Share

@Pblc_10
Follow
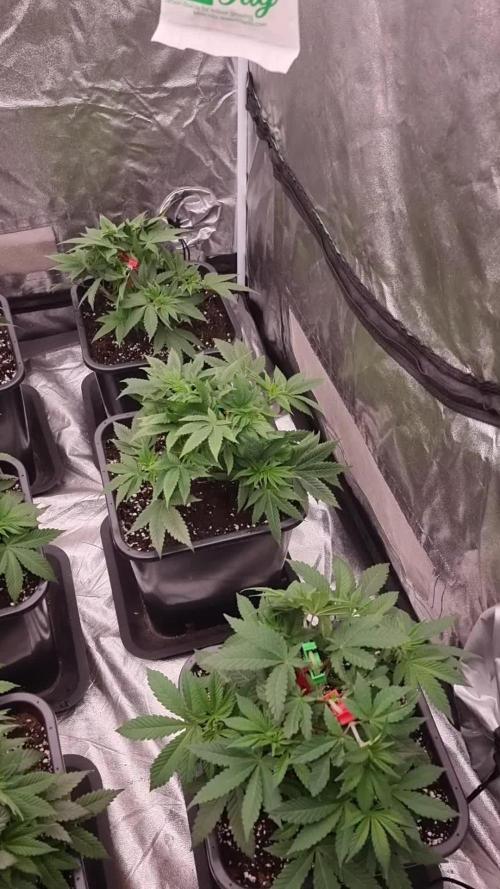
Das wird die letzte Vegi Woche sein ich denke mal in 2-3 Tagen schicke ich sie in die blüte. Heute habe ich nochmal ein wenig entlaubt und 2 CO² Bags rein gehangen. Sonst sehen sie sehr vital aus und freuen mich schon auf die blüte
Das nächste mal werde ich erst in eine Woche düngen da sie ja erst in den Allmix gepflanzt wurden und alles noch satt grün ist👍
Über Tipps würde ich mich natürlich freuen🍀✌️

Processing
Likes
3
Share


@MELs_Garden
Follow
Del 23 al 29 de diciembre:
23 de diciembre:
Lavado de raíces a 3 plantas con agua sola.
24 de diciembre:
Lavado de raíces de 4 plantas con agua sola.
29 de diciembre
Todas las plantas están clareando las hojas, buen sintoma. Significa que hicimos bien el lavado de raíces. Los tricomas siguen poniéndose blancos, estarán el 50% blancos 50% transparentes. Tic tac.
Likes
4
Share


@DarbGrowDiaries
Follow
Getting bigger and looking healthy, only around 150 PPFD
They seem to be sensitive to strong light, still too little
Day 21 - topped the bigger girl, hopefully she catches up since she was already moving faster

Likes
15
Share


@No_Clout
Follow
Everything is going to plan so far, at the end of week 4 I will be flipping the lights to 12/12 because the gelatos will be ready for it, but the Og is a little bit behind but I’m sure it will catch up with them in the stretch.
Day 26 - just switched the lights this morning 12/12 as it’s about time imo as the gelatos are getting big I don’t have the time or space to let them veg on so the Og could catch up, so I’m gonna hope that during the stretch it does.

Likes
253
Share


@Ju_Bps
Follow
Hello growmies 👩🌾👨🌾🌲🌲,
👋 Girls still beautiful, the end is arrived 🏁🏁,
Keep flushing
Neighbors said stop to the party, Trichromes should be ready, smeel is so so strong 😱😱😱😱
💧 Give water each 2/3 day
2 l Water + Flash Cleaner (3 ml/l)
PH @6
💡Mars Hydro - FC 3000
50% 28 cm
Mars Hydro Fan kit
Setting 9
Have a good week and see you next week 👋
Thanks community for follow, likes, comments, always a pleasure 👩🌾👨🌾❤️🌲
Mars Hydro - Smart FC3000 300W Samsung LM301B LED Grow Light💡💡
https://www.mars-hydro.com/fc-3000-samsung-lm301b-led-grow-light
Mars Hydro - 6 Inch Inline Fan And Carbon Filter Combo With Thermostat Controller 💨💨
https://www.mars-hydro.com/6-inch-inline-duct-fan-and-carbon-filter-combo-with-thermostat-controller
Anesia Seeds - High Mars 36% THC🌲🌲
https://anesiaseeds.com/product/high-mars/

Likes
22
Share


@Ton_Trichomen
Follow
Start March 16 🇱🇺🌱🤩 day 48
Grow method 12/12 from seed Sea of green
At the moment everything is more than good, my ladies are enjoying their healthy i see a beautiful green and trichome formation everywhere and a beautyfull smell is coming up also ... in 7 days there will be another schwazzing for my ladys and from then on .. let it go
Short info about my Humidity:
as you can see my humidity sensor from my CT grow system that I have is around 80% RH, but that is not right, my humidity is around 49-52% my sensor gets 24 hours fully blown by my humidifier onto the sensor no matter where I hang it because my ventilation is all around and is blown from top to bottom and a box fan lets everything circulate through the growroom so my old hygrometer is hanging in there againe and everything is fine..
Amnesia by & for
@superstrains_official
Runtz by & for
@zamnesiaxseeds
Sour Diesel by & for
@inseedious.nl
Cobalt Haze by
@sensiseeds02 &
Arjans Strawberry Haze by
@greenhouseseedco for
@amsterdamseedcenter
Under @marshydro_ebay
Nutes by @hypronl_official
Soil:
Atami light mix &
5mm broken puffed clay &
16mm puffed clay on the bottem
of my 5.5L. pots
Temp: 25,62 °C temp outside 15°C
Lights: 12/12
Humidity: 49-52%
Vpd/KPa: 1.3 -1.4
Ph : 5.90
Tds/ec 1.5
Water: 0.8L. p.plant 23°C
CO²: No Mercy Tabs
Nutes by Hy-Pro Fertilizers
HyPro : Spraymix 0ml by 1L.
HyPro : Terra vegi & bloom 2.2ml by 1L.
HyPro : Rootstimulator 5ml by 1L.
HyPro : Generator 0.16ml by 1L.
HyPro : Epic Bloom 00ml by 1L.
HyPro : Cal-Mag 0.2ml by 1L.
Light distance: =55 cm
dimmer on 75% = 970umol/m² +-10
Gear all controlled by @ctgrow_control_systems
1x MarsHydro TSW3000
1x MarsHydro TSL 2000
Air Van: 800m³ Prima Klima on 30%
Filter: Prima Klima 660m³ for seed& veg stage &
660m3 CanLite for bloom stage
3 l water cooling airco Diamant...
3.3l humidifier
1.8l dehumidifier


Likes
10
Share


@Nimbus
Follow
Hello dude's
This week we are switching to 20 lt reservoir. A little training and defoliation. I am very satisfied with the development.
Keep in peace ✌️


Likes
200
Share


@Ferenc
Follow
Day 96, 15th of December 2020:
Wao and wao... this is what I can say.
A bit late I was on holiday I usually start the week with the first day but now with the last one.
So let's start with the "black sheep" of this group as she is alone here RQS Wedding Gelato.
Easy growing issue free little bushy lady. Absolutely great choice of grow. Pretty much ready for Christmas but she can be cut even now lol....
And now let's speak about the Original Sensible Seeds' girls...
Well Black Ghost OG similarly to RQS Wedding Gelato is calm little bushy and issue free lady.... no problem all good ready for Christmas....
Runtz Gum the thick chick with heavy big buds and excellent appearance is really amazing. I placed a stick there and fixed her to look better... It was not necessarily but i have done it.
She needs more time pretty much done ny Christmas or a bit after....
Gelato from Original Sensible Seeds is similar in terms of acting such as streching and all that ...
The same situation applies not much to really say we wait ;)
I am really happy to have these ladies....
Well, Do-Si-Dos OG is the craziest one ever... lol.... not only due her crazy kind of streching style but the trichome developement that comes along to the fan leaf "holder" stem is pretty crazy....
Those buds are like a diamonds sticky and she would be ready to harvest but need to wait because I need to go....
I really had to fix her by placing a stick there I broke one stem but fixed as it did not come off... so crazy especially now because of the weight of the buds... now she looks even more beautiful...
I think she is the most challenging grow ever.
Original Sensible Seeds genetics is unique really high quality just look at them.
Royal Queen Seeds as well but this is my second grow from them my first was a Green Gelato which is the same calm littlw bushy plant. Amazing very good for newbies ;)
I am going on holiday again and back on 28th of December so after harvest starts.
Girls will be cut after.
The 7th weeks starts with tomorrow 16th of December....
Only flushing and no more nutritient will be used.
Soon full report comes. Lamp is the same 11 hours on and 13 off....
The last 4 days they will get 4 days darkness and only ventilation will be working no even more water ;)


Likes
17
Share


@ipoke_smot420
Follow
Day 49-
I had a little mishap with the White Widow. It seems I may have most likely had a pH issue. Hopefully I've taken care of that. Gave them all a good flush with plain, aerated rainwater.
@fast_buds
@atlasseed
@seedsman
@sunraise
@greengro


Processing
Likes
18
Share


@Ktims420
Follow
One plant is significantly struggling , brown spots on leaves, it is the tallest and all the spots are towards the top but it is growing a lot slower , no colour change on any of the buds , I have one picture of her. I don’t know what the problem could be all the other girls are fine and have been given the same feeding and watering schedule. However the other girls are very happy from here out it is plain PHed water till I chop. Couldn’t be more excited yet nervous ✌️🏻💚
Likes
12
Share


@Jay_Gardener
Follow
First grow ever! Popped the seeds while still working out the kinks on the misting system. Growing in a custom built 24" x 36" x 48" fully insulated box. I've got the fans and humidifier dialed in to hold temps and humidity steady during the day and am only losing about 6°C during lights out (Depending on temperature in Garage). Everyone was sprouted in Rapid Rooters surrounded by hydroton. Right now I'm tweaking the misting system with solenoids to minimize dripping as I'd like to go water-to-waste... but without being super wasteful. Only the two autos (AKxCM and SCH) will be staying in the box for the duration of the grow. The other four seedlings are photos and will be moved to a sunny window to put on some size prior to being moved outdoors towards the end of May.
I'm a total rookie, but have tried to pay lots of attention to other diaries and lots of forums. I'm sure i'll make some mistakes along the way, but hopefully ya'll will keep me on the true garden path. I'm looking forward to all your questions, comments, and nasty remarks.

Likes
25
Share


@pifflestikkz
Follow
Day 45
17/08/24 Saturday
Another watering today using de-chlorinated tap water pH 6 only.
Lemon skittles and XXL ammo are tall, bud nice and smelly plants!
The Kabul is more of a dense compact build, I'm excited to see what they grow into 😍
Picture and video update ✌️ 💚
Day 48
20/08/24 Tuesday
Feed today using de-chlorinated tap water pH 6. With Plagron PK13-14 and power buds.
Noticing the stretch stop, and now packing out there bud sites 💪💚
Vid + pic update ✌️💚


Likes
9
Share


@Naujas
Follow
although the first week outside was not very good, there was little sun and cold nights, the temperature was +7 at night, but it seems the girls successfully endured it, now they promise better weather :).
Likes
9
Share

@Enki_Weed
Follow
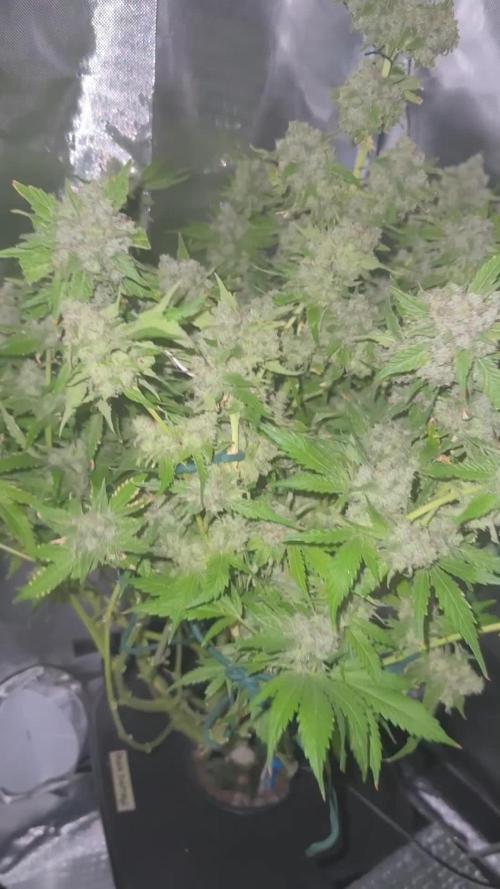
In den letzten ein bis zwei Wochen hat sich unsere Pflanze weiterhin prächtig entwickelt und zeigt nun deutliche Anzeichen einer fortgeschrittenen Blütephase. Es gab keine dramatischen Veränderungen, sondern eine stetige Reifung, die uns dem Erntezeitpunkt näherbringt.
Die Pflanze präsentiert sich sehr buschig und vital, mit zahlreichen dichten Blütenständen, die sich gut ausgebildet haben (siehe Gesamtansicht der Pflanze). Die Buds sind kompakt und haben in den letzten Wochen an Volumen und Gewicht zugelegt. Man kann deutlich sehen, wie die Blütenkelche anschwellen und sich zu reifen Blütenständen formen.
Trichom- und Stigmen-Reife:
Ein genauerer Blick auf die Buds (wie im ersten Nahaufnahme-Bild der Trichome und im weiteren Nahaufnahme-Bild der Buds mit orangenen Stigmen ersichtlich) zeigt den Fortschritt der Reifung. Die weißen, harzigen Trichome bedecken die Blütenstände in Hülle und Fülle, was auf eine intensive Produktion von Cannabinoiden hinweist. Bei den Trichomen ist nun eine gute Mischung aus milchig-trüben Köpfen zu erkennen, die auf die volle Potenz hindeuten. Erste bernsteinfarbene Trichome beginnen ebenfalls aufzutreten, was ein Zeichen dafür ist, dass der Erntezeitpunkt bevorsteht.
Parallel dazu haben sich die Stigmen (die feinen Härchen auf den Buds) von Weiß zu einem satten Orange-Braun verfärbt. Dies ist ein weiteres starkes Indiz für die Reife der Blüten und die nahende Ernte.
Blattwerk und Nährstoffbedarf:
Das Blattwerk der Pflanze ist größtenteils weiterhin gesund und grün, was auf eine gute Nährstoffversorgung schließen lässt. Einige der größeren Fächerblätter können in dieser späten Blütephase leichte Anzeichen von Vergilbung zeigen, da die Pflanze ihre Energie nun primär in die Blütenentwicklung steckt und Nährstoffe aus den Blättern zieht. Dies ist ein natürlicher Prozess, der oft als "Herbstfärbung" bezeichnet wird.
Wir werden die Reifung der Trichome weiterhin genauestens beobachten, um den optimalen Erntezeitpunkt zu bestimmen, der je nach gewünschtem Effekt variieren kann. Auch die allgemeine Gesundheit der Pflanze wird weiterhin im Auge behalten, um sicherzustellen, dass sie bis zur Ernte optimal versorgt ist.


Likes
8
Share


@TeaTime
Follow
Fastberry Auto is truly a gem among autoflowering cannabis strains! Its rapid growth, delightful berry-like aroma, and beautiful purple buds make it a joy to cultivate. The sweet and fruity flavor is a treat for the senses, and the balanced high leaves me feeling creatively inspired and deeply relaxed. A must-try for any cannabis enthusiast, whether you're a seasoned grower or just starting out! -
Likes
8
Share


@Chubbs
Follow
420 Fastbuds Week 2
Cherry Cola Auto
This week has been good. I know it's been 4 days since last updated but I was out of town last week and was late to update by a couple days. They have definitely grown substantially since last updated. I'm still keeping every thing the same as far as watering, light schedule, and preventative maintenance.
All in all Happy Growing
Likes
1
Share

@Chubbs
Follow
This week's been exciting, they've grown upward a few inches and started to bush out. I did do a mild defoliation taking off a few lower leaves and tucked some of the top bigger fan leaves. I started adding co2 this week and they seem to really be enjoying the added amount.
All in all Happy Growing.

