


Likes
Comments
Share


@Topshelf_only
Follow
Everything looking really good. Couple more day then switching to 12/12 with 2 weeks of half strength veg / bloom nutrients. Plenty of height left for the final stretch .




Likes
38
Share


@GreenHouseLab
Follow
Week 11 has better defined picture of this cultivar in her final phase. Ended up being exactly 12 weeks from seed.
Smells delicious will be hanging whole as the humidity was initially very low at 45% now with a humidifier currently sitting at 55% and 70 Deg which is not bad. She received 48hrs of darkness.
Likes
27
Share


@I_Identify_As_A_Dan
Follow
Week 10 for Kalini Asia by Zamnesia seeds,
Shes now fully bounced back from her last training and shes filling out really nicely.
Now just have to toughen up her branches and keep her nice and flat.
Being watered once a week atm.

Likes
12
Share

@GrowPro3500
Follow
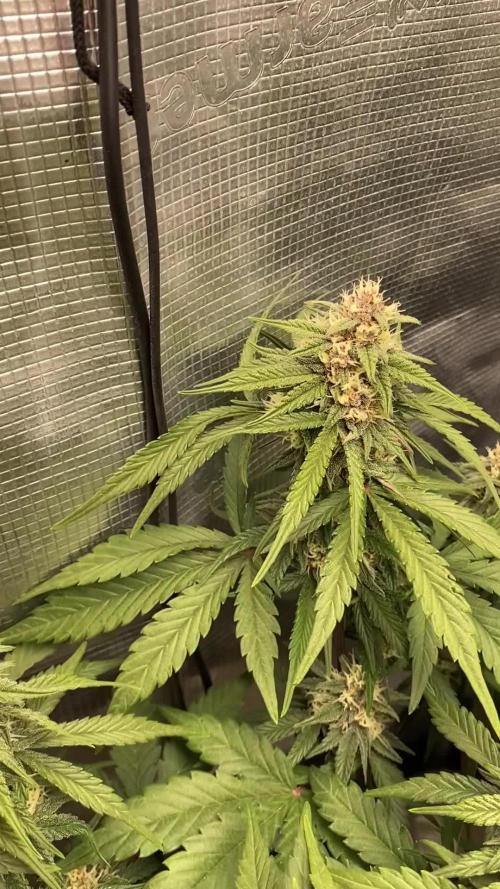
I’m shook — I nearly killed her when she started herming.
A mate was like, “cut the sacks off and give her a chance,” and thank god I listened — these are the densest buds I’ve gotten off autos so far. Fingers crossed she didn’t throw any micro-seeds.
This plant keeps surprising me — spoil her and she acts up, neglect her and she spits out stuff like this. I don’t believe in anything anymore.
Likes
21
Share


@Mosquito_Haarlem
Follow
Het is een mooie week geweest voor haar.
Ze voelt zich prettig onder het led licht en de bloemen worden steeds dikker en de bladeren hebben een prachtige groene kleur.
Dit wordt de laatste week dat ze de power roots en pure zyme krijgt, vanaf volgende week zal ik deze vervangen voor de green sensation.
Ik zal gedurende de week foto's updaten.
Dag 49: de bloemen worden dikker en 1 zijtak heeft de hoofd cola in lengte ingehaald. Zie filmpje
Morgen start week 8 😁👌🏼
To be continued...

Likes
43
Share


@Master_weeda
Follow
Bonjour a tous les padawans et les maîtres jedis
Pour cette semaine 4 je surveille comme à mon habitude hygrométrie et arrosage. Je peaufine mon LST en stressant ma plante le moins possible. Je combine mon LST avec un pincage d'Apex cela me permettra d'avoir une canopé plus homogène donc une meilleure pénétration lumineuse et par conséquent un meilleur rendement.
Petit rappel sur le pincage d'Apex:
Le pinçage des plantes de cannabis
Proche de la taille d’apex sur le principe, cette technique possède cependant plusieurs avantages, le principal étant de conserver le gros bud central de la plante, d’une production et qualité maximale.
Pinçage des plantes de cannabis
Le pinçage d’apex (tête de la plante) consiste simplement à pincer délicatement la tige du dernier étage de la plante, entre le pouce et l’index, jusqu’à sentir la fibre s’écraser sous les doigts avec un petit bruit critch caractéristique. Si l’espace disponible sur la tige du dernier étage ne permet pas d’y placer confortablement ses doigts, il faudra plutôt pincer l’étage du dessous.
Le pinçage ralentira fortement la croissance verticale de la plante, tout en stimulant le développement des branches secondaires, donnant ainsi à la plante une forme de buisson.
La plante mettra quelques jours à réparer ce pinçage, formant un nœud à cet endroit, et poursuivra ensuite sa croissance de façon normale. Le pinçage peut alors être répété si nécessaire, sur l’étage suivant nouvellement formé, ainsi que sur les éventuelles branches secondaires qui pourraient dépasser l’apex.
Le pinçage est donc une excellente technique pour avoir une belle canopée uniforme de type marée verte. En pinçant régulièrement l’apex des plus grandes plantes de votre espace, durant la croissance et en début de floraison (stretch), vous obtiendrez ainsi facilement des plantes de hauteur homogène en pleine floraison, ce qui facilitera la culture et augmentera la production finale, surtout si vous cultivez simultanément de multiples variétés de marijuana.
Avec un peu d’habitude le pinçage pourra être réalisé aussi rapidement qu’efficacement. En cas de pinçage trop violent qui se traduirait par un apex arraché, cela produira simplement les mêmes résultats qu’une taille classique de l’apex, ce qui ne sera donc pas dramatique.
Que la force soit avec vous💪

Likes
1
Share


@Waisgrower
Follow
Muy asombrado por los resultados obtenidos en tan poco tiempo. Flores muy resinosas, compactas y con un buen sabor.

Likes
45
Share

@JaramnieJazz
Follow
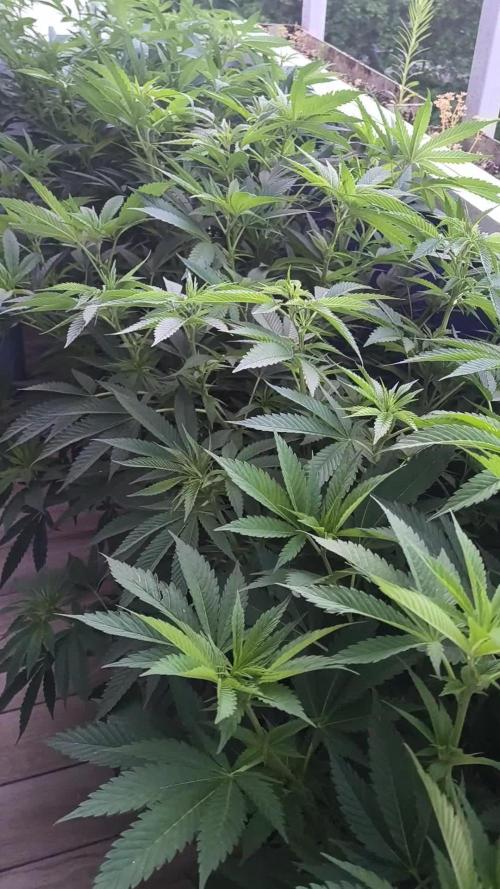
17.06.26 So Woche 21 Veg startet alles sieht top aus
Die Dünger gabe gestern und heute hat echt was gebracht sind sofort dunkler geworden mit mineralischen Dünger geht das fix mit bio Dünger würde das min 1 Woche dauern bis man eine Verbesserung feststellt
18.06.26 Top nur das verfluchte Wetter
19.06.26 Regen und die Dünger gabe hat was gebracht sehen jetzt noch besser aus als vorher


Likes
21
Share


@helpmamagrow
Follow
Wanted to wait til they were healthier to flip but ended up just flipping anyway since I was running out of height space. Will probably defoliate more up until week 5 and then just let her do her thing after that!

Likes
19
Share


@Comfrey
Follow
Tangerine Dream Auto - Barney‘s Farm
Mein erster Indoor Keller-Grow neigt sich dem Ende zu. Es ist bunt geworden im Zelt. Die erste Blüte habe ich bereits vaporisiert und bin ziemlich begeistert vom Geschmack und der Wirkung.
Leider habe ich aufgrund persönlicher Umstände nicht im Ansatz geschafft hier ein paar Tagebücher zu führen. Es war für mich ein extrem stressiger Winter und ich bin froh, dass ich wenigstens regelmäßig ein paar Fotos machen konnte.
Der Anbauraum hatte zwischen den Pflanzen gemessen eine Minimaltemperatur von 17,4 Grad und während der Vegetationszeit konnte ich die Auto-Damen Tagsüber mit bis zu 28 Grad unter einer Sanlight Evo 4-120 1,5 verwöhnen. 18/6 - Licht/aus. Die Luftfeuchtigkeit war in der Veggiephase bei ca. 65-75 Prozent im Zelt und in der Blütephase konnte ich sie Stück für Stück absenken auf 55-43 zum Ende hin.
Gedüngt habe ich ein einziges Mal mit 1:20 sauberem Urin am Ende der dritten Woche. Ansonsten gieße ich auf das Terra Preta ähnliche Substrat ausschließlich mit hartem Leitungswasser mit Ph 7,6.
Das Substrat wurde kurz nach der Sämlingsphase mit einer dicken Schicht Laub, Braun- und Grünschnitt Mulch abgedeckt, welchen ich zuvor dreißig Minuten bei 150 Grad im Ofen gedämpft habe (Sterilisation). Es kamen Nematoden, Raubmilben und Gelbtafeln zum Einsatz, weil wir mit einer ziemlich unangenehmen Trauermückenplage zu kämpfen hatten.
Anfang der Blütephase kam es zu einer Nährstoffblokade aufgrund von Überwässerung. Das Substrat hält die Feuchtigkeit sehr lange und die Mulchschicht verhinderte ein Austrocknen des Substrats. Wir haben anfangs deutlich Zuviel gegossen und das Substrat nicht etwas austrocknen lassen. Nach Anpassung des Gießintervalls auf alle drei Tage mit ca. 2-2,5 Liter, löste sich das Problem nicht in Luft auf, aber wir konnten es aufhalten.
Meine Pflanzen sind bereits geerntet und hängen zum Trocknen. Viel Spaß mit den farbenfrohen Bildern. Happy Growing! 💚


Likes
7
Share


@WolverineGreens
Follow
Moved em outside while the weather is nice. Waiting on the last of the parts so that I can reset. Should b done in the next week or 2.
Only need to set up the net on the trellis and set
up the irrigation when the manifolds come.
Alaskan Purple...Gelato og....Skywalker og....do si do cookies....runtz....white widow...Bruce banger...


Likes
14
Share


@thebito
Follow
17/05 - Colheita realizada. Flores cortadas nas bases dos galhos para serem pesadas antes da secagem. Após isso foram removidas todas as fan leaves maiores e de fácil remoção e as flores foram deixadas em uma rede de secagem dentro da estufa.
18/05 - flores retiradas da rede e penduradas no teto da estufa com barbantes, pois estavam ficando amassadas > 21.3ºC - 22.3ºC / rh 52% - 64%
19/05 - 21.5ºC - 22.1ºC / rh 45% - 50%
20/05 - 21.7ºC - 22.3ºC / rh 46% - 51%
21/05 - 17.9ºC - 21.9ºC / rh 48% - 84%
22/05 - 20.1ºC - 23.3ºC / rh 49% - 81%
23/05 - 23.5ºC - 24.1ºC / rh 56% - 60%
24/05 - 23.5ºC - 24.0ºC / rh 46% - 65%
25/05 -
26/05 - 23.8ºC - 24.3ºC / rh 64% - 65% > flores aparadas e preparadas para a cura, sobra da poda guardada para dry sift, flores guardadas em jarros herméticos com higrômetros, ainda sem sachês de umidade


Likes
2
Share


@fabialien
Follow
Lunes 19 Agosto 2024
Semana 1 oficialmente como plantulas en jifys, dejaremos en jiffys hasta notar raíz abundante, jiffys hidratados con Agua con Enraizador Radix 10000. Veremos la evolución todos los Lunes.


Likes
4
Share


@Barcelona_Farmers710
Follow
Buenas farmers!! Después de pasarnos tres dias con sólo agua volveremos con la mitad de nutrientes durante los próximos dos riegos, ya empezamos a prepar nuestras plantas para la fase final ! Espero que os guste buenos humos family!💚
Likes
169
Share


@SlowpokeFuegobud
Follow
🍊 🐶 💜 🍊 🐶 💜 🍊 🐶 💜 🍊 🐶 💜🍊 🐶 💜 🍊 🐶 💜 🍊 🐶 💜 🍊 🐶 💜
Welcome to week 8, my fellow growmies!! 💚 💚 💚
DAY 50
Watered with 2ml bloom + more pk + 4 ml humics, growzyme + 3ml bigfruits+ 2ml calmag + epsom + Living Organics 0.2g/L 💧
DAY 52
Watered with 4 ml humics, growzyme + bigfruits + 2ml calmag 💧
LED 100%
DAY 55
Watered with 2ml pk + 4ml bloom + 4 ml humics+growzyme + 3ml bigfruits + 2ml calmag (no pHminus) 💧
Thanks for stopping by, it's a true pleasure to have you as visitors!! 💚 💚 💚 😘
💜 🐘
______________________________________________________________
About Sour Tangie Dawg cannabis seeds
Sour Tangie Dawg is a sativa dominant cross between the famous Tangie and Chemdawg. Expect a combination of sweet & fruity mixed with a gassy, jet-fuel flavour. The amazing mix of citrus, tangerine, pine and gasoline produces uniquely rich, dank buds. The powerful sativa high is strong, uplifting and long lasting, great for creativity and socialising.
Chemdawg is the parent of OG Kush, all Diesel strain originate from Chemdawg. The Tangie is originally a Skunk hybrid strain but extremely fruity with the trademark Tangerine flavour. This strain is potent with THC-levels over 20% alongside very generous yields of top quality weed, very suited for hash and rosin producers. If you’re looking for a strain to produce the best tasting concentrates this Sour Tangie Dawg is a proven winner! She easy to grow and the perfect choice for SCROG growing due to her growth speed and stretch. We advise switching to 12/12 light when 75% of the net is filled. For outdoor growers the harvest period is early October. Indoors she’s finished after 9 weeks of flower - fast for a sativa dominant strain. We recommend growing in soil with organic nutrients for the best tasting weed.
Get some fantastic genetics here: https://supersativaseedclub.com/ 💜 🐘
___________________________________________________________________________
SETUP:
80x80x180 cm Zelsius
240W Full Spectrum LED IR UV dimmable
DW240H-A6-HS
Heatsink color red
LED Chips:
512pcs SAMSUNG LM301H + 24pcs Osram 660nm + 8pcs Osram IR 730nm + 8pcs UV 385nm
Color mix: 2700K + 4000K
2,8umol/J
Driver HLG-240H-C2100B
Coverage: veg 5x3ft / flower 4x2ft
Product size: 628x205x68mm
Green Buzz Nutrients
Shouts go out to my sponsors @GreenBuzzNutrients, thanks so much for your support! ❤️
If anyone would like to try their amazing organic products, use code GD42025 for generous 25% discount (for orders of minimum 75€) ✨
https://greenbuzznutrients.com/
Biobizz Lightmix
custom exhaust fan 320/270cm³/h
Carbon Active Granulate 240cm³/h
tab water pH 8 - EC 0,25 with Calmag to 0,5
Advanced Hydroponics pH minus Grow + Bloom to pH 6.2
🍊 🐶 💜 🍊 🐶 💜 🍊 🐶 💜 🍊 🐶 💜🍊 🐶 💜 🍊 🐶 💜 🍊 🐶 💜 🍊 🐶 💜
Likes
1
Share


@GingerGarageGrow420
Follow
Day: 28 from sprout
Strain: Chill Out OG F4
Medium: Fox Farm Ocean Forest
Light: Vivosun VS2000 50%
Light Distance: 12 inches
Watering: By hand, ~10oz daily
Nutrients: pH Perfect Advanced Nutrition Grow, Bloom, Micro 1.5 ml / L
Looking healthy and growth is exponential
Likes
23
Share


@KarlysCannabis
Follow
Got them in pots on Wednesday, they're happy and growing like crazy. I buried them deeper in the 5g so they're growing out more than up right now. Getting hard to regulate temp and humidity in that tent as it's colder outside.
Likes
28
Share


@Roberts
Follow
I am still battling a little magnesium deficiency. Starting to add cal mag in her moisture water between feeds. Likely due to the small Potter she is in. Hopefully will have the rest of that issue resolved now. Also raising the ph a little should help as well. She is growing under the new Spider Farmer G3000 light. I likely will have to transplant to a little bigger small Potter soon. Been using the run off to rinse the substrate I will use. So she won't know anything happened when I do it. Just more room. Basically avoiding a ph difference between coco substrate is plan. Thank you Spider Farmer, and Amsterdam Marijuana Seeds. 🤜🤛🌱🌱🌱
Www.amsterdammarijuanaseeds.com
Thank you grow diaries community for the 👇likes👇, follows, comments, and subscriptions on my YouTube channel👇. ❄️🌱🍻
Happy Growing 🌱🌱🌱
https://youtube.com/channel/UCAhN7yRzWLpcaRHhMIQ7X4g
Spider Farmer G300w: https://amzn.to/3S2zvsd
Spider Farmer 10X20 Heat Mat Kit - https://amz.fun/lsa0J
Spider Farmer Amazon Store: https://www.amazon.com/spiderfarmer
Spider Farmer Official Site: https://spider-farmer.com
Discount code: saveurcash

Likes
96
Share


@Tropicannibis_Todd
Follow
💩Alrighty then Growmies We Are Back At it 💩
Well folks we just finished up the last run and so we are bad to do it all over again 😁
So what do you say we have some fun 👈 We got some Z & Z 🚗 🚘 🚗 🚘 👉 From Exotic Seeds
Well we are just 28 days and folks shes doing pretty good 👌
It's been a crazy week 👉 huge storm rolled in and we lost power for around 4 days😳 so I had to get creative and have things on back up 👈 Shes in her preflower so the stretch is on 👌
So this week I've started her nutrients regiments 👌Just need to remind myself to take it easy 🤔
FC4800 from MarsHydro Lights being readjusted and chart updated .........👍I've added a UR45 to the mix👈
www.marshydro.ca
👉I used NutriNPK for nutrients for my grows and welcome anyone to give them a try .👈
👉 www.nutrinpk.com 👈
NutriNPK Cal MAG 14-0-14
NutriNPK Grow 28-14-14
NutriNPK Bloom 8-20-30
NutriNPK Bloom Booster 0-52-34
I GOT MULTIPLE DIARIES ON THE GO 😱 please check them out 😎
👉THANKS FOR TAKING THE TIME TO GO OVER MY DIARIES 👈
Would you like to hang with the growdiary community 👉 https://discord.gg/gr4cHGDpdb 👈