


Likes
Comments
Share

@DogDoctorOfficial
Follow
🌸 Lava Cake – Week 7 Flower (Harvest Special) 🌸
This week marks a major milestone in the Lava Cake journey: we harvested phenotype two, who had been affected by bud rot. Bud rot may have tried to take the best from us, but we didn’t allow it. Every infected part was carefully removed, and the remaining healthy plant was harvested and is now drying as a whole plant under controlled conditions.
⸻
🙏 Apologies & Context
We know this is technically a flower week update, but due to the new updates on Grow Diaries and the desire to share photos, videos, and the story of this harvest so we’re combining the harvest with the flower week report.
We apologize for any confusion — this is the only way to fully document and expose all that’s happening, and to make sure the lessons, successes, and challenges are visible for everyone following along.
The next report will be the official “Harvest Report”, covering:
• Drying & trimming process
• Curing updates
• Smoke review
⸻
🌿 Quick Recap – From Seed to Here
• Germination: Smooth in the Cannakan with Aptus Regulator & Start Booster, 3 seeds, 2 kept.
• Vegetative Stage: Robust growth under Black Series 600 LED and later ThinkGrow & Lumatek LEDs. Root development and early structure supported with Aptus super soil and micro/macro mixes.
• Transplant: Into 11L fabric pots, carefully monitored environment, roots thriving.
• Early Flower: Weeks 1–4 brought thick white hairs, dense colas, and heavy branching. Nutrient support included Aptus Regulator, CalMag Boost, Plagron boosters, and All-in-One Liquid.
• Mid Flower & Challenges: Week 5–6 showed signs of bud rot. Lava Cake #2 needed early harvest; Lava Cake #1 continues to swell and thrive.
Through all of this, the Lava Cakes proved their resilience and quality, showing that even under stress, their genetics shine beautifully.
⸻
🌱 Week 7 – Harvest Details
• Bud Rot Management: All infected material removed and disposed of immediately.
• Harvest Technique: Whole plant harvested, inspected, and prepared for controlled drying.
• Drying: Slow, careful drying in a separate, stable environment to preserve aroma, terpenes, and cannabinoids while minimizing risk.
Even though bud rot forced an early cut, the flowers are still dense, fragrant, and high quality. Their resilience and beauty deserve celebration.
⸻
🔬 Educational Notes
• Bud rot prevention & learning: This week reinforces how crucial airflow, humidity management, and daily inspection are during dense flower stages.
• Whole-plant drying: Allows moisture to equalize gradually between stems and buds, preserving terpenes and flavonoids while keeping the product safe.
• Environmental awareness: Temperature spikes, stagnant airflow, or dense canopy zones can quickly create pockets for mold — constant monitoring is essential.
⸻
🌟 Closing Thoughts
Week 7 is about resilience, lessons, and triumph over challenges. The Lava Cakes showed their strength even under pressure but needed to be harvested early, so we did it, no fears this is the only way and the way to save the rest of the closet sharing girls
We want to celebrate the journey, from seed to harvest, and thank everyone following along for learning and growing with us.
The next report will focus entirely on drying, trimming, and tasting — the final step where we get to enjoy the fruits of all the care, attention, and love put into these girls.
📲 Don’t forget to Subscribe and follow me on Instagram and YouTube @DogDoctorOfficial for exclusive content, real-time updates, and behind-the-scenes magic. We’ve got so much more coming, including transplanting and all the amazing techniques that go along with it. You won’t want to miss it.
• GrowDiaries Journal: https://growdiaries.com/grower/dogdoctorofficial
• Instagram: https://www.instagram.com/dogdoctorofficial/
• YouTube: https://www.youtube.com/@dogdoctorofficial
⸻
Explore the Gear that Powers My Grow
If you’re curious about the tech I’m using, check out these links:
• Genetics, gear, nutrients, and more – Zamnesia: https://www.zamnesia.com/
• Environmental control & automation – TrolMaster: https://www.trolmaster.eu/
• Advanced LED lighting – Future of Grow: https://www.futureofgrow.com/
• Root and growth nutrition – Aptus Holland: https://aptus-holland.com/
• Nutrient systems & boosters – Plagron: https://plagron.com/en/
• Soil & substrate excellence – PRO-MIX BX: https://www.pthorticulture.com/en-us/products/pro-mix-bx-mycorrhizae
• Curing and storage – Grove Bags: https://grovebags.com/
⸻
We’ve got much more coming as we move through the grow cycles. Trust me, you won’t want to miss the next steps, let’s push the boundaries of indoor horticulture together!
As always, this is shared for educational purposes, aiming to spread understanding and appreciation for this plant. Let’s celebrate it responsibly and continue to learn and grow together.
With true love comes happiness. Always believe in yourself, and always do things expecting nothing and with an open heart. Be a giver, and the universe will give back in ways you could never imagine.
💚 Growers love to all 💚
P.S. – Heavy Fruits & Harvest Decision
One of the key reasons we decided to harvest Lava Cake #1 this week was how heavy the colas had become. The flowers were so dense and weighty that some branches were starting to bend, snap, and strain under the load.
While this is a testament to the plant’s vigor and genetics, it also increased the risk of further bud rot and damage, making an early, careful harvest the safest and most sensible choice.
Even under pressure, these girls delivered impressive structure, weight, and resin coverage, proving their strength and quality until the very last moment.
Thank you all for being here with me, see you all on the next report, Growers Love to All and never stop believing
🙏🙏🙏

Likes
16
Share


Likes
4
Share


@Thomas12477
Follow
The plants are doing beautifully after two waves of bug attacks. The first wave was spider mites that I located in my greenhouse before they had a chance to spread to my canibus.I had to spray two days in a row to kill them all. Than 5 days layer I see thrips, so I gave it another spray. I foiler fead my nutrients.

Likes
14
Share


@Ashbash
Follow
Continuing slowly on towards harvest. I Have discovered something bad looking under the microscope though, and im fearing the wortst tbh. Might have to be thrown away :(((((((((


Likes
15
Share


@PiusWaxis
Follow
Here we are almost at the end of this incredible journey, the tenth week of flowering is over, the growth and progress of my plant shows no signs of slowing down. Every day brings new surprises and advancements that continue to amaze me.
The commitment to providing high-level care with Plagron's premium nutrients has proven instrumental in maintaining the plant's exceptional health and vigor.
The results speak for themselves, as the plant continues to flower and show robust development. 💪🌿✨
The buds have expanded further in size and density, yielding under their weight, and displaying an eye-catching layer of resin that highlights the vitality and overall well-being of the plant.
It's truly a sight to witness and a testament to the benefits of using high-quality nutrients throughout the growing process.
The TrollMaster "TENT-X" environmental control system remains an indispensable component of my grow setup, ensuring that the grow room maintains the optimal balance between temperature and humidity levels necessary for plants to thrive.
The system's precision control capabilities remain critical in creating an environment conducive to optimal plant growth. 😎💪
The 240W MEDIC GROW MINI-SUN 2 LED light continues to provide stellar lighting conditions, providing plants with a tailored spectrum that meets their specific growing needs. By carefully monitoring temperature, humidity and VPD data via control system graphs, I can make precise adjustments to optimize growing conditions and maximize plant health and productivity. 😍
I'm excited to share a video that captures this week's temperature, humidity, and VPD trends, offering a look at how these advanced technologies work together seamlessly to create the perfect growing environment for plants. It is truly amazing to see how these tools work in harmony to support the growth path of plants.
As each week unfolds, I am filled with anticipation for the new discoveries and obstacles that await us in the grow room.
With the unwavering support of Plagron nutrients, the continued reliability of the TrollMaster control system, and the exceptional lighting provided by MEDIC GROW LED, I am confident that the next week, as well as the last, will usher in further progress and triumphs in this cultivation journey.
Thank you for joining me on this exciting adventure of growing and exploring the wonders of growing plants! 💪👽🚀

Likes
8
Share


@CanabisLoverHobbyGrower
Follow
Didn't mean to but ended up snapping the main stem on one of them so I germinated another seed to replace it but over the last 3 days it actually looks like it might be OK, sort of looks like an extreme case of topping so I've left it and will see what happens over the next week, should start seeing some proper growth now, 2 weeks old today, started on a little bit of root juice, roll on next week 👌
Processing
Likes
77
Share


@BipolarHellas
Follow
Hello everyone,
🇬🇷
so,the first week passed,I have 3 seedlings which are very small but growing slowly and steadily...I expected more growth but I can't do anything so I just wait...
WEEK 2: "ENGINES STARTED..."
☠️Day 7...the second set of leaves has popped out...The contest didn't start well for me with such slow growth...but what can i say... I like it,its part of the journey...
☠️Day 10...my little ones are growing still very slowly...I can see their third set of true leaves...had to go down on water because they showed some signs of overwatering...I water every 3 days now...just misting the soil
☠️Day 12...💧I watered with GHF Enhancer, 1 g/L...it's got a lot of goodies in there...the only thing I had to do is drop the ph of the water to 5,cause the Enhancer has a pretty high ph of 9,3...
☠️Day 13...they are growing their 3rd and 4th set of leaves...I top fed them with GHF BioGrow and I have placed them under a 50W Led...
☠️Day 14...my babies are doing just fine,no signs of a negative reaction to something...some of the new growth is a bit strange in shape,but it will be fixed in time...the week is over,the engines are on and here we go...see u next week and thanx for watching

Likes
4
Share


@Familytrees19
Follow
Beautiful week! Seen some beautiful growth and stems are becoming very thick! What great genetics so far! Elev8 seeds so far seem really good, I’ve grown these breeder seeds before and the same thing Beautiful growth and thick healthy stems! I used the destiny foliar spray and they seem to like it! All plants showing stretching too the light! This will be my second crop using the kind led K5 XL1000 wifi enabled! What a beautiful light, the plants seem to love it as well! I topped them a few days ago and the growth has started. I’m thinking of flipping these babies week 4 maybe week 5

Likes
28
Share


@Esoteric_growing
Follow
I have been training this one for a while, this is a rare lemonade pheno of strawberry lemonade which is totally leaning to the lemon side but not like a lemon skunk or lemon haze. It’s very lemon/diesel/sweet. Probably the nicest lemon type terp I have seen and can’t wait to get this one to the finish line
Likes
14
Share


@StoneyMelony
Follow
This was not a very diffecult plant to grow. I wanted to see how the plant was growing without training it. I didn't have luck on that because she grow so big, 3 times her size when vegged. Obviously very sativa. So in the end i had to bend the shit out of all the stems. After all the LST you could see she stacked up really nice and as time went by and she grew fatter and fatter. All the buds became top heavy and i had to tie everything so i didn't snap my branches. I think although it was maybe not the prettiest grow to watch the outcome is great. i cannot believe it myself. So because i had 2 plants in the room i had to devide the lights also in 2. That being said it is a lot of weed from 1 autoflower . So i can only say i am very happy with this. :-)

Likes
21
Share


@Esmoki_La_Cabrona
Follow
August 18, Day 28. Had to flush on Friday due to nutrient lockout. There were purple stems which caught my attention to a possible nutrient deficiency. Coupled by the dark green older fan leaves and bright green of new growth, my Apera TDS meter confirmed nutrient lockout. Kaboom was flushed a total of 4 times Friday night, then foliar fed at 25% strength the next morning. She was given 1.1 liters of pHd water since the top inch was already dry despite flushing the night before. I am taking her thirst to mean she is recovering well. I plan on resuming the GH least aggressive feed schedule tomorrow and will begin feeding with every watering. Now that she's on the mend from the nutrient lockout I can tell she's thirstier than what she used to be, I'm taking that to mean she's hanging in there.
Friends, growmies, cousins, comrades, colleagues and cultivars. Updates last week were minimal because this plant mama came down with COVID. Flushing a plant during COVID fever is no joke. Stay well and healthy everyone.
August 19, Day 29. Fed at least aggressive strength today until 25% runoff. Included a new supplement to the nutrient line up, silica. Today is the first time I use it so I went easy and used the weakest dose. Plant has 5 main sites so far, yahoozie. To top a second time? No se todavia, deja lo pienso jajaja
August 21, Day 31.Topped one more time, clipped the tallest point to give the others time to catch up. I know I will need to defoliate a tiny bit, soon, but I'm a bit scared to remove either too much or a mega vital leaf. I'll watch videos about it and aim for next week. I sprayed the top inch with pH'd water and will feed and water tomorrow morning.
August 22, Day 32. Fed and watered, no recharge since I used it on Day 29. As I repositioned the kabob sticks, I noticed a couple of milestones - she is in the very beginning stages of forming pistils and she is beginning to smell. I plan on keeping her in veg for at least 2 more weeks, hopefully this isn't super ambitious for a plant named Kaboom lol 😂
August 24, Day 34. I checked on Kaboom and found that the top inch was totally dry so I fed and watered her. I used everything except recharge, but will use it at next feeding since I'm aiming for 10 days in between applications. I think Kaboom is looking fabulous


Likes
21
Share


@GODSGIFT_2005_JM
Follow
🍼Greenhouse Feeding BioGrow
⛺️MARSHYDRO
The ⛺️ has a small door 🚪 on the sides which is useful for mid section groom room work. 🤩
☀️ by VIPARSPECTRA (models: P2000 & XS 2000)

Likes
12
Share


@Staffedition
Follow
Привет друзья. Моей растихе сегодня 176 дней
27.12 перестал кормить и начал проливать чистой водой
20.10 перевёл свет в режим 12/12
Начал применять LST технику на 19 дне, а 18 августа добавил ДЕФОЛИЗАЦИЮ
С 20.08 ДЕФОЛИЗАЦИЮ
С 20.08 LST технику
На сегодняшний день влажность 54%
5.09.2023 заметил высокий Ph 7.9
С 48 дня Ph не ниже 5.8
На сегодняшний день Ph 6.0
Начал кормить с 60 дня Canna Terra Vega
PPM 150
Всем мира и добра!
Не забудь поставить лайк❤️, если понравилась как прошла неделя
И читайте наш TELEGRAM: https://t.me/smail_seeds
#Smail_Seeds 😀
Likes
Comments
Share
@Raul2021
Follow
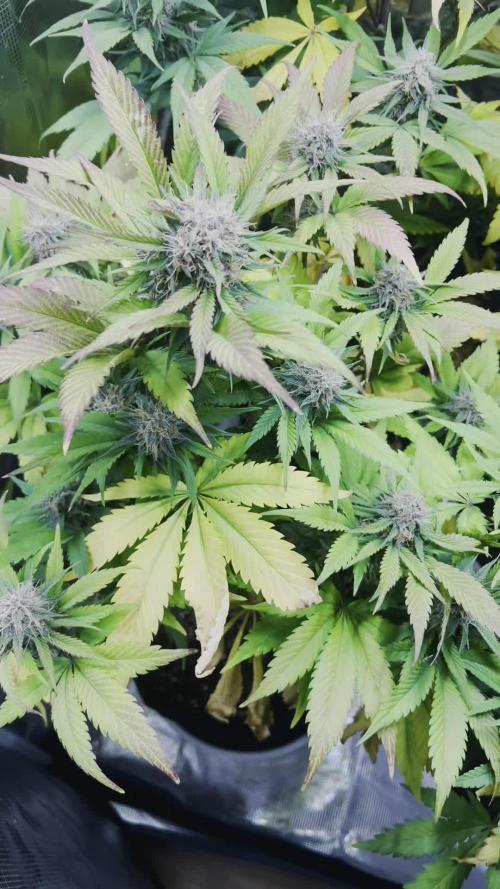
Día 63 de vida de las plantas, crecimiento explosivo de las flores y desarrollo de terpenos de la planta mas avanzada, se ha regado con unos 1,5 litros por planta con un PH de 6,1 y 5,7 y una EC de 0,49 y 1,68. Se han añadido fertilizantes de floración en el riego y potenciadores de flores, siguen cada día desarrollándose, bebiendo mucha agua y con un olor muy potente, en 4 / 5 riegos más se corta toda fertilización y se hace lavado con un nuevo producto adquirido, FLAWLESS FINISH. Muchas hojas se han empezado a caer y a amarillear, la planta parece estar consumiéndose a si misma muy rápido, pero aun es pronto para cortar, se espera entrar en el proceso de maduración en la próxima semana, se aplicará el finalizador OVERDRIVE para un remate final.
Se espera una cosecha en las primeras semanas de Abril.
Estas son las condiciones de esta semana:
Ventilación: nivel 70% oscilación 90 grados modo natural
Extractor: 65% y 25% de standby
Intractor: 25 %
Humidificador: Off
Luz: 100% con altura de 20 cm
Ppfd: 750 umol/m2/s
Periodo: 18-6
Humedad: 45% a 55%
Temperatura: Día 26 C - Noche 22 C
Vpd: 0,91 a 2,47 kpa
Co2: 297 a 885 ppm
Temperatura del sustrato: mínima 19,2 C máxima 23,2 C
Humedad del sustrato: mínima 7,6% máxima 49,8%
Productos y Marcas usadas:
Indoor: MARSHYDRO 80x80x160
Led: MARSHYDRO FC 1500 EVO SAMSUNG
Ventilacion y extracción: MARSHYDRO
Controlador: IHUB PRO MARSHYDRO + Kit Sensores
Medidor PH: Milwaukee PH 600
Medidor EC: Milwaukee C66
Sustrato: COMPOSANA Semilleros / LIGHT MIX BIOBIZZ
Ph: BIOBIZZ UP / DOWN
-Fertilizantes-
BAC: GROW, BLOOM, PK, CALMAG
ADVANCED NUTRIENTS: VODOO JUICE, BUD CANDY, TASTY TERPENES, BIG BUD, OVERDRIVE, BUD IGNITOR, FLAWLESS FINISH


Likes
2
Share

@ThatsmyGrow
Follow
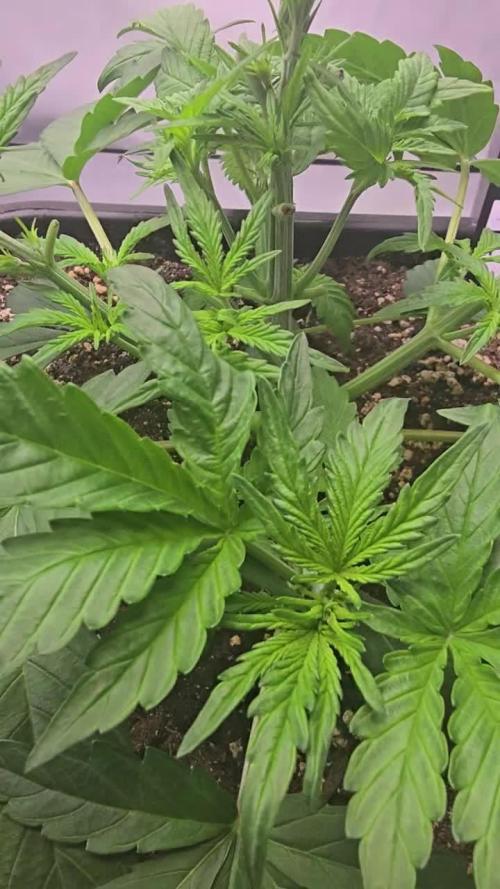
🌱 Week 3 – Gorilla Cookies Auto Pheno Hunt
Another week down and the differences between the phenos are becoming more obvious every day 👀🔥
The environment stayed very stable this week with temperatures, humidity, and VPD remaining consistent. Because all plants are growing under the exact same conditions, it’s really interesting to see how differently each phenotype develops genetically.
📈 Current observations:
Several phenos are already reaching close to 30 cm in height
Meanwhile, some smaller phenos — especially Pheno #6 — are still around 13 cm
Leaf structure and overall plant shape continue to vary a lot between phenos
Growth vigor is clearly different from plant to plant now
💧 Feeding & maintenance:
This week the plants received their first proper feeding with around 4 liters of nutrient water.
Some phenos seem to react more sensitively to the nutrients, as a few plants are starting to show slight brown leaf tips, so I’ll keep a close eye on them over the next days 👀
I also removed more large fan leaves to improve light penetration and allow the lower branches to develop more evenly.
📊 Current environment:
Temperature stable around 26°C
Humidity staying between 63–65%
VPD maintained around 1.3 kPa
Light intensity remaining at 35%
Now I’m really curious to see when the first flowering signs will appear 🌸🔥
💬 Which pheno would you pick so far?
Likes
2
Share


@GingerGarageGrow420
Follow
Strain: Fast Buds Rainbow Melon Photo Feminized
Day 35 of Flower
Day: 84 from sprout
Medium: Growers Gold
Light: Vivosun VS2000 at 75%
VPD: 1.5 kPa
Light Distance: 8 inches
Watering: By hand, ~20 oz daily
Nutrients: pH Perfect Advanced Nutrition Grow, Bloom, Micro 2 ml / L and 1 ml / L big bud.
Pistols and terps looking great
33 inches
Likes
11
Share


@Mrniceeguy
Follow
My first time cloning I think I got it .. I’m a hands on kinda guy. If I can learn it I’ll do it.. super excited this strain is ⛽️