
Likes
Comments
Share

@NoProbation4Weed
Follow
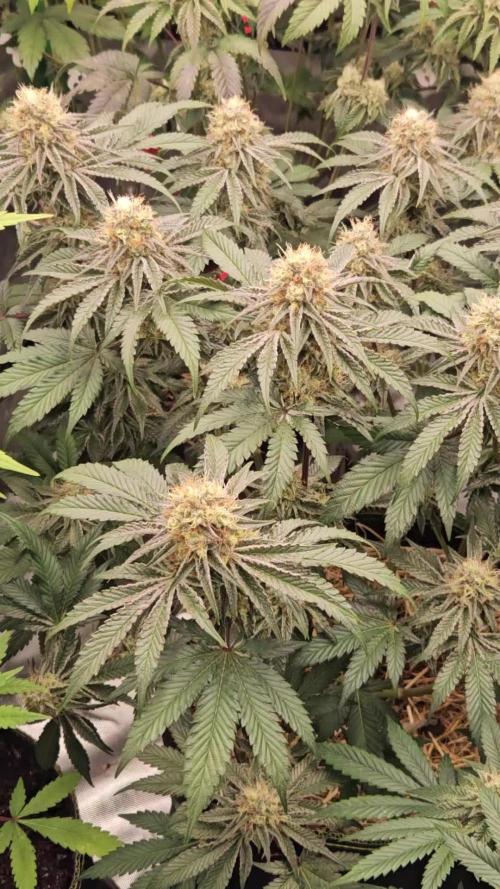
The Grape Candy smell on this plant is insane! the amount of resin production is also very good.
VPD around 1.4–1.6
The light hits the plants with around 900 PPFD.


Likes
5
Share


@Unnamed
Follow
Removed 20l from the reservoir and filled it up with fresh nutrients.
Added Yara Kristalon Orange, Yara Calcinit and a little bit of Haifa GrowClean to the reservoir.
Adjusted PH/ORP, PH- adds P and ORP adjustment adds K.
Topped it up with tap water every second day, the dehumidifier pulls ~12l/day, most of it should be from the plants I've got in my tent.
I am struggling to keep ORP at ~100, might be a sign of root trouble.
Nothing else to report.
Values are average of the day.
DATE - °C - RH% (Tent Temp/RH)
20241125 23.9 61.9
20241126 23.6 60.9
20241127 23.3 60.3
20241128 22.8 60.7
20241129 23.2 60.4
20241130 22.7 61.3
20241201 22.3 60.3
DATE - PH
20241125 5.99
20241126 5.94
20241127 5.96
20241128 5.95
20241129 6.02
20241130 5.98
20241201 5.93
DATE - ORP (mV)
20241125 103
20241126 95
20241127 92
20241128 67
20241129 127
20241130 88
20241201 72
DATE - EC(us/cm)
20241125 1955
20241126 1852
20241127 1864
20241128 1914
20241129 1988
20241130 2052
20241201 2135
DATE - CF
20241125 19.55
20241126 18.52
20241127 18.64
20241128 19.14
20241129 19.88
20241130 20.52
20241201 21.35
DATE - °C (Reservoir)
20241125 23.1
20241126 22.3
20241127 22.2
20241128 21.9
20241129 22.3
20241130 21.8
20241201 21.2


Likes
9
Share


@Pakkapon2477
Follow
ปรับไฟทำดอก 12/12 เข้าสู่ช่วง week2
Temp 26
Rh 65%
Ec 3.0
Ph 6.3
VPD 1.13
Co2 1500ppm


Processing
Likes
23
Share


@GrowGuy97
Follow
Started flushing the biggest plant today the should have about another week & half left on it, all the other ones are still clear & cloudy! Fingers crossed everything goes good through harvest I have never flushed or done any of the harvest or cure process😅😬
Likes
148
Share


@BioBuds
Follow
An here we are. At the end of another cycle. The end of another year, and what a year it was. For Sunshine and me personally, it was a tough year, with our families sick on multiple occasions, life-threatening. We are very thankful for many things but most of all that all our parents are healthy again.
We wish your families are as fortunate in the coming year.
So we end this Gorilla's life with a swift cut of the scissors, after thanking her again for the companionship, the well-needed distraction, and all the love she has given me already.
I sometimes read that people won't go near their plants when they are angry or sad. Please do go to your plants when you are sad or angry!
They are millions of years old. They have been healers of animals and humans since they were around. Our emotions can not taint something so pure as the spirit of this plant.
She will heal us, give her life for us, sacrifice herself for our healing. She is all-powerful and all-knowing, there is nothing we mere humans can do, except disrespect her powers.
Bask in her glowing light, enjoy her soothing energy, her creative spark when you are in need of love, just don't smoke her at that time, for she will soothe you bit not give her treasures, she will seduce you.
Next to thanking Santa Maria for her healing, we would like to thank our friends here, all who shared their kind words, advice, and attention.
I had made a video to share my thanks on video, but every time I got very emotional. You guys have no idea how tough this year was.
The gorilla is real easy to clean and sticky and cristally. Its amazingly great to smoke!
So a special thanks to: @Sailormoonflowers for being a buddy to talk to, @JamMAKEcan for being there with ideas and always a lot of love, @Roberts for being an inspiration @Cannabeast and @LegendarySeedThumb for always checking out my grows, to all who I forgot who are always here to greet me! @Growdiaries for being an awesome site and community and last but not least: @MarsHydroLED for letting us try their SP-3000.
VERY HAPPY NEW YEAR XXX
We wish all of you freedom, love, happiness, but also the awareness to see many of us are still being repressed, with growing but also with our human rights.
Jah jah gave us life to live, so let us live brothers!
It is time the rastaman made a plan!
We are 99% loving people on this planet, we need no 1% to fuck it up with wars and strife.
We need to stop cooperating, peacefully resist. If you can buy local, ban exploiting multinationals.
Help your local businesses, help your neighbors, we need to wake up and stop funding this black stain on our planet.
Sell your stock in multinationals, invest in local businesses.
Buy local products, speak out when you get taxed higher than millionaires (and you are).
The day is coming my brothers and sisters. Soon a handful of CEO's will find out when billions are done with them.
For now thanks for everything!

Likes
17
Share


@Sergio_721
Follow
pre-flowering
they still seem very loaded with nutrients in fact one has burnt tips so I am watering abundantly with only demineralized water when they drain they start to feed them.
I removed all the supports, we wait for the flowers 😂
Likes
5
Share


@OnlyTomatoes
Follow
[ Information ]
For all information on this grow, including strain and room details, please see the first week of veg.
[ Updates ]
Day 10 - Watered today, 1.2ec feeding of mainly organics (Fulvic/Humic, Kelp, Molasses, Big Bloom) with runoff. 6.8ph. Group one is stretching much harder due to plant density, I will be adding a net soon.
Day 13 - Watered today with the nutrients listed for this week. 2.2ec at 6.5ph. 80gals total. Added a small dose of Open Sesame for the first time today as bud sites are starting to form on all plants. Added a net to Group 1 yesterday, I will add the nets for Group 2 in a couple days. Group 1 plants are 38-40 inches, group 2 plants are 32-34 inches. I may adjust net height, this isn't normally how I run a cycle; I'm trying a few different things side-by-side. The "one plant per square foot of canopy" group has consistently shown that even with a short veg period there is far too many wasted growth nodes on the sides of the canopy. The plants around the edge tend to branch out instead of up, as they're naturally trying to find sunlight. My last attempt at using these side branches with heavy topping of the middle nodes resulted in a higher yield, as expected as the light footprint was 5x5 instead of 4x4, which defeats the purpose of "one plant per square foot of canopy" anyways. A better test would have been to stunt the growth of all middle nodes enough to weave the side branches into the main canopy, though this seems to be a waste of time without much gain. I'm much happier with Group 2 which has 1 plant per 2 square feet of canopy space. While it also has side branching, the difference in height at the canopy level of the sides and middles are not nearly as different as Group 1, which means a more even light distribution without the need of a net. As overgrown as the room is getting, they still have 7-8 days before they're defoliated a final time.

Likes
30
Share


@Jamesg
Follow
Didn't stretch as much as she might have done which suits me. On target for plenty of
compact buds. Taking the Shogun coco nutrient range like a champ. Only issue I've had is having to defoliate more times than I'd like.

Likes
16
Share

@AestheticGenetix
Follow
Cut on 5/5/26 drying.
She has an initial sweet smell that turns pine and lemon kind of


Processing
Likes
32
Share


@Dunk_Junk
Follow
14cm vertical growth this week. Flowering stretch reducing.
Trichome production has started! She's starting to get frosty.
Processing
Likes
9
Share


@Goldenboy2020
Follow
Day 67 buds getting bigger and bigger. One plants is definitely can see nugs swelling and other starting to also. Prob has another two weeks I like a couch like high so wanna harvest little later.but have my jeweler loop to check teicroms. The smell is crazy a sweet and skunky smell.when you touch the nugs smell fruity sweet aroma.
Day 71 end of week 6. Everything seems to be going well. I know one plants will be ready before others just when is the questions. Got some good answers on grow questions so thinking at least a week. But I will keep checking trichromes. The look kind milky but not Ambers yet. Going to start flushing here on out.

Likes
14
Share


@DTHEREID
Follow
Three at my place and they are purple as can be! Gonna finish up beautifully in the next weeks. If I didn’t put these girls down they would be standing at least 60” tall. Insane how big these autos are.
These purple ones in my tent are entering week 4.
The other three out of the same pack are at my dads under my hps set up. These girls are about 50” just early on in flower

Likes
13
Share


@GloveGreen
Follow
14/09/2021
Hello everyone, welcome to the third week of life of the so dreamed Dark Phoenix of Green House Seeds Co.
I'm very surprised with the development of one of the plants, it grew a lot in the last week getting an excellent performance in my opinion. I would like to know your opinion. Leave comments please.
Speaking of cultivation I keep keeping the temperature around 25°C to 26°C
I raised the EC value to 1.0 ms.

Likes
7
Share

@HOMEGROWBOOK
Follow
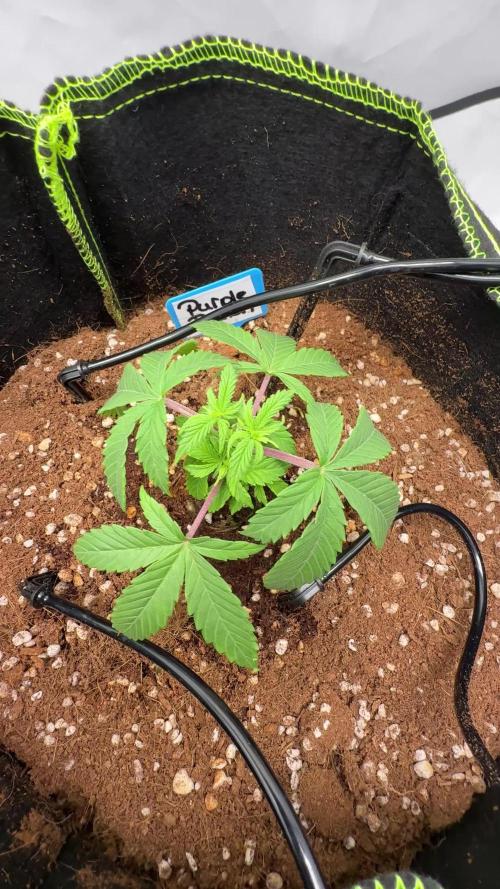
At the start of Week 4, Purple Punch entered a more active vegetative phase. The plant measures around 11 cm and shows healthy, vibrant green growth with no visible deficiencies. Internode spacing remains tight, indicating good light intensity and stable conditions.
This week marks the beginning of structured training. Topping, LST, main-lining, and light defoliation were introduced to shape the plant early and encourage even canopy development. The plant responded well so far, with no signs of stress after the initial training.
Feeding is based on a coco setup with balanced nutrients and root support, maintaining a pH of ~5.9 to optimize uptake. Environmental conditions remain stable, supporting recovery and continued growth.
Likes
14
Share


@Naujas
Follow
a few photos are missing, I was away:) To be honest, I've never had such a big automatic flower before, although the light intensity was really high all the days of its growth, it still went up ;) first experience with such a girl:) But she looks really good:) good luck to everyone:).
Likes
8
Share


@BlazingAngel420
Follow
I have noticed quite a lot going on in this little 4x4 tent. I am a bit upset with the burnt tips on every purple lemonade. I got CAL-MAG to strengthen the cell walls and prevent any future burns, but I was a bit late for that and the damage was done. Although there are burnt tips I'm still happy with how far along they have come and you don't learn if you don't experience it first hand. Happy growings my fellow weedlings 🌱 🌳🌸🤓🖖.
Likes
41
Share


@AsNoriu
Follow
Day 78 from seed touching soil. #1 was eaten by bud rot, really heavy, buds all in dirt, she was very low, overstreched from lack of light and water, so went all to bin. Two plants were worthless, last hope on late one . #2 is still going, shows preflowers, big plant.
Happy Growing !!!

Likes
25
Share


@I_Identify_As_A_Dan
Follow
Week 10 for Lemon Orange by Greenhouseseedco,
Her colour is looking much much better 😍 1/3 of the phenos is getting barely any lateral branch growth so i think she will be the smallest yielder
Keeping the canopies are flat as possible and i think its not going too badly 😇
Still wanting a little more growth before flipping to flower.