


Likes
11
Share


@Young_agronomist
Follow
27.07.23-отлично реагирует на тренировки и ростки очень пушистым кустом !
Увеличиваю ппм до 850 и пш 6.0
Растение очень счастливо .
Провожу флаш каждые три дня во избежание засола .
Плохо переносит большие обьемы еды
Эта девочка продолжает почти и очень кустится ! Получает 900 ппм и 6 пш.
30.07.23 -срезал пару больших листьев и освободил пространство для новых побегов и лучшей аэрации . Стресса девочка не испытала
31.07.23-росте очень быстро , акукуратно снимаю большое листья 🍁
Выгладит здорово (только очень кустистый )

Likes
4
Share


@RoJoWW5308
Follow
So far, so good. Tops are fattening up slightly, stretch is well passed. The root ball in the reservoir is unreal.
Figuring out feeding with this container is definitely a challenge. She's in full blown potassium and phosphorus deficiency status, but I've increased the dosage on fertilizer so I'm hoping to counteract that. It's already starting to work, I'm just timid about overdoing it.

Likes
14
Share


@Rock_n_Roll_Randy
Follow
EVERYTHING IS HARVESTED NOW AND TRIMMING LIKE A MANIAC. STAY TUNED FOR THE NEXT BIG GROW. THE STRIVE NUTRIENTS IS INSANE.. BEST FERTILIZER PRODUCTS EVER MADE. I USED IT 4 TIMES IN 13 DAYS AT FULL STRENGTH AND THERE IS NO NUTRIENT BURN AT ALL AND THEY EXPLODED. AND I HAD A FEW THAT WERE TURNING YELLOW, I THOUGHT IT WAS ROOTBOUND OR CALMAG DEFICIENCY BUT THE STRIVE NUTRIENTS BROUGHT THEM BACK AND THEY ARE SUPER HEALTHY AGAIN....
ATTENTION GROWERS:::::: YOU MUST TRY STRIVE NUTRIENTS. BY FAR THE BEST FERTILIZER PRODUCTS EVER.. I PROMISE YOU THAT AND IF YOU USE IT YOU WILL NEVER USE ANYTHING ELSE
FOR EVERYTHING MARS HYDRO VISIT:
www.mars-hydro.com
www.marshydroled.ca
PROMO CODE: rocknroll
VISIT THE ALIEXPRESS STORE:
@marshydro_aliexpress
Instagram: @marshydropenny
https://youtube.com/channel/UChU5ZWwNi-DvnO3oWVU3ceA
(NEW) STRIVE NUTRIENTS 💪
https://strivenutrients.com/
Thanks for taking the time to read and check out my diary🤜🤛
FC-E6500 LED GROW LIGHT:
FC-E6500 grow light with 3978pcs OSRAM BridgeLux Diodes & Moso Driver, market-leading PPF 2.7 µmol/J, Max 2.5g yield/watt with 30% higher Average PPE, more cost-effective when compared to same style type lights. Only consumes 650W, perfectly cover 5x5ft (personal), 4x4ft (commercial) grow space. Innovative Precise Uniform Lighting-Built-in removable bars interval & dimmability enable the exact & dynamic PPFD control over each of the plant growing stages, FC-E6500 detachable bars deliverSuperior Heat Dissipation: Real Aluminum heatsink together with 6 slim profile passive cooled bars (THINNER & LARGER surface) and detachable Meanwell Driver, create less heat. save 50% hydro than other old grow lights! Driver can be mounted remotely on the side of a grow tent/rack or on an adjacent wall to remove heat from grow space. Full Spectrum UV IR LED: With Yield Max spectrum (660nm Osram enhanced Deep Red,2800k-5000k,730-740nm IR,380-410nm UV LEDs), Average PPFD the FC-E6500 LED grow lamp enables cultivators to produce BIG FAT Dense Buds, perfect for full-cycle hydroponic, soil, grow tent/grow room.
Dimmable Commercial Grow Light: Cost-efficient, easy dimming & daisy chain With a max up to 20 lights, IP65 Waterproof, master light easily controls the rest. Perfect for commercial & home horticulture.
FC4800 LED GROW LIGHT:
GET THE MAX FROM MARS👍: Welcome one of the newest members of the Mars Hydro family🤜🤛🤘. The Mars Hydro FC 4800 480W LED Grow Light can accommodate up to a 4' x 4' area for flowering. It has OVER 2000 LED chips consisting of the best selling Samsung LM301B diodes which has a Luminous Efficacy of: 220 lm/W
0.2 W, 3 V mid power,
Osram 660nm Diodes, Infrared light and UV LIGHT👍. It boasts the incredible efficiency of 2.8 µmol/J, maximum 2.5gram yield per watt with 30% higher Average PPFD. This High-intensity spectrum is beneficial for plants at all stages - from veg to bloom, and creates Big dense Buds👍. achieve 50% higher yields & quality compared with the old lights! Only consumes 480W for 4x4ft personal grows, and 3x3ft for commerical grow. It comes with a dimmer and daisy chain function with a maximum of up to 15 lights, the master light controls the rest👍. Wide 6-bar design offers even & wide canopy coverage and can maximizes your grow space. slim 180° FOLDABLE DESIGN... YES I SAID FOLDABLE🤘🤣 , making it compact and easy to install, it's IP65 WATERPROOF and will give you no worries while growing in a humid environment and makes it a flexible high performance commercial grow light for enormous SUPER FROSTY yields.😛😛😛. MARS GETS EM FROSTY BOYS👍
AWESOME HEAT DISSIPATION: The Low energy consumption FC4800 growing light has 6 passive-cooled bars and an aluminum heat-sink a removable driver you can upgrade later or have it outside your tent. with zero noise you can save up to 50% in your electricity bill compared to HID's or HPS lights!
It also has a removable driver so you can upgrade it in the future or have it outside your grow space for better heat control in your growroom👍
UPGRADED FULL SPECTRUM: Yield Max Spectrum with enhanced red (Top-Bin Samsung 3000k-5000knm, Osram 660nm Deep Red), speed up blooming & fruiting, perfectly suited for full-cycle growing. The FC4800 LED grow lamp was born for Big Buds, perfect for commercial, grow tent, grow room, hydroponics, and all soil grows.👍
THE BEST SAMSUNG DIODES: THE FC4800 has Top Bin genuine Samsung Osram Diodes, combined with remarkable 2.8 µmol/J Efficacy, 30% higher Average PPFD, 50% less energy consumption, to maximize your yields. They give you a TRUSTED 3 years warranty 100% Satisfactory guaranteed!!!
TSW2000 LED GROW LIGHT:
INCREASE YIELD AND CROP QUALITY WITH MARS HYDRO LED GROW LIGHTS: NEWEST SMD LED technology provides the highest PAR/LUMEN output (1122umol@18") and can make you get 30% higher yield compared to OLD blurple led lights. Max 2.5g yield per wattage and achieve maximum quality and quantity, much better than traditional HPS grow systems
LOW ENERGY CONSUMPTION LED GROW LIGHT: Consuming only 300W true output with 684 LEDS! It saves up to 50% energy than other led grow lights. Perfect for 3.5x3.5ft bloom stage, 4x4ft veg stage. Over 90% light energy can be absorbed by plants, it will have higher intensity in a MARS HYDRO grow tent with diamond design mylar, or by crossing over using multiple TSW2000
HIGH EFFICIENCY FULL SPECTRUM INDOOR GROW: 3000K 5000K and IR 660nm 760nm RED, makes it close to natural light, highly engineered to provide improved growing performance for plants at all stages of growing, rapid plant response from seed to flower; Uniform and wide-beam light distribution for your plant's optimal growth
8x8 1680D GROW TENT
The MARS HYDRO 8x8 Grow Tent interior is made of a unique diamond design mylar which is highly reflective. (Other companies mylar and reflective rate is as low as 50%, and it won't provide efficient light. They use thick 1680D oxford canvas, and being double stitched, it is tear proof and perfect for locking in the light. Their grow tent keeps 100% of the light inside the tent and helps your plants absorb more light. EXTRA-THICK material means No light leaks or rips at all.👍
Strong Stable metal corner adapters and poles are the trustful supporters of the tent. It's very sturdy, neither rusting or paint flaking off. quick and easy tool-free setup. They use heavy-duty metal zippers, with double layer black lining, by far the best on the market which creates a light-proof seal.
The Easy observation windows are made by double layers of cloth. Observe the growing conditions of your plants without opening the tent and avoid disturbing your plants. The observation windows also serves to dissipate heat and ventilate the air.
The tent includes 2 removable waterproof floor trays to hold soil and water. The removable tray can be taken out to wash easily.
They guarantee the grow tents are easy to install even if you've never done something like this before. Clear Instructions and no tools needed! They also offer 30-day unconditional refunds for quality problems. Just contact their friendly 24 hours customer service 👍
Likes
29
Share


@HotIce
Follow
Неделя прошла отлично! Дал первый компот на цветение! Были пожелтело некоторые нижние и старые листья, но компот похоже хороший и все по ходит в норму)
Ещё немного делал лст, следущий наверно буду делать когда они ещё подрастут! Продолжаю бороться с жарой.
Следующую неделю надеюсь дневник буду вести лучше)


Likes
19
Share


@Papabro2k
Follow
Last week for the flush the same as last time but a lot bigger this time around the buds are really hard and the Crystal looks amazing . 3rd run will be nutriculture


Likes
6
Share

@PapaTerps
Follow
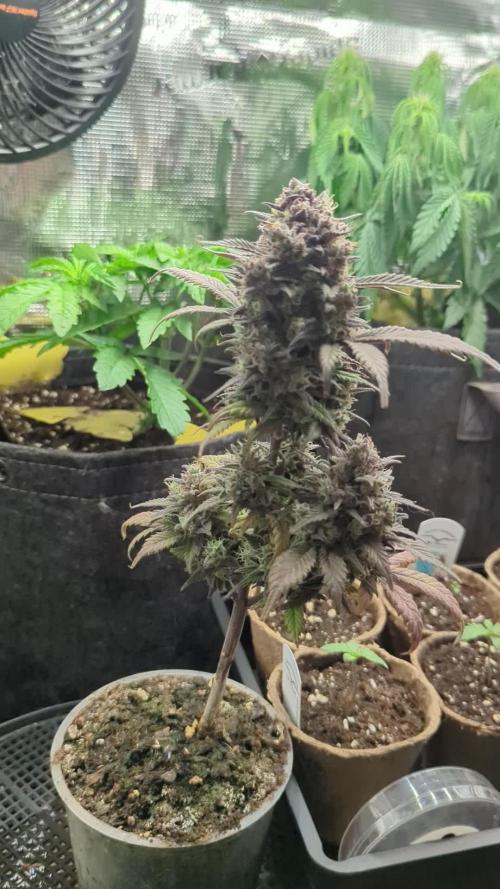
Strawberry Gorilla Automatic - FastBuds
Day 71 - watered with 1L of RO tap water with defined nutrients, mixed in order and then pHd to 6.3. This will be the last feeding with full nutrients as I now start to prepare her for harvest! Her next feed will include half of the defined nutrient units and then she will have her first flush! 👍🏻 She has taken on a beautiful purple hue on her flower now along with the deep purple on her leaves, this combined with the white and amber of the pistils, and the lime green on the bud sites, really makes her pop and shimmer, shes very beautiful!😍 Her armoa is really starting to come out now too, she smells just like strawberries and candy! Her trichomes are mostly milky with some starting to turn amber, so I'd say another few days and she'll be ready for harvest! I know she wont have a huge yield, but the point of this micro grow, was to find out more about the strain and how what a micro grow could achieve, so no matter the yield, I am super happy with the results so far - to the point where I am planning to have two micro grows in my next grow (TB SkillteZ by Bulldog Seeds & Pineapple Express F1 by Zamnesia)🙌


Processing
Likes
27
Share


@BorisGroen
Follow
i filled the wing up with a boost buddy co2 bag
and my plants got a new light and there growing like weeds
loving the total package


Likes
7
Share


@HeavyHead
Follow
Nutrients and water this week ;p
Starting to really get a sweet berry like smell to the room :)
Will be dropping temps slightly at the end of this week.

Likes
48
Share


@pifflestikkz
Follow
Day 106
14/10/24 Monday
Her colours are really coming through now 🤩
Nearing her end now, possibly another week after this ✌️💚
Picture and video update 📸💚
Day 108
Day 58 flower now 🗓️✅
16/10/24 Wednesday
De-chlorinated tap water with flawless finish to pH 6.2.
She really is starting to mature, weight on her buds is increasing. Trichomes now forming cloudy
Picture and video update 📸
Day 109
Day 59 Flower
17/10/24 Thursday
Nothing to update - she is just maturing now, picture and video update 📸💚
Day 110
18/10/24 Friday
Allowing her today, then Saturday she will be 24 hrs dark 🌑 and chop Sunday.
She is incredible, black and purple buds, leaves to match, coated, I mean sugar laced looking like tony Montana ❄️ sneezed on my grow, she is glistening with trichomes, seeing some amber's now.
Will upload pictures at harvest now
Day 111
19/10/24 Saturday
Here we go 😍 time for the dark side 😈🌑 I do 24hrs for my autos, I find they start wilting after this for me.
I'll update Sunday before the

Likes
116
Share


@Tropicannibis_Todd
Follow
💩Holy Crap Growmies , we are outdoors and in the Ground and there Doing Great💩
👉It's been another full week 35 days from seed and she's doing great , very nice Growth, considering shes been up against the wind and rain 👈
No problems 😊 so far so good 👍And she's now in full on flowering 😁👈
I GOT MULTIPLE DIARIES ON THE GO 😱 please check them out 😎
👉THANKS FOR TAKING THE TIME TO GO OVER MY DIARIES 👈
👉NutriNPK NUTRIENTS USED FOR FEEDING 👈rain water to be used entire growth👈
👉www.nutrinpk.com right now get 10% off using SPRING2022 as the coupon code👈
Likes
6
Share


@Gardens_of_Of
Follow
Green House feeded one is simply the happiest lady in the tent, growing big frosty buds.
Advanced Nutrients one is recovering and growing colorful buds.
Both phenos smell like grapes just like described in the name…

Likes
27
Share


@RDWCGrowing
Follow
1/20/2023- So much to do pre grow and over the next 16 days, absolute first order of business is that I have to take down my current Grow---TIMBER-- Then I have a list of things I have to get done in order to be ready to start this grow 1 Feb.
With that said
T - 2 days until start 48 hour Flush
T - 2 days until Start 48 hours of Light
T - 4 days until TIMBER!!!
Items that need to be done before 1 Feb 2023
1. I need to clean the tent out
2. I need to clean the equipment- Proper Sanitization between grows in Hydro is a must!!!
3. I need to get the hole in the ceiling above my tent repaired- For my last grow I had a deep sink installed in my grow room, to make Hydroponics a little bit easier and have a water source in the same room. The seals on the pipes they were installing broke and leaked through the ceiling causing some damage all the way across my grow room, I was already weeks into my grow and couldn't risk them working above my tent and it would have been very awkward positon for them to be working in as well, so have to get this done quickly between chop and germination.
4. I have to install my new light- I was using a Vivosun 4000 and for this grow I am switching up to a Spider-farmer SF 7000.
1/20/23- For this upcoming grow I am working with M/F photo seeds so I ordered 4 Sex determination kits. I recieved my my 4 Sex determination testing kits from Rimrock Analytics today. I will be using these to test my plants at week 2 of Veg so that when/if I take clones I know I am taking them off females. As well as I don't want to accidently pollinate my tent during this grow I am looking for big beautiful buds not seeded buds. :-)
1/24/2023- Harvest of current grow- Started at 2:00pm and finshed wet trim and firt batch into the freeze dryer.
1/25/2023- Next batch into the freeze dryer and cleaning all my equipment for this Grow.
T-1 Day until the workers are supposed to be here to fix the hole in the Grow Room.
T-3 days until I instll my new Gorilla Grow Tent and my New Light Spider Farmer SE-7000 for this grow.
T-7 Days until Start of Germination
1/26/2023- Harvest is done ran through the Freeze dryer and dry tim completed.
1/27/2023- Grow Room repairs completed. Hole is gone Letting the paint dry before I install the new tent.
T-2 days until Install the New Gorilla Grow tent and the new Light
T-3 days until I put the hydro equipment in the new tent
T-5 days until Germination
1/29/2023- Day 0- Final Pre Germination activities
Germination Start T-3 days
The paint on the ceiling was dry and it was time to finish prepping for Germination. I got the following items knocked off my list.
New 4X4 Gorilla Grow Tent is up and ready
New Spider Farmer SE-7000 Light is installed- Thanks Moony Grows for the suggestion and for the Code that got me some money off and free shipping (Moonygrows)!! I turned the lights all the way up to max and set the timer to 18/6 0600-0000. I will keep an eye on the temperature and humidity without my plants and see how hot it gets with the new light.
I put my Hydro system back together and put in 40 gallons of water into it, time to monitor for leaks the next few days.
I Setup my cloning machine for Germination Days 3-11
1/30/2023
let me break down the situation, ROOM in the TENT.. Enough said.. No really I tried putting my exhaust system up in the new tent with my new light, The light is so big corner to corner that it really didn't give me enough room for the lights be be raised, with the exahust hanging the buckets my plants are Starting in are 2 and 1/2 feet off the ground, great for plenty of room for roots but not so great for upwards space for the plant to grow. In a 6' 11 tent with the exauhst in side and hanging that only gave me a little over 4 feet of grow room to play with. My last grow if you saw my diary, anyone could tell I was struggling to keep the buds off the lights. No good, Since space was such an issue I was running my carbon filter inside on the ground but It really needed to be up sucking the heat out not shooting the cool out. With that setup I was sucking air through the filter and pushing it out the tent at a bottom exhaust hole cold out. Wasn't doing me any good for my heat. I was hitting temps of up to 85 degrees. I bought a portable AC unit and have been running it in the grow room to try and keep temps below 85 and I have had to lower the power on my lights during grow also not ideal.. With that said a friend of mine MoonyGrows (Check out his diary) took the time to look at my issue send me a picture of my grow tent setup with detailed instructions on how to suck the air out from the top but putting my filter and fan on top of my tent so no room issue and I am sucking the air out from the top where the heat is instead of pushing the air out from the bottom where the cool is... THANK YOU MoonyGrows For taking the time to help me get this straightened out.. Now I have room and I have the exhausts working right and now my temps with everything at 100% are topping out at 80 this dropped the temp by 5 + degrees at 100% max.
T-2 days until Start of Germination
Prepped my seed tray with humidity dome
Prepped my Rapid Rooter plugs. I Used RO water, and I added a few drops of Hydrogen peroxide to Oxygenate the water. I then PH balanced between 5.7-6.0 the same that they will be getting in the Cloning Machine and when they get to thier final grow pod. I perfere the 5.8x range and I hit 5.84 for these rapid rooters. If you want to see a complete video on the process HowWeedGrow has an amzing video that shows step by step how to do it and explains it better than I ever could including how to plant the seeds. Which I will cover when I get to that step on Wed. https://www.howweedgrow.com/how-germinate-weed-seeds-cannabis-rapid-rooters/
1/31/2023
T-1 day until Germination Start
All set and ready have my Rapid Rooter plugs ready to go have my seeds out.. Have my seed tray warming up tonight. Tomorrow morning right into the Rapid Rooter then strait into the tray. I will spray the dome to start the humidity in there.
2/1/2023
Germination Day!!
Let the games begin!
0600am Put the seeds into the Root Riots. And then put the seeded Root Riots into their first home the Seed tray. I have them under the light 24/7. Sprayed the dome
7:30pm Sprayed the Dome to keep humidity going on the dome.
2/2/2023
Day 1 of Germination
Sprayed the Dome in the morning
Sprayed the Dome in the evening
2/3/2023
Day 2 of Germination
Roots are starting to come out the bottom of the root riot plugs and the heads are slowly popping out of Number 4 just below the surface.
Afternoon- Number 4 has popped up
Evening- Number 3 has popped up as well. Happy Dance!!
2/4/2023
Day 3 - Germination
Surprise Surprise Surprise- all 4 have now poked their heads up.. Happy day!! 100% Germination succeeded.
Now major milestone to track is how many are female and how many are male.
I will take look at the roots this afternoon/evening and see if they have enough root to go into the cloning machine for the next 7 days before they go into their Hydro Pods.
Day 3 - Germination - Evening..
Roots looked good and they were tall enough to make it into the cloning machine.
Now that they are all in the cloning machine I have switched the lighting to veg state 18 on 6 off.
2/5/2023
Day 4 - Germination - Morning
All the Ladies (fingers crossed) looking great stretching nicely and look nice and green, Photo synthesis underway....
UPDATE!! After a very interesting POD cast on FSTS by Dr. Bruce Bugsbee from Utah University, I have shifted my lighting to 24 hours on through seedling and then I am going to shift to 20 hours on the rest of Veg.
2/6/2023
Day 5 - Germination
While Checking on my conditions inside the new tent last night, I found that the Humidity was down to 39 Percent. I added an AquaOasis Cool Mist Humidifier, the reason I selected this humidifier is that I needed one that could be turned on and off utilizing my Inkbird Humidity Controller IHC200 that I have my Pro Breeze Dehumidifier currently running with.
Root structures are starting to get there about 1/4 of an inch.
2/7/2023
Day 6 - Germination
Everything seems on track more roots poking out of each today. They are each getting a little taller as well.
Checked in the evening and number 3 was drooping the Root riot plug on the bottome was dry and the roots were not in the water yet. I raised the water just enough that the longest root that was sticking out is now hitting the water.
2/8/2023
Day 7 - Germination
Everything looked good while checking in on them this morning number 3 is now full up and no droop again.
2/9/2023
Day 8 - Germination
T-2 days until Plant into Forever Pods and we start week 1 of Veg .. :-)
Surprising thing to me is that number 1 and 2 were later in popping then 3 and 4 but the roots are growing longer in 1 and 2.
2/10/2023
Day 9 - Germination
Number 1 and Number 2 are definitely ready for transplant today.. Based on how they were yesterday and where they are today I am hoping by tomorrow 3 and 4 are ready. Today they look to me where 1 and 2 did yesterday.. I really hope 3 and 4 catch up by tomorrow since..
T-1 day until transplant to new/ final home for grow.
Need the roots long enough to have some clay down in the basket to keep the root riot out of the water and only roots in the water..
2/11/2023
Day 10 - Germination
Today they got placed in thier forever Home, 7 days from Sprout and 7 days until Week 1 Start.
PPM- 180 this is water out of the Tap
Temp Water: 70.7
Temp Tent: 77
Humidity: 40% I have a humidifier going 24/7 to try and bring this up.. I also have Humidity Domes on each plant.
2/12/2023
Day 11 - Germination
Sprayed the domes, all are looking good.. Nothing much to do at this phase but Keep monitoring the PH level in the system and making sure they have a comfortable home.
T-6 days until Week 1 start
2/13/2023
Day 12 - Germination
Sprayed the domes, They were looking a little yellow today so I moved the light down to assist. Nothing much to do at this phase but Keep monitoring the PH level in the system and making sure they have a comfortable home.
T-5 days until Week 1 start
2/14/2023
Day 13 - Germination
Sprayed the domes, They were looking a little Florissant yellow today, with what looks like slight burn on the tips, I talked with a fellow grower and we agreed that It was probably that I was drowning them, Yes you can drown you plants even in Hydro, but only early on.. :-) It usually happens with the water being too high, which soaks not only the roots but the medium (root Riot plug in this case). I lowered the water from touching the bottom of the pot to about 1" away. This will probably take 3-4 days to resolve. I will continue my daily monitoring.
T-4 days until Week 1 start
2/15/2023
Day 14 - Germination
Sprayed the domes, continue my daily monitoring they look a little darker green instead of lime green now that I lowered the water levels in the system, so I think that I might have resolved the issue but it will take a few days for recovery to happen.
T-3 days until Week 1 start
2/16/2023
Day 15 - Germination
I looked in on them this morning, 3 and 4 look like they are doing well and recovering nicely. Number 1 not so much it has brown spots on the leaves, this very well can still be a side effect of the overwatering but I decide to go ahead and add Nutes earlier than I was planning just incase. I was going to wait until Saturday but I think intervention is necessary now especially after drowning them early on.
I added 1/2 what I am planning on adding for week 1 start. I also think I am going to adjust my chart to add 1/2 2 days after plant from now on. I don't think it would hurt it to have some Nutes to pull from.
.25ml/Gal Calmag = 12.5ml
1ml/gal GH FloraMicro= 50ml
1ml/gal GH FloraGro = 50ml
1ml/gal GH FloraBloom = 50ml
T-2 days until Week 1 start = I will drain the system and start it over on Saturday with Week 1 Nutes.
2/17/2023
Day 16- Germination
I didn't even want to post today after looking in on them this morning, 3 of the 4 are now showing signs of dronwing.. Brown spots on the leaves, the water levels were still too high.. I drained about another inch out of the tanks.. Will see how quick they recover.. I start week 1 tomorrow and will have to ensure my water levels are at least 1" away from the basket on this round.

Likes
Comments
Share


@Oyziphar
Follow
We had a medium week with sun and rain 🌧️🌞 Pleasant outside temperatures 🌡️; and perfect in the greenhouse
I topped and pruned the plants to become a flat canopy 👊
Once a week I give the plant a liquid booster with OPF 7:2:3 ; Fulvic 25 ; Yuccah ; Biovin liquid ; Earthworm compost extract.
Big Thanks to Luc from Plant Health Solutions / Bioplantenvoeding dot nl 🙏🙏🙏

Likes
5
Share


@Bak2Blk
Follow
I swear every time I LST, within a few hours, they are right back covering the spots I tied down and opened up. I haven't had to give them nutes just yet because of the FoxFarm soil. I try to wait about a month before starting to give nutes after transferring them to this soil bc this soil already has so many nutes in it already. At the rate they're growing, they're likely going to be in need of a feeding very soon. Plan to top GDP2 again in a few days. GDP1 and BK I may top a 3rd time but I haven't decided. I don't want them to get so bushy that the tent becomes too small. And yes I decided I'm not going to LST GDP2. I may tie her down some for light exposure but no bending and tying down like with GDP1 and BK. More updates to come as the week goes.
6/29: I topped GDP2 one more time. I made sure I didn't FIM this time lolol. I topped all 3 new stalks which should give me 6 more, I believe. BK, I defoliated her lightly yesterday, took off a lot of the really large fan leaves. You can't even tell I didn't anything now lolol They're growing big and beautiful especially GDP2 since I've decided not to LST. I did tie down one of her branches though to give more light to other lil potential bud sites. 😍😘😌
6/30: I tested the PPM of the run off water and it's still pretty high even though I haven't added any nutes at all to any of the water I've watered them with. Only pH'ed the water and that's it. I'll be holding off a little longer before feeding them. That FoxFarm Happy Frog soil is no joke... hot hot hot...

Likes
12
Share


@StonedandSteady
Follow
AutoBlueberry breed by #DivineSeeds #DivineSeedsSquad #DivineSeedsBreedingCompany Origin:Afghani/Thai
Type:50% Indica/ 40% Sativa/ 10% Ruderalis
Flowering:56 days
THC:22%
Harvest:400-550 g/m2
Height:110-150 cm
Thier Growing under the #Growatt600w and in my #TopoLite 24×24×48 Grow Tent! I'm also using #TNBNaturals #TheEnhancer Co2 Despersal Canister and using thier Ph⬆️⬇️ for my Decolinated Tap Water!
Green and Growing Up Great! She's leaving her 2nd week of Veg and Stretching out into her 3rd week! She's Growing in my special blend of ProMix potting mix, a 1/2 bag of Earthworm castings and 2 light handfuls of Diatomaceous Earth mixed Up well for before transplanted! Diatomaceous Earth: Diatomaceous earth is made from the fossilized remains of tiny, aquatic organisms called diatoms. Their skeletons are made of a natural substance called silica. WHAT IS DIATOMACEOUS EARTH?
In a nutshell, DE comes from the fossilised remains of small marine organisms called diatoms. Over a 30 million year period, these hard-shelled algae collected on the bottom of bodies of water, eventually forming into a type of sedimentary rock. Fast forwarding, it wasn’t until around 1836 that a German peasant Peter Kasten discovered the ivory-coloured, powdery substance while drilling a well in northern Germany. Ever since, the usefulness of DE for multiple purposes, including industrial and horticultural applications, has been well-reported. Just sprinkle some diatomaceous earth on top of your soil and watch mother nature's secret weapon work its magic.CONDITIONS THE SOIL
When it comes to growing cannabis, everyone strives to provide the best soil to grow the best plants—but there’s always a way to make it even better. Making the soil a better medium is called soil conditioning, which is exactly what diatomaceous earth does. It works by improving the retention of moisture in your potting soil, holding a large amount of fluid and drying at a rate that’s much slower. This natural soil additive also helps to retain nutrients and allows for better oxygenation of the substrate. NATURALLY CONTROLS PESTS
DE is an all-natural, safe-to-use substance that doesn’t harm the cannabis plant with toxic chemicals. The nature of diatomaceous earth makes it useful against most types of insect infestation you might be experiencing; and unlike chemical insecticides, insects can’t develop a resistance to the effects of DE. So once they’re gone, they’re gone for good. DE is an abrasive. and when used as an insecticide, it gradually scrapes away an insect’s exoskeleton, absorbs the fluids, and dehydrates insects and other critters to eventual death. IMPROVES PLANT STABILITY
When using DE in your soil, it can be especially beneficial as it frees up nutrients so that they are made available to the plants as needed. This works via the silica content of DE being absorbed into the plant tissue, which helps improve the plant’s ability to respond and receive more nutrients as DE activates. This in turn results in greater yields and better stability under small pH fluctuations!
https://divineseeds.net/
https://instagram.com/divine.seeds?igshid=osxe2v7en33v https://divineseeds.net/
Thanks Again to All my Friends, Family's, Teams, Sponsors, Followers and Subscribers!!! Your Genetics are Merry Magnificent, Mega Marvelous and Mighty Medical! Love um!!! I really Can't stress enough how Thankful and Grateful I am of All of you and what you've Shared with Us! Means the World!!! It's definitely a Pleasure being able to Grow with these Phenomenal Grow Lights! Please Enjoy! BudBrothers4-Life! Cheers Famz!!! Much Props and Much Topz!💯🔥 #Osree #GrowStarStore #Growatt #TNBNaturals #TNBTeam #GrowYourOwn #Bliss
https://instagram.com/as420.ca?igshid=1f116alw054wp
The Grow Bags: https://www.as420

Processing
Likes
4
Share


Likes
12
Share


@WoEsWar
Follow
10/14-10/20
10/14: After lowering the temperature in the tent about 5 degrees, the leaf tip burn has stopped. This is the second time I believe I have successfully controlled the Grow Dots release rate with temperature adjustments (maybe--more experiments are needed, but it sure seems like it gives you a great amount of flexibility).
The tent is crowded, but the temp/RH/VPD have been perfect (see image).
Branches seem too spindly. I'm worried that the buds aren't going to fatten up enough. We'll see. Lots of time left.
Still hand watering (1/2gal per day per plant)
10/16: The lower fan leaves on one plant are yellowing a lot (the left side, or "bigger" plant with the larger light). They also happen to be below the largest buds. The largest buds also happen to be closest to the light. After reading around a bit, here's what I think happened: The parts of the plant closest to the light were getting too much light, which caused the fan leaves to yellow and start to die. The DLI was close to 60 for those parts of the plant, which is WAY too high. I turned it down, and now it's around 45 for the big buds, and 35-40 for the remainder of the plant. I wish there was a way to move the larger buds further away from the light, but there's not because of space limitations. I still have some concern about the size of the buds. I think I'm going to end up with a whole bunch of apricot-sized buds and no big kahunas. It doesn't seem like it will be the yield I hoped for, and I am no sure why. A common comment in the Glookies diaries I've seen is that the yield was below expectation. Lots of time left--maybe they'll fatten up a lot.
10/16 (again): I had a little extra time today so I built a DIY CO2 generator. See video. There's some chance it will overflow and/or explode and spray yeast and sugar all over the place. I plan to watch carefully. The pump and heat mat are on a timer so that they're only going when the lights are on.
10/20: Last day of this week. I turned down the light and the leaves stopped yellowing. So, problem solved. The plants look as good as any other Glookies diary I see on here for this far along. I am using every available inch of this tent. I've been as careful as I can about keeping things spaced for airflow. Daytime temps: 78F; nighttime: 67F. Humidity staying steady at 55. I didn't water yesterday because the bags felt too wet on the bottom. The pot bases are bone dry today, so I should be good to water again tomorrow. I hit them with Recharge day before yesterday.

Likes
28
Share

@deFharo
Follow
Bienvenidos cultivadores de marihuana! 🖐️ 👨🌾
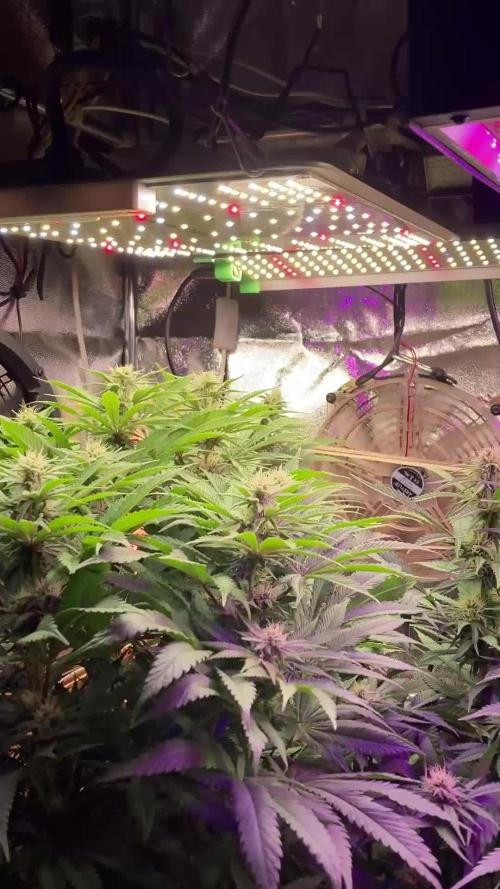
Tercera semana de floración concluida con éxito! 😍
Esta planta faraónica avanza hacia su gloria, la exhuberante masa foliar se mantiene, los tricomas invaden el entorno, el consumo de agua es brutal, los inmaculados brotes florales tienen ahora todo el protagonismo... nada puede salir mal! 🤠
Esta semana he hecho tres riegos lentos y profundos, con poca concentración EC, para preparar a la planta para el gran juego de flor, donde subiré un poco las dosis de Bio Fertilizantes... la planta me hablará y yo contento y servil haré todo lo que me mande. 😏
😁 HASTA LA PRÓXIMA. SALUD Y SALUDOS PARA TODOS!
================================
Info de la cepa Tutankhamon x Cookies USA de Pyramid Seeds: https://www.pyramidseeds.com/es/gold-line-by-pyramid-seeds/219-tutankhamon-x-cookies-usa.html
"La unión de dos leyendas en una semilla..." Pyramid Seeds.
- Genética: Sativa 60%, Índica 40%
- Tiempo de Floración: 60-65 días
- Rendimiento en interior: 500 g/m²
- THC: 27%
- Aromas: Crema, Fruta, Terroso, Cítrico
================================
