
Likes
Comments
Share

@Dr_Green_Thumb87
Follow
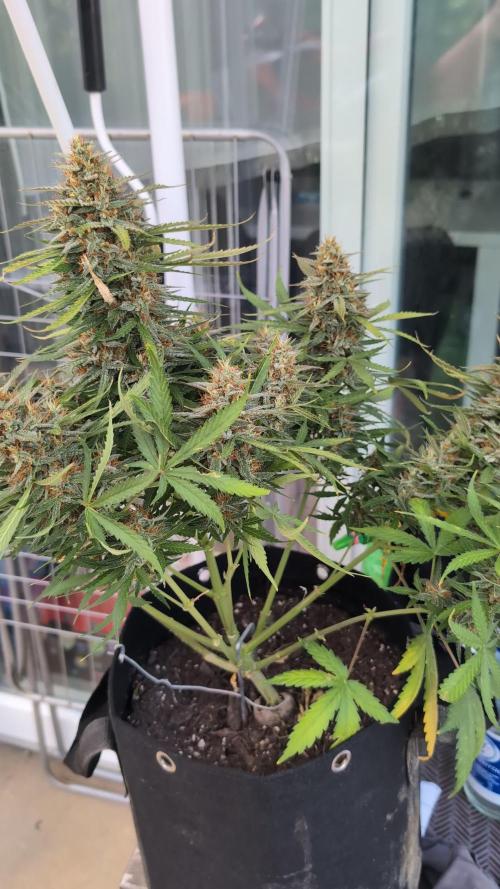
73 days from germimation to harvest of plant no1 from fast Buds
No2 chopped after 76days
No1 45gr. dry yield


Likes
11
Share


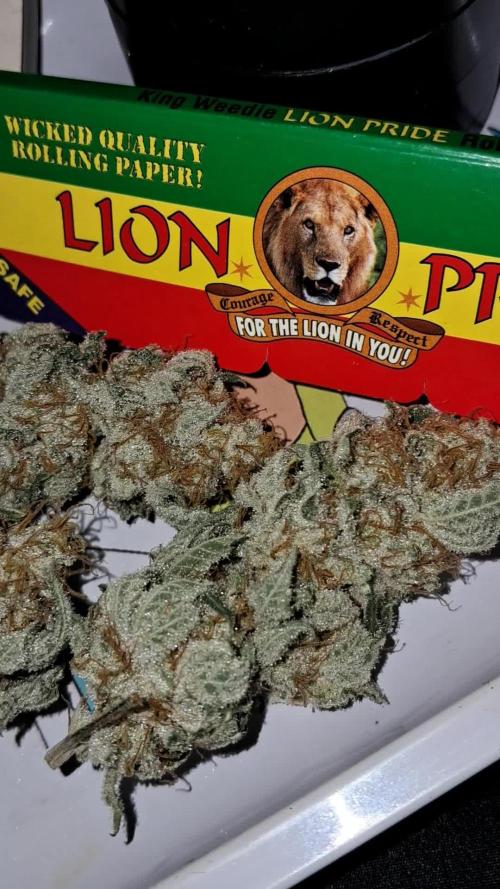
@Woodythedog
Follow
pink kush was harvested with 2 cheesepunch for the others I think it will still take 1/2 weeks

Likes
7
Share


@wunderbaer
Follow
Found Budrot in the mainbud… Damn it! Cut the whole mainbud and let the dmaller ones which looked fine. Wish me luck…

Likes
24
Share


@MikeyP
Follow
Well I stumbled thru my first week. Lucky that she needed humidity because it was abundant. She didnt need much from me yet other than some ph adjustments but today is the end of week 1 and I will be adding nutes tonight.


Likes
2
Share


Likes
14
Share


@Canabisseurs
Follow
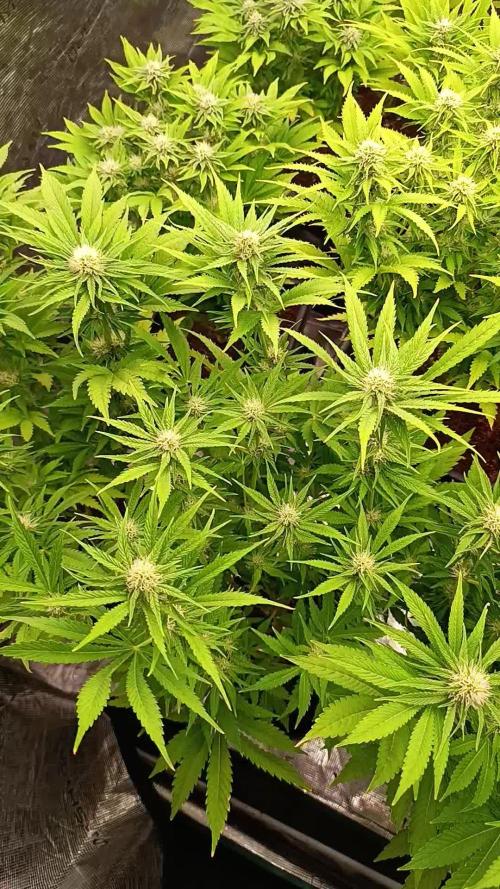
The Supercheese girls are kicking off Week 6 after a smooth transplant into 5L grow bags. They've settled in well, showing healthy new growth and bouncing back fast. Started topping to promote a bushier structure and stronger branching — they're responding beautifully. Keeping them in a sunny spot during the day and under the 100 W LED at night to keep those winter temps in check. Looking forward to shaping them up over the next week. Let the training games begin! #Supercheese #Week5 #ToppedAndThriving #VegPhase

Likes
59
Share


@AsNoriu
Follow
Day 1. She is out !!!! Let's all stupidity start NOW ;)))
Still have no pH up down, just boiled water, 7.4 pH ;)))))
So , because life is so unfair, I decided to cheat from time to time, think all evenings she will spent under 12W table light ...
Simple Lux meter app shows 1000 lux during day ;)))) under table light I get 8000-10000 reading ;))) easy cheat, no regrets !!! ;))))
Evening. Girl is getting green colour, but slowly, still worried about pH... let's see ...
Day 2. Gave 0.5g of BioSys from Ecothrive and 7 ml of 6.3 ph water
Day 3. At 18 pm lost all electrics at home, she spent 22 hours without light, +11 at night, +16 during day ....
Day 4. Mycelium is here !!! She looks nice !
Day 6. 20ml of 6.3 ph . Looks nice, just lanky, bought fan too ;)))
Damn math getting higher... 3 seeds + 11£ for ph+-, 3.50£ for BioSys, now 12 for fan ... Plus couple pennies for nutes.
Electrics at home included into rent, so light and fan run for free, hope she wont stink a lot ;))))
Happy Growing !!!

Likes
199
Share


@PEAKYPLANTERS
Follow
HOLY GOD ..... WHAT MUSIC! BOYS !This beauty with purple nuances makes you want to eat them
MY FRIENDS ARE STRETCHING AND GAINING WEIGHT !!!
VAMOS!
LET'S GO TO GET THE PRIZES IN THE RANKING AND BREAK THE PODIUM!
HAPPY AND ABUNDANT HARVESTS FOR EVERYONE

Likes
39
Share


@J_diaz420
Follow
El cambio de fotoperiodo para el inicio de floración fue el día 18 de la semana anterior.
Desde ese momento de han hecho riegos con vegetativo y floración.
Generalmente en 3°o 4° semana de floración elimino el vegetativo.
También se a regado estimulante de floración delta 9 de manera foliar aprox cada 10 días.
Recordar que doy 1 riego de fertilizante cada dos de agua sin fertilizantes por semana, donde en los riegos sin fertilizantes añado microorganismos, enzimas y calmag.

Likes
2
Share

@420DeepGrow
Follow
📆 Semana 5
El estiramiento queda completamente atrás y los erizos ya están bien formados en cada punta, compactos y uniformes. Los cálices continúan apilándose con orden y empieza a notarse un aumento real de densidad, aún sin llegar al engorde máximo.
La resina comienza a cargarse con más presencia, cubriendo brácteas y hojas cercanas, anticipando la fase de volumen que está por venir. Los pistilos siguen activos y blancos, manteniendo el ritmo de construcción floral.
La estructura permanece equilibrada, bien expuesta y sin estrés, con la energía centrada en consolidar flores y potenciar la producción de tricomas.
Seguimos creciendo fuerte 💪!

Likes
26
Share


@BlackDragon22
Follow
Che dire ragazzi... Odori fortissimi nell'aria, come vedete gli insetti stanno a pranzo e cena sulle mie piccole.. Pazienza! Non dovrebbe mancare tanto, penso 2 settimane al raccolto, sono riuscito a farcele vedere di giorno finalmente è sono contento di poterle condividere con tutti voi 🙏🏽 aggiunte un po di noci in più, anche se si vede un po di fox talking, il resto perfetto.
Likes
1
Share


@CannaBreeze
Follow
Unfortunately, one of the two seedlings succumbed to the intense sunlight exposure of a single day and exhibited classic signs of stress and stem damage, succumbing within the first week. With only one seedling remaining, I decided to proceed by faithfully following the established nutrient schedule.
Here are the nutrients administered:
May 8th:
250ml of water
0.5ml of RootJuice
0.5ml of BioHeaven
0.5ml of Activera
EC: 450 nS
pH: 6.5
May 10th:
350ml of water
1ml of RootJuice
1ml of FishMix
1ml of BioHeaven
1ml of Activera
EC: 850 nS
pH: 6.5


Likes
10
Share


@jahredi
Follow
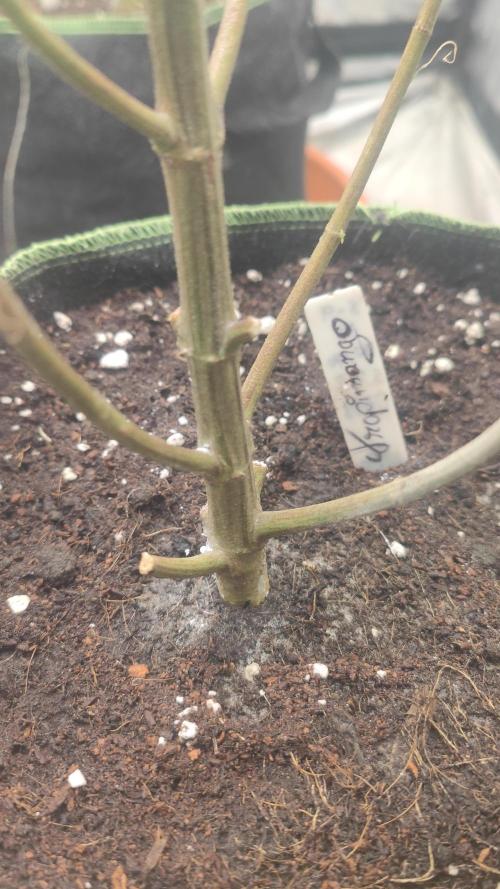
Day 36 today! It was a great week for the plants. Definitely starting to take shape. It’s cool to see the dominate Sativa and dominate Indica strains growing side by side on the same timeline and same regiment.
I actually only added .5 tsp of Tiger Bloom to 5 gallons of water last week. So they received two straight waterings of that, and I think they started to show minor signs of note burn. NBD. I did give them a healthy dose (1 gallon each) of straight water last time, and I will do the same (straight water) for at least the next watering. Then maybe a super small dose of Cha Ching after that. IDK. See how they look.
Did some LST this morning and by the evening photo shoot the ends were already pointing straight up. Love to see that vigor.
Honey Peach is a gnarly little rough and tough Indica strain. Coming in at a stout 15”, it’s the heavier of the two plants and I suspect it has a much more robust root mass (especially if what’s above the soil is any indication of what’s happening bellow). Looking very similar to when I grew it indoors. Compact, stinky and the leaves just go haywire all over the place. It’s definitely looking like it will produce a dense, substantial main cola and some solid spears off the side shoots again. I’m estimating 5-6 more weeks based off of what I saw on the indoor grow. I love this strain for ongoing daytime smoking. Great smell and a nice smooth flavor that gives me a mellow, relaxing high.
First time growing this Blue Dream and it’s looking true to the Sativa family. Topping out at a slender 25”, this plant has very symmetrical and even growth. It really stretched the past week. Personally, I have no idea what to expect, but I have seen a few other grows of this exact strain take substantially longer to mature than advertised (I think one went a full 16 weeks). It’s definitely moving slower than the Honey Peach, but that is to be expected as it is sativa dominate.
Definitely starting to smell! Time to hook those carbon filter up to the fans!
Likes
8
Share


@TorvicKofran
Follow
ENGLISH:
The first week of growth of my little ones has passed, I am very satisfied with the growth rate and progress of the girls, I am experimenting with a led lamp that had 95w stored and I am very satisfied although I have the feeling that my HM lamp 250w provides a little faster growth.
the first girl to go out was Tutankhamun. she was in a hurry to bring her leaves to light. then it was followed by Anubis, then Lennon and the last American pie, Kryptonite was also in the newspaper but at the time of passing it to the substrate his rai suffered a break so in this week he managed to get Cookies USA from pyramid seeds to replace his space and today it has already been passed to the substrate waiting for it to come to light, each one receives a 50ml irrigation enriched with rooting, vitamins and enzymes, following the table provided by the HESI manufacturer, I hope they increase their growth rate to a the third week switch to HM 250w to prepare them for flowering. I hope there will be no complications later, that's all for this week, I hope you are well and have a good week!
ESPAÑOL:
ya pasó la primera semana de crecimiento de mis pequeñas, me encuentro muy conforme con la velocidad de crecimiento y el avanze de las chicas, estoy experimentando con una lampara led que tenia guardada de 95w y estoy muy conforme aunque tengo la sensacion que mi lampara HM 250w aporta un crecimiento un poco mas rapido.
la primera chica en salir fue Tutankhamon. se notaba apurada en ya sacar sus hojas a la luz. luego fue seguida por Anubis, luego Lennon y al ultimo American pie, dentro del diario estaba tambien Kryptonite pero al momento de pasarla al sustrato su rai sufrio un quiebre por lo que dentro se esta semana logre conseguir la Cookies USA de pyramid seeds para reemplazar su espacio y hoy ya fue pasada al sustrato a la espera de que salga a la luz, cada una recibe un riego de 50ml enriquecido con enraizante, vitaminas y enzimas, siguiendo la tabla entregada por fabricante HESI, espero que aumenten su velocidad de crecimiento para a la tercera semana cambiar a HM 250w para prepararlas para la floracion. espero que no hayan complicaciones mas adelante, eso es todo por esta semana, espero se encuentren bien y que tengan una buena semana !.

Likes
12
Share


@Jays_Not_Here_Man
Follow
An amazing week for these beauties. At the start of week two they began forming really well, and by the end there was stacking and great nug production happening. They are filling out so well. Some of the tops were over achievers and got too lanky to manage, so I tucked as I could to manage them without damaging, but they still took off.
I typically tuck and bend for the first week, then go hands off till week 3 with a defoliation, but with the bud production happening so quickly it became difficult and I didn’t want to risk snapping anything off and stressing the plant out.
Temps have been consistent, around 80 degrees and 58 % RH. I’ve been checking daily for and pests or problems and haven’t had anything pop up. Also checking for signs of stress or ball/sack hermie production, but all signs say they are happy and healthy. Happy Gardening 🇨🇦👊❤️

Likes
24
Share


@Mrs_Larimar
Follow
2023-03-15
Please add one more Week in Flowering!- i was in Holidays here
This one is kinda perfect strain for me
growing vigor and sweet, getting great Strucutr, no Training needed
Just love , water and nutes
and good Conditions in Light and VPD, made her outstanding
I LOOOOVE her Colors in the End, and she smells fbulous, quite Zkittley with alovely Piny undertone, and some
Kush Notes. Iam very courious to her taste and effects
