
Likes
42
Share


Likes
12
Share


@Miguels_Fuego
Follow
A little nute burn. Dialing back a bit, but she is still getting frosty.

Likes
8
Share


@jsnafu
Follow
She is growing well, after a slow start. Light is 17” and the par is 600ish. I am going to make canister with yeast. Having a problem with low humidity and high humidity at night in the 70% range. Still just watering with cal mag, VJ and B-52 about 50-100 ml every other day.
End of week update: the environment is doing better. Moved the light a little closer about 700 par. Watering has been 2-3 days about 75ml. Exciting things to come…

Likes
9
Share

@LastinG
Follow
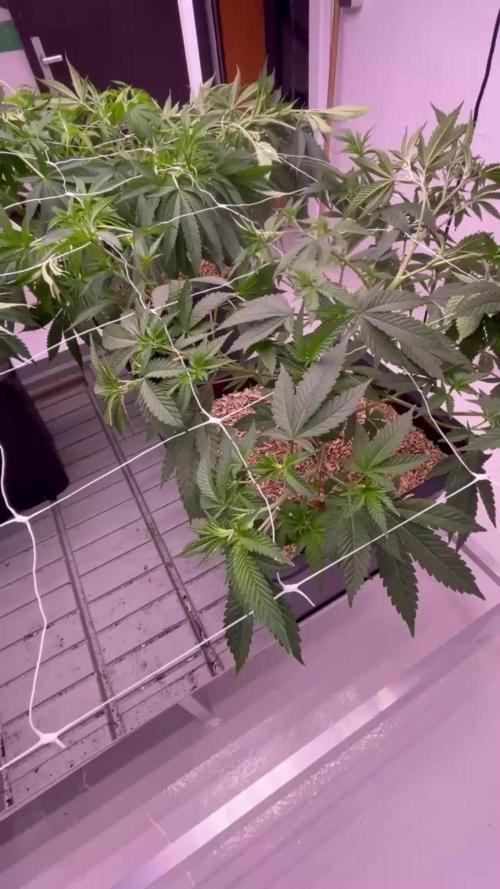
Week 6 veg and we are starting to setup for flower. Got the SCROG net up this week and the if the plants react nice ill start flower. Also spent some time on the 1000W LED controller and set up a proper day cycle – blue heavy early for tight growth, then ramping white and a bit of red later in the day. Here’s exactly how it’s tuned right now.
Nectar is still the most even and balanced of the bunch. Wide bushy shape, strong laterals, and she’s filling the net without any drama. Leaves look dark green and healthy, living soil doing its job like always.
Rainbow Melon is the absolute beast as usual. Super dense and aggressive – she’s really claiming her space under the net. Gonna have to stay on top of training and maybe pull a few more lower leaves soon to keep the airflow right, but she’s loving it.
Something Good has picked up speed and looks a lot more even now. Still the smallest but catching up nicely, good color and steady new growth coming in.
Probably 1 or 2 more weeks of veg to let them really fill the screen before we flip. Also hung the new big Biotabs banner – looks clean in the background. What do you think @Mia_BIOTABS ?? Overall everything’s happy, no stress, just solid progress. All three fertilizer are working great so far. They also got the usual foliar feeding. See you next week
Update: added photos of the stems and a 1 day after applying the trellis net. 15. I flipped them into flower


Likes
9
Share


@Silverback_Guerilla
Follow
TUESDAY 9/3:
I almost want to delete this diary..not even worth my time I'm afraid.
She seems to be stuck. Hasn't really recovered from her root problems despite being transplanted into a looser mix with a couple extra gallons of soil. She doesn't look any worse, but she also doesn't look any better, and the calendar tells me that there isn't much time left for things to change....😟
WEDNESDAY:
I was out at the property for awhile today, hosed off the horsies and cleaned their hooves really well. I was there long enough that I was able to move the plants into direct sunshine for an extra couple hours. I fed her with a half-gallon of water including bembe, terpinator, tiger bloom, beastie bloomz, armor si, and big bloom.
THURSDAY, FRIDAY, SATURDAY, SUNDAY:
I was sick as a dog . 2-day stomach virus, followed by an acute pancreatitis attack...
😷
MONDAY:
I gave her about a half-gallon of aquarium water with some bembe, beastie bloomz, and tiger bloom.
Processing
Likes
24
Share


@ElChicoDelaWeed
Follow
14 días desde EASY START.(4 semillas,1 venía solo la cáscara de un lado)
Maceta RQS 10L.
-EASY BOST ORGANIC NUTRITION.(preparación del suelo con 50g en 10 litros de sustrato con perlita)
-EASY COMBO BOOSTER PACK.
-En la 2ª semana riego las 4 plantas con agua mezclada con la pastilla EASY GROW BOOSTER (la dividí en 4 trozos para la semana 2,3,4 y 5 diluyendo en 1L. de agua la mezcla).
-Las 3 que están en vaso de plástico para la próxima semana le voy añadir al vaso uno granos del EASY BOOST ORGANIC que no le mezclé cuando las planté).
👌


Likes
50
Share


@Roberts
Follow
Crystal candy was a interesting grow. I battled ph issues off and on due to learning nutrition, and operator error basically. Still was a good harvest. Putting it in cure, in a cvault for approximately a month then to mason jars, and burping till desired humidity range in buds. Thanks everyone for likes, follows and subscriptions on my YouTube channel. Appreciate the support. Thanks again sweet seeds. This is a must grow everyone, if you like growing autos. Be safe out there and happy growing.


Likes
9
Share


@Kindbot
Follow
The second plant did not respond nearly as well to some drought stress tests.
We use it for comparison.
Consider this an experiment in stunted growth due to damage in early veg.
Likes
19
Share


@adam_pawloski87
Follow
Let’s Go Day 67 from seed !! So this week went real great! 2 Ogreberrys an Bruce Banner started getting flushed! The rest will follow up and start flush next week ! Today the 3 will continue getting flushed while the 3 others get there dose of nutrients, PHd at 6.5! Let’s grow lil ladies let’s grow!!! You all have an amazing productive day as well as a a great safe week !! Peace love and positive vibes to y’all Cheers 😶🌫️💨💨💨💨🤙🏻If there’s any questions please ask, I’ll be opened up to answer at best of my knowledge! Thank you all have a dank day !!

Likes
11
Share


@CocoLogic
Follow
Oct 11th: (F55)
Fertigation once a day with same recipe (950 EC 6.1 PH) watered until 10-20% run-off
Oct 12th: (F56)
Fertigation once a day with same recipe (950 EC 6.1 PH) watered until 10-20% run-off
Oct 13th: (F57)
Fertigation once a day with same recipe (950 EC 6.1 PH) watered until 10-20% run-off
Oct 14th: (F58)
Fertigation once a day with same recipe (950 EC 6.1 PH) watered until 10-20% run-off
Oct 15th: (F59)
First Flushing day 1 gallon each with 5ml/gallon of Flora Kleen
Oct 16th: (F60)
Flushing 2 gallons each with 5ml/gallon of Flora Kleen, Run Off is at 400 EC the target is 200 EC should have this in 1 day or 2
Oct 17th: (F61)
Flushing 1 gallon each with 5ml/gallon of Flora Kleen


Likes
14
Share


@Chi_K24
Follow
Into week 4 and they have blew up on me again. #2 still lagging behind but showing new growth at a decent pace. I think she will be the black sheep of this grow.
So far I have performed another round of topping and very lite defoliation. (Can i get more aggressive anything under the main canopy?
Watered them in with dechlorinated 6.8pH tap water. I think I may have to think about when to start top dressing them. Maybe 2 more weeks? Lol
Also noted that I they are starting to suck up allot of water! May have to start wetting out the whole pot now and see how they respond. So far its a garentee to water them ever 3-4 days. Now getting much closer to 3.
Hope you guys enjoy the video commentary and photos. I'm a bit lazy and maybe one day put a little more effort to taking better photos with my phone.
Cheers

Likes
501
Share


@PurpleWorship
Follow
Week 1 went off perfectly, purples babies reaching WEEK 2!
😍 PRESENTATION OF THE LADIES 😍
------------------------------------------
The four plants are the same genetic. But they already have a different look, and I would introduce them to you :)
1) The Ugly - She have terrible first leaves. But she isn't late compared to the other. So I still believe in my Ugly!
2) The fatties - 2 of them grew wide leaves. It's just about leaves shape for now.
3) The solar panel - This one grew less wide but longer leaves.
Regarding the Ugly, I must say that for the 4 seeds, I had to manually remove the shell when they sprouted.
They all had their shell on after sprouting, and I don't like that. Probably a bit old seeds?
For now, they share the same needs, and seems all happy.
But this might change. I may even not be abble to recognize them, except if I cheat on them by putting labels on their pots ^^
💧 WATERING 💧
------------------
Luckily, the weather is offering some rains, and I been abble to put the ladies out under the rain during day 7 and 8.
Not that long, they still got watered on Day 8, some hours after the rain. With feeding for the first time!
🍗 FEEDING 🍗
------------------
First feeding. Used Fish-mix at 0.8ml/L. I plan to have a second watering in the week, but without nutrients. That's why I written 0.4ml/L in diary settings.
If you know me, you also know that I like Fish-mix, but that I'm also effraid of it ^^ As foliar later during veg, it's an awesome products, easy to see that plants love it.
But it seems verry powerfull, and need to be used carefully when given to plant. My rule is to limit to 50% of recommended dose. For now.
Anyway, Fishmix right after a rain must turn on every form of life in soil I believe 😀 Even life coming from rain.
🏡 GROWING CONDITIONS 🏡
-----------------------------------
Starting an indoor session on the end of summer seems a good choice for me:
- Some rains that provide me better water
- I can put the ladies out if verry sunny, to save electricity/money
- Perfect temps in the grow room. My house is always windows open. The growroom lightup in the end of the afternoon, when the day get cooler
- Plants will flowering indoor during winter. I need heat during winter, so thanks grow room :D And cold air mean verry dry air! So reaching low humidity on the end of flowering will be verry easy!
Pests : Nothing to report for now. I'm expecting a visit of my good old friends the thrips in 2-3 weeks 😎
Grow tent & Light (XS2000 ViparSpectra) : Something I notice just now: I'm abble to close the grow tent without air-extraction. I never been abble to do that in the past.
This light is waaaay more efficient, and produce way less heat, because I couldn't keep tent close with my previous Mars Hydro TSW2000.
Don't be effraid, I still renew the air in tent multiple times a day ;)
💜💜💜💜💜💜💜💜💜💜💜💜💜💜💜💜💜💜💜💜💜💜💜💜💜💜💜💜💜💜💜💜💜
Thanks for reading guys :) Thanks for crossing your fingers last week, as you can see.... it worked!
PS : Improved my skill with my new camera. But except more and more better ones as I practice ^^
💜💜💜💜💜💜💜💜💜💜💜💜💜💜💜💜💜💜💜💜💜💜💜💜💜💜💜💜💜💜💜💜💜
Update Day 13: Plants watered with PH 6.2 water. Look at that Hugly... She really have a problem 😅 I'll try my best with her 🙌
Likes
4
Share


@Cannabot
Follow
My biggest plant,very impressed but DNA are always OP and this strain is just wow.Chocolope smell is typical of this strain, just super worried about PM but doing my best to not invite that bastard in.

Likes
20
Share

@DapperDabber
Follow
I wish I had more to say but these ladies are just happily chugging along!
My humidity is either spiking or that probe is having... ? complications.
I'll open up the windows to dry it out down there, it's not crazy to think the sub-irrigation and high transpiration of flowering is dumping water into their lung room. 🤔🤔 Also it was raining and snowing the last two days, so maybe a de-humidifier will have to get budgeted 🤓
I've never had mold issues and I don't want i start!
Again, they're coming along effortlessly! Coming soon I'll probably top dress and get rid of the rice hulls, as well setup the automated watering because they're drinking so dang much!
Thanks for reading and take care!


Likes
19
Share


@MadeInGermany
Follow
Hey guys :-)
A lot has happened this week :-).
She has developed very well.
Today it was topped on the main shoot for the first time.
How often I will use topping on her, I make it dependent on how everyone else develops.
I want to bloom soon so it won't happen very often :-).
It was poured twice this week with 1 l each time (for nutrients, see table above).
Fast plant spray from GBL was applied 2 times this week.
New was added this week Fast Bud from GBL is preparing her for the coming flowering.
Bio Grow Stay away for a while because the substrate is 30-50 % consists of fresh earth and the ladies are nice and dark green :-).
Today there was another spray with neem oil against the remaining tripse which I will repeat one last time next week.
As always, everything was cleaned and checked.
Have fun with the update and stay healthy 🙏🏻
👇🏼👇🏼👇🏼👇🏼👇🏼👇🏼👇🏼👇🏼👇🏼👇🏼👇🏼👇🏼
You can buy this Nutrients at :
https://greenbuzzliquids.com/en/shop/
With the discount code: Made_in_Germany you get a discount of 15% on all products from an order value of 100 euros.
👇🏼👇🏼👇🏼👇🏼👇🏼👇🏼👇🏼👇🏼👇🏼👇🏼👇🏼👇🏼
You can buy this strain at :
https://gardenofgreenseedbank.com/candyland/
Water 💧 💧💧
Osmosis water mixed with normal water (24 hours stale that the chlorine evaporates) to 0.2 EC. Add Cal / Mag to 0.4 Ec Ph with Organic Ph - to 5.8 - 6.4
MadeInGermany

Likes
5
Share


@BigGGrows
Follow
She is now in preflower showing budsite/tops. So far i counted 10. Still doing LST and did a light defoliation removing maybe 5 leaves. She is growing nicely with a decently even canopy. I have started 1/4 strength nutrients. Calmag, fox farms big bloom, and fox farms tiger bloom.
