
Likes
Comments
Share

@GoodTimesOrganics
Follow
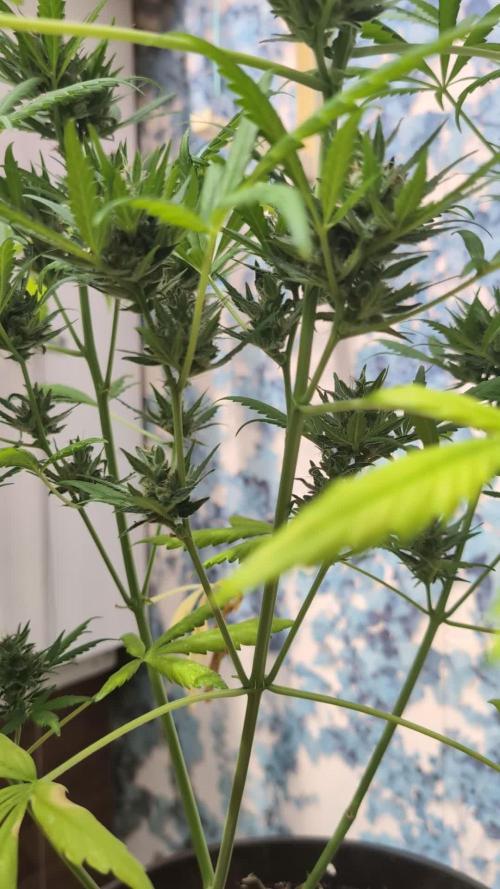
Nach dem Trichomcheck habe ich festgestellt, dass die Pflanze doch nochmal eine Woche bekommt.
Der Großteil ist zwar milchig, aber bei den Autos, möchte ich gerne auch Mal hinauszögern. So dass der großteil der Teichome bärensteinfarben wird

Likes
23
Share


@420DeepGrow
Follow
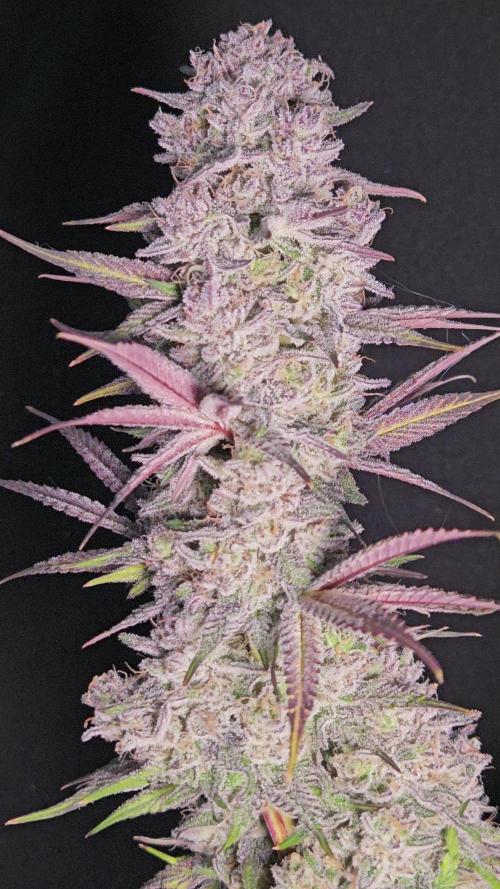
Toda esta fantasía se hace realidad gracias a Royal Queen Seeds y @James por confiar en mí. 🚀💥
Fiel a su linaje genético, la Hyperion F1 ofrece un aroma intenso que está dominado por notas frescas de pino y hierba, junto con un trasfondo terroso y un delicioso toque especiado. Aunque todos nuestros híbridos F1 producen excelentes concentraciones de cannabinoides y terpenos, no hay duda de que la Hyperion destaca entre el resto. Sus cogollos alargados y escarchados producen una resina rica y cargada de cannabinoides (sobre todo THC), y terpenos como mirceno, ocimeno, farneseno, terpinoleno, cariofileno y humuleno. Esto no solo da lugar a un aroma muy fuerte, sino también a un efecto bien equilibrado que combina una relajación física (en gran parte gracias al mirceno y al farneseno) con la euforia, risa y efecto motivador de otros terpenos. Al igual que el dios de la luz del mismo nombre, la Hyperion F1 causa un subidón esclarecedor que se puede disfrutar a cualquier hora del día.
🌻🚀 Consigue aqui tus semillas:
https://www.royalqueenseeds.es/semillas-de-marihuana-hibridas-f1/622-hyperion-f1.html
🍣🍦🌴 Xpert Nutrients es una empresa especializada en la producción y comercialización de fertilizantes líquidos y tierras, que garantizan excelentes cosechas y un crecimiento activo para sus plantas durante todas las fases de cultivo.
Consigue aqui tus Nutrientes:
https://xpertnutrients.com/es/shop/
📆 Semana 5:
Un temporal ha ralentizado el crecimiento, aunque ella sigue creciendo algo mas lento.
No riego esta semana porque hay lluvias constantes que mantienen la humedad en el suelo.
Esta semana creo que apareceran las preflores


Likes
16
Share


@CanarianGrow92
Follow
Again only water for this last week, wonderful smell and nice hard and sticky buds, not too fat, but i did several toppings here! Im sure this smoke is going to be a hard hitter, i really love the final smell of this plant, nice genetics, i did noted a slight difference in the phenotypes, i still have another plant in veg, im sure i get some clones of that one and see if i keep her 😁
Soon we will harvest

Likes
20
Share


@MrWolfe
Follow
These lights are a bit hot so I’m gonna upgrade to my Luxx 645s for the rest of this run.


Likes
12
Share


@Cris1982
Follow
Fotos de la 4 semana de vegetación, ya empezaremos con la poda apical y lst, se realizó preventivo con aceite de neem, jabón potásico y canela


Likes
91
Share


@CANNASIM
Follow
Girls are growing nicely, this week ran nice and smooth, no issues.
My soil is a bit compact now, and water is not penetrating so well, so i tried to te compact the top layer and mess a bit with the textile pot, that improved a lot… Next time will ad some clay pellets, as i always do…
They are in the edge of nutes and i will have to be careful next week. The cal mag is been added one a week, 2ml per l in water only day.
Ec is around 2.5.
The SKR is developing nice flowers really fast, she looks around one week ahead, top leaves are starting to look more sativa some how, she is packed and dense, did just some leaves tucking nothing else. I decided not to defoliate. Is looking like i will outgrow my space, they are developing really nice.


Likes
38
Share


Likes
15
Share


@MR_FLEXOPONIC
Follow
Nutrition change today:
15ml Micro
15ml Gro
15ml Bloom in 3gal. tank
Stepped-up to mild vegitative growth.
Seedling is looking healthier and stronger every day.

Likes
25
Share


@Mr_Weeds_Autos
Follow
Boy how these ladies have grown. All 6 ladies at this point are showing trichomes and the flower sites are really starting to bulk up. Girl Scout Cookies # 2 is soooooo frosty it's crazy !!!! Other than keeping the tent clean and making sure they get a watering and feeding each week, these ladies have been effortless to grow. One that has changed is that they seem to a bit more thirstier than usual but thats normal in flower I've heard. Well till next time fellow growers Happy Growing and Enhance Your Life!

Likes
6
Share


@PoshGrow
Follow
Welcome to Auto Alaskan Purple Grow by PoshGrow!
🍀 Week #6 2020 August 27th - September 3th.
General Info:
When planted: 2020 July 23th.
Week: 6
Days: 35 - 42
Last Update Day: 2020 September 3th.
Plants: 5 Alaskan Purple Auto.
Equipment:
Tent: MarsHydro 1mx1mx2m or 39"x39"x72".
Light: HLG 260w V2 Rspec QB Kit.
Exhaust: 4" 322 CFM fan + Viper Carbon Filter.
Intake: 4" 100 CFM Inline Fan.
Oscillating Fan:
Lower: 4" Ram Fan.
Upper: 9" Voxon Box Fan.
Humidifier: Taotronics TT-AH001.
Dehumidifier: Pavlit MD750.
Soil: NPK soil 40% Compost, 50% Peat Moss, 10% Agroperlite.
Pot: 7 gallon Fabric Pot x 5pcs.
Nutriens: Fox Farm Trio.
PH Correcton: Chemoform pH-Minus Granulat.
PH Pen: Cheap Chinese one, I callibrate it every time I use it.
Water pump:
Digital microscope: cheap Chinese USB X4, 1600X.
Comment

Likes
2
Share


@magicgarden
Follow
première semaine avec cette gorilla king de chez @kannabiaseed et une hulkberry de rqs
pas grand chose a dire pour cette première semaine juste le fait que tout ce passe pour le mieux du monde

Likes
43
Share


@TheBudWhisperer
Follow
Medium:
Yep - still gonna beat on the DWC drum. It just gets better and easier every run. Almost religiously changed out the res. every week and this was definitely overkill. Could’ve easily gotten away with every 10 days to 2 weeks. Stuck with peroxide this run again instead of going with bennies via hydroguard or hygrozyme. The results speak for themselves on a 6 week veg. That’s for sure. Still save’n them dolla bills on the nutes too. Minimal nute mixing (as well as simplistic regime) and for what we’re using in each res. - gotta be easily a 50-60% savings on nute consumption vs. more traditional methods. Honestly makes one wonder why organic soil grows are seemingly all the rage. I’ve found terp. Profiles, structure, plant health and of course yields to all be just that much better in straight water. What more can I say, we love our DWC.
Method 🎚️🎚️🎚️
The dueling methods were the whole point of this grow. Our best attempt to illustrate the differences between LST vs. LST/Topping ie. just how significant is the difference in terms of overall production? The truth of this test is a bit of a double edged sword. On the one hand, topping does have a significant effect on overall yield. This fact is regardless of whether or not from seed or clone.That said and when it comes to clones, you still have to be mindful of the drawbacks of further dividing (and thus reducing nug size for) main branches. Our topped clone #2 is a perfect example of this. While the structure demonstrates significantly more branching, the nug sizes are also significantly smaller. As you’ll see in the yield details it does somewhat make up for this through a higher overall weight but it was also a much less manageable plant than #1. Root mass on the topped plant was heavier and bulkier, drinking much more water than its counterpart. And in late flower half the plant was pretty much falling over. While some of this is attributable to the extremely hollow stems (and thus a carbon deficiency), making the most of the grow light proved difficult with the topped plant as bushy as it was. Basic summary - if ur cloning for profit or efficiency, stick with straight LST and grow a whole bunch of em. If I had to do it again I don’t think i would’ve bothered with topping - just for the sake of greater ease🤔🤔🤔. Then again, I’m greedy as fuck when it comes to my yields so I Could totally see myself trying to max everything out and go for broke🤙🤙. 3/5 volume bars for the rating - we accomplished what we were trying to.
Yield/Harvest🌴🌴🌴🌴
Awwwwwe yeah - down to where it counts and these girls were champs💪. While internodal spacing was longer than necessary and overall bud size was smaller than average; these plants pushed out some solid weight👍😎👍. Ran er through a 7 day dry and all jarred up on a slow cure.
Final numbers:
Total yield - clone #1: 5.14oz = 143.92g
Total yield - clone #2: 6.01oz = 168.28g
Approx. est. yield: 600g/m2 divides by 4.8, multiplied by 2 (approx. for 2/3 the cabinets sq/ft) = 250g per 0.41m2
Actual yield: 11.15oz. per 0.41m2 = 312.2g per 0.41m2.
That is some seriously good production right there😎👍😎. The high end avg. for this strain is 650g/m2. When you crush that out to my space and the numbers above, it works to about 270g per 0.41m2. Our actual yield still destroys the high end avg. by almost a zip and a half👍👍👍. The cree cob does it again. Fuck’n jazz hands y’all🙌!
With results like these you could really give the whole grow a 9/10. It’s only an 8 in my book because it’s not my preferred high. Otherwise, any time you’re north of 5+ oz. per plant, it’s a good day at the office👍👍.
Props👊👊👊
No choice but to shoutout Humboldt genetics. These beans have treated me so well and I can’t say enough Good things about the strains this organization puts out👌👍👌. Other than that, thanks to everyone who dropped by for a look and a comment. The convos always good and of course - any questions or enlightened conversation are welcome. Every time I try to take a break from documenting a grow, I end up growing something worth documenting. If your as high as I am right now, you should still be trying to figure out that last sentence.... stay lit y’all. See ya soon on the next one👊👊👊.

Processing
Likes
8
Share


@eldruida_lamota
Follow
Que hay de nuevo familia, mis green ak xL están dando sus frutos, no veas que bonitas que se están poniendo, floración algo lenta y variedad difícil de cultivar pero que si sabes realmente merece la pena.

Likes
38
Share


@Danger90946
Follow
01/04/2022- Hello and welcome all been away on some family matter. So today was the last day this girl got watered and will also be the last day she got light as well, she will be cut down Friday morning. The smell has gotten a lot more stronger since flush was started last week Wednesday. Will update before I chop her down.
Likes
15
Share


@gottagrowsometime
Follow
Welcome to my Lemon Drizzle sponsored by Spider-Farmer & Barneysfarm with their New SE brand, (upgraded 2023 Spectrum) and 1 of 5 of Barneysfarm new Releases I was given.
Veg Days 2-9 Days 8-14 Week 2
Plant grew really well in week 2. Rapid growth, holding pace with the 1st weeks explosive growth. Her roots are amazing. And it'll be getting uppotted soon. Running on a Full compliment of Natural Line Plagron with others in their line. Will be adding everything they have, in their range of course. New "Power Buds" and Green Sensation, SR, and idk why but I added Terpinator. And, its not an ideal nutrient to use in a sensitive range where PH mistakes cause big issues. She did do good this week but, this is the last of good week. As Co2 growing with young plants is new to me. My co2 is too high and lux is too low, I've taken out Runtz and put GDP auto back at floor. And I've upped the Lux and Will be lowering the light for ripening for my plant and dropping co2 back to 800.
Thanks to all who viewed. And to Bella from Spider-Farmer for the opportunity to work with them. And for the 2nd Yr in a row. Barneysfarm have let me pick 5 of their new Releases. Highly appreciated, that also goes to all who stopped by to view, like, &/r comment. Thanks and I look forward to seen your work. Either way. Thanks again for stopping by.


Likes
11
Share


@RegularWizardCo
Follow
6/29/2024 Day 38
Temp: 84.3 F
RH: 49%
VPD: 2.08kPa
Plant #1 Height: 34” inches
Plant #2 Height: 28.5” inches
Watered 2 gallons with the normal regiment. Been empty for two days but the soil was good. The branches have healed and started to do the candelabra deal, really cool! Smell is getting stronger everyday.
6/30/2024 Day 39
Temp: 82.8 F
RH: 55.3%
VPD: 1.70kPa
Plant #1 Height: 35” inches
Plant #2 Height: 28.5” inches
7/01/2024 Day 40
Temp: 82.8 F
RH: 55.3%
VPD: 1.70kPa
Plant #1 Height: 35” inches
Plant #2 Height: 28.5” inches
Have to move the plant and tent today. Everything went good. I had to tie the top cola over to get it in the car but it went just fine for me. Now we get to acclimate it to it's new lung room.
7/04/2024 Day 44
Temp: 81.2 F
RH: 58.6%
VPD: 1.49kPa
Normal day with no pics. Everything is good. She keeps taking everything I am throwing at her!