

Likes
48
Share


@Troy_McClure
Follow
SUMMARY:
- overall everything went smooth but I overcompensated the LED height, I started too high (lack of extension cords), then I dropped them too low, ultimately burning the second set of "starter" leaves (after the cotyledon set). I didn't get the humidifier and climate to synergize in the way I liked either, but it went well overall.
nov. 11
12:00 - third seed has still not been able to germinate, resorting to emergency soak in glass of bottled flat water
15:00 - seed taken out of glass back in damp paper towel
nov.12
23:00 - put humidifier inside tent set to 95% but rH never got to 60% according to AC infinity's humidistat in between both smart pots at soil level
- lowered lights from 30inch to floor to 20inch to floor
- soil is 3.5" from floor
- seedling canopy is 1.5" tall
nov. 13
- 15:00 Grow tent climate stabilizing with the humidifier helping keep the rH between 50-60%, which is about 10% higher than before.
- note: humidifier is set to max 95% rH on its setting, claims the rH is high around 80% but the AC humidistat right at the canopy claims it is closer to 50%.
- Keeping the AC Infinity CLOUDLINE T6 controller set on 24/7 only on setting 2
- note: must be careful with the S6 active intake, as the ducting can drastically drop the cfm coming in, resulting in a rapidly increasing negative pressure which if left uncheck could force the tent to cave severely. It was very important to watch immediately when changing the inline fans speeds, and the ducting positioning to ensure a stable and safe pressure exists.
- Temperature stable around 78F during 18H of LED light
- soil is slowly drying up, its still significantly heavier than the empty pot, not quite moist so will have to see about watering, still trying to get those roots to work for it and avoid overwatering.
- Turned on 6" mini fans to get the lanky stalks to dance a bit and strengthen, fans are about 2 feet away at 45 angle set on "normal" power
nov. 14
19:00 - humidifier is able to get the tent to a low rH of around 60%+
nov. 15
14:00 - one hour after turning on lights without humidifier on and the rH drops from 53% (as it levels out to when lights are off for 8H) down to 40%.
Nov. 16
17:00 - seedlings looking a little sad and in need of some water
- the younger seedling’s leaves are starting to twist a little bit (like a propeller), this could potentially be from the mini fans moving them around.
- gave both plants 3x waterings of 50ml each, over the course of 5 mins. Watered until run-off, soil was extremely light and dry as to encourage greater root growth. Water was measured at 6.92 and the run-off is measured at 7.21 for the younger smaller seedling but 8.14 for the larger older.
Nov. 17
14:00 - seedlings had to sit in the room just under normal room lights as grow tent was set into final position and hooked up to the new ventilation going out of the house.
- some potential concerns with the air exchange “leaking” cold air back into the tent
- the concern is that the grow room sits around 70-74 during the warmest possible times
- whereas, during the coldest possible times it is possible for the grow room to drop to 63, which is the lowest temp just outside of the danger zone
-
- 22:00 right now the fan settings are synchronized on 4 and humidifier set to 80%
- it appears as if this setting will hold the rH around 60-70% and the temperature around 70-74F
- grow room temp: 74
- humidifier: rH 78%
- set to 80%
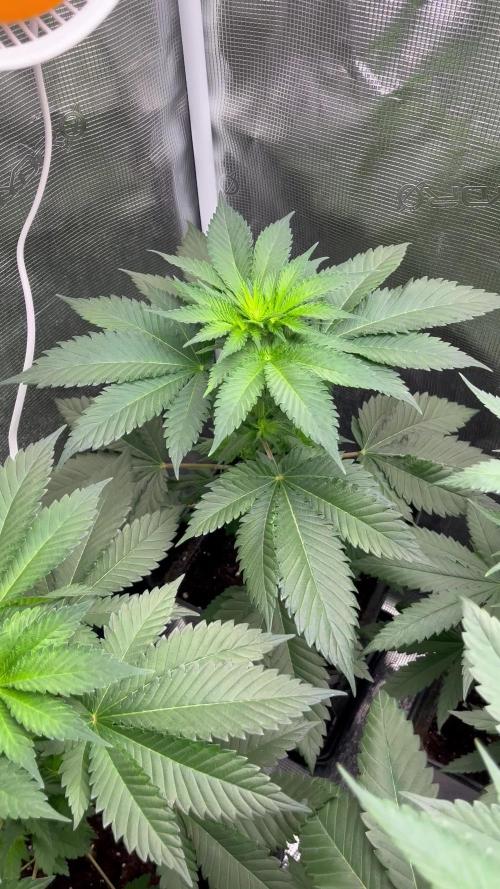
- Older seedling getting some discoloured around the tips and a little bit of a brown tip
- likely lowered LED too long, but they were out of the grow tent a few hours , so not worried at all and expect full recovery in 48 hours
- Lights now 27 inch from the floor / 23 from canopy
Specifications:😎👇
Seeds:
- 2x White Widow feminized seeds from Crop King Seed
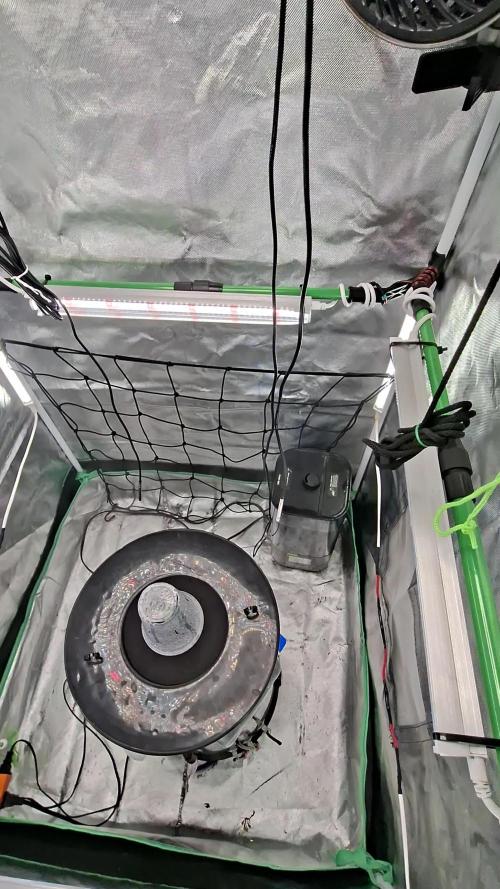
Tent:
- 4x4x6 Mammoth Grow tent
LED:
- 2x Spider Farmer SF1000 LED (default 100 watt draw for seedling but will be bumped up to 125 Watt for flowering if not sooner)
Pots:
- 2x 0.5 L starter pots
- 2x 5 gal smart pots after transplant
Soil:
- Pro-mix containing mycorrhizae and perlite, used for starter pots and mixed at roughly 1:3 ratio with Ocean Forest
- Fox Farm Ocean Forest soil, used in the 5 gallon pots and mixed with roughly 3:1 ratio with pro-mix
- note: pro mix was mixed thoroughly with ocean forest in the 5 gal pot, then pro-mix was used on the top layer, in and around where the transplant will be to help the early veg stage avoid getting too "hot" via nutrients.
Nutrients:
- Fox Farm Big Bloom
- Fox Farm Big Grow
- Fox Farm Tiger Bloom
Inline Fans:
- AC Infinity CLOUDLINE T6 6" (exhaust)
- AC infinity CLOUDLINE S6 6" (active intake)
- AC infinity 6" ducting
Oscillating fans:
- 2x Wind Devil 6" fans
Carbon Filter:
- 2x iPower Carbon Filter on both inline fans
- note: carbon filter on intake fan as basement had mold issues in furnace room far removed but same floor, some mold issue in other room, cat litter in basement, thus, avoiding all risks and sleeping sound at night :) all mold was killed, scrubbed, cleaned, sprayed, painted, and sprayed again before setting up.
Humidifier:
- TaoTronics Cool Mist Humidifier
Timers:
- 2x Kuman 15A/1800W 24-Hour Digital Timer

Likes
68
Share


@Theia
Follow
Hi all
Another week blagged. No rot lots of frost..
Fingers crossed for next few weeks.
Thanks for stopping by..Rather boring update,sorry..
Stay safe 😷😷
Grow well 🌿🌱🌼
Likes
285
Share


@Tropicannibis_Todd
Follow
Alrighty My Friend
well this was one hell of a grow , i had a blast , the SugarLarry exceeded my expectations in everyway ....
I would definitely recommend 👌
👉Soil Provided by ProMix.ca
👉Nutrients Provided by Agrogardens
👉Lighting Provided by MarsHydro.ca
Thanks my friends for the great support over the years 🙏 Happy Growing

Likes
6
Share


@IQuSX
Follow
Hi, topman!
If you like, check my post every week on my profile and let's get to our important exploration of auto-boost options.
See here... It is F1 version!

Likes
Comments
Share


Processing
Likes
34
Share


@Ashbash
Follow
Transition to flowering over the past week. Lights are now 12-12 and stretching has started. The one that i think is Green Gelato (#1) is stretching most, just like last time. The Gorilla has a slightly different leaf shape to last time. It was more indica style, but now looks hybrid. Both looking very healthy imo.
#3 was overwatered. Gave it the same as the other two despite it being smaller, and this is what happens lol.
There is damage on some of the leaves. it looks like a deficiency of something, but i reckon its from the fan as its only affected directly in front of the fan.
Temps are much better with the QB, i hope i will get the same amount of bud as the 250W HPS!!
Likes
Comments
Share

@fabialien071
Follow
iniciamos semana con nutricion athena, semana del 31 de mayo al 5 de junio 2026. dejamos en cubeta de 1 galón hasta ver un crecimiento de la raiz avanzado.
Likes
18
Share


@VanTheMan
Follow
Day 22 - 06/04-2024 - Watered 2L - I am trying out LST with this one. Starting out with a soft bend using cotton thread. before bending i gently rubbed the stem between my fingers to soften it up
Day 25 - 09/04-2024 - Watered 1,5L - I am really satisfied with my LST work so far and now i regret i did not try this out earlier....

Likes
34
Share


@BOMbolenath
Follow
Buds are getting bigger. It's developing well. This strain have a nice structure.

Likes
9
Share


@High_Grade_Dadli
Follow
Purple paralysis/ rainbow candy is jus hit the 5 week of flowering she looking very promising scent is 🔉 volume should turn up these nxt couple week
Likes
151
Share


@CANNASIM
Follow
------GENERAL COMMENT------
Girls are moving forward, a lot of growth for the week, the two strains are absolutely different in terms of structure. Unfortunately the three Candy Kush did not sprout, so I will run only this two girls for this cycle. Down a bit the watering mainly doing a feed every other day, trying to manage the root mass to expand. Choose to do natures candy also in veg since i'm using recharge regularly, is 0-0-0 not noticing a lot of EC raise with it, velo kelp came in to play also. One dose of sensi Cal Mag this week since i notice some paling going on, my medium is inert by the way.
------SM.BLUEBERRY COMMENT------
She is creating a lot of foliage compared to the AK, both are in the same hight. May top in a week, this will depend.

Likes
8
Share


@TegridyCal
Follow
White Widow is swelling the peaks it was finally a little slow maybe but they are swelling very well. The trunk is beautiful thick and resistant, on the flowers the first trichomes are seen, the plant is finally coming.

Likes
9
Share


@DeepRootsGrowTrees
Follow
KICKASS AUTO by KANNABIA
Week #6 May 7th-14th
Week#1 Flower
This week she had continued to stretch both vertically and horizontal her side branches all have multiple bud sites on them she's a really bushy plant looks like she's going to produce a nice harvest. She's looking 👍 good no issues being outside she's actually thriving ✨️ right now. Stay Growing!!
Kannabia.com Kickass Auto

Likes
5
Share


@DemonDabsSolventless
Follow
Day 11:
We have:
3x White Widow
1x Critical
2x Special Queen #1
1x Special Kush #1
Important:
The method used "jiffy" is efficient and fast but in another possible germination I will definitely do the "paper towel" method first. It is important to note that for good germination, the seeds must have as little soil as possible on top, where I delayed by 1 week due to the fact that the seed was very deep in a jiffy.
I reduced the distance of the LED from 60cm to 30cm because we still have plants that are stretching too much so this was the measure adopted awaiting results.
For 8 pots of 0.5L, 500ml of pure water containing:
1ml Voodoo Juice
1ml Sensi Grow A+B (2ml total)
1ml B52
2ml CalMag
The net proportion was satisfactory.
Likes
51
Share


@Chumpkilla
Follow
12/30/23 - Day 54 - Hello All! I started this week a day early. I wanted to update everyone on something I have been thinking about a lot. Curing. I feel if there was a hole in my growing skills it would be curing. Last grow there was more than I had anticipated. I was not set up for curing 1 lb. I threw in an audible at the last minute. It worked out but I know I can improve with some trial and error and hands-on experience. So after reading a ton, and going off of some of my prior builds for drying, I came up with this design.
I have a controller that will turn the air on and will run when the contents inside the box hit whatever RH% I want to set it at. I think the first week I will set it for 78%RH, then every couple of days go down a % until I hit 62%.
The thought is that if the bucket gets above the set RH% then the air will kick on and distribute air across the buds until the RH% is back down to where you want it. It will force the humidity out. I won't need to worry about burping. It will happen on its own.... in theory.
Ill update tomorrow with some pictures after the water change.
12/31/23 - Day 55 - Everything is looking good. The water change completed this morning while I was in the shower. Its adding nutes now and will do so over the next hour or so. She is starting to get stinky. I had to add the extra carbon filter to the room. I've got some pics up top of that.
Happy New Year! Next time I post it will be in 2024! Have a great night and be safe! Dont drink and drive, your life and anyone else involved in an accident is too important! C' YA!
1/4/24 - Day 58 - I have been thinking of trimming her for a while.... I got a comment on the bushy-ness and I got self-conscious and gave her a trim. Lol I have been going bath and forth for a while and that gave me the push to give her a little trim.
She looks great and is growing really quickly. Ill update with more pics as it goes along.
Likes
10
Share


@MG2009
Follow
11/16/2020
She's growing, roots are nice and healthy, so time for flowering.
Switching to 11-14 and flower dose will start today. Full bucket switch to
Grow, Micro, Bloom flower week one
Raised level of water to 16 liters just touching mesh pot, she used about 1/2 her water (6liters)
And do not want her to go hungry lol
Likes
2
Share

@eldruida_lamota
Follow
Vamos familia, actualizamos la primera semana de floración de estas NoName de Seedstockers.
La temperatura que estuvo entre los 24-26 grados y humedad dentro de los rangos correctos.
Esta semana cambiamos a 12 horas luz,12 horas de oscuridad, estiraron bien y ensancharon bastante también, el color es verde sano.
Se nota que los nutrientes de la marca Agrobeta hacen sus funciones.
- os dejo por aquí un CÓDIGO: Eldruida
Descuento para la tienda de MARS HYDRO.
https://www.mars-hydro.com
Hasta aquí todo, Buenos humos 💨💨💨
Likes
16
Share


@CJgrows
Follow
Starting to ripen up probably another week or two on gorilla glue and strawberry pie the grapefruit is just now packing on bud so I’d say maybe 4-5 weeks left on grapefruit. Little bit of amber showing on the gorilla glue. Mostly clear yet on the strawberry pie. Overall happy with gorilla glue and strawberry pie. Grapefruit not so impressive yet. The smell is quite strong at this point and is getting stronger by the day with the really sweet notes of strawberry and the earthy medicinal smell of the gorilla glue.

Likes
19
Share


@JeyGanesha
Follow
Alla prima strawberry banana gli ho fatto il lavaggio radici, ancora una settimane più o meno e ci siamo gente😀👍💪💚💛
Non vedo l'ora di raccogliere perché sto rimanendo anche senza terapia🎺
Likes
7
Share


@Snooziecheesecake
Follow
I was ahead of schedule with my weekly updates so I am changing this week to the true week 6 update, photos are about a week and a half from last week update.
Starting flowering nutes tomorrow after flushing all day today, seeing a lot of new pistil growth. I was hoping to have these harvested around week 10 but I’m thinking it’s gonna be more like 12 or 13 now which is fine, just taking it day by day. This week has been a lot of stretching, with the tallest one coming out at around 17 inches.
I was gone on a trip for 5 days and left them to their own devices, and returned to see great growth and no signs of any issues. Humidity was at 90% in the tent when I got back which scared me but I saw no signs of stress, these girls really are some hulks. Aired it out and it’s back to a reasonable level now.
I’ve been expressing my worries in previous updates about the plants growing too big for their grow area, however nothing is getting out of control and I don’t see them growing more than 12 more inches, which at max could be pushing a little close to the light but should be ok.
Starting to get hints of some nice pungent smells which are different than the previous earthy ones, getting pretty excited.
