


Likes
9
Share


@Smokey_J26
Follow
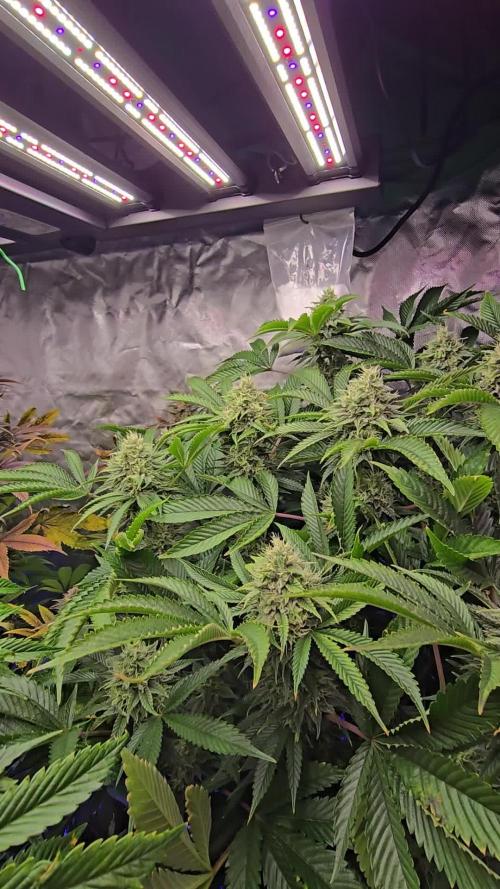
A nice bit of growth this week, one girl is shorter than the other 2, and slightly behind in terms of growth. Hoping to see a good spurt now with the first application of Evo 2.0 spray on day 25, abit more nutrients added and lights turned up to 400w. Onwards and upwards 🌱💯


Likes
16
Share


@Chubbs
Follow
420Fastbuds
FBT2310/Week 6
What up growmies. Weekly update on these beautiful ladies. This week we've had some temperature swings and wow did they not like getting down into the high 50's. They both bounced back but won't be letting it get that cold again if I can help. Flower sites are all over with pistols. No signs of any major issues so will keep the same routine. All in all Happy Growing

Likes
36
Share


@MadeInGermany
Follow
Flowering day 56
since time change
to 12/12 h.
Hey everyone :-).
We are now close to the harvest 😍
This strain is really extremely fast 👍.
Both phenotypes now remain there for 3 or 4 days before they are put in the darkroom for 48 hours 😁.
The trichomes are now 70% milky and 30% amber ☺️.
They were watered one last time today with 1.2 l per plant so that they can dry again until the darkroom :-).
Before the last update, there will be an interim update of the harvest 👍.
Until then, I wish you lots of fun with the update.
Stay healthy 🙏🏻 and let it grow 🍀
You can buy this Strain at :
https://sweetseeds.es/de/sweet-skunk-f1-fast-version/
Type:
Sweet Skunk F1 Fast Version
☝️🏼
Genetics:
Sweet Skunk Auto (SWS34)
X
Early Skunk
👍
Vega lamp:
2 x Todogrow Led
Quantum Board 100 W
💡
Bloom Lamp :
2 x Todogrow Led
Cxb 3590 COB 3500 K 205W
💡💡☝️🏼
Soil :
Canna Coco Professional +
☝️🏼
Fertilizer:
Green House Powder Feeding
☝️🏼🌱
Water:
Osmosis water mixed with normal water (24 hours stale that the chlorine evaporates) to 0.2 EC. Add Cal / Mag to 0.4 Ec Ph with Organic Ph - to 5.5 - 5.8 .

Likes
14
Share


@Cannabot
Follow
100% Germination on bulk seed banks Purple glam kush. First time growing this strain.Grown in south africa

Likes
31
Share


@Alex8o
Follow
Added 2 scoops x plant of Bat guano for preventing any deficiency and feeding supersoil since i used Big Bud (i was scared about deficiency before understanding was a light stress). Now they're very thirsty ,i'm watering Every 2 days with about 1liter per plant.
Processing
Likes
14
Share


@ThatoneAKguy
Follow
She was touch and go couple weeks ago and you could never tell it today! Originally what I think happened was the stalk was over saturated so I toned back the amount of watering and ran a stint of florakleen to back it up.


Likes
40
Share


@DutchBarnacle
Follow
With the seeds of the next cycle already germinating in cups of water it was time to harvest the Northern Light Automatic by Royal Queen Seeds.
She was moved outside the tent and was given a full hand trim. The entire process took about three hours. As opposed to the Sherbet Queen of last run, the Northern Light was trimmed wet.
Drying conditions are 23°C and between 50-60% humidity. She still smells a bit like hay on the second day after harvest, nowhere near dry. On the third day after harvest, the hay smell is stronger.
More information once she's dried sufficiently. Ofcourse, I will then also share her dry weight. After some consulting our peer group came up with a range between 65-90 grams. What is YOUR guess?
Likes
9
Share


@Headies
Follow
fantastic smells coming out of the tent! The purple punch smells delicious. The sour diesel smells dank. The girl scout cookies smells like GSC
Likes
11
Share


@ibbzy
Follow
This is my first ever grow and thought I'd document and also seek advice.
Neurodivergent grower here, seem to have gone overboard for a first timer.
Running a drain to waste system through coco/perlite (70/30).
Using 1.2 gallon pots from The Bucket Company. Hooked to a water bubbler irrigation feed from reservoir.
The reservoir is a makeshift mobile chiller aha. Seemed a good a idea but could only hold 3-5 gallons at a time.
Will need to either fork out on a water chiller with bigger reservoir upgrade or think or something.
Under the reservoir we have the EZrun-off pump by The Bucket Company. Essentially a catch tray with a pump inside that automatically pumps the waste out to the desired location when maximum storage capacity is close. Mine runs just over to my kitchen sink.....when I can be bothered to make some holes underneath....I could hide the pipes and make it more stealthy via routing it to the drain pipe works under the sink cupboard.
Old drippers where replaced mid veg stage with Netbow halo drippers by Netafim. Achieved a much more uniformed saturation of the medium.
My nutrient of choice will be MegaCrop by Greenleaf nutrients plus additionals such as Orca mycorizhae and Myco Chum for the extras...
Popped seeds directly to riot cubes on 14/06/24.
3 days later we have sprouts.
Purple Stardawg x2
Runtz x2
Strawberry Cough x2


Likes
7
Share


@Marihuanacali89
Follow
Bueno familia después de una buena defoliacion y riego ..ya hemos preparado el @wifiindoor remoto a 12/12 h para el cambio a floración... Así que mañana comienza la preflora ... Veremos a estas niñas en todo su esplendor próximamente ..con ganas de verlas ya jejejeje
@marshydro_amazonled @130.devin_mars
@marshydroled_amazon @coco_pan2022 @marshydro_amazon @co.ol9055


Likes
10
Share

@Dendegrow
Follow
👹 Monster Marker – Sweet Seeds
Absolutely crazy strain! 😎🔥
The terpenes are super berry-like and sweet 🍇 – smells amazing already.
The bud structure is starting to show some foxtailing, with very short internodal spacing 🌿💪.
I’m really curious to see if the colas will grow completely together by the end of flowering 👀✨
Follow me here and on Instagram: @DendeGrow to stay updated – I share more grow tips, tricks, and behind-the-scenes content over there 🌱📸
---
👹 Monster Marker – Sweet Seeds
Absolut krank, diese Sorte! 😎🔥
Die Terpene sind super beerig und lecker 🍇 – der Geruch ist jetzt schon der Hammer.
Die Budstruktur zeigt bereits Foxtailing, mit sehr kurzen Internodien-Abständen 🌿💪.
Ich bin gespannt, ob sich die Colas am Ende komplett miteinander verbinden 👀✨
Folgt mir hier und auf Instagram: @DendeGrow, um nichts zu verpassen – dort gibt’s noch mehr Tipps, Tricks und Einblicke rund ums Growen 🌱📸
Likes
37
Share


@Master_weeda
Follow
Bonjour à tous les padawans et maîtres jedis
Tout d'abord merci à greenhouse de me permettre de faire cette culture en m'offrant le feeding greenhouse et des graines
Je rappelle que cultive simultanément 9 pots de 10 et 11 litres dans une box prévu pour 4 et que je n'utilise que le strict minimum du matériel nécessaire à une culture correcte au prix le plus bas possible
MATÉRIEL CONFIGURATION
Box 80×80×160
Lampe led Lampwin 300 watts ×2
Ventilateur à pince 15 watts
Xiaomi Deerma humidificateurs 5L
Hygrometre thermomètre
Extracteur PROFAN 107 m3/h - 100
Prise programmable électronique ×2
1 pot carré noir 10 litres
Green house feeding enhancer
Green house feeding biobloom
Green house feeding biogrow
Substrat biobizz ligthmix
Fil de fer et pince coupante
Microscope
Petite balance de précision
CULTURE ÉTAPE PAR ÉTAPE
J'ai tout dabord fais germé ma graine avec le easy start de Royal queen seed et je suis agréablement surpris car franchement le taux de réussite est très élevé (17 graines sur 19) simple d'utilisation et très efficace.
Une fois la plantule sortie et d'une hauteur de 2 ou 3 centimètres je la prend délicatement et la place directement dans son pot définitif. Je préconise des pots allant entre 10 litres et 15 litres pour des autofloraisons cultivées en intérieur.
Le pot aura été préalablement préparé (video dans diarie) avec 30 grammes d'engrais greenhouse feeding biobloom et 30 grammes de greenhouse feeding biogrow, soit l'équivalent de 3 grammes par litre de substrat.
Je dépose donc la plantule dans son pot définitif je recouvre un peu de avec de la terre je tasse légèrement et j'arrose pour garder le substrat humide pas plus
Je place ma lampe led 300watts à environ 90 centimètres de la plantule avec un cycle de lumière de 24/24 pendant une semaine. Au début de la semaine 2 le cycle de lumière passera en 20/4 grace a un programmateur car c'est pour moi le cycle de lumière qui offre le meilleur rendement pour une autofloraison.
Jour1: léger arrosage
Jour2: léger arrosage
Jour3: la plantule commence à être plus vigoureuse mise en place de la ventilation pour augmenter sa masse racinaire et léger arrosage
Jour4: arrosage avec un litre et demi d'eau ph6.3 à laquelle j'ai ajouté 0.9 gramme de greenhouse feeding enhancer (soit 0.6 gramme par litre d'eau)
Jour5: aucune technique spéciale
Jour6: aucune technique spéciale
Semaine agréablement calme sans problème ni carence apparente
Que la force soit avec vous !

Likes
14
Share


@MG2009
Follow
03/03/2022
Down to one Lemon OG, one Biscotti Skunk, and three Grape Skunk all looking super vigorous
including Lemon OG .
Very happy with the genetics so far trimmed up the legs a bit lots of potential clones!
Ps.
Forgot picture of Biscotti Skunk it's lights out so that will get done tomorrow.

Likes
19
Share


@GoldenWeedGrower
Follow
Legend
Timestamp: 📅
EC - pH: ⚗️
Temp - Hum: 🌡️
Water: 🌊
Food: 🍗
pH Correction: 💧
Actions: 💼
Thoughts: 🧠
Events: 🚀
Media: 🎬
D: DAY, G: GERMINATION, V: VEGETATIVE, B: BLOOMING, R: RIPENING, D: DRYING, C: CURING
________________________________
📅 D70/B08 - 24/01/24
⚗️
🌡️
🌊
🍗
💼
🧠 pH is finally stable on the lower side (hopefully)
🚀 The Tent-X is on its way, I can't wait to get it..
🎬 Added Timelapse video
________________________________
📅 D71/B09 - 25/01/24
⚗️ EC: 1.2 pH: 5.6
🌡️ T: 23 °C H: 45%
🌊
🍗
💧
💼 I put T-H Sensor of TrolMaster on the SCroG net
🧠
🚀Tent-X from TrolMaster received, I'm going to set it up tomorrow
🎬 Added Timelapse video
________________________________
📅 D72/B10 - 26/01/24
⚗️ EC: 1.2 pH: 6
🌡️ T: 23 °C H: 40%
🌊 Added 6L
🍗 Added Bloom A-B - CalMag - Big Bud - Bud Candy - B52
💼 Tent-X set up done !
🧠 It works perfectly and as I just see so far, from now on, I'm going to experiment a new way to grow !
🚀
🎬 Added Timelapse video and Set-Up videos and pics
________________________________
📅 D73/B11 - 27/01/24
⚗️ EC: 1 pH: 5.5
🌡️ T: 23 °C H: 40%
🌊
🍗
💧 Added a little of pH-
💼
🧠
🚀
🎬 Added Timelapse video
________________________________
📅 D74/B12 - 28/01/24
⚗️ EC: 1 pH: 5.5
🌡️ T: 23 °C H: 35%
🌊 Added 4L
🍗 Added CalMag - Bloom A-B - B52 - Bud Candy - Big Bud
💧 Added some pH-
💼
🧠
🚀
🎬 Added Timelapse video and 4 pics
________________________________
📅 D75/B13 - 29/01/24
⚗️ EC: 1 pH: 6.0
🌡️ T: 23 °C H: 50%
🌊
🍗
💧
💼
🧠
🚀
🎬 Added Timelapse video and "TM+ Pro" App screenshots. This is the app used to monotoring the Tent-X controller
________________________________
📅 D76/B14 - 30/01/24
⚗️ EC: 1.2 pH 6.1
🌡️ T: 18-26 °C H: 30-55% (from now on, I'll put the Min-Max values of T-H as I can easily read them from the app.)
🌊 4L
🍗 CalMag - Bloom A-B - Bud Candy - Big Bud - B52
💧
💼 I added a Humidifier as the H falls down to 30%
🧠 With the help of Humidifier, according with "TM+ Pro" app, I got the perfect VPD (Vapor Pressure Deficit) rate !! (see screenshots)
🚀 I have to face a very low rate humidity of the external enviroment
🎬 Added Timelapse video and T-H values daily graph, and perfect VPD from the Tent-X controller
________________________________

Likes
12
Share


@Pedro_88
Follow
Estoy muy satisfecho con el crecimiento de mi chemical bride, ayer hubo un fuerte viento y tumbo a mí watermelon skittlez no la pude encontrar, pero ya tenemos otra en proceso que verán en estos días
Likes
15
Share


@SweetheartOG
Follow
The girls are fully in flower this week which of course is a GREAT sight to see when opening the tent. The smell in the tent is so sweet and fruity it's already making your mouth water!! So this week I feed the girls with a little of the living soil veg so they are still getting a helping hand. They were also given the living soil bloom and some barley which I will admit is the first time using it but so far me plus the girls are very much enjoying!! I have done the necessary light de-foliating on all 4 girls over the past 2 weeks and more LST. Happy toking guys and girls!! Will keep you all posted with more videos through the week so please keep checking back 🙂