Likes
Comments
Share
@Regenwurm
Follow
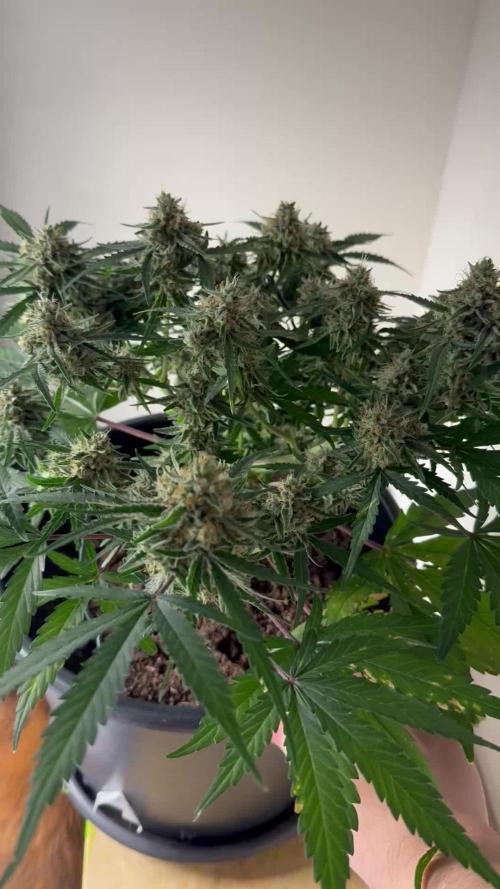
Die letzten Woche bleibt es nun mit dem Klima noch schwierig! Die Luftfeuchtigkeit und Temperatur im grünen Bereich zu halten mit sehr hohen Außentemperaturen….. der neue große externe Entfeuchter ist in Betrieb genommen ….er macht seinen Job ! Der Externe Entfeuchter im Vorraum entfeuchtet jeden Tag zwischen 5-7 Liter! Diese Woche eine minimale Entlaubung gelaufen …. Diese Woche gab es nach dem fluchen mit canna flush keine Nährstoffe mehr ….ich habe die Pflanzen nochmal mit 40 l gespült….der ec im drain wurde danach gemessen …. Danach immer noch 1,1-1,2…. 3 Tage gewartet und noch mal mit 40 l gespült…. Danach dann ec 0,7 so bleibt es nun…. Den ph habe ich beim letzten flushen auf 7 gesetzt da die wurzeln nichts mehr transportieren sollen…. Der Herbst muss schnell her 😁( 1 mal als erstes geflusht mit Canna flush mit 15 l pro Pflanze) Die tricome sagen das alles fertig ist. Ich warte noch bis das Substrat ausgetrocknet ist und dann wird sofort geerntet .zum abreifen auf 70 % runter gefahren , Nebeneffekt ist, geringere Temperatur im Zelt und das ist gut… Tage der Keimungsphase = 4 Tage Tage in Wachstum = 52 Tage Tage in der Blüte = 68 Tage Gesamt = 124 Tage Wachstum h (in einer Woche)= 0 cm 2 mal in dieser Woche mit Purolyt Mischung 1:25 besprüht Lichtstärke: 75 % PPFD: ca. 800 umol Lichtabstand: 35 cm Std Tag/Nacht: 12/12 Temperatur Tag: ca. 25,5 Grad RLF Tag: 55% Temperatur Nacht: 21 Grad RLF Nacht: ca. 55 % VPD Wert: ca. 1,0 PH Wert Wasser/Düngelösung: 5,7 -7,0 EC Wert: 0,7-1,2 Ventilator Oszillation: Stufe 1 Befeuchter: Aus Entfeuchter: an Bewässerung: manuell alle 3 Tage geflusht Purolyt Besprühung: 2 mal Controlling: Grow Control Dünger: Canna Coco Licht: Pro Emit Vollspektrum Abluft: EC Carbon Active 750 m3
Likes
1
Share
@Jaschkoo0
Follow
This week i flushed both plant but the Burn was very Bad
Likes
5
Share
Likes
25
Share
Jour42 defolliation and LST Jour45 defolliation Jour47 arrosage avec de l'eau ph6.3 à laquelle j'ajoute 1ml par litre d'eau de topmax biobizz La plante entre maintenant en floraison c'est donc le début du stretch Explication en anglais (Stretch explanations more) EXPOSURE TO LIGHT One of the main culprits in abnormal stretching of cannabis plants is the lack of light. Plants that are too far from an adequate light source will respond by accelerating stem growth in order to get closer to the lamp themselves. Especially when there are many other plants. A lack of lighting can easily cause overcrowding in a growing chamber, reducing the steady progression of your crop and the distance ratio between your bulbs and your plants. To address this problem, be sure to provide enough light to your plants to prevent stem growth. At the same time, you should not position your lights too close to your plants either since this would also result in an over-stretching of the stems and in some cases, the loss of your crop. In addition to the distance between the light source and the plant, the type of light you will use also affects the size of the stretching of your crop. The orange and red lights encourage stretching and result in thinner, larger stems. And conversely, blue light stimulates a growth of thicker stems and a smaller size. When a species is ready to enter the vegetative phase and undergo its most drastic stretching period, metal halide lamps can be used to deter far too long stems. THE HEAT Heat is another essential element that can determine the stretch size of your plants during vegetation. Temperatures above 27 degrees push the stems to lengthen more and more and will propel the potential of sativas to push as high as possible. Heat lamps that are positioned too close to plants create an intolerable environment that will grow large, soft plants that will potentially wobble until they fall and lose flowers in its fall. OTHER CAUSES OF STRETCHING There are multiple variables that can lead to the stretching of plants beyond what could normally be expected of the plant. Environmental stressors resulting from transplantation (when a plant passes from one pot to another) can cause the plant to return to shock. This will eventually trigger a reaction causing a stretch. Cannabis plants that are not grown in decent conditions or do not receive enough nutrients will respond in a variety of ways and this includes stretching. Crops that are not spaced far enough apart are likely to stretch to sting the light to other plants. Due to extreme proximity, the plants will fight among themselves to reach the light, forcing them to expand as much as possible throughout the crop. HOW TO CONTROL STRETCHING DURING FLOWERING Stretching during flowering, you guessed it, takes place when you move your plants from the vegetation stage to the flowering stage. This is a completely normal reaction, as your plants are preparing to bear the weight of their heads. Stretching of a plant at the beginning of flowering varies widely; some plants can double in height while others grow only a few centimetres. There are, however, two main variables that can give you at least an idea of how your plants are stretching during flowering, and how much. Here are these two variables: Variety: Genetics has the greatest impact on the size of your plant. In general, sativa varieties stretch more than indicas and tend to develop long, slender stems. Light: Some lights, such as HPS, are more likely to encourage stretching. In addition, great distances between your canopy and your lights will cause the plants to stretch as they try to get closer to the light source. Stretching during flowering usually lasts the first two weeks of the phase. To minimize stretching, keep your lights between 10 (for CFL) and 30 centimetres (for HID) of your canopy. Finally, choose indica varieties if you have a smaller growing space. HOW TO AVOID STRETCHING In many cases, you can expect your cannabis plants to stretch during the flowering phase. Keeping that in mind helps to make a plan in case your species ends up growing much more than you could have imagined. If the information is available, get information on the standard size of your species and compare it to the size of your growing space taking into account the necessary distances between the bulbs and the plants. TRAFFIC While outdoor crop operations benefit from natural air to naturally limit stretching, indoor crops must assume the maintenance of air circulation within a confined space. Basic ventilation is enough to help the cannabis stems strengthen and become thicker rather than too high. In this way, the plants continue to grow vigorously without reaching heights and at the same time, your tolerance ceiling. MANUAL INTERVENTION For growers who want to get their hands dirty, there are physical procedures that can be done to reduce stretching. Similar to the natural effect that the wind has on cannabis plants, manually bending the leaves and stems will cause tiny cracks in the plant's tissues that will cause the plant to focus on regenerating its wounds instead of its vertical growth. THE TOPPING Topping is a form of manual intervention on cannabis to influence its performance, shape or size. In essence, topping is a process in which a new node is cut, growing from the plant to reduce its size and create a "v"-shaped notch that will eventually form two heads. Topping may be an effective measure to combat stretching, but it is important not to do so when the flowering phase begins. In most cases, an abnormal stretch of cannabis plants will not completely destroy your crop. In fact, stretching can indeed help increase your performance. For growers with a growing operation large enough to contain tall plants, stretching can increase the total yield of a species with more vertical space for head formation. In both cases, stretching can easily be planned in advance and there are multiple solutions to help you with this problem which is all too common. May the force be with you 💪
Likes
7
Share
Venga familia que acabamos la sexta semana de estás Gelato Olandese de Dutchfem. Entramos en la recta final esta semana aplicamos el PK de Agrobeta, ExplotaCogollos. Iremos viendo el proceso de engorde de las flores. Se ve que tienen un buen color están bien sanas, se ve que progresan adecuadamente. Agrobeta: https://www.agrobeta.com/agrobetatiendaonline/36-abonos-canamo Mars hydro: Code discount: EL420 https://www.mars-hydro.com/ Las maximas de temperatura no superan los 26 grados y las mínimas no bajan 20, así que no me puedo quejar. Los niveles de humedad también son los correctos van entre 50%/65% de humedad relativa. Por supuesto el Ph lo estamos dejando alrededor de 6. Hasta aquí es todo, buenos humos 💨💨💨.
Likes
8
Share
@Raffitsch
Follow
I think it fits after what they went through ^^ I'm currently discovering all the things you can do with my beloved plants. I hope I'm on the right track to escaping into my own world ^^ hehehe
Likes
5
Share
En observación, ya no realizare mas técnica. En este punto aumente el fertilizante 5, 6 ml X litro de agua, no tiene ninguna plaga, me preocupe de eliminar algunas de sus ramas y hojas en las que no llegaba el sol.
Likes
7
Share
@MADMANk
Follow
If i said i wasnt getting a bit intimidated by the amount of nodes this girl is shooting id, id be lying... Big defoliation, as she needs constantly almost! The nodal spacing is so cool, rather than 2 nodes a time the nodes spawn in a more "zig zag" pattern up the stems Super healthy and happy
Likes
155
Share
@deFharo
Follow
Bienvenidos cultivadores de marihuana clandestinos y también a los que tienen la fortuna de no serlo!🖐️👨‍🌾👍 Este es un diario donde semanalmente explico algunas de mis técnicas de cultivo y preparados orgánicos, los cuales llevo experimentando dos años en cultivos de marihuana interior. • Hay dos componentes absolutamente necesarios para cualquier cultivo y de los que no se puede prescindir: La luz y el agua... hoy toca hablar de agua, homenajear al agua que la montaña y el cielo me regalan para mis plantas de marihuana!! 💧💧💧 Tengo que decir, que hasta el momento, nunca he usado agua con cloro en mis cultivos, mi interés por el agua pura de manantial ya venía de antes, pues yo mismo la consumo habitualmente, el cloro es añadido al agua corriente para hacerla potable y acabar con posibles bacterias o patógenos, pero no distingue entre buenos y malos. Siempre he creído que el consumo de agua pura, ayuda a mantener la micro biota de nuestro sistema digestivo, os podría hablar de las ventajas palpables, pero voy a obviar comentarios escatológicos. En el caso de mi modo de cultivo, donde baso toda mi técnica en el mantenimiento e inoculación masiva de Microorganismos de Montaña (MM) en el sustrato, el uso de agua pura sin cloro es obligado. El 03 de julio de 2020, publiqué lo siguiente: GROWING TIP: Agua!! Mineralizada, viva y estructurada. La importancia de la calidad del agua para el cultivo es vital para mi, he recorrido los manantiales, ríos y arroyos de mi zona con el medidor de EC y el de PH para conocer las aguas que me rodean, recojo siempre que hay oportunidad agua de lluvia de la terraza de un vecino, nunca me falta agua pura, desecho regar con agua del grifo. Para mi, y actualmente, la mejor mezcla de agua que puedo ofrecer a mis plantas es agua de lluvia 75% con otra de un manantial de montaña de agua alcalina (Carbonato cálcico PH: 9.2) y muy mineralizada (EC: 0.85), esta agua yo mismo la consumo regularmente, consigo una mezcla de agua pura con un EC alrededor de 0.19, me garantizo así el aporte de calcio y otros minerales. En épocas donde no llueve uso agua pura de manantiales y arroyos con EC de 0.3. Estas aguas las filtro y almaceno a obscuras en mi casa, la cuestión es que el agua parada pierde oxígeno y también desordena su estructura molecular haciéndola caótica. Para poder recuperar esta estructura y oxigenación, el agua debe estar en movimiento como en la naturaleza, yo me ayudo de un agitador magnético para volver a tener agua viva, el agitador crea un vórtice implosivo que en 10 minutos pone las cosas en su sitio y carga de oxígeno nuestra agua, una vez hecho este proceso voy añadiendo los nutrientes uno a uno y sigo agitando hasta el final. El agua tratada con esta técnica, mejora la asimilación de nutrientes porque favorece el intercambio catiónico e inunda de oxígeno nuestro sustrato y raíces, también con esta técnica se pueden bajar las concentraciones normales de EC en un 30% y conseguir los mismos resultados, prueba y verás!! ------ Hoy tengo algunos comentarios nuevos sobre los diferentes tipos de agua que uso y usé. - Agua de río: Comencé recogiendo agua de los dos ríos caudalosos que cruzan mi pueblo, buena agua, no hay industrias en su cauce, pero sin embargo las aguas fecales de los pueblos acaban en él. Por lo que, ante la duda, deseche el uso de este tipo de agua. - Agua de lluvia: Como comenté antes, recogía agua de lluvia desde el desagüe de la terraza de un vecino (PH: 7, EC: 0.07), mucho trabajo, exposición vecinal y explicaciones surrealistas a los transeúntes que me preguntaban, como decir que recogía el agua para mi perro que no podía tomar agua con minerales por tener tendencia a la formación de piedras en la vejiga, en otras ocasiones, respondía con entusiasmo que era la mejor agua para cocinar alubias!! 🤷‍♂️😎 Definitivamente dejé de recoger agua de lluvia de ese lugar, pues el agua que explico a continuación ya viene con los niveles de EC que yo busco... - Agua de montaña: Manantial permanente a 700m de altitud, el PH varía según la época del año, cuando en otoño, invierno y primavera hay más lluvia, el PH está en 7, y el EC en 0.25, en verano el PH sube a 8 y el EC a 0,5, esto es debido a que la carga de minerales es mayor cuando no hay lluvias. Según la geología de la zona, rocas cálcicas, arcillas y basalto principalmente, este agua mineral contiene suficiente mineral (Ca, Mg, Si, Al, Fe, K...) para no tener necesidad de usar aditivos como CalMag. Esta, es el agua que más uso para riegos. - Agua de manantial alcalino: Casi a nivel del mar, muy mineralizada, con menos variación de PH y EC en épocas de lluvia: PH entre 8 y 9.2, EC entre 0.5 y 0.9. Esta agua la uso de varias maneras: a) Es el agua que yo bebo. b) El café y la comida la hago con esta agua. c) Por su nivel de alcalinidad la uso para los diferentes fermentados anaeróbicos, compensa la extrema acidez de estos preparados y aporta minerales ya solubilizados. d) Este invierno la he usado para riegos mezclada con agua de des-humificador al 50%, obteniendo agua con un EC de 0,25. e) Las raras ocasiones en que riego sólo con agua, uso ésta si el cultivo va bien, y si necesitara hacer un lavado de sustrato por sobre fertilización, uso el agua de des humificador: PH: 7, EC: 0.09, que al no contener minerales el poder de disolución es mayor. - Agua de des humificador: Este invierno debido a las bajas temperaturas, alta humedad relativa y aparición de oídio, me vi obligado a tener funcionando permanentemente un des humificador, y para hacer de la necesidad virtud, he estado recogiendo esta agua exenta de minerales, mezclándola al 50% con las aguas del manantial alcalino, de esta manera me he he ahorrado algunos viajes al manantial de montaña. Recientemente medí el consumo de este aparato, y casi me caigo de espaldas al comprobar un consumo de 140w, lo he tenido encendido más de 3 meses las 24h del día y en ocasiones he tenido funcionando dos des humificadores! y yo, engañosamente, pensé que no consumían más de 50w... bueno, después del disgusto de saber el despilfarro de vatios, yo, que me he esforzado mucho en los últimos cultivos, acarreando macetas del interior al exterior, por consumir el mínimo de luz eléctrica y que me ha supuesto obtener unas cosechas medio bajas para lo que estaba costumbrado, ahora, en mis nuevos 4 cultivos la luz no va a ser el obstáculo, ya que ahora los des humificadores están guardados, y voy a alumbrar estas plantas con todo lo que me quepa en la carpa, la media de vatios por planta de mi última temporada de cultivos fue de 40w/planta, esta temporada voy a llegar a los 100w por planta... más luz es igual a más masa floral!!🌲🌲🌲🌲 - Agua de mar (for nerds): Yo no me he atrevido a usarla para riegos, pero con el agua de mar preparo Ormus casero con agua del mar Cantábrico, donde separo el sodio y hago precipitar los minerales: Publicado el 10 de julio de 2020 a) Fuente principalmente de Magnesio, Azufre y calcio para todo el cultivo. El Ormus contiene de un 30 al 60% de magnesio. Yo lo uso sistemáticamente en todos mis riegos, las dosis van desde el 1% al 2%. b) Contiene más de 70 minerales, la mayoría en modo monoatómico que mejora el intercambio catiónico y la asimilación de nutrientes. c) Al ser un producto alcalino se puede usar para subir el PH del riego cuando se necesite. Aumenta muy poco la carga de EC. d) Forma parte de mis componentes en la solución acuosa que preparo para germinación y establecimiento de semillas. e) Almacenado a obscuras el producto no tiene caducidad conocida. • Agua de coco (for nerds). Producto natural rico en azúcares, vitaminas, proteínas y aminoácidos, enzimas citocininas (División celular, crecimiento), ácido giberélico (Estimulación de raíces) y minerales (Ca, Fe, P, Mg). - Los momentos clave de más demanda de enzimas citocininas comienzan en la mitad de la primera etapa de germinación y establecimiento de la plántula, y al comienzo de la etapa de floración/reproducción. En la última etapa de los cultivos es innecesaria. - Los momentos clave del ácido Giberélico comienzan también en la primera mitad de la primera etapa de cultivo y las últimas semanas de crecimiento vegetativo, después de estas etapas la necesidad del ácido decae hasta hacerlo innecesario en las últimas semanas del cultivo. - Yo uso el agua de coco, alternándola con otros nutrientes, sólo en las primeras etapas de la planta y hasta la preflora. - Las dosis dependen de la carga de EC que se prefiera. Como mínimo aconsejo una carga en disolución de EC de 0,4 o PPM 200. - El agua de coco natural se debe guardar en el refrigerador, como máximo 4 días, pues fermenta con mucha facilidad. y esto es todo por hoy... tengo sed! 😁 Hasta la próxima semana... SALUDOS CULTIVADORES!!🖐️👨‍🌾💧💦🌞💡 =================================
Likes
150
Share
Bonjour à tous , Comme vous pouvez le voir tout vas bien , et ça grandit de plus en plus... Gros palissage pour la "Black Domina 0" , 3 jours sépare les deux photos , tout vas bien ! En pleine forme :-) Rien à signaler pour cette semaine , pas d'avancer sur la floraison... Nous sommes toujours sur des plans au stade de végétation voir certains en près floraison mais c'est léger....
Likes
14
Share
@Wenz004
Follow
F-MILF takes 70 % of my tent now...wtf Hope all this green gives some good buds at the end. Deficiency from last week is under control...added some Silicate from TA...no idea if that helped or anything else...of course...there is too much light photons for the above area...but wtf I cannot do the plant smaller...lamp is on 75% now und lower would be bad for lower buds. NL untopped (F-MILF) getting this week: (TA nutrients mentioned above are for NL topped from other tent...pictures follow) Aptus Topbooster 6 drops/l (increased) Aptus P-boost 12 drops/l (increased) Aptus regulator 3 drops/l Aptus All in one 0.6 ml/l Aptus CaMg 0.6 ml/l TA Silicate 0.4g/l 4-6 litre each day nutrified (thats a real problem) F-MILF cannot get enough...just makes me poor that fat big milf
Likes
16
Share
🍼Greenhouse Feeding BioGrow & Bio Enhancer ⛺️MARSHYDRO The ⛺️ has a small door 🚪 on the sides which is useful for mid section groom room work. 🤩 ☀️ MARSHYDRO FC 3000 LED 300W ☀️Also special thanks to VIPERSPECTRA P2000 (200W) & XS2000(240w) LED growlights 🌱 DUTCH HEADSHOP SEEDS: www.dutch-headshop.eu www.dutch-headshop.nl ONE STOP SHOP . 100% germination success on first try! with HUGE seed selection! . Very friendly customer service . Best bio-seed packaging . Sells other products @ best prices: . Nutrients . Vaporizers . Smoking accessories (grinders, cones) . CBD Tinctures . Resin Extracts . Boveda humidity packs . Ziplock bags . Other health supplements such as: . Lion’s Mane Organic Capsules . Hemp Seed coffee
Likes
3
Share
Likes
9
Share
@nEcKk
Follow
The fruits become heavier and begin to ripen. The night temperature was set to 20° C The humidity was set to 50%
Likes
6
Share
Week 1 24 hours ethos popped and began to stretch Temp 76 humidity domes on top 5 of 5 out going directly into pots and 24 hour lighting on day 3! gonna run 24/7 for 30 then switch over hopefully. Nothing added but FishShit and rootdrench to pop
Likes
4
Share
@Herbie
Follow
The time has come for for this beautiful girl Scout cookies auto from Original Sensible seeds. Her leaves had started to slightly yellow due to me missing a water or two. Also extra dry because I've been so caught up with “real life stuff” that she has been sat on the side for about 3 days as I haven't had the time needed to harvesting her until now......,. The buds are lovely and fat 😃 whilst feeling a very good weight 😏 (should be updated below) some time later........... Wow! Now she's trimmed for her bikini shot, the buds look beautiful and plump. Oooozing a fruity fragrance with every snip. Very happy with earlier in the grow, chopping off some developing bud sites I felt would not have the time to flourish. Something I've tested from a-b samples (although different strains) and currently lean towards limiting the amount of bud sites thats she has to actually grow. *I'm talking Autos* A Brilliant strain and genetics from a growing perspective. I'm finding a pattern to my taste in how strains grow. just got to wait and see on the final smoke. peace    
Likes
10
Share
@LJGRW
Follow
Week 8 has completed we are now going on week 9 of flower with this yummy frosty looking Papaya Sherbet she is throwing all sorts of different smells it goes from a sweet skittles then as well as a bubble gum (bubble yum) candy this is an amazing phenotype right here, come week ten it’s supposed to be 36 degrees on Thursday night that’s a gamble not sure if we should take it my wife and I are wanting to give her a full 10 weeks but might have to cut her down early :( but This morning we gave her as well as our Holy Grail (bag seed) each 1.5 tablespoons of Organic Coconut Sugar and a tablespoon of molasses and that’s it from here on out, water, water, and more water haha!! Going to let the soil dry out for most of the last week of her life to help send her into a bit of a shock Maybe some ice water prior to see if it helps pack on more trichomes!!
Likes
13
Share
2000 ml alle 2 Tage pH-Wert: 6,1 EC-Wert: 1,2 Temperatur: 22ºC Luftfeuchtigkeit 62% Schädlingsbekämpfung: PPFD: 500 µmol/m²/s DLI: 33 Düngemittel: Mineralischer Dünger 3.5-6-6 PK 13/14 Besonderheiten: Wurden direkt in die erde gepflanzt in einer Kokos-Quelltabletten. -Tag 71 Heute haben wir auch bei ihr den Runoff kontrolliert und der PH wert ist auch hier leicht zu hoch mit 6,8 und ein EC wert von 1220. WIr haben ihr Wasser mir einem PH wert von 5,8 gegeben und Mikroorganismen. -Tag 73 Heute haben wir sie mit 2000 ml Wasser gegossen, angereichert mit 1 ml Calmag, 6,5 ml Canna PK 13/14, 1 ml Plagron Green Sensation, 1ml Plagron Power Buds, sowie 0,32 ml HY-PRO Generator. Der EC-Wert betrug 1,650 mS/cm und der pH-Wert lag bei 5,8 😎 -Tag 75 Heute haben wir sie mit 2000 ml Wasser gegossen, angereichert mit 1,5 ml Calmag, 6,5 ml Canna PK 13/14, 2 ml HY-PRO Epic Blast sowie 0,32 ml HY-PRO Generator. Der EC-Wert betrug 1,590 mS/cm und der pH-Wert lag bei 5,8 -Tag 77 Heute haben wir bei ihr den pH-Wert kontrolliert, und er liegt bei 6,6. Das ist zwar nicht so gut, aber immer noch besser als beim letzten Mal. Der EC-Wert lag bei 940. Wir haben ihr Wasser mit einem pH-Wert von 5,7 sowie Mikroorganismen mit Weizensirup gegeben 😅
Likes
Comments
Share
DWC Grow #3 - Week 5 (Day 28–34) | Canopy Takes Over + Trellis/Topping + Space Management (Dec 25–31) Week 5 was the week the plant stopped being “a plant in a bucket” and started being a canopy-management project. Growth turned noticeably more explosive, the footprint expanded fast, and I had to make real decisions about structure, airflow, and tent space. Day 28 (Dec 25) - Explosive growth Came home to a huge jump in growth. The plant looked healthy and vigorous, and it finally felt like the system was “locked in” after the earlier turbulence. Reservoir was stable, roots looked strong, and the canopy started to crowd the tent. I started seriously thinking about topping and how to manage height long-term. Day 29 (Dec 26) - Post-training recovery looks good The plant handled the recent canopy work well and kept pushing new growth. I logged a stable reservoir (temp staying in a good range) and the overall posture looked positive. Water usage was clearly increasing, which matches the jump in biomass. Day 30 (Dec 27) - Strong momentum + dialing light position The plant kept building mass fast. I continued to raise the light slightly as the canopy climbed and nudged intensity upward cautiously (still conservative relative to manufacturer “veg” suggestions). Reservoir readings stayed in the workable zone, and water level continued to drop steadily, confirming she’s drinking. Day 31 (Dec 28) - Steady readings, steady push No big interventions - more “observe, tuck, and keep it stable.” The canopy was getting denser, and I could tell the next phase would be about preventing the tent from turning into a packed, hard-to-service jungle. Day 32 (Dec 29) - Space management: moved extraction hardware outside To reclaim headroom and working space, I moved the inline fan and carbon filter outside the tent. This was purely about space and practicality as the plant expands. I kept an eye on airflow behavior and made sure the setup still pulled properly. Day 33 (Dec 30) - Canopy density reality check Canopy got dense enough that it started feeling like a “light and airflow engineering” problem. I did a light prune (nothing extreme - more like clearing obvious blockers). I also noticed some droop and ended up focusing on reservoir basics: keeping the root zone oxygenated and avoiding a too-high water line. I siphoned out some water to bring the level down. The water looked a bit murky but didn’t smell, which was reassuring. Day 34 (Dec 31) - Hands-off (New Year) I was away for New Year’s, so this was effectively a hands-off day. Sometimes that’s the best thing for me - less temptation to over-adjust. The plan was simply to return, assess water usage, and continue shaping the canopy with minimal stress. Week 5 takeaway: The plant is officially in “take over the tent” mode. Growth is strong, water consumption is increasing, and the limiting factor has shifted from “will she survive?” to “can I keep the environment and structure under control without over-correcting?”
Likes
1
Share
@Aleks555
Follow
Amaretto Tarmac Auto by SEEDSTOCKERS Week 11 – Final Stage This beauty is now in her 11th week, and she’s entering the final stage of flowering. The buds are dense, sticky, and absolutely covered in trichomes — a true resin factory! 😍 The aroma is simply delicious, and the flavor matches it perfectly. We’ve already sampled a few buds from the lower branches, and wow… the taste is amazing, and the effect is strong and satisfying — just pure fire! 🔥💨 We’re planning to let her go for about 2 more weeks before harvest to reach peak ripeness. So far, this strain has been a real pleasure to grow. Big thanks to SEEDSTOCKERS for providing such top-tier genetics. Highly recommended to all growers out there! 🙌🌱💚