


Likes
Comments
Share


Processing
Likes
1
Share


@Mr_nugs_lover_David
Follow
This wedding cake is looking as healthy as her sister however she's in a bigger pot 25 liters. Let's see if she does as good as her sister,she's enjoying life right I don't think I'll have any type of issue,she's being fed 100% organically,with lactobacillus liquid made by me,liquid bat guano,and she has in her soil florians living organics and more bat guano and seaweed,mycorrizae,humic and fulvic acids,beneficial bacteria and fungus. She's gonna be a wonderful plant at the end I'm sure. Stay tuned guys! 💚🌱✌️


Likes
20
Share


@Santica_Garden
Follow
So this is how things are looking for the ladies at the end of Week 3 of Veg, I have uploaded a video for you guys with all the information you need. 👍🏾

Likes
42
Share


@cheetah844
Follow
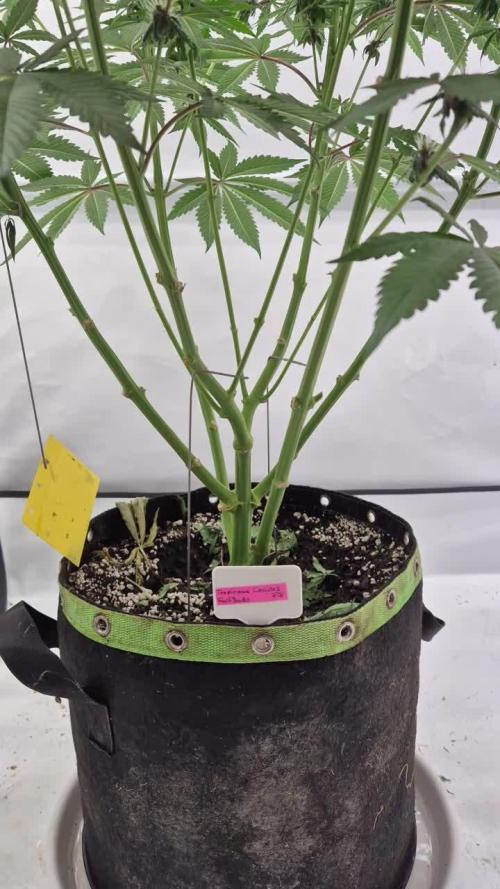
We have a runner. She's growing to the sun 🌞 can't wait to get her outside. The male I grew was extremely tall I'm going to keep her short and bushy, hopefully. One of my favorite daytime strains for an uplifting mood that I've had so far.

Likes
Comments
Share


Likes
2
Share


Likes
29
Share


@Sidbank
Follow
10.07 Heat is under control. There is only problems with Sciaris.
13.07 Everything is going quite well, the temperature is a bit annoying, without air conditioning is not easy, I hope that tomorrow I will be able to install it. I fight Sciaris flies with bacteria and oils, but the population persists, but it is under control


Likes
8
Share


Likes
16
Share


@Ale1000
Follow
Ya están en su última semana , una planta que nunca dió problemas , fácil de cultivar y acepto con mucho éxito el corte apical y el entrenamiento lst .


Likes
10
Share


@SgtDoofy
Follow
3/14:
Came back from a 4 day vacation to a lot of dry, wilted, dead leaves on Amnesia. Trainwreck is super starved as well. My automatic watering system didn't kick on, and the humidifier ran out of water within 24 hours, so there's that. It may be for the better though, as the PH of the nutrients had risen to 7.5. I tossed that mix, and made another 2 gallons of half strength nutes, molasses and epsom salt. I watered them both to runoff, and now I'll wait for Amnesia to prioritize which leaves she thinks are worth saving, and then I'll defoliate the dead ones. Hopefully trainwreck will just bounce back to green. She needed to be defoliated anyway, so this situation makes it easier for me to find the dead leaves.
Edit: Came back to feed the last of the nutes and decided to pluck the crispy goners. I found that pulling the leaf stem downward will make the most dead leaves fall right off, allowing me to test a majority of the leaves and give Amnesia a major haircut. Luckily I left a lot of leaves from prior defoliation, as Amnesia REALLY sucked them dry.
3/15:
Amnesia looks no worse for wear than last night. Trainwreck as well. Went ahead and pulled as many dead leaves off Trainwreck as I could. Some leaves were a mix of crispy brown and healthy green, which I think is pretty goofy, so I avoided taking any green fans but removed the crispy ones. The colors of the leaves around the buds are really fun to look at.
3/16:
Amnesia is starting to SHED her dead leaves, allowing me to pick the leaves with almost no effort. I tested as many leaves as I could, giving another haircut. I would say this isn't a good thing, but since it's my first grow, I'm rolling with it. As long as Amnesia keeps the buds and its nearest leaves alive, it will slowly grow, albeit stunted. I'm not sure if this condition will cause it to finish sooner, but I'm going to need to watch the trichomes under a microscope every couple of days just in case she's ready for harvest. Trainwreck looks about the same as it did before. No new leaves are ready to be removed there yet.
3/19:
Amnesia is still shedding leaves, but also bulking up. Trainwreck is slowly bulking up, and turning purple as well! Going to keep an eye on Amnesia's trichomes.
Edit: because amnesia is yellowing so much, and because it's been 5 days, I'm going to feed both plants a quarter strength nutrient mix just in case I've been overfeeding them somehow.

Likes
20
Share

@TheGourmetWeed
Follow
Nice plants
2 totally different phenotypes, as one was already harvested, and the other isn't even half way of flowering after 10 weeks.
Nice trichome production, great fresh and fruity smell, this plant is a pleasure to smoke in the end of the day.
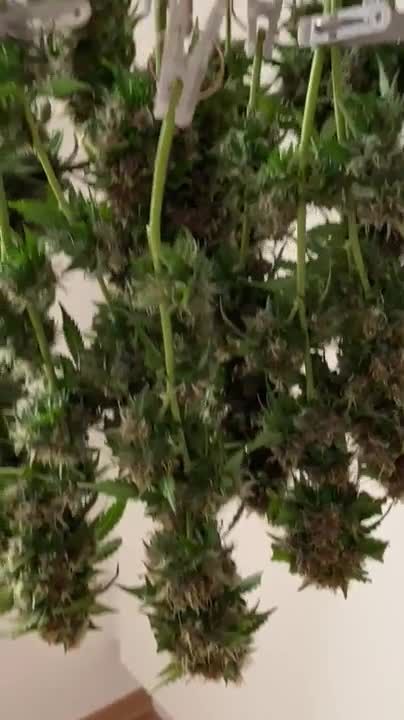
Dried her upside down hanging in a tent I have for the purpose, at 25c, 30%RH -
Only removed fan leaves, no manicuring, been doing that as I smoke, noticed the bud lasts longer and with a better smell and you end up saving loads of time.
Really happy with this smoke, smells like proper weed. Maybe was the best time I dried and cure(ing).
Only problem is that I'm smoking more as it's so tasty ahaha.
Good stuff, thumbs up!
PS - I'll start looking for the "original" Zkittlez to try out and check the differences between them.
Update: 12 April 2021 - Chopped down Plant #2
So, finally Saturday I chopped her down. She looked now ready and delicious, although I only notice yesterday how many seeds she has allover the place. She hermied in front of me without noticing, not good at all and need to start looking much better and in detail into the plants.
Feel like an idiot now.
Anyways, it was a full week!
Emptied the grinder collector and pressed it down a little, makes a very nice smoke, light but pleasant, the kind of stuff it keep you going all day without the dumb effect.
From all trimming made the bubble hash. Got a little too green as the 220micron bag's stitches slightly opened letting some contaminants in the final mix, hence the green color.
This was a hit. in opposition to the grinder stuff, this sent me straight to the moon, really heavy stone effect, even thinking was hard. Reminded me those afghan/ moroccan balls we used to get back in the early 2000's.
The weed itself it's still drying so the smoke report will be updated in there.
715g of fresh cut plant is good, let's see the potency and the seeds. Might turn it all into bubble hash, if I see it'll be an hassle to remove seeds.
On an earlier bud I've cut and dried, smoked it and you can see pure white ashes in the bong. Ain't that a beauty?

Likes
4
Share


@Crusty_Juggler
Follow
60x60 cm tent in a 1920's peek-in-closet
Oversized vent for silence
High power DIY LED
True SoG 12/12 from seed with 15 plants in 2L pots
Watering all plants in bottom tray with 30% of total pot size (10L)
WEEK 1
DAY 1 - Germinated in paper towel
DAY 3 - Planted into pots + Lights ON at 125w
DAY 5 - All plants have broken soil
DAY 7 - Slight stretch - Light at 185w
WEEK 2
Two of the Iced Out are lagging behind, others are on point - I'm trying to push light and nutes to the max.
Extraction fan (AC infinity Cloudline T6) on level 2.
DAY 13 - First full watering (10L) with 20 ml Canna Terra Vega
DAY 14 - Circulation fan turned on (low) during lights on
WEEK 3
Good growth, two Iced Out still lagging
DAY 18 - Light at 225w, Extraction fan on level 3 during lights on
DAY 20 - 2nd watering, 8L with 30ml Vega + Light at 250w
DAY 21 - On point, mostly :) Could've pushed nutes a bit more from the go
WEEK 4
DAY 24 - So far this week I'm just kicking back and watching them do their thing. The two lagging Iced Outs are trying to catch up.
DAY 26 - Watering 10L with 50 ml Vega (one day too late...) + light on 300w (max)
DAY 28 - 4 weeks from popping the seeds, looking good except for the two Iced Outs, one of them is trying to get with the program, the other... Well, some plants are just pricks.
WEEK 5
I think this is the week we'll see them take off :)
DAY 29 - Plants are starting to show sex, removed 2 Urkle Mints males, the other two are females, the rest are fems so we're down to 13 female plants total with only a single weakling
DAY 29 - Watering 8L with 50ml Vega (shouldn't have been later than today!)
DAY 33 - plants exploded over the last 4 days and most are stretching and starting to flower
DAY 33 - Watering 10L with 60ml Vega (feeding Vega once or twice more then we switch to Flora)
DAY 35 - Just cruisin' 😎

Likes
11
Share


@SintrexGrow
Follow
Plant is showing fast growing and responded well to my diy setup and diy lights 💪

Likes
132
Share


@Crashoverite
Follow
Hi all👨🌾👋
Welcome to my another week update
Hope everyone keeping well 🧑🌾
Week 5
Mar 1 - Mar 7
What a joyful grow. Both girls are almost like twins. Super healthy and strong. Girls are in pre-flower and going head to head in development. Not expecting them to grow super tall but time will show. Considering to let them grow freely and not installing scrog net. This idea may change in coming days. 2 waterings of 2.5 l on Mar 2+ foliar feeding and second in Mar 7. May take another week before first runoff experience. Continously leaves tucking. Girls are responding perfectly to feeding like also to my LST. I am very happy and excited of what's to come 😁🧑🌾
Wishing you all a wonderful rest of the week✨🍀
Much appreciate all your likes, follows and comments. 🙏💚❤️💜
Peace and love brothers and sisters 👨🌾✌️💚
Stay tuned for new week update soon
Links
https://2fast4buds.com/seeds/TROPICANA-COOKIES-AUTO
https://www.biobizz.com/
https://fishheadfarms.com/
Likes
15
Share


@MG2009
Follow
02/10/2021
I supper cropped the top 4" down toward lower level to promote auxins to redistribute, also starting 12-12 light cycle should be 8-9 weeks of flowering🙏 if she more than doubles in stretch,then I will need to switch to LED lights to finish
Likes
71
Share


@Krisis
Follow
06/04/24. Going into week 5 flower.
Not much to say here this week.
Everything is pretty much same as last week.
Seems like things are slow going. I feel like the buds aren’t doing much really and should be bigger. These are a longer going strain than my other so maybe that makes a difference. Maybe I’m just impatient. Guess we’ll see.
Only thing aside from that I find concerning is #2 seems to have some pistils turning color. Seems way too early for that. I keep checking for hermie crap or pollen or something lol. If this was just its thing it seems like both plants would be doing it, but I guess you know what they say about assuming.
Thanks for lookin & have a good week.

Likes
17
Share


@m0use
Follow
This was a fun project that was a few years in the making and a year later to see if they would last a season for this upload to happen. Before any of this I would bike aorund town grabbing up all the old Ikea solid pine bed slats that I could find and storing them in the basement. I have a lot of wood down there, any size worked as long as I have enough of them. The hot days to find them were the first and last of the months because that's when people where moving in/out. I also kept an eye on the free section on local online classifieds as well. The entire purpose of this was to recycle as much off the streets as I could before buying anything to finalize the project. In the end I only bought sealer, screws and some takeaway/beers. All the wood was 100% free and salvaged off the streets of Toronto saving it from the dumpster bin.
After collecting all the slats for about 2 years I was playing aorund with them on how I wanted to make this work. I had previously done a little project like this before but I messed it up and the boxes where crap. did not last longer then 2 seasons, they where thin and shallow as well could not grow much of anything in them. I Was talking to my friend who is renovating their house and we brainstormed some ideas on the boxes, I found some designs I liked online and said lets make something like this out of what I have here. We tossed out a few of the design features when looking at them as it would have been wasted wood and extra work not needed. If I had more wood them maybe it could have been an option but simple was the name of the game. They taught me what I needed to know like how the miter saw and sander worked, plus all the other tools I was using. They did help out with a table saw and creating the triangle support joints in the corners, They used some pine left overs they had while making a staircase indoors. I did not feel up to the task of using a table saw given all the relatives I know who have lost a finger to them.
In the end we decided the design would be three boards high and take an alternating pattern on corners. layer one short, layer 2 long, layer 3 short. Went with a galvanized and painted deck screw so it can take the weathering. Ran into some problems like making everything level as some of the boards were warped and other ones had undesired aspects like knots and tacky sticker goo I could not remove. So I used them for the base that will not been seen so much. Clamped everything down and called it a day.
Once it was all done and over with, I then brought them back home from my buddies work garage and started to seal them. I went with a boiled linseed oil as its a food safe option should the wood degrade into the soil I will plant in them. I will need to reapply it to the boxes year after year but the main coat is the most important one and I put it on 3 layers with a good dry in between coats. the inside of the boxes that where coated did not degrade at all as the sun did not hit them so it will not need a new coat just the outside. Overall the end result was very impressive for myself, I've never taken a woodworking class ever and It was a near perfect outcome for me. Heavy Duty Planter Boxes for all my gardening needs. I made a last min decision to add in a plastic liner to preserve the wood even longer and stapled that into the frame. it has held up quite well and may need replacing end of 2nd or 3rd year out in the sun. Used a thick moisture wrap plastic with UV protectors in its formula.
Lets see what I can grow in them this year!
m0use's haus of projects - garden box edition