


Likes
Comments
Share


@German_GrowLab
Follow
Einen wunderschönen guten Tag, liebe Grow-Community, und herzlich willkommen zur fünften Woche meines kleinen Outdoorprojekts!
Wir nähern uns mit großen Schritten der eigentlich interessanten Phase meines Gartenprojekts. Jetzt mag der ein oder andere sagen, dass die Pflanze im Vergleich zur letzten Woche kaum Fortschritte gemacht hat, und evtl. habt ihr recht. Allerdings möchte ich zu meiner Verteidigung sagen, dass das Setup so für mich sehr neu gewesen ist und ich zwar indoor „gelernt“ habe, ich jedoch die letzten Grows fast vollständig outdoor kultiviert hatte (seitdem es legal ist, selbstverständlich ;)). Außerdem sehe ich die letzten Wochen noch als Anzuchtphase, also alles halb so wild :).
Aber genug der Ausreden :), was stand diese Woche an?
Da sich der „Auswilderungszeitpunkt“ jetzt wetterbedingt doch noch um eine Woche verschiebt und die kleinen Substrat und Topf geschuldet den ersten Mangel aufweisen, habe ich den kleinen mal ihre erste richtige Düngung verabreicht (Greenhouse-Powderfeeding 1 g/L). Eigentlich sollten sie schon rausgesetzt werden, allerdings traue ich diesem ganzen Warm-/Kalt-Mumpitz nicht. Da gönne ich den Damen lieber noch eine Woche in ihren künstlich beleuchteten vier Wänden. Ebenso musste ich die Pflanzen untenrum etwas ausdünnen, da die älteren Blätter leider mangelbedingt irreversibel geschädigt waren.
Der Tee wird für ca. 24 Stunden mittels einer Aquarienpumpe in Kombination mit Sprudelsteinen belüftet. Je nach Dauer der Belüftung enthält das Endprodukt mehr Mikroorganismen (24 h), bei länger gebrauten Tees enthält dieser weniger Mikroorganismen, dafür mehr gelöste Nährstoffe und Enzyme sowie Aminosäuren, welche als Futter für bereits bestehende Mikroorganismen fungieren. Um das beste Ergebnis zu erzielen, müsste ich mein Setup noch mit einem Heizstab ergänzen, welcher die Wassertemperatur konstant zwischen 20 und 23 Grad hält.
Für den Tee benötigen wir:
Ca. 15 L Wasser
30 g
1 l Regenwurmhumus
Eine handelsübliche Aquarienpumpe + Sprudelstein
Melasse (fungiert als Nahrung und begünstigt die Vermehrung der Bakterien). Der Wurmhumus steuert die Mikrorganismen sowie Huminsäure bei, welche das Pflanzenwachstum unterstützen. Ich verwende ausschließlich Regenwasser, da es weder Chlorrückstände aufweist noch einen niedrigen EC‑Wert (ca. 0,05) hat.
Wo liegen die benefits?
Fördern den Gasaustausch der Pflanze, indem sie dafür sorgen, dass sich die Stomata schneller und weiter öffnen (wenn als Blattspray angewandt).
– Beimpfen den Boden mit nützlichen Mikroorganismen (Pilze, Bakterien, Protozoen, Nematoden etc.) und sorgen dafür, dass ein Boden-Nahrungsnetzwerk aufgebaut wird, welches die organischen Stoffe im Boden zersetzt und diese für Pflanzen verfügbar macht.
Morgen werden die Kleinen dann mit dem Tee gegossen. Alles, was übrig bleibt, benutze ich dann, um die bis dahin hoffentlich fertig gemischte Erde anzugießen, bevor sie eine Woche in den Endtöpfen fermentiert.
Aber dazu wie immer im nächsten Bericht mehr. :)
Euch wie immer einen schönen Restsonntag
Und wir hören uns nächste Woche.
Peace.




Likes
35
Share


@Compassionate_Gardener
Follow
All 18 CANNALOPE HAZE plants from DNA-GENETICS continued thru week 6 to develop their BEAUTIFUL flower crowns. The plants on the right under the Q6W-Gen. 2 LED-Lamps from SANlight are in general a little more uniform (all have almost the same height). The plants on the left side under the Lumatek PRO 600W are developing well, but some are smaller and some are taller. The production of flower seems to be on PAR now between the two sides, but thats hard to judge only by looking at them. In the end the weight will tell, who produced more flower. 😃 I still give only PURE tab-water, without any PH correction, since the BIOTABS nutrients are adjusting the ph-value and work for the FULL-CYCLE, its unbelievably easy and convenient, I LOVE IT! 😎 The Ambient Q240+ from HOMEBOX is now nicely filled by the plants and they continue to grow well. 😁 The Lumatek is still running at 100% at a distance of 50 cm from the top of the plants. The two SANlights at 60 cm distance were so strong (first signs of light bleaching) that I decreased the power by dimming them to 80% during week 6. I am curious to see how the test goes on further...

Likes
9
Share


@my420experiment
Follow
Learning a ton as I go.
Started low stress training using rubberized wire poked down into the soil.
Spent a lot of time just tucking the fan leaves down.
I'm an idiot when it comes to watering.
I dont think I'm getting enough down to the bottom of the pot, but dont want to over water.
I'll just continue with what I'm doing.

Likes
2
Share


@Bwright_315
Follow
So far so good just suck the weather getting colder out . Praying it stay warm for just a few more weeks
Likes
7
Share


@PrinceOfHerbs
Follow
The plant is now in its 3rd week of flowering, they look very healthy and the first pistils can be seen. The smell starts to become slightly sweet.
The first signs that the fertilizer is working can also be seen, spores are forming on the soil.
I'm very excited to see what these magnificent specimens will bring 💚💚💚

Likes
12
Share


@bayfrontbudzman84
Follow
Keeping with week 3 schedule. Topped plants and installed net. Getting ready for the final 2 weeks of veg.

Likes
11
Share


@BudBeezy
Follow
Welcome to week 7 of my first Grow diary. Unfortunately it has rained a lot this week, but the temperatures have risen again. On Sunday we had perfect weather, which I would like to have all the time. The plant is growing bushier from day to day, which has made LST a little more difficult for me. Apart from a bit of aphid infestation, which I fought with neem oil, everything is going well. This week I fertilised with nettle manure again. I completely forgot to give you an update on the cuttings. A week after I cut them I unfortunately discovered mould and had to dispose of them. I really like the weather forecast for next week. Look forward to the coming week.
See you next week ✌️
Likes
3
Share


@Northern_Ent
Follow
June 21: first day of summer and Tropicana Cookies FF is doing fine.
Foliar spray in the morning of Extreme Blend, and potassium silicate to toughen the stems. Using Dr Bronner’s Peppermint soap as a wetting agent.
Started a lazy compost tea this afternoon. Third tea so far this year.
June 24: almost ready for the second round of topping. Likely tomorrow.
June 25: video show second round of topping to make the manifold.
Likes
32
Share

@yan402
Follow
⚗️ FERMAKOR – Neutralisation & Filtering (Final Stage)
🧠 “From reactor to bottle — the first real batch.”
---
13.10.25 — Pulled about 1L of the finished FERMAKOR extract into a 5L bucket and added roughly 2L of clean water. Let it sit for a bit to calm down and cool off before touching the pH.
Sample came back around pH 6.8–7, totally non-caustic — exactly what I wanted before acidifying for storage.
Started adding phosphoric acid (59%) slow and steady, stirring between each pour.
Ended up using about 50ml total before the colour flipped red on the GHE drops, landing the mix right around pH 3–3.5.
No foam, no violent reaction, just smooth. Smell turned clean and metallic-sweet — the kind of smell that tells you it’s done reacting.
---
Filtering setup
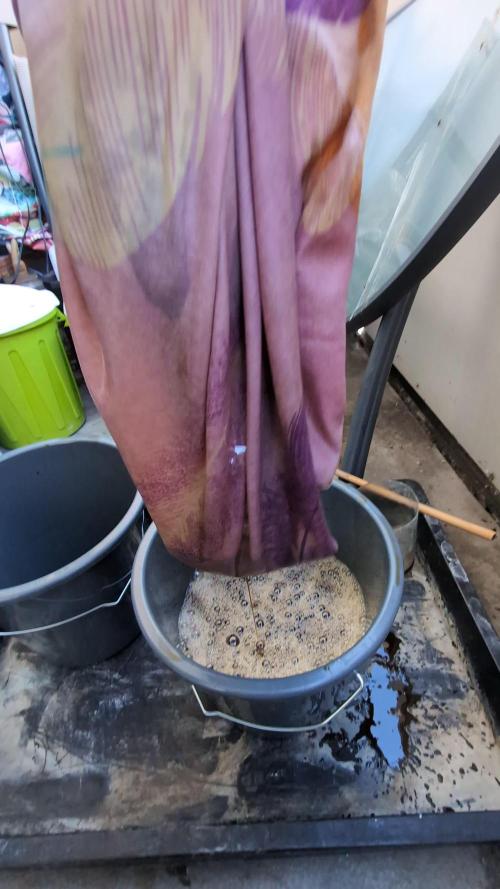
Used a pillowcase and cheesecloth layered together as the filter stack.
The pillowcase handled all the heavy junk, the cheesecloth grabbed the fine silt.
It came out thick, dark amber, glossy — zero grit.
I’ll leave it to rest overnight, open, just to let any tiny bubbles or gases clear out before bottling.
---
Final note
This batch is officially FERMAKOR B Concentrate V1.0 (1:4).
Storage pH locked between 3.3–3.8, ready to bottle and shake before use.
This one’s rich in P, K, Mg, and micros, while Calcium Nitrate will handle the N and Ca on the A-part side.
---
🌱 Closing the diary
That’s it for this round — extraction phase complete.
I’ll be closing this diary here and opening a new one called “FERMAKOR A+B Test Grow – V1.”
Testing starts Monday, 20.10.2025 on a single plant.
Time to see if this brew actually works in the tent.
📸 All images videos to be added later — filter setup, pH colour, and final concentrate.


Processing
Likes
10
Share


@DonPablo_
Follow
buds are very visible and getting some mass (still really small though) and really satisfied with the number of bud sites. REALLY REALLY can't wait to harvest these ladies.
P.S. the plant at the end of the last video is an autoflower we planted a few weeks ago.


Likes
24
Share


@DeepRootsGrowTrees
Follow
GORILLA COOKIES 🍪 FF / FASTBUDS
WEEK #14 OVERALL
WEEK #6 FLOWER
This week no issues to report she's doing well this week, her buds are getting some weight to them and they have a nice aroma!! Stay Growing!!
GORILLA COOKIES 🍪 FF/ FASTBUDS


Likes
9
Share


@Reaper
Follow
This is day 70 since germination
she get ph water 6.5 since end of week 9 till the end of her life
Likes
73
Share


@Rwein93
Follow
Ciao ragazzi e bentornati qui con me le sorelle Mimorange.🍊😉
Ci siamo! Fra un paio di giorni taglierò loro. I buds sono estremamente compatti, profumati e di un colore favoloso, come potete vedere nei ravvicinati delle apicali.😍
Ho eseguito un lavaggio delle radici massivo nel giorno 92 con ben 20 L di acqua ciascuna per pulire bene e poi dopo aver aspettato che asciugasse per bene, ho innaffiato loro nel giorno 96 con 1,5 L di acqua.💪
Nel giorno 98 ho eseguito anche una voluminosa defogliazione per dare concentrare le energie suo buds negli ultimi giorni.👍
Eh niente ragazzi! Anche per questa settimana è tutto. 👊
Grazie a tutti per aver guardato e restate sintonizzati per nuovi aggiornamenti.🙏
Buona settimana e felice crescita 🌱 🌱 🌱

Likes
7
Share


@darb35
Follow
All 3 plants are different, the one at the back is as big as the other two.
One of the plants in the front is in a 9 liter airpot and developing quicker than the other two.
Also the buds are looking a bit different, very white on the bluecheese in the back.
This week I also started adding Acti-Vera and Bio-Heaven, hopefully they like it.
Not noticing anything unusual and I am glad I have the extra 20 cm to grow in hight in the new tent.
Day 46, switched to bigger lights SF-G3000, fits perfect in a 70x70 😇
Light at 60%, 40 CM from top.

Likes
8
Share


@Hippity
Follow
They had an hour drive roadtrip today, I hope they didn't get stressed. Moved them to their new home where they are under a 825W Gavita HPS. Today I stopped the Botanium's nutrients and started the Advanced Nutrient's PH Perfect Micro/Grow/Bloom, 1ml of each, inside their 1lt tank. Overall so far they look really healthy, happy, and smell good.
This is basically an attempt to grow weed the easiest way possible... I started this grow under my desk with fluorescent tubes ducktaped on it... It's also an experiment to see if it's possible to grow Cannabis with a Botanium.
This is an almost completely automatic grow using a simple automatic hydroponic system pot that has an inside timer and waters the plants every 3 hours, and they also claim that it's impossible to overwater the plant with this system. Let's see through this test...
The capacity of the pot is kinda small to grow a big juicy tree, so I'm trying to get just a few nugs the simplest way possible...
The strain is Green-O-Matic which is one of the smallest cannabis strains ever bred. It consists of some really interesting parents which are White Dwarf, Low Rider, a short Moroccan landrace and a short Ruderalis landrace
I hope you enjoy this simple experiment...

Likes
80
Share


@OrganicNature420
Follow
• New release Cali Crasher by Doctor's Choice
• Kali Mist x Ak47 x Colombian Gold
• Satvia (mostly)
• THC high
• Yield 400 - 600gs indoors
Nutrients • GreenBuzzNutrients
(DISCOUNT CODE • GD42025) %25
I use the whole product range and this stuff is a game changer. I've not had one bad grow with this company and it hasn't let me down once. Terps and taste are through the roof. No need for run off in coco only during flush week. Hands down the best nutrients on the market
YOU GORGEOUS GROWERS CAN NOW GET A WHOPPING %25 OFF ALL PRODUCTS USING THE NEW CODE ABOVE
LIGHT/TENT • Mars Hydro FC-E6500 5x5 tent
Flush week. 5days and then back onto a light feed. She actually smells really nice for a lemon scented gir. Super oily to touch and has plenty of frost on her ❄️👍🏻

Likes
13
Share


@KirbyFarm
Follow
This week i did LST on the gorilla cookies. The nugs are starting to fatten on a couple. Looking good so far 😎. Also the yellowing went away after a good few days of flush. Now rhey are on half of the recommended does of nutes.